Preface
What is this book?
This book is a guide about:
-
Software delivery: how to run & maintain software in production?
-
DevOps: a methodology to make software delivery more efficient
Instead of focus on culture & theory, this book focuses on hand-ons guide:
- Step-by-step examples about how to run real system & real code.
- Core concepts & best practices of modern DevOps and software delivery.
Why this book exists?
-
There is no hands-on guide that teach software delivery end-to-end.
-
Software delivery is current learned in the hard way - through trial and error - which can be very costly (outages, data lose, security breaches…)
note
The author learned from his experience when he worked at LinkedIn in 2011:
- LinkedIn’d just IPO, share price was up 100%, revenue was growing 100% by year, 100M members, growing fast.
- From the inside, the company was in turmoil because of software delivery - a $10 billion company could not deploy code:
- They deployed once every 2 weeks through a painful, tedious, slow, error-prone way
- A deployment went so bad, that it could not be completed; new changes, some fixes, more issues…Team worked overnight several days, then everything was roll-backed.
- They kicked of Project Inversion:
- new features development was freezed for several months
- the entire engineering, product, design team reworked all the infrastructure, tooling, technique
- Months later, they could deploy dozens of times per day:
- with fewer issues, outages
- allowing the whole company move much faster
note
How did they do that?
-
They didn’t know what they didn’t know
-
They learn about best practices from the industry:
- Trunk-based development (from one company)
- Canary deployment (from another)
- Feature toggles (from another)
- …
-
Most developers don’t know what they don’t know:
- About software delivery and DevOps
- Best practices that top tech companies had figured out
-
This book helps you learn from the experience of others so you can build software faster, more reliably and more securely.
warning
The results from adopting DevOps can be wonderful, but the experience along the way may be not.
Watch out for snakes
-
“DevOps” is used to describe a lot of unrelated concepts. ⛓️💥🌕🌑
e.g. A TLS certificate (& the cryptography behind it), a deployment pipeline, and backing up data from a database.
note
What makes DevOps hard? (It’s not the complexity of the concepts)
- It’s the number of concepts to master (DevOps is an incredibly broad surface area)
- It’s how to get everything connected together correctly (or nothing works at all)
-
“DevOps” is a box of cables. 🧰⛓️
You pull out a cable but end up with a giant mess where everything is tangled together
tip
This book try to untangle this mess of cables:
- Each cable in that mess is in fact a separate cable.
- In isolation, each concept in DevOps (a cable in that mess) is within your grasp.
-
Sometimes, DevOps even feels like a box of snakes. 🧰🐍🐍
You pull of a cable but end up getting bitten.
caution
DevOps is current a giant mess:
- A new industry
- Tools, techniques aren’t mature
- It often feels like everything is broken, frustrating & hopelessly tangled
-
In DevOps, each time you learn a new buzzword (a new concept):
- it comes with 10 more unfamiliar buzzwords (it’s a mess of cables)
- or it might try to by you (a cable or a snake)
but stick with it & watch for the snake
Who should read this book?
Anyone responsible for deploying & managing apps in production:
-
Individual contributors in operations roles: SREs, DevOps Engineers, SysAdmins…, who wants to level up about software delivery & DevOps.
-
Individual contributors in development roles: Software Engineers/Developers.., who wants to learn about the operations side.
-
Managers: Engineering Managers, CTOs…, who want to adopt DevOps & software delivery best practices in their organizations.
What is in this book?
| Chapter | Key ideas | Hand-ons example |
|---|---|---|
| 1. An Introduction to DevOps & Software Delivery | The evolution of DevOps. | |
| On-prem vs cloud. | ||
| PaaS vs IaaS. | - Run an app on Fly.io. - Run an app an EC2 instance in AWS. | |
| 2. How to Manage Infrastructure as Code | Ad hoc scripts. | Use Bash to deploy an EC2 instance. |
| Configuration management tools. | Use Ansible to deploy an EC2 instance. | |
| Server templating tools. | Use Packer to build an AMI. | |
| Provisioning tools. | Use OpenTofu to deploy an EC2 instance. | |
| 3. How to Deploy Many Apps: Orchestration, VMs, Containers, and Serverless | Server orchestration. | Use Ansible to deploy app servers & Nginx. |
| VM orchestration. | Use OpenTofu to deploy an ASG and ALB. | |
| Container orchestration. | Deploy a Dockerized app in Kubernetes. | |
| Serverless orchestration. | Deploy a serverless app with AWS Lambda. | |
| 4. How to Version, Build & Test Your Code | Version control. | Store your code in GitHub and use PRs. |
| Build systems. | Configure your build in NPM. | |
| Dependency management. | ||
| Automated testing. | - Set up automated tests for a Node.js app. - Set up automated tests for OpenTofu code. | |
| 5. How to Set Up CI/CD | Trunk-based development. | - Use OIDC with GitHub Actions and AWS. - Run tests in GitHub Actions. |
| Branch by abstraction. | ||
| Feature toggles. | ||
| Deployment strategies and pipelines. | Run deployments in GitHub Actions. | |
| 6. How to Work with Multiple Teams & Environments | Internal developer platforms. | Create multiple AWS accounts. |
| Microservices. | Deploy microservices in Kubernetes. | |
| Updating and patching. | Configure automated updates. | |
| 7. How to Set Up Networking: VPCs, VPN, and DNS | DNS, domain names, CDN. | Set up a custom domain name in Route 53. |
| Virtual private clouds (VPCs). | Deploy a custom VPC in AWS. | |
| Service discovery, service meshes. | Do service discovery with Kubernetes. | |
| Network access and hardening. | Use SSH and EC2 Instance Connect. | |
| 8. How to Manage Authentication, Authorization & Secrets | Authentication and user management. | |
| Authorization, permissions, ACLs. | Set up SSO and roles for AWS. | |
| Encryption at rest and in transit. | Use ACM to provision a TLS certificate. | |
| Secrets management. | Store secrets in AWS Secrets Manager. | |
| 9. How to Store Data: SQL, NoSQL, Queues, Warehouses, | Local and network drives. | |
| Relational DBs, schema management. | - Deploy PostgreSQL using RDS. - Deploy Redis using ElastiCache. - Use Flyway for schema migrations. | |
| NoSQL, queues, data warehouses. | ||
| File storage. | Use S3 and CloudFront for static assets. | |
| 10. How to Monitor Systems: Metrics, Logs, Alerts, and Observability | Metrics and dashboards. | Create a dashboard in Grafana. |
| Logs and log aggregation. | Aggregate logs in Elasticsearch. | |
| Alerts and on-call rotations. | Set up alerts in CloudWatch. | |
| Observability and tracing. | ||
| 11. The Future of DevOps and Software Delivery | Serverless. | |
| AI. | ||
| DevSecOps, shift left, supply chain. | ||
| Infrastructure from code, runbooks. |
What isn’t in this book?
| DevOps, software delivery’s topic | What isn’t in this book |
|---|---|
| DevOps culture & team dynamics | Cross-functional teams, high-trust environments, collaboration tools/techniques |
| Organization processes | Capacity, blameless postmortem, on-call rotation, KPIs, SLOs, error budgets… |
| Server hardening | OS permissions, intrusion protection, file integrity monitoring, sandboxing, hardened images… |
| Low-level networking | Routers, switches, links, routing protocols… |
| Compliance | A detail guide to meed any standard, e.g. SOC2, ISO 270001, HIPAA, GDPR… |
| Cost optimization & performance tuning | A detail guide to reduce costs & improve performance |
Code examples
-
This book includes many examples to work through, which is available at GitHub repository: https://github.com/brikis98/devops-book
-
The code samples are organized
- by chapter (e.g.
ch1,ch2),- and within each chapter, by tool (e.g.
ansible,kubernetes,tofu)
- and within each chapter, by tool (e.g.
- by chapter (e.g.
tip
The examples show what the code looks like at the end of a chapter.
To maximum the the learning:
- write the code yourself
- check the “official” solutions at the end
Opinionated Code Examples
The code examples represents just one opinionated way to implement this book core concepts - IaC, CI/CD…
important
In real world, there is no single “best” way that applies to all situations:
- All technology choices has a trade-off.
- Some solution maybe a better fit in some situations that others.
Always use your judgment to pick the right tool for the job.
note
The core concepts in this book only change & evolve over a long time span (5-10 years). But the code examples that implement these core concepts may change more frequently. e.g. Kubernetes has a release cycle of 4-month1.
You Have to Get Your Hands Dirty
This book will teach you principles, techniques, tools about DevOps & software delivery.
But you can only achieve serious results if you learn by doing:
-
re-create the example code yourself
- writing code
- running code
- make the code work
-
do the extra get your hands dirty section & tweak the examples
- customize to your needs
- break things
- figure out how to fix them
- …
Using Code Examples
The code examples in this book may be used
- in your programs and documentation (but not too much)
- but not for selling & distribution
https://kubernetes.io/releases/release/
Chapter 1: An Introduction to DevOps and Software Delivery
I wrote an app. Now what?.
Delivery it to users! But how?
- AWS, Azure or Google Cloud (Heroku, Vercel, Netlify)?
- One server or multiple servers?
- Docker? Kubernetes?
- VPC? VPN, SSH?
- Domain name? DNS, TLS?
- Backup database?
- Why the app crashed? How to debug it?
A Primer on DevOps
Why DevOps matters?
-
The gap between companies with world-class software delivery and everyone else is 10x, 100x or even more.
-
Dora’s software delivery metrics:
-
What is it?
… of software changes Metrics Description Throughput… 🚀⏱️ Lead time How long it takes a change to go from code committed to deployed in production? 🚀🔢 Deploy frequency How often does your organization deploy code to production? Stability… 🆘🚨 Change fail percentage How often deployments cause failures that need immediate remediation (e.g. hotfix, rollback) 🚧⏱️ Recovery time How long it takes to recover from a failed deployment? -
Performance according to 2023 State of DevOps Report
Metrics Low performers Elite performers World-class performers Elite vs low performers 🚀⏱️ Lead time Deployment processes takes… 36 hours 5 mins In minutes (100% automated) 10-200x more often 🚀🔢 Deploy frequency Deploying … Once/month Many/day Anytime (Thousands/day) 10-200x faster 🆘🚨 Change fail percentage The rate of deployment causing problems… 2/3 1/20 Detect in seconds (before user-visible impact) 13x lower 🚧⏱️ Recovery time Outages last 24 hours 2 mins In minutes (sometimes automated) 700-4000x faster
-
-
It’s possible to achieve the performance of the elite (or even the world-class):
- Each of these performers may do it a little differently
- But in common, most of these performers share a lot of best practices.
important
The DevOps movement is an attempt to capture some of the best practices from the world-class performers in DORA software delivery metrics.
Where DevOps Came From
Before DevOps
-
Building a software company …
-
write the software
- which is handled by the Developers - Dev team
… also means manage a lot of hardware:
-
setup cabinets, racks -> load with servers -> install wiring, cooling -> build redundancy power systems…
- which is handled by the Operations - Ops team
-
-
An application would be:
- built by the Dev team, then
- “tossed over the wall” to the Ops team
The Ops team had to figured out the software delivery:
-
how to deploy, run, maintain… it.
-
most was done manually:
- manage the hardware
- install the app & dependencies
-
The company eventually run into problems:
- release are manual, slow, error-prone
- frequent outages, downtime
The Ops team
- reduce the release cycle (because they can handle all these manually things)
- but each release is bigger, causing more problems
Teams begin blaming each other, silos form…
After Devops
-
Instead of managing their own hardware (or data-centers)
- many companies take advantage of cloud providers (e.g. AWS, Azure, Google Cloud)
- many Ops teams spend their time working on software - e.g. Terraform, Ansible, Docker, Kubernetes - to manage the hardware.
-
Both Dev & Ops teams spend most of their time working on software:
-
The distinction between the two team is blurring.
-
There may still a separation of responsibility …
- The Dev teams are responsible for the application code
- The Ops team are responsible for the operation code
-
…but both teams need to work more closely together…
-
-
There come the DevOps movement with the goal of
- making software delivery vastly more efficient
- (building better software faster)
by moving to the cloud & shifting to DevOps mindset:
Before After After Example 👥 Teams Devs write code, “toss it over the wall” to Ops Devs & Ops work together on cross-functional teams 🧮 Servers Dedicated physical servers Elastic virtual servers AWS’s EC2 🌐 Connectivity Static IPs Dynamic IPs, service discovery 🛡️ Security Physical, strong perimeter, high trust interior Virtual, end-to-end, zero trust ⚡ Infrastructure provisioning Manual Infrastructure as Code (IaC) tools Terraform 🔧 Server configuration Manual Configuration management tools Ansible ✅ Testing Manual Automated testing CI 🚀 Deployments Manual Automated CD 💱 Change process Change request tickets 🎫 Self-service 🏧 🔢🔄 Deploy cadence (Deploy frequency) Weeks or months Many times per day 🔢🔁 Change cadence (Lead time) Weeks or months Minutes -
DevOps movement has transformed a lot of companies:
- Nordstrom:
- number of features delivered by month increased 100%
- defects reduced 50%
- lead time reduced 60%
- number of production accidents reduced 60 - 90%
- HP’s LaserJet Firmware:
- the amount spent on developing features went from 5% to 40%
- development cost reduced 40%
- Etsy:
- From infrequent deployments to 25-50 deployments/day
- Nordstrom:
The Evolution of DevOps Software Architecture & Software Delivery Process
The architecture & software delivery process evolution can be broken down into:
- 3 high-level stages
- each stages consists of 3 steps
Stage 1
Stage 1 applies to most software projects start: new startups, new initiatives (at existing company), side projects.
-
Step 1:
- Single server: everything runs on a single server
- ClickOps (Process): manage infrastructure & deployment manually
User -> SERVER -
Step 2:
- Standalone database: database become a bottleneck -> break it to a separate server
- Version Control (Process): team grows -> collaborate & track changes
- Continuous Integration (Process): reduce bugs/outages -> automated tests
User -> Server -> DATABASE Developer -> VERSION + CONTINUOS CONTROL INTEGRATION -
Step 3:
- Multiple servers: a single server is not enough
- Load Balancing: distributed traffic across servers
- Networking: protect servers -> a private networks
- Data Management: scheduled backups, data migration
- Monitoring (Process): get better visibility of system
              ---- VPC ----------------------------
             |                             BACKUPS |
             |                  SERVER        ↑    |
     User -> | LOAD BALANCER -> SERVER -> Database |
             |                  SERVER             |
             |                   ...               |
              --------------------------------------

Developer ->  Version + Continuos   + MONITORING
              Control   Integration
State 1 is
- simple
- fast to learn, easy to set up
- fun to work with
Most software projects never need to make it past stage 1.
note
If your application is so good and the number of users keep going - in other words, you have scaling problems - you may have to move on to the subsequent stages.
caution
Only move to the subsequent stages, if you’re facing problems that require more complex architecture & processes to solve.
- These complexity has a considerable cost.
- If you’re not facing these problems, then you can and should avoid that cost.
Stage 2
Stage 2 applies to larger, more established companies software that has larger user bases and more complexities.
-
Step 4:
- Caching for data stores: database is still a bottleneck -> add read replicas & caches
- Caching for static content: traffic grows -> add CDN for content that doesn’t change often
---- VPC ----------------------------------------- | Backups | | ↑ | User -> | CDN -> Load balancer -> Servers -> Database | | (CACHE) ↓ | | CACHE | -------------------------------------------------- Developer -> Version + Continuos + Monitoring Control Integration -
Step 5: team size become a problem, deployment is slow, unreliable
- Multiple environments: to help teams do better testing. Each env is a full copy of infrastructure, e.g. dev, stage, prod
- Continuous delivery (Process): fast/reliable deployment -> deployment pipeline
- Authentication & secrets (Process): a little security
---- VPC ------------------------------------- _ | Backup | |_ | ↑ | | | User -> | CDN -> Load balancer -> Servers --> Database | | | | ↓ | | | |PROD Cache | | | ---------------------------------------------- | | |STAGE | | ---------------------------------------------- | |DEV | ---------------------------------------------- Developer -> Version + Continuos + CONTINUOS + Monitoring + AUTH, Control Integration DELIVERY SECRETS -
Step 6: teams keep growing to keep moving quick
- Microservices: allow teams work independently, each microservice comes with its own data store & caches.
- Infrastructure as Code (Process): infrastructure for all microservices is a too much to be managed manually.
              ---- VPC ---------------------------------------------------- _
             |                                              Cache  Backups | |_
             |                                                ↑      ↑     | | |
             |                 ------> SERVICES <-> SERVICES --> Database  | | |
             |                |           ↕      ↕      ↕                  | | |
     User -> | CDN -> Load balancer -> SERVICES <-> SERVICES --> Database  | | |
             |                                                ↓      ↓     | | |
             |prod                                          Cache  Backups | | |
              -------------------------------------------------------------  | |
               |stage                                                        | |
                -------------------------------------------------------------  |
                 |dev                                                          |
                  -------------------------------------------------------------

Developer ->  Version + Continuos   + Continuos + Monitoring + Auth,   + INFRASTRUCTURE
              Control   Integration   Delivery                 Secrets   AS CODE
Stage 2 represent a significant step up in terms of complexity:
- The architecture has more moving parts
- The processes are more complicated
- The need of a dedicated infrastructure team to manage all of this.
Stage 3
Stage 3 applies to large enterprises with massive user bases.
-
Step 7: massive user bases
- Observability: More visibility <- Tracing + observability
- Service discovery: So many microservices, how to communicate with each other?
- Server & networking hardening -> Compliance standard, e.g. PCI, NIST, CIS
- Service mesh: Unified solution for manage microservices -> all items about + load balancing + traffic control, error handling
---- VPC ---------------------------------------------------------------- _ | Cache Backups | |_ | ---------------------------------- ↑ ↑ | | | | | Services <--> Services-----|------> Database | | | | | | | | | | | OBSERVABILITY | | | | | | | | | | | | | | | | User -> | CDN -> Load -> | ↕ SERVICE ↕ | | | | | balancer | DISCOVERY | | | | | | | | | | | | | | | | | | HARDENING | | | | | | | | | | | | Services <--> Services-----|------> Database | | | | --------------------------------- ↓ ↓ | | | |prod SERVICE MESH Cache Backups | | | ------------------------------------------------------------------------- | | |stage | | ------------------------------------------------------------------------- | |dev | ------------------------------------------------------------------------- Developer -> Version + Continuos + Continuos + Monitoring + Auth, + Infrastructure Control Integration Delivery Secrets as Code -
Step 8: a lot of data from users
- Analytics tools: process & analyze data <- data warehouse/lake, machine learning platforms…
- Event bus: more microservices, more data -> event bus -> event-driven architecture
- Feature toggles & canary deployment (Process): deploy faster, more reliable <- advanced deployment strategies
---- VPC -------------------------------------------------------------------------- _ | Cache Backups | |_ | ---------------------------------- ↑ ↑ | | | | | Services <--> Services-----|------> Database ---- | | | | | | | | | | | | Observability | | | | | | | | | | | | | | | ↓ | | | User -> | CDN -> Load -> | ↕ Service ↕ | DATA | | | | balancer | Discovery | WAREHOUSE | | | | | | ↑ | | | | | | | | | | | | | | Hardening | | | | | | | | | | | | | | | | Services <--> Services-----|------> Database ---- | | | | | --------------------------------- ↓ | ↓ | | | | | | Service Mesh | Cache | Backups | | | | | ↓ ↓ ↓ ↓ ↓ | | | | EVENT BUS ======================================================= | | | |prod | | | ----------------------------------------------------------------------------------- | | |stage | | ----------------------------------------------------------------------------------- | |dev | ----------------------------------------------------------------------------------- Developer -> Version + Continuos + Continuos + Monitoring + Auth, + Infrastructure + FEATURE + CANARY Control Integration Delivery Secrets as Code TOGGLE DEPLOYMENT -
Step 9:
- Multiple data centers: -> global user base
- Multiple accounts: larger employee base -> isolate teams/products
- Advanced networking: connect data centers, accounts
- Internal developer platform (Process): boost developer productivity; ensure all accounts are secure <- account baseline/factory
 ---->   DATA   (With all the infrastructure as in data center 1)
|      CENTER 2
|          |
|          |     ---- VPC -------------------------------------------------------------------------- _
|          |    |                                                          Cache  Backups           | |_
|     ADVANCED  |                     ----------------------------------     ↑      ↑               | | |
|     NETWORKING|                    |      Services <--> Services-----|------> Database ----       | | |
|          |    |                    |                                 |                     |      | | |
|          |    |                    |           Observability         |                     |      | | |
|          |    |                    |                                 |                     |      | | |
|          |    |                    |                                 |                     ↓      | | |
User ->  DATA   | CDN -> Load     -> |       ↕     Service      ↕      |                   Data     | | |
        CENTER 1|        balancer    |            Discovery            |                 Warehouse  | | |
                |                    |                                 |                     ↑ |    | | |
                |                    |                                 |                     | |    | | |
                |                    |            Hardening            |                     | |    | | |
                |                    |                                 |                     | |    | | |
                |                    |      Services <--> Services-----|------> Database ----  |    | | |
                |                     ---------------------------------      ↓    |  ↓         |    | | |
                |                             |   Service Mesh   |          Cache | Backups    |    | | |
                |                             ↓                  ↓           ↓    ↓            ↓    | | |
                |                Event Bus =======================================================  | | |
                |prod                                                                               | | |
                 -----------------------------------------------------------------------------------  | |
                  |stage                                                                              | |
                   -----------------------------------------------------------------------------------  |
                    |dev                                                                                |
                     -----------------------------------------------------------------------------------

Developer ->     Version + Continuos   + Continuos + Monitoring + Auth,   + Infrastructure + Feature + Canary     + Developer
                 Control   Integration   Delivery                 Secrets   as Code          Toggle    Deployment   Platform
Stage 3 applies for company with the toughest problems that deal with the more complexity: global deployments, thousands of developers, millions of users.
note
The architecture in stage 3 is still a simplification to what the top 0.1% of the companies face.
Adopting DevOps Practices
Which DevOps practices to adopt?
important
KEY TAKEAWAY #1.1 You should adopt the architecture & software delivery processes that are appropriate for the stage of your company
caution
Don’t immediately jump to the end and use the architecture & processes of the largest, most elite companies:
- You don’t have the same scale
- You don’t have the same problems to solve
Their solutions may not be a good fit for you.
How to adopt DevOps practices?
The key to a success of adopting DevOps (or any migration project) is to do it incrementally:
-
Split up the work in a way that every step brings its own value, even if the later steps never happen
-
Don’t fall into false incrementalism where all steps need to be completed before any step can bring value.
There is a big changes that the projects gets:
- modified
- paused or even cancelled
important
KEY TAKEAWAY #1.2 Adopt DevOps incrementally, as a series of small steps, where each step is valuable by itself.
caution
Avoid “big bang” migration (all or nothing).
tip
Focus on solving small, concrete problem one at a time.
e.g.
- Migrate to cloud:
- Instead of migrating all teams at the same time
- Identifying one small, specific app/team -> Migrate just that app/team
- Adopt DevOps:
- Instead of applying all processes
- Identifying one small problem, e.g. outages during deployment -> Automate the deployment steps
Even if the larger migration doesn’t work, at least
- one team is more successful
- one process works better
An Introduction to Deploying Apps
Run an App Locally
Example: Run the Sample App Locally
-
A Node.js “Hello, World” - a web server
// app.js const { createServer } = require("node:http"); const server = createServer((req, res) => { res.writeHead(200, { "Content-Type": "text/plain" }); res.end("Hello, World!"); }); const port = 8080; server.listen(port, () => { console.log(`Server listening on port ${port}`); }); -
Install Node.js (if you haven’t installed)
-
Run the app
node app.js -
Open link http://localhost:8080 in browser
note
By default, when you run a web server on your computer:
- It’s only available on localhost.
- In other words, the web server can only be accessed from your computer.
tip
The localhost is a hostname - configured on every computer - points back to the loopback network interface (which is typically 127.0.0.1)
The problem with expose an app run on your personal computer
-
Security
Your personal computer (PC) is not hardened:
- There’s a lot of app installed. The more apps running, the more likely an app has an CVE that could be exploited by attacker.
- There is your personal data (documents, photos, videos, passwords…)
-
Availability
Your PC might:
- be accidentally shutdown.
- not be designed to run 24/7.
-
Performance
If you’re using your PC,
- that might take away system resources from your app,
- which might cause performance issues for your users.
- that might take away system resources from your app,
-
Collaboration
If your app has a bug, or needs to be updated:
- someone (coworkers, collaborators…) needs to access to your PC,
- should you give them access to your personal data? No!
important
KEY TAKEAWAY #1.3 You should never expose apps running on a personal computer to the outside world.
When to expose an app that runs on your PC
You can deploy an app locally, and expose that app only when:
- You’re exposing it to a trusted 3rd-party, (e.g. a coworker)…
- … to get feedback
tip
You can use tunnelling tools, e.g. localtunnel, ngrok, btunnel, localhost.run
- to get a temporary URL of your app
Then give someone you trust that URL to access your app.
Why many businesses still expose their critical apps from a PC
Maybe because of:
- The company has resource constrained, e.g. a tiny startup
- The person running the app doesn’t know any better
- The software delivery process is so slow, cumbersome; sneaking the app in a personal computer is the quickly way to get it running.
The solutions:
-
For 1, it’s the cloud.
-
For 2 & 3, it’s reading this book:
- You know better (2)
- You know how to create a software delivery process that allow your team to quickly & easily run their apps the right way: on a server. (3)
Deploying an App on a Server
There are 2 ways to get access to servers:
- On prem: Buying & setting up your own servers, e.g. Dell R7625 Rack Server[^1]1
- In the cloud: You rent servers from others, e.g. AWS EC2
Deploying On Prem Versus in the Cloud
on-prem : Abbreviated for on-premises software : Software you run: : - on your own servers : - in a physical location you own: e.g. your garage/office/data center
in the cloud : Software you run: : - on servers in a cloud computing platform, e.g. AWS, Azure : In other words, you rent servers from a cloud platform via a software interface, and use these rented servers to run your software.
When to Go with the Cloud
Using the cloud should be the default chose because of the following advantages:
| Advantage | Explain |
|---|---|
| Pay-as-you-go | - No up-front cost for hardwares - Extremely cheap or even free in early days |
| Maintenance & expertise | - No need to maintain hardwares - or hiring experts to do that |
| Speed | - No need to wait for the hardwares: order, ship, assemble… |
| Elasticity | - No need to plan long in advance |
| Managed services | - No need to maintain your own primitive services: databases, load balancers, storages, networking… |
| Security | - The cloud is secure by designed, with a huge amount of resources (time, expertise) |
| Global reach | - The cloud has data centers on over the world - By using the cloud, your team can be anywhere in the world |
| Scale | - The cloud is massive & growing at incredible rate |
important
KEY TAKEAWAY #1.4 Using the cloud should be your default choice for most new deployments these days.
When to Go with On-Prem
| On-prem makes sense when… | Explain | Note |
|---|---|---|
| You already have an on-prem presence | - If it ain’t broke, don’t fix it | |
| - The cost of a migration to the cloud might outweigh the benefit | ||
| You have load patterns that are a better fit for on-prem | - For some load patterns, cloud provides might charge a lot of mony, e.g. bandwidth & disk-space usage | Don’t forget the cost of maintenance for the hardware |
| - Your traffic is huge, but steady & predictable and you can afford your own servers. | ||
| - You need access to some hardware that’s not available in the cloud, e.g. CPUs, GPUs… | ||
| Compliance | - Some compliance standards, regulations, laws… have not yet adapted to the cloud |
When to Go with Hybrid
hybrid : a mixture of cloud & on-prem
The most uses cases of hybrid cloud:
| Use case | Explain |
|---|---|
| Partial cloud migration | - New apps are deployed to the cloud |
| - Some apps are migrated to the cloud | |
| - The rest are kept on-prem | |
| Right tool for the right job | You have both type of load pattern: |
| - An app has traffic spikes on holidays -> Cloud | |
| - Another app uses lots of disk space & bandwidth -> On-prem |
Two types of cloud: PaaS and IaaS
There are 2 types of cloud:
-
IaaS - Infrastructure as a Service
IaaS gives you access directly to the low-level primitives computing resources, e.g. servers, so
- you can create your own software delivery process.
e.g. Amazon AWS, Microsoft Azure, Google Cloud
-
PaaS - Platform as a Service
PaaS gives you a full, opinionated software delivery process.
e.g. Heroku, Netlify, Fly.io, Vercel, Firebase, Render, Railway, Platform.sh
tip
One of the first service from AWS (the first cloud that came out in 2006) is Elastic Compute Cloud (EC2), which allow you to rent servers from AWS.
This is the first Infrastructure as a Service (IaaS) in the market.
EC2 gives you access directly to the (low-level) primitive computing resources - the server.
tip
A year later, in 2007, Heroku came out with one of the first Platform as a Service (PaaS) offerings, which focus on high-level primitive.
In additional to the infrastructure, e.g. server, Heroku also provides a full, opinionated software delivery process:
- application packaging
- deployment pipelines
- database management
- …
Deploying An App Using PaaS
note
The examples in this chapter use Fly.io as the PaaS
tip
Why Fly.io?
- Provides $5 free credits -> the example can be running without cost anything.
- Support automatically packaging code for deployment via Buildpacks -> code can be deployed without any build system, Docker image…
- Has a CLI tool
flyctl-> deploy code straight from your computer.
Example: Deploying an app using Fly.io
-
Step 1: Install
flyctl -
Step 2: Sign up & sign in
fly auth signup fly auth login -
Step 3: Configure the build
# examples/ch1/sample-app/fly.toml
[build]
  builder = "paketobuildpacks/builder:base"
  buildpacks = ["gcr.io/paketo-buildpacks/nodejs"]

[http_service]
  internal_port = 8080
  force_https = true
  auto_stop_machines = true
  auto_start_machines = true
  min_machines_running = 0
tip
For real-world applications, flyclt can recognize many popular app frameworks automatically and you wouldn’t this config file.
-
Step 4: Launch the app
fly launch --generate-name --copy-config --yes
Get your hands dirty with Fly.io
- Check the app status with
fly status - See the app logs with
fly logs, or https://fly-metrics.net - Scale the numbers of servers up & down with
fly scale - (Make a change then) Deploy a new version of the app with
fly deploy
note
When working with the cloud, make a habit of undeploy any things you don’t need anymore.
- For fly.io, it’s by using
fly apps destroy <NAME>
How PaaS stacks up
A Paas provides:
- not just the low-level primitives, e.g. the servers “🖥️”
- but also the high-level primitives - powerful functionalyity out-of-the-box, such as:
- ⬆️⬇️ Scaling servers
- 🌐 Domain names
- 🔒 TLS certificates & termination
- 📊 Monitoring
- 🤖 Automated deployment
These high-level primitives is what make PaaS magic - it just works.
In a matter of minutes, a good PaaS take care of so many software delivery concern for you.
warning
The magic of PaaS is also the greatest weakness of PaaS.
- Everything is happenning behind the scenes. If something doesn’t work, it can be hard to debug/fix it.
- There is a lot of limitation:
- What you can deploy
- What types of apps you can run
- What sort of access you can have to the underlying hardware
- What sort of hardware is available
- …
note
Many projects start on PaaS, then
- migrate to IaaS if they grow big enough and require more control.
Deploying an App Using IaaS
-
There are 3 types of IaaS: VPS, CDN, cloud providers:
IaaS type Description Example VPS Providers - Provide access to the Virtual Private Servers (VPSs) as cheap as possible Hetzner, DigitaOcean, Vultr… - aka VPS Hosting Providers, might offer other features, e.g. networking, storage… CDN Providers - Provide access to Content Delivery Network - CDN servers2 CloudFlare, Akamai, Fastly - Might also offer: DDoS protection… Cloud Providers - Very large companies provides general-purpose cloud solutions for everything: VPS, CDN, serverless, edge computing, data/file storages… Amazon Web Services (AWS), Microsoft Azure, Google Cloud Platform (GCP) Alibaba Cloud, IBM Cloud -
In general, VPS and CDN providers are
-
specialists in their respective area,
-
so they will beat a general cloud in term of features & pricing in those areas.
e.g. A VPS from Hetzner is usually much faster & cheaper than from AWS.
-
-
if you only need the features in their area, better off going with them.
-
-
If you are
- building the infrastructure for the entire company,
- especially one that is in later stages of its DevOps evolution,
- your architecture usually needs many types of infrastructure
- the general-purpose cloud providers will typical a better fit.
- building the infrastructure for the entire company,
Example: Deploying an app using AWS
-
Step 1: Sign up for AWS
After you signed up,
- you initially sign in as the
root user, which has full permissions to do anything in the AWS account. - you can create
IAM user- which is more-limited user account within your AWS account.
[!WARNING] Never use your AWS
root userfor daily tasks. - you initially sign in as the
-
Step 2: Create an IAM user.
Use the Identity and Access Management (IAM) service to:
- create an IAM user
- manage IAM users
- add permissions to that IAM user via IAM policy, which can be attached
- directly to the IAM user
- or via IAM group
- add permissions to that IAM user via IAM policy, which can be attached
After you create an IAM user, AWS will show you the security credentials for that users: 1. Sign-in URL, 2. Username, 3. Console password.
[!TIP] The password is called console password because it’s used for signing in to the AWS Management Console - the web application that manage your AWS account.
[!TIP] Keep both the root user’s password and IAM user’s password in a password manager, e.g.
1Password,BitWarden -
Step 3: Login as the IAM user.
Go the the sign-in URL and sign in with the IAM user credential.
[!TIP] The sign-in URL is unique for each AWS account.
In other words, each AWS account has it own authenticated & authorization system.
-
Step 4: Deploy an EC2 instance.
Use the AWS Elastic Compute Computing (EC2) Service to deploy an EC2 instance:
-
Click
Launch instance -
Fill in name of the instance
-
Choose the Application & OS Images (Amazon Machine Image - AMI)
- Use the default -
Amazon Linux
- Use the default -
-
Choose the Instance type, which specifies the type of server: CPU, memory, hard drive…
- Use the default -
t2.microort3.micro(Small instance with 1 CPU, 1GB of memory that including in AWS free tier)
- Use the default -
-
Choose
Proceed without a key-pairbecause you’re not going to use SSH for this example -
Configure Network settings:
-
Use the default settings:
- Network:
Default VPC - Subnet: No preference -
Default subnet
- Network:
-
Firewall (Security group): Choose
Create security groupwith the rules:- Disable
Allow SSH traffic from - Enable
Allow HTTP traffic from the internet<- This allows inbound TCP traffic on port 80 so the example app can receive requests and response with “Hello, World!”
[!NOTE] By default, EC2 instances have firewalls, called security groups that don’t allow any network traffic in or out.
- Disable
-
-
Configure User data:
[!NOTE] User data is a script that will be executed by the EC2 instance the very first time it boots up
Fill in a Bash script that:
- Install
node.js - Get the code for example server (a simple Node server in a file)
- Run the server (and ignore hangup signals by using
nohup)
- Install
-
caution
Watch out for snakes: These examples have several problems
| Problem | What the example app does | What you should do instead |
|---|---|---|
| Root user | The app is running from user data, which runs as root user. | Run apps using a separate OS user with limited permissions. |
| Port 80 | The app is listening on port 80, which required root user permissions. | Run apps on ephemeral ports - port greater than 1024. |
| User data’s limit | The app put all its code & dependencies in user data, which is limited to 16KB. | User configuration management tool or server templating tools. |
| No process supervision | The app is started by user data script, which only run on the first boot. | Use process supervisors to restart that app if it crashes, or after server reboots. |
| Node.js specifics | The app is run in development mode, which only a have minimum of logging and doesn’t have optimized performance | Run Node.js in production mode3. |
Get your hands dirty with AWS
- Restart your EC2 instance: Does the app still work? Why (not)?
- Create a custom security group opens up port 8080.
- Find logs/metrics about the EC2 instance, compare with monitoring from fly.io.
How IaaS stacks up
Comparing PaaS and IaaS
When to Go with PaaS
tip
Your customers don’t care what kind of CI/CD pipeline you have:
- Whether you’re running a fancy Kubernetes cluster
- Whether you’re on the newest NoSQL database
- …
All they matters is you can create a product that meets your customers’ needs.
important
KEY TAKEAWAY #1.5 You should spend as little time on software delivery as you possibly can, while still meeting your company’s requirements.
- If you can find a PaaS meets your requirements, you should:
- use it & stick with it as long as you can.
- avoid re-creating all those software delivery pieces until you absolutely have to.
The following use cases is a good fit for PaaS:
-
🛝 Side projects
Focus all your time on the side project itself, instead of wasting any time to the software delivery process.
-
🚀 Startup & small companies
A startup lives or dies based on its product - something the market wants.
- Invest all the time/resources to the product.
- Only when you’re facing the scaling problem, which means you’ve found your product/market, start thinking of moving of PaaS.
-
🧪 New & experimental projects (at established companies)
Established companies might have invested in IaaS but still have a slow & inefficient software delivery process:
- by using PaaS, you can quickly launch something & iterate on it.
When to Go with IaaS
Only move to IaaS when a PaaS can no longer meet your requirements, which means you’re facing the following problems:
-
🪨 Load & scaling:
When you are dealing with a huge a mount traffic:
- In other words, you’re facing the scaling problem (and have found your product)
- PaaS might no longer meet your requirements:
- The pricing of PaaS might become prohibitively.
- The supported architectures by PaaS is limited
a migrate to IaaS is require to handling that load & scaling.
-
🍕 Company size
For companies with dozens of teams with hundreds or thousands of developers, PaaS offers for governance & access controls might be not enough.
e.g.
- Allow some teams to make changes, but not the others
-
🅱️ Availability
Your business might have a higher level than what PaaS offers for uptime guarantees (SLOs, SLAs)
PaaS offerings are limited in term of visibility & connectivity options, e.g.
- Many PaaS don’t let you SSH to the server, when there is an outage/bug you can’t know what really happening.
[!NOTE] Heroku - the leading PaaS - only supports SSH into a running server after a decade.
-
🛡️ Security & compliance
If your business needs to meet some strict security, compliance requirements - e.g. PCI, GCPR, HIPPA - IaaS might be the only option.
important
KEY TAKEAWAY #1.6 Go with PaaS whenever you can; go with IaaS when you have to.
Conclusion
- Adopt the architecture & software delivery processes that are appropriate for your stage of company
- Adopt DevOps incrementally, as a series of small steps, where each step is valuable by itself
- You should never expose apps running on a PC to the outside world
- Using the cloud should be your default choice for most new deployments these days
- You should spend as little time on software delivery as you possibly can, while still meeting your company’s requirements
- Go with PaaS whenever you can; go with IaaS when you have to
https://www.dell.com/en-us/shop/ipovw/poweredge-r7625
https://world.hey.com/dhh/the-hardware-we-need-for-our-cloud-exit-has-arrived-99d66966
CDN servers are distributed all over the world, to serve & cache content, especially static assets, such as images, CSS stylesheets, JavaScript bundles.
Chapter 2: How to Manage Your Infrastructure as Code
ClickOps and IaC
ClickOps
ClickOps : clicking through an web UI of a cloud provider’s website to configure computing infrastructure
The problems of ClickOps:
- Deployments are slow & tedious → You can’t deploy more often
- Deployments are error-prone → Bugs, outages…
- Only one person knows how to deploy → If that person is overloaded, everything takes ages; there is also bus factor
Infrastructure as Code
Infrastructure as Code (IaC) : You write & execute code to define, deploy, update, destroy your infrastructure : This marks a shift in mindset in which : - all aspects of operations are treated as software : - even those represent hardware, e.g. setting up a server
-
With modern DevOps, you can manage almost everything as code:
Task How to manage as code Example Chapter Provision servers Provisioning tools Use OpenTofuto deploy a serverThis chapter (2) Configure servers Configuration management & templating tools Use Packerto create an image of a serverThis chapter (2) Configure apps Configuration files & services Read configuration from a JSONfile during bootConfigure networking Provisioning tools, service discovery Use Kubernetes’s service discoveryBuild apps Build systems, continuous integration Build your app with npmTest apps Automated tests, continuous integration Write automated tests using JestDeploy apps Automated deployment, continuous delivery Do arolling deployment with KubernetesChapter 3 Scale apps Auto scaling Set upauto scaling policies in AWSChapter 3 Recover from outages Auto healing Set upliveness probes in KubernetesChapter 3 Manage databases Schema migrations Use Flywayto update your database schemaTest for compliance Automated tests, policy as code Check compliance using Open Policy Agent (OPA) -
For infrastructure, there are 4 type of IaC tools:
IaC tool Example Ad-hoc scripts Use a Bashscript to deploy a server.Configuration management tools Use Ansibleto deploy a server.Server templating tools Use Packerto create an image of a server.Provision tools Use OpenTofuto deploy a server.
The Benefits of IaC
When your infrastructure is defined as code:
- the entire deployment process can be automated
- you can apply software engineering practices (to your software delivery processes)
which bring a lot of benefits:
| How? | The benefit | |
|---|---|---|
| 🤳 Self-service | Code → Automated | Developers can kickoff their own deploy whenever necessary |
| 💨 Speed & safety | Code → Automated → Computers do it better than human | Deployments can be significantly faster; consistently & not prone to manual error |
| 📚 Documentation | The state of your infrastructure is in the source code | Every one can understand how things work |
| 🏷️ Version control | The infrastructure (as code) can be tracked by a version control, e.g. git | The entire history of infrastructure is now in the commit log. |
| ✅ Validation | The state of your infrastructure can be*“tested” just as code* | You can perform: code review, automated tests, analysis tools |
| 🔁 Reuse | Your infrastructure can be packaged intoreusable modules | You can easily build your infrastructure on top of documented, batted-tested modules. |
| 😀 Happiness | IaC allows both computer & developers to what they do best (automation & coding) | Everyone is happy. No more repetitive & tedious deploy task. |
Ad Hoc Scripts
What is Ad Hoc Script
ad hoc (ad-hoc) : (adj) arranged or happening when necessary and not planned in advance
ad hoc script : code written in a scripting language - e.g. Bash/Ruby/Python - to automate a task you were doing manually
Example: Deploy an EC2 Instance Using a Bash Script
In this example, you will automate all the manual steps, in example in chap 1 that deploy an app using AWS.
-
Migrate the user data
cd examples
mkdir -p ch2/bash
cp examples cp ch1/ec2-user-data-script/user-data.sh ch2/bash/ -
Write the Bash script to deploy an app using AWS
- Create security group
- Create rule for that security group
- Run the instance
- Get the public ip of the instance
- Print: instance id, security group id, public ip
# examples/ch2/bash/deploy-ec2-instance.sh
# TODO
caution
Watch out for snakes: these are simplified examples for learning, not for production
Get your hands dirty: Ad hoc scripts
-
What happens if you run the Bash script a second time?
- Do you get a error?
- If so, why?
-
How would you have to tweak the script if you wanted to run multiple EC2 instances?
1.i. If the script is run the second time, there will be an error. 1.i. Because in a VPC - the default VPC in this case - the security group’s name need to be unique.
- To have multiple EC2, you can duplicate the whole script an change the name of the security-group.
warning
When you’re done experimenting with the script, you should manually un-deployed the EC2 instance by using the EC2 Console
How Ad Hoc Scripts Stack Up
| IaC category criteria | Ad Hoc script | Example |
|---|---|---|
| CRUD1 | - Only handle basically create<br> - Hard to have full CRUD | If you run the script a second time, the script will try to<br>- create a new security group<br>- without knowing that the security group is already exists. |
| Scale | Scale Hard, need to figure everything out yourself | - Keep track of everything<br> - Connect everything together <br> - Deployment strategies. |
| Idempotency2 & error handling | Most ad hoc scripts:<br> - are not idempotent <br> - don’t handle errors gracefully | - A script runs → Error → Partial state → Forget what it has done → Rerun the script → Another error. |
| Consistency | No consistency | You can:<br> - use any programming language you want<br> - write the code however you want. |
| Verbosity | Very verbose | You need to do everything yourself (CRUD, idempotency, error handling), which make the code very verbose. |
important
Key takeaway #2.1: Ad hoc scripts are
- great for small, one-off tasks,
- but not for managing all your infrastructure as code.
Configuration Management Tools
What is Configuration Management Tools
Configuration Management Tools : e.g. Chef, Puppet, Ansible : Appear before cloud computing → Designed with the assumption that: : - someone else had set up the hardware, e.g. Ops team racked the servers in data center. : - primary purpose is to handle the software - configure the servers: OS, dependencies, your app (deploy, update).
note
The configuration management tools can also deploy & manage servers or other infrastructure.
How Configuration Management Tools work
-
Most configuration tools makes changes directly on a set of server you specify, which is called mutable infrastructure paradigm:
- The same long-running servers will be mutate over & over again, over many years.
-
To be able to make changes on these servers, you need 2 things: something to drive the changes & a way to connect to the server.
Chef, Puppet Ansible Something to drive the changes You run amaster server(s) You use an CLI ➕ Can have areconciliation loop: check & match the desired configuration ➕ Can run anywhere (dev PC, build server…) A way to connect to the server Viaagent software that installed on each server Via SSH ➖ Need to install the agent ➖ Need to open extra port [!WARNING] Chicken-and-egg 🐥🥚 problem You have a tool that configure your servers:
- before you can use that tool
- you need to configure your servers.
- before you can use that tool
Example: Deploy an EC2 Instance Using Ansible
note
This example use Ansible to deploy an EC2 instance so you can have a server to use the configuration management tool - Ansible.
warning
Although configuration tools can also deploy & manage servers:
- they’re not originally designed to that.
For this example, spinning up a single server for learning & testing, Ansible is good enough.
tip
Before start this example, you can read the docs about the basic concepts in Ansible.
See:
- https://docs.ansible.com/ansible/latest/getting_started/index.html
- https://docs.ansible.com/ansible/latest/getting_started/basic_concepts.html
To deploy an EC2 instance using Ansible, you need to:
-
Define an Ansible playbook3
- in Ansible’s domain specific language (DSL), which is based on YAML.
- to tell Ansible to do what you want:
- create a security group
- create an EC2 key-pair (& save it)
- create the EC2 instance (& tag it)
# examples/ch2/ansible/create_ec2_instance_playbook.yml
# TODO
Example: Configure a Server Using Ansible
- To let Ansible know which servers it needs configure, you provide an inventory4 that:
-
Specify a list of static IP addresses of the servers (in group).
e.g.
webservers: # A group of servers named webservers hosts: 10.16.10.1: dbservers: # A group of servers named dbservers hosts: 10.16.20.1: 10.16.20.2:- Now, you can use Ansible playbook to target the servers in those 2 groups:
webservers,dbservers
- Now, you can use Ansible playbook to target the servers in those 2 groups:
-
Use an inventory plugin to dynamically discover your servers with IP addresses that change frequently.
-
e.g.
-
Use the aws_ec2 inventory plugin to discovered EC2 instance on AWS
# examples/ch2/ansible/inventory.aws_ec2.yml plugin: amazon.aws.aws_ec2 regions: - us-east-2 keyed_groups: - key: tags.Ansible # 1️⃣ leading_separator: "" # 2️⃣ -
1️⃣: Ansible will create groups bases on the value of the tag
Ansible -
2️⃣: By default, Ansible adds a leading underscore to the group names. This disables it so the group name matches the tag value.
-
-
For each group (of servers) in the inventory, you can specify group variables5 to configure how to connect to the servers in that group.
# examples/ch2/ansible/group_vars/ch2_instances.yml
ansible_user: ec2-user # The user Ansible ‘logs in’ as.
ansible_ssh_private_key_file: ansible-ch2.key
ansible_host_key_checking: false # Turn off host key checking so Ansible don't prompt you
-
- To let Ansible know what to do (with the servers), you provides a playbook (that specifies the roles6 of these server).
-
The playbook
# examples/ch2/ansible/configure_sample_app_playbook.yml - name: Configure the EC2 instance to run a sample app hosts: ch2_instances # Target the servers in group ch2_instances - the one created in previous example, grouped by the inventory plugin gather_facts: true become: true roles: - sample-app # Configure the server using an Ansible role called sample-app -
The role:
-
Tasks
# ch2/ansible/roles/sample-app/tasks/main.yml - name: Add Node packages to yum shell: curl -fsSL https://rpm.nodesource.com/setup_21.x | bash - # 1️⃣ - name: Install Node.js yum: name: nodejs # 2️⃣ - name: Copy sample app copy: # 3️⃣ src: app.js # Relative path to the role's files directory dest: app.js # Relative path on the server - name: Start sample app shell: nohup node app.js &- 1️⃣: Use the
shellmodule to installyum - 2️⃣: Use the
yummodule to installnodejs - 3️⃣: Use the
copymodule to copyapp.jsto the server.
- 1️⃣: Use the
-
Files
Copy
app.jsfrom chapter 1 toexamples/roles/sample-app/files/app.js
-
- The final structure of the example
.
├── configure_sample_app_playbook.yml
├── group_vars
│   └── ch2_instances.yml
├── inventory.aws_ec2.yml
└── roles
    └── sample-app
        ├── files
        │   └── app.js
        └── tasks
            └── main.yml
- Run the playbook
tip
Don’t forget to authenticate to AWS on the command line.
ansible-playbook -v -i inventory.aws_ec2.yml configure_sample_app_playbook.yml
Output
PLAY RECAP
xxx.us-east-2.compute.amazonaws.com : ok=5    changed=4    failed=0
Get your hands dirty with Ansible
- What happens if you run the Ansible playbook a second time? How does this compare to running the Bash script a second time?
- How would you have to tweak the playbook if you wanted to run multiple EC2 instances?
- Figure out how to use the SSH key created by Ansible (
ansible.key) to manually SSH to your EC2 instance and make changes locally.
warning
When you’re done experimenting with Ansible, you should manually un-deployed the EC2 instance by using the EC2 Console
How Configuration Management Tools Stack Up
| Aspect | Configuration Management Tools | Explain, examples |
|---|---|---|
| CRUD | Most supports 3/4 CRUD operation: | |
| - Create | ✅ | |
| - Read | 😢 Hit or miss, e.g. For Ansible, you need to manually give each resource a unique name or tag | |
| - Update | 😢 Hit or miss | |
| - (Don’t support delete) | ❌ | |
| Scale | - Designed for managing multiple servers. | Increase the number of instances, and Ansible will configure all of them. |
| - Some has builtin support forrolling deployments | If you have 20 servers → update Ansible role → re-run Ansible → Ansible rolls out the change in batch, and ensure no downtime. | |
| Idempotency & error handling | Some tasks are idempotent | yum |
| Some task are not idempotent | Some task using shell module | |
| Consistency | Consistent, predictable structure code with conventions. | Docs, file layout, named parameters, secret managements… |
| Verbosity | Concise ← DSL | The Ansible code may have the same length with Bash, but handles a lot of things: CRU, scaling… |
Drawbacks of configuration management tools
- Setup cost
- Configuration drift due to mutable infrastructure paradigm: each long-running server can be a little different from the others.
Immutable infrastructure paradigm
With immutable infrastructure paradigm:
- Instead of long-running physical servers,
- you use short-lived virtual servers (that will be replaced every time you do an update).
- Once you’ve deployed a server, you’ve never make changes to it again.
- If you need to update something, even it’s just a new version of your application
- you deploy a new server.
- If you need to update something, even it’s just a new version of your application
tip
Cattle vs pets
| Cattle | Pet | |
|---|---|---|
| Examples | 🐄🐃 | 🐶🐱 |
| Paradigm | Immutable infrastructure | Mutable infrastructure |
| What it mean? | Treat a server like a cattle: - each one is indistinguishable to others, with random, sequential IDs - kill them off & replace them regularly | Treat a server like a pet: - give it unique name - (take care of it) & keeps it alive as long as possible |
note
Immutable infrastructure paradigm is inspired by:
- Function programming:
- Variables are immutable
- After you set a variable to a value, you can’t change that variable again.
- If you need to update something, you create a new variable.
- It’s a lot easier to reason about your code.
- Variables are immutable
important
Key takeaway #2.2
Configuration management tools are
- great for managing the configuration of servers,
- but not for deploying the servers themselves, or other infrastructure.
Server Templating Tools
What is Server Templating Tools
Server Templating Tools : e.g. Docker, Packer, Vagrant : instead of: : 1. launching servers : 2. configure them (by running the same code on each) : you: : 1. create an image of a server that captures a fully self-contained “snapshot” of the operating system (OS), the software, the files, and all other relevant details. : 2. use some other IaC to install that image on all of your servers.
Two types of image tools - Virtual machine and container
Virtual machine
virtual machine (VM) : a VM emulates an entire computer system, including the hardware (and of course the software)
VM image : the blueprint for a VM : defined with tools: Packer, Vagrant
hypervisor : aka virtualizer : a type of computer software/firmware/hardware that creates & runs virtual machines.
-
You run a hypervisor7 with the VM image to create a VM that virtualize/emulate
- the underlying hardware: CPU, memory, hard driver, networking…
- the software: OS, dependencies, apps…
-
Pros and cons of VM:
VM Pros - Each VM is fully isolated from the host machine & other VM. <- Can run any 3rd-party code without worry of malicious actions - All VMs from the same VM image will run exactly the same way in all environments. e.g. Your PC, a QA server, a production server. Cons - Overhead of CPU/memory usage. <- For each VM, the hypervisor needs to virtual all hardware & running a guest OS … - Overhead of startup time. <- … that whole OS needs to start.
Container
container : a container emulates the user space8 of an OS
container image : the blueprint for a container
container engine : a Container Engine takes a Container Image : - (simulates an user space with memory, mount points & networking) : - turns it into a Container (aka running processes) : e.g. Docker, cri-o, Podman
| VM | ||
|---|---|---|
| Pros | - Each container is partial isolated from the host machine & other containers. | <- ☑️ Good enough to run your application code. |
| - All containers from the same container image will run exactly the same way in all environments. | e.g. Your PC, a QA server, a production server. | |
| - No overhead of CPU/memory usage & startup time. | <- For all containers, the container engine only needs to virtual a user space (instead of all hardware & a guest OS) | |
| Cons | - Each container is only partial isolated from the host machine & other containers. | <- ❌ Not good enough to run any 3rd-party code without worry about malicious actions. |
Example: Create a VM Image Using Packer
In this example, you will use Packer to create a VM image for AWS (called an Amazon Machine Image - AMI)
-
Create a Packer template
# examples/ch2/packer/sample-app.pkr.hcl packer { required_plugins { # 0️⃣ amazon = { version = ">= 1.3.1" source = "github.com/hashicorp/amazon" } } } source "amazon-ebs" "amazon_linux" { # 1️⃣ ami_name = "sample-app-packer-${uuidv4()}" ami_description = "Amazon Linux 2023 AMI with a Node.js sample app." instance_type = "t2.micro" region = "us-east-2" source_ami = "ami-0900fe555666598a2" ssh_username = "ec2-user" } build { # 2️⃣ sources = ["source.amazon-ebs.amazon_linux"] provisioner "file" { # 3️⃣ source = "app.js" destination = "/home/ec2-user/app.js" } provisioner "shell" { # 4️⃣ inline = [ "curl -fsSL https://rpm.nodesource.com/setup_21.x | sudo bash -", "sudo yum install -y nodejs" ] pause_before = "30s" } }- 0️⃣ - Plugin: Use the
Amazonplugin9 to build Amazon Machine Image (AMI) - 1️⃣ - Builder: Use the
amazon-ebsbuilder to create EBS-backed AMIs by- (launching a source AMI)
- (re-packaging it into a new AMI after provisioning10)
- 2️⃣ - Build steps:
- After provision the EC2 instance, Packer connects to the server and runs the build steps in the order specified in the Packer template.
- (When all the builds steps have finished, Packer will take a snapshot of the servers and use it to create an AMI)
- 3️⃣ - File provisioner: Copy the files to the server.
- 4️⃣ - Shell provisioner: Execute shell commands on the server.
[!NOTE] The Packer template is nearly identical to the Bash script & Ansible playbook,
- except it doesn’t actually run the app.
- 0️⃣ - Plugin: Use the
-
Install Packer
-
Install Packer plugins (used in the Packer template)
packer init sample-app.pkr.hcl[!NOTE] Packer can create images for many cloud providers, e.g. AWS, Azure, GCP. The code for each providers is
- not in the Packer binary itself
- but in a separate plugin (that the
packer initcommand can install)
-
Build image from Packer template
packer build sample-app.pkr.hclOutput
==> Builds finished. The artifacts of successful builds are: --> amazon-ebs.amazon_linux: AMIs were created: us-east-2: ami-XXXXXXXXXXXXXXXXX- The
ami-XXXvalue is the ID of the AMI that was created from the Packer template.
[!NOTE] The result of running Packer is not a server running your app, but the image of the server.
- This image will be used by another IaC tolls to launch one or more servers (running the image)
- The app will be run when the image is deployed (or the server is launched).
- The
Get your hands dirty with Packer
-
What happens if you run packer build on this template a second time? Why?
-
Figure out how to update the Packer template so it builds images that
- not only can run on AWS,
- but also can run on other clouds (e.g., Azure or GCP)
- or on your own computer (e.g., VirtualBox or Docker).
How Server Templating Tools Stack Up
| Aspect | Server Templating Tools | |
|---|---|---|
| CRUD | Only supports Create | → Create’s all a server templating tool needs11 |
| Scale | Scale very well | e.g. The same image can be used to launch 1 or 1000 servers. |
| Idempotency & error handling | Idempotent by design | → If there is an error, just rerun & try again. |
| Consistency | Consistent, predictable structure code with conventions. | e.g. Docs, file layout, named parameters, secret managements… |
| Verbosity | Very concise | ← Use an DSL; don’t have to deal with all CRUD operations; idempotent “for free” |
warning
Server templating tools cannot be used in isolated (because it only supports create).
- If you use a server templating tool, you need another tool to support all CRUD operations, e.g. a provisioning tool
note
All server templating tools will create images but for slightly different purposes:
- Packer: create VM images run on production servers, e.g. AMI
- Vagrant: create VM images run on development computers, e.g. VirtualBox image
- Docker: create container images of individual applications, which can be run any where as long as that computer has installed an container engine.
important
Key takeaway #2.3 Server templating tools are
- great for managing the configuration of servers with immutable infrastructure practices.
- (but needs to be used with another provisioning tools)
Provisioning Tools
What is Provisioning Tools
provisioning tool : e.g. OpenTofu/Terraform, CloudFormation, OpenStack Heat, Pulumi… : a provisioning tool is responsible for : - deploying : - managing (all CRUD operations) : the servers & other infrastructure in the clouds: : - (servers), databases, caches, load balances, queues, monitoring : - subnet configurations, firewall settings, routing rules, TLS certificates : - …
note
What are the different between ad-hoc script, configuration management tools, server templating tools & provisioning tools?
- Configuration management tools: manage configurations of servers
- Server templating tools: manage configurations of servers with immutable infrastructure practices
- Provisioning tools: deploy & manage the servers (& other infrastructure)
How Provisioning Tools work
Under the hood, provisioning tools work by
- translating the code you write
- into API calls to the cloud providers you’re using
e.g. If you write OpenTofu/Terraform code to create a server in AWS, when you run OpenTofu, it will:
- Parse your code
- (Based on the the configuration you specified,) make a number of APIs calls to AWS
- to create an EC2 instance
note
By making APIs to cloud providers, provisioning tools bring in many advantages:
- You don’t need to setup master servers.
- You don’t need to setup connection to the servers ← Take advantages of the authentication mechanism of cloud providers.
Example: Deploy an EC2 Instance Using OpenTofu
tip
Terraform vs OpenTofu
Terraformis a popular provisioning tool that HashiCorp open sourced in 2014 under Mozilla Public Licenses (MPL) 2.0.- In 2024, HashiCorp switched
Terraformto non-open source Business Source License (BSL).
- In 2024, HashiCorp switched
- As a result, the community fork
Terraformunder the namedOpenTofu, which remains open source under the MPL 2.0 license.
To deploy an EC2 Instance using OpenTofu, you
-
write an OpenTofu module
- in HCL12,
- in configuration files with a
.tfextension (instead of.pkr.hclfor Packer template)
[!NOTE] An OpenTofu module is a folder with all
.tffiles in that folder:- No matter are the name of these
.tffiles. - But there are some conventions, e.g.
main.tf: Main resourcesvariables.tf: Input variablesoutputs.tf: Output variables
-
use that OpenTofu module (run OpenTofu code) to deploy the EC2 instance.
For this example, the OpenTofu module for an EC2 instance looks like this:
-
main.tf: Main resources# examples/ch2/tofu/ec2-instance/main.tf provider "aws" { # 1️⃣ region = "us-east-2" } resource "aws_security_group" "sample_app" { # 2️⃣ name = "sample-app-tofu" description = "Allow HTTP traffic into the sample app" } resource "aws_security_group_rule" "allow_http_inbound" { # 3️⃣ type = "ingress" protocol = "tcp" from_port = 8080 to_port = 8080 security_group_id = aws_security_group.sample_app.id cidr_blocks = ["0.0.0.0/0"] } resource "aws_instance" "sample_app" { # 4️⃣ ami = var.ami_id # 4️⃣1️⃣ instance_type = "t2.micro" vpc_security_group_ids = [aws_security_group.sample_app.id] user_data = file("${path.module}/user-data.sh") # 4️⃣2️⃣ tags = { Name = "sample-app-tofu" } }What the OpenTofu code do?
-
1️⃣ - Use AWS provider: to work with AWS cloud provider.
[!NOTE] OpenTofu can works with many providers, e.g. AWS, Azure, GCP…
- An OpenTofu provider is like a Packer plugin.
[!TIP] AWS has data centers all over the world, grouped into regions.
- An AWS
regionis a separate geographic area, e.g.us-east-1(Virginia),us-east-2(Ohio),eu-west-1(Ireland),ap-southeast-1(Singapore)- Within each region, there are multiple isolated data centers, called
Availability Zones(AZs)
- Within each region, there are multiple isolated data centers, called
-
2️⃣ - Create a security group: to control the network traffic go in & out the EC2 instance
[!NOTE] For each type of provider, there are
- several kinds of resources that you can create
- e.g. servers, databases, load balancers, firewall settings…
The syntax for creating a resource (of a provider) in OpenTofu is as follows:
-
resource "<PROVIDER>_<TYPE>" "<NAME>" {
  [CONFIG ...]
}
with:
PROVIDER: name of the provider, e.g.awsTYPE: type of the resource (of that provider) to create, e.g.instance(an AWS EC2 instance)NAME: an identifier you can use in OpenTofu code to refer to this resource, e.g.my_instanceCONFIG: one or moreargumentsthat specific to that resource.
- several kinds of resources that you can create
-
3️⃣ - Create a rule for the security group: to allow inbound HTTP request on port 8080.
-
4️⃣ - Create an EC2 instance: that uses the previous security group, and have a
Nametag ofsample-app-tofu.- 4️⃣1️⃣ - **Set the AMI**: to `var.ami_id`, which is a reference to an `input variable` named `ami_id` in `variables.tf`. - 4️⃣2️⃣ - **Set the user data**: to a file named `user-data.sh`, which is in the OpenTofu module's directory, next to other `.tf` files.
-
-
variables.tf: Input variables# examples/ch2/tofu/ec2-instance/variables.tf variable "ami_id" { description = "The ID of the AMI to run." type = string }[!NOTE] The input variables allow an OpenTofu module
- to be customized when that module is used to provision resources.
Example explain
- The input variable
ami_idallow you to pass in the ID of an AMI that will be used to run the EC2 instance.- You will pass in
IDof the AMI you build Packer template in previous section.
- You will pass in
-
outputs.tf: Output variables# examples/ch2/tofu/ec2-instance/outputs.tf output "instance_id" { description = "The ID of the EC2 instance" value = aws_instance.sample_app.id } output "security_group_id" { description = "The ID of the security group" value = aws_security_group.sample_app.id } output "public_ip" { description = "The public IP of the EC2 instance" value = aws_instance.sample_app.public_ip }[!NOTE] The output variables can be used to log & share values betweens OpenTofu modules.
-
(Not about OpenTofu) The application & the user data
-
The application: is already included in the AMI (built from the Packer template in previous section).
-
The EC2 instance user data (to start the app)
# examples/ch2/tofu/ec2-instance/user-data.sh
#!/usr/bin/env bash
nohup node /home/ec2-user/app.js &
-
After writing the OpenTofu module code, you need to run that module code to deploy the EC2 instance:
-
Install OpenTofu
-
Install any providers used in OpenTofu code
tofu init -
Apply the OpenTofu code to deploy the EC2 instance
-
Run the
applycommandtofu apply -
The
tofu applycommand will prompt you for theami_idvalue and you paste in the value via the CLIvar.ami_id The ID of the AMI to run. Enter a value:Alternative to provide the values via the CLI prompt, you can do it via
-varflag, environment variables, or variable definitions file.-
-varflag:tofu apply -var ami_id=<YOUR_AMI_ID> -
Environment variable
TF_VAR_<var_name>export TF_VAR_ami_id=<YOUR_AMI_ID> tofu apply -
Variable definition file (a file named
terraform.tfvars)-
Define
terraform.tfvars# ch2/tofu/ec2-instance/terraform.tfvars ami_id = "<YOUR_AMI_ID>" -
Run
tofu applyand OpenTofu will automatically find theami_idvalue.
-
-
-
The
tofu applycommand will then-
show you the
execution plan(planfor short)…OpenTofu will perform the following actions:…Details of the actions…
  # aws_instance.sample_app will be created
  + resource "aws_instance" "sample_app" {
      + ami                                  = "ami-0ee5157dd67ca79fc"
      + instance_type                        = "t2.micro"
      ... (truncated) ...
    }

  # aws_security_group.sample_app will be created
  + resource "aws_security_group" "sample_app" {
      + description            = "Allow HTTP traffic into the sample app"
      + name                   = "sample-app-tofu"
      ... (truncated) ...
    }

  # aws_security_group_rule.allow_http_inbound will be created
  + resource "aws_security_group_rule" "allow_http_inbound" {
      + from_port                = 8080
      + protocol                 = "tcp"
      + to_port                  = 8080
      + type                     = "ingress"
      ... (truncated) ...
    }
Plan: 3 to add, 0 to change, 0 to destroy. Changes to Outputs: + instance_id = (known after apply) + public_ip = (known after apply) + security_group_id = (known after apply)[!NOTE] The plan output is similar to the output of the
diffcommand of Linux andgit diff:Anything with:
- a plus sign (
+) will be created - a minus sign (
–) will be deleted - a tilde sign (
~) will be modified in place
[!TIP] The plan output can also be generated by running
tofu plan. - a plus sign (
-
…prompt you for confirmation
Do you want to perform these actions? OpenTofu will perform the actions described above. Only 'yes' will be accepted to approve. Enter a value: -
If you type
yesand hitEnter, OpenTofu will proceed:Enter a value: yesOutput
aws_security_group.sample_app: Creating... aws_security_group.sample_app: Creation complete after 2s aws_security_group_rule.allow_http_inbound: Creating... aws_security_group_rule.allow_http_inbound: Creation complete after 0s aws_instance.sample_app: Creating... aws_instance.sample_app: Still creating... [10s elapsed] aws_instance.sample_app: Still creating... [20s elapsed] aws_instance.sample_app: Creation complete after 22s Apply complete! Resources: 3 added, 0 changed, 0 destroyed. Outputs: instance_id = "i-0a4c593f4c9e645f8" public_ip = "3.138.110.216" security_group_id = "sg-087227914c9b3aa1e"- The 3 output variables from
outputs.tfis shown at the end.
- The 3 output variables from
-
-
Example: Update Infrastructure Using OpenTofu
-
Make a change to the configuration - add a
Testtag with the value of"update"resource "aws_instance" "sample_app" { # ... (other params omitted) ... tags = { Name = "sample-app-tofu" Test = "update" } } -
Run
tofu applycommand againtofu applyOutput
aws_security_group.sample_app: Refreshing state...
aws_security_group_rule.allow_http_inbound: Refreshing state...
aws_instance.sample_app: Refreshing state...

OpenTofu used the selected providers to generate the following execution plan.
Resource actions are indicated with the following symbols:
  ~ update in-place

OpenTofu will perform the following actions:

  # aws_instance.sample_app will be updated in-place
  ~ resource "aws_instance" "sample_app" {
      id = "i-0738de27643533e98"
    ~ tags = {
          "Name" = "sample-app-tofu"
        + "Test" = "update"
      }
      # (31 unchanged attributes hidden)

      # (8 unchanged blocks hidden)
    }
Plan: 0 to add, 1 to change, 0 to destroy. Do you want to perform these actions? OpenTofu will perform the actions described above. Only 'yes' will be accepted to approve. Enter a value: -
OpenTofu will update the EC2 instance after you type
yesand pressEnter
note
How OpenTofu know which infrastructure to update?
- Every time you run OpenTofu, it records information about the infrastructure it created/updated?
- in an OpenTofu state file.
note
How OpenTofu manages the information about the infrastructure it has created/updated?
- OpenTofu manages state using backends:
- The default backend is
local backend:- State is stored locally in a
terraform.tfstatefile (in the same folder as the OpenTofu module)
- State is stored locally in a
- The default backend is
- For the previous example and this example:
- When you run
applythe first on the tofu module:- OpenTofu records in the files the IDs of the EC2 instance, security group, security group rules, and any other resources it created
- When you run
applyagain:- OpenTofu updates it view of the world (
Refreshing state...):- OpenTofu performs a diff of
- the current state (in state file)
- the desired state (in your OpenTofu code)
- OpenTofu then show its execution plan: the actions it will perform (to transform the current state to the desired state).
- OpenTofu performs a diff of
- OpenTofu updates it view of the world (
- When you run
Example: Destroy Infrastructure Using OpenTofu
-
To destroy everything you’ve deployed with an OpenTofu module, you use
destroycommandtofu destroyDetail of the actions
OpenTofu will perform the following actions:

  # aws_instance.sample_app will be destroyed
  - resource "aws_instance" "sample_app" {
      - ami                                  = "ami-0ee5157dd67ca79fc" -> null
      - associate_public_ip_address          = true -> null
      - id                                   = "i-0738de27643533e98" -> null
      ... (truncated) ...
    }

  # aws_security_group.sample_app will be destroyed
  - resource "aws_security_group" "sample_app" {
      - id                     = "sg-066de0b621838841a" -> null
      ... (truncated) ...
    }

  # aws_security_group_rule.allow_http_inbound will be destroyed
  - resource "aws_security_group_rule" "allow_http_inbound" {
      - from_port              = 8080 -> null
      - protocol               = "tcp" -> null
      - to_port                = 8080 -> null
      ... (truncated) ...
    }
Plan: 0 to add, 0 to change, 3 to destroy. Changes to Outputs: - instance_id = "i-0738de27643533e98" -> null - public_ip = "18.188.174.48" -> null - security_group_id = "sg-066de0b621838841a" -> nullDo you really want to destroy all resources? OpenTofu will destroy all your managed infrastructure, as shown above. There is no undo. Only 'yes' will be accepted to confirm. Enter a value: -
Type
yesand hitEnterto confirm that you want OpenTofu to execute its destroy plan.
caution
Be careful when you run destroy in production.
- It’s a one way door 🚪. There’s no
"undo".
Get your hands dirty with OpenTofu - Part 1
- How would you have to tweak the OpenTofu code if you wanted to run multiple EC2 instances?
- Figure out how to configure the EC2 instance with an EC2 key pair so you can connect to it over SSH.
Example: Deploy an EC2 Instance Using an OpenTofu “Reusable Module”
note
OpenTofu modules are containers for multiple resources that are used together.
There are 2 types modules in OpenTofu:
- root module: any module on which you run
applydirectly. - reusable module: a module meant to be included in others modules (root modules, reusable modules).
So far, you’ve only used the root module - the ec2-instance module.
In this example, you will transform the ec2-instance as a root module into a reusable module.
-
Create 3 folders:
modules,live,sample-app:mkdir -p examples/ch2/tofu/modules # For reusable modules mkdir -p examples/ch2/tofu/live # For root modules mkdir -p examples/ch2/tofu/live/sample-app # The sample-app (root module) that use the ec2-instance reusable module -
Move the
ec2-instancemodule into themodulesfolder:mkdir -p example/ch2/tofu/modules mv ch2/tofu/ec2-instance ch2/tofu/modules/ec2-instance -
In the
sample-appfolder, createmain.tffor the main resources of the sample app:# examples/ch2/tofu/live/sample-app/main.tf module "sample_app_1" { # 1️⃣ source = "../../modules/ec2-instance" # 2️⃣ # TODO: fill in with your own AMI ID! ami_id = "ami-09a9ad4735def0515" # 3️⃣ }What does the code do?
- 1️⃣ -
moduleblock: calls a reusable module from a parent module. - 2️⃣ -
sourceparameter: path to a local directory containing the child module’s configuration files, e.g.../../modules/ec2-instance - 3️⃣ - other parameters that will be passed to the module as input variables, e.g.
ami_id
If you run
applyonsample-appmodule, OpenTofu will use theec2-instancemodule to to create an EC2 instance (, security group and security group rules)[!NOTE] Modules are the main way to package & reuse resource configurations with OpenTofu.
e.g.
- Create multiple resources that meant to be used together (module ~ package)
- Create same type of resource multiple times (module ~ function)
[!TIP] What happen if you run a root module multiple times?
- It will create/update the resources in that root module.
[!TIP] So how do you reuse a module to create a group of resources multiple times?
-
You can’t re-apply a root module to do that.
-
You need to apply a root module that call another reusable module multiple times.
e.g.
module "sample_app_1" {
  source = "../../modules/ec2-instance"

  ami_id = "ami-XXXXXXXXXXXXXXXXX"
}

module "sample_app_2" {
  source = "../../modules/ec2-instance"

  ami_id = "ami-XXXXXXXXXXXXXXXXX"
}
- 1️⃣ -
-
Namespace all the resources created by the
ec2-instancemodule.-
Introduce a
nameinput variable to use as the base name for resources of theec2-instancemodule# examples/ch2/tofu/modules/ec2-instance/variables.tf variable "name" { description = "The base name for the instance and all other resources" type = string } -
Update the
ec2-instancemodule to use thenameinput variable everywhere that was hard-coded:resource "aws_security_group" "sample_app" { name = var.name description = "Allow HTTP traffic into ${var.name}" } resource "aws_instance" "sample_app" { # ... (other params omitted) ... tags = { Name = var.name } } -
Back to
sample-app/main.tf, set thenameinput to different values in each module block# examples/ch2/tofu/live/sample-app/main.tf module "sample_app_1" { source = "../../modules/ec2-instance" ami_id = "ami-XXXXXXXXXXXXXXXXX" name = "sample-app-tofu-1" } module "sample_app_2" { source = "../../modules/ec2-instance" ami_id = "ami-XXXXXXXXXXXXXXXXX" name = "sample-app-tofu-2" }
-
-
Move the
providerblock (from theec2-instancemodule) to thesample-approot module:# examples/ch2/tofu/live/sample-app/main.tf provider "aws" { region = "us-east-2" } module "sample_app_1" { # ... } module "sample_app_2" { # ... }[!NOTE] Typically, reusable module
- do not declare
providerblocks, - but inherit from root module. ← Any user of this reusable module can configure the provider in different ways for different usages.
- do not declare
-
Finally, proxy the output variables from the
ec2-instancemoduleoutput "sample_app_1_public_ip" { value = module.sample_app_1.public_ip } output "sample_app_2_public_ip" { value = module.sample_app_2.public_ip } output "sample_app_1_instance_id" { value = module.sample_app_1.instance_id } output "sample_app_2_instance_id" { value = module.sample_app_2.instance_id }
The reusable module ec2-instance is ready, let’s init & apply the example-app
tofu init
tofu apply
Example: Deploy an EC2 Instance Using an OpenTofu “Reusable Module” from GitHub
note
The OpenTofu module’s source parameter can be set a lot of different source types13.
- a local path
- Terraform Registry
- GitHub/Git repositories
- HTTP URLs
- S3 buckets, GCP buckets.
- …
In this example, you will set the sample-app module source to a GitHub repository (github.com/brikis98/devops-book), with the same source code for the ec2-instance module at the path ch2/tofu/modules/ec2-instance.
-
Modify the
sourceparametermodule "sample_app_1" { source = "github.com/brikis98/devops-book//ch2/tofu/modules/ec2-instance" # ... (other params omitted) ... }- The double lash (
//) is used to separate the Github repo & the path of module (in that repo)
- The double lash (
-
Run
init:tofu initInitializing the backend... Initializing modules... Downloading git::https://github.com/brikis98/devops-book.git... Downloading git::https://github.com/brikis98/devops-book.git... Initializing provider plugins...- The
initcommand will download the module code (from GitHub) & the provider code.
- The
-
Run
applyand you will have the exact same two EC2 instance as the previous example.
warning
When you’re done experimenting, don’t forget to run destroy to clean everything up.
important
A common pattern at many company is:
- The Ops team define & manage a library of well-tested, reusable OpenTofu modules:
- Module for deploying server
- Module for deploying database
- Module for configuring networking
- …
- The Dev teams use these modules as a self-service way to deploy & manage the infrastructure they need for their apps
Get your hands dirty with OpenTofu - Part 2
-
Make the
ec2-instancemodule more configurable:e.g. add input variables to configure
- the instance type it uses,
- the port it opens up for HTTP requests, and so on.
-
Instead of having to provide the AMI ID manually, make OpenTofu find the ID of your AMI automatically (Tip: Use data sources)
How Provisioning Tools Stack Up
| Aspect | Provisioning Tools | Notes |
|---|---|---|
| CRUD | Fully support all CRUD operations | |
| Scale | Scale very well | With self-service approach, can scale to thousands, ten thousands of developers. |
| Idempotency & error handling | Idempotent & handle error automatically | ← Declarative approach: you specify the desired state, the tool itself automatically figure out how to get to that desired state. |
| Consistency | Consistent, predictable structure code with conventions. | e.g. Docs, file layout, named parameters, secret managements… |
| Verbosity | More concise | ← Declarative + DSL |
important
Key takeaway #2.4 Provisioning tools are
- great for deploying & managing servers or infrastructure.
tip
Many provisioning tools support:
- not only manage traditional infrastructure, e.g. servers
- but also many aspects of software delivery
e.g. OpenTofu can manage
- Version control system, e.g. GitHub
- Metrics & dashboard, e.g. Grafana
- On-call rotation, e.g. PagerDuty
Using Multiple IaC Tools Together
important
Key takeaway #2.5 You usually need to use multiple IaC tools together to manage your infrastructure.
Provisioning + Configuration Management
Example: OpenTofu + Ansible
-
OpenTofu: Deploy all infrastructure:
- networking, e.g. VPCs, subnets, route tables
- load balancers
- data stores, e.g. MySQL, Redis
- servers
-
Ansible: Deploy apps on top of these servers
 App      +  App      +  App      +  App      +  App      + ... | ← ANSIBLE
(Deps...)   (Deps...)   (Deps...)   (Deps...)   (Deps...)       |


 Server   + Server    + Server    + Server    + Server    + ... |
                                                                | ← OPENTOFU
 Networking, load balancers, data stores, users...              |
Provisioning + Server Templating
Example: OpenTofu + Packer ← Immutable infrastructure approach
- Packer: Package app as VM images
- OpenTofu: Deploy
- networking, load balancers, data stores…
- servers from VM images
 Server        +  Server        +  Server        +  Server         + ... | ← 3. OPENTOFU

 VM            +  VM            +  VM            +  VM             + ... | ← 2. PACKER
(App, Deps...)   (App, Deps...)   (App, Deps...)   (App, Deps...)        |

 Networking, load balancers, data stores, users...                       | ← 1. OPENTOFU
Provisioning + Server Templating + Orchestration
tip
Orchestration tools - Kubernetes, Nomad, OpenShift - help you deploy & manages apps on top of your infrastructure.
Example: OpenTofu + Packer + Docker & Kubernetes
- Packer: Create a VM image that has Docker & Kubernetes agents installed.
- OpenTofu: Deploy
- networking, load balancers, data stores…
- a cluster of servers, each with the built VM image ← forms a Kubernetes cluster
The Kubernetes cluster is used to you run & manage your Dockerized applications.
                  Container                                              |
 Container        Container                         Container            | ← 4. KUBERNETES + DOCKER
 Container        Container        Container        Container            |

 VM            +  VM            +  VM            +  VM             + ... | ← 2. PACKER
(Docker, K8s)    (Docker, K8s)    (Docker, K8s)    (Docker, K8s)         |

 Server        +  Server        +  Server        +  Server         + ... | ← 3. OPENTOFU
                                                                         |
 Networking, load balancers, data stores, users...                       | ← 1. OPENTOFU
This approach
-
has many advantages:
- Docker images built quickly → Can run & test on your PC.
- Kubernetes builtin functionality: auto healing/scaling, various deployment strategies…
-
but also has the drawbacks in added complexity:
- extra infrastructure to run (K8s clusters are difficult14 & expensive to deploy, manage)
- several extra layers of abstraction - K8s, Docker, Packer - to learn, manage & debug.
Conclusion
-
Instead of ClickOps (clicking out a web UI, which is tedious & error-prone), you can use IaC tools to:
- automate the process
- make it faster & more reliable
-
With IaC, you can reuse code written by others:
- Open source code, e.g. Ansible Galaxy, Docker Hub, Terraform Registry
- Commercial code, e.g. Gruntwork IaC Library
-
Pick the right IaC tool for the job:
IaC tool Great for Not for Ad-hoc scripts Small, one-off tasks Managing IaC Configuration management tools Managing configuration of servers Deploying servers/infrastructure. Server templating tools Managing configuration of servers with immutable infrastructure practices Provision tools Deploying & managing servers/infrastructure -
You usually needs to use multiple IaC tools together to manage your infrastructure.
e.g.
- Provisioning + configuration management
- Provisioning + server templating
- Provisioning + server templating + orchestration
CRUD stands for create, read, update, delete.
A code is idempotence when it can be re-run multiple times and still produce the desired result
A playbook tells Ansible what to do (to which devices). For more information, see https://docs.ansible.com/ansible/latest/playbook_guide/playbooks_intro.html
An inventory tells Ansible which servers to configure (and how to connect to them) For more information, see https://docs.ansible.com/ansible/latest/inventory_guide/index.html
You can store variable values that relate to a specific host or group in inventory. A group variable is a variable that is assigned to all machines of that group.
In Ansible, a role is a structured way to organize:
- Tasks: to be run on the server
- Files: to be copied to the server
- Templates: to be dynamically filled in data
- Other configurations that will be applied to the server:
Popular hypervisors: VMware, VirtualBox, Parallels
On most modern operating systems, code runs in one of two “spaces”: kernel space or user space.
- Code running in kernel space has direct, unrestricted access to all of the hardware.
- There are no
- security restrictions (i.e., you can execute any CPU instruction, access any part of the hard drive, write to any address in memory)
- or safety restrictions (e.g., a crash in kernel space will typically crash the entire computer),
- so kernel space is generally reserved for the lowest-level, most trusted functions of the OS (typically called the kernel).
- There are no
- Code running in user space does not have any direct access to the hardware and must use APIs exposed by the OS kernel instead.
- These APIs can enforce
- security restrictions (e.g., user permissions)
- and safety (e.g., a crash in a user space app typically affects only that app),
- so just about all application code runs in user space.
- These APIs can enforce
https://developer.hashicorp.com/packer/integrations/hashicorp/amazon
The amazon-ebs builder builds an AMI by launching an EC2 instance from a source AMI, provisioning that running machine, and then creating an AMI from that machine.
Server templating is a key component to the shift to immutable infrastructure.
With server templating tool, if you need to roll out a change, (instead of updating the existing server), you:
- create a new image
- deploy that image to a new server
With server templating,
- you’re always creating new images
- (there’s never a reason to read/update/delete)
HCL is the language used by Packer, Terraform/OpenTofu and many other products of HashiCorp.
https://developer.hashicorp.com/terraform/language/modules/sources
Most major cloud providers provide managed Kubernetes services, which can offload some of the work for you.
Chapter 3: How to Deploy Many Apps: Orchestration, VMs, Containers, and Serverless
- Chapter 3: How to Deploy Many Apps: Orchestration, VMs, Containers, and Serverless
- An Introduction to Orchestration
- Server Orchestration
- What is Server Orchestration
- Example: Deploy Multiple Servers in AWS Using Ansible
- Example: Deploy an App Securely and Reliably Using Ansible
- Example: Deploy a Load Balancer Using Ansible and Nginx
- Example: Roll Out Updates to Servers with Ansible
- Get your hands dirty with Ansible and server orchestration
- VM Orchestration
- What is VM Orchestration
- Example: Build a More Secure, Reliable VM Image Using Packer
- Example: Deploy a VM Image in an Auto Scaling Group Using OpenTofu
- Example: Deploy an Application Load Balancer Using OpenTofu
- Example: Roll Out Updates with OpenTofu and Auto Scaling Groups
- Get your hands dirty with OpenTofu and VM orchestration
- Container Orchestration
- What is Container Orchestration
- The advantages of container orchestration
- Containers and container orchestration tools
- A Crash Course on Docker
- Example: Create a Docker Image for a Node.js app
- A Crash Course on Kubernetes
- Example: Deploy a Dockerized App with Kubernetes
- Example: Deploy a Load Balancer with Kubernetes
- Example: Roll Out Updates with Kubernetes
- Get your hands dirty with Kubernetes and YAML template tools
- A Crash Course on AWS Elastic Kubernetes Service (EKS)
- Example: Deploy a Kubernetes Cluster in AWS Using EKS
- Example: Push a Docker Image to AWS Elastic Container Registry (ECR)
- Example: Deploy a Dockerized App into an EKS Cluster (With Load Balancer)
- Get your hands dirty with Kubernetes and container orchestration
- Serverless Orchestration
- What is Serverless?
- How Serverless works?
- Serverless pros and cons
- Type of serverless
- Example: Deploy a Serverless Function with AWS Lambda
- A Crash course on AWS Lambda triggers
- Example: Deploy an API Gateway in Front of AWS Lambda
- Example: Roll Out Updates with AWS Lambda
- Get your hands dirty with serverless web-apps and Serverless Orchestration
- Comparing Orchestration Options
- Conclusion
An Introduction to Orchestration
Why use an orchestration?
-
The problem with a single server 🎵 - single point of failure:
- Your single server cannot run
all the time:- There will be a lot of outages 🛑 due to:
- hardware issues
- software issues
- load: 🪨
- deployments
- There will be a lot of outages 🛑 due to:
- Your single server cannot run
-
To remove this
single point of failure, typically you needs- multiple copies, called replicas, of your app.
- a way to
- manages those replicas 👈 Who gonna be the manager 🧠🎼?
- solve all the problems (of each server) 👈 Multiple failures ← Multiple servers 🎵🎵🎶
- …
-
The tools that done all of the previous things is called orchestration tools:
- Capistrano, Ansible (👈 Server orchestration)
- AWS Auto Scaling Group, EC2 (👈 VM orchestration)
- Kubernetes, Nomad… & managed services: EKS, GKE, AKS, OpenShift, ECS (👈 Container orchestration)
- AWS Lambda, Google Cloud Functions, Azure Serverless (👈 Serverless orchestration)
What is an orchestration?
orchestration tool : tool responsible for orchestration: : - manage the cluster (where the applications runs) : - coordinate individual apps to start/stop (how each application runs) : - increase/decrease hardware resources available to each app (which is available to each applications) : - increase/decrease the number of replicas (how many copies of each application) : - …
-
An orchestration tool solves the following problems:
The problem What exactly is the problem? Notes 🚀 Deployment How to initially deploy one/more replicas of your app onto your servers? 🎢 Deployments strategies How to roll out updates to all replicas? Without downtime1? 🔙 Rollback How to roll back a broken updates? Without downtime? 🆔 Scheduling How to decide which apps should run on which servers? With enough computing resources2? Scheduling can be done:
- manually
- automatically by a scheduler3.⬆️⬇️ Auto scaling How to auto-scale your app up/down in response to the load? There are 2 types of scaling:
- vertical scaling (a “bigger” machine)
- horizontal scaling (more small machines).🩹 Auto healing How to know if an app/a server is not healthy? Auto restart/replace the app/server? ⚙️ Configuration How to configure the app for multiple environments? e.g. Each environment has a different domain name; computing resources settings. 🔒🤫 Secrets management How to pass secrets to your apps? aka credentials - e.g. passwords, API keys ☦️ Load balancing How to distribute traffic across all replicas? 🌐🕸️ Service communication How each app communicate/connect with each other? aka service discovery How to control/monitor the these communication/connections? aka service mesh: authentication, authorization, encryption, error handling, observability… 💾 Disk management How to connect the right hard drive to the right servers?
Four types of orchestration tools
-
In the pre-cloud ere, most companies has their own solutions: gluing together various scripts & tools to solve each problem.
-
Nowadays, the industry standardize around four broad types of solutions:
Type of orchestration How do you do? “Server orchestration” (aka “deployment tooling”) You have a pool of servers that you manage. The old way from pre-cloud era, still common today. VM orchestration Instead of managing servers directly, you manage VM images. Container orchestration Instead of managing servers directly, you manage containers. Serverless orchestration You no longer think about servers at all, and just focus on managing apps, or even individual functions.
Server Orchestration
What is Server Orchestration
server orchestration : the original approach from pre-cloud era, but still common today : setup a bunch of servers → deploy apps across these servers → changes are update in-place to these servers : there is no standardized toolings in this approach : - configuration management tools, e.g. Ansible, Chef, Puppet : - specialized deployment scripts, e.g. Capistrano, Deployer, Mina : - thousands of ad-hoc scripts
important
Key takeaway #1 Server orchestration is an older, mutable infrastructure approach where
- you have a fixed set of servers that you
- maintain
- update in-place.
Example: Deploy Multiple Servers in AWS Using Ansible
warning
Deploy & manage servers is not really what configuration management tools were designed to do.
- But for learning & testing, Ansible is good enough.
First, to use Ansible as a server orchestration, you need
- a bunch of servers (that will be managed, e.g. physical servers on-prem, virtual servers in the could)
- SSH access to those servers.
If you don’t have servers you can use, you can also use Ansible to deploy several EC2 instances.
The Ansible playbook to create multiples EC2 instance can be found at the example repo at ch3/ansible/create_ec2_instances_playbook.yml, which will:
- Prompt you for:
number_instances: The number of instances to createbasename: The basename for all resources createdhttp_port: The port on which the instances listen for HTTP requests
- Create a security group that opens port 22 (for SSH traffic) and
http_port(for HTTP traffic) - Create a EC2 key-pair that used to connect to the instances (that will be created) via SSH.
- Create multiple instances, each with the Ansible tag set to
base_name
To run the playbook:
-
Copy
create_ec2_instances_playbook.ymlfrom example repo toch3/ansiblemkdir -p ch3/ansible cd ch3/ansible cp -r <PATH_TO_EXAMPLE_REPO>/ch3/ansible/create_ec2_instances_playbook.yml . -
Use
ansible-playbookcommand to run the playbookansible-playbook -v create_ec2_instances_playbook.yml-
Enter the values interactively & hit
Enter -
Or define the values as variables in a yaml file and pass to
ansible-playbookcommand via-extra-varsflag.# examples/ch3/ansible/sample-app-vars.yml num_instances: 3 base_name: sample_app_instances http_port: 8080ansible-playbook -v create_ec2_instances_playbook.yml \ --extra-vars "@sample-app-vars.yml"
-
Example: Deploy an App Securely and Reliably Using Ansible
Previous chapters has basic example of deploying an app:
- Chapter 1: Example: Deploying an app using AWS: Deploy an app to AWS with “ClickOps”
- Chapter 2: Example: Configure a Server Using Ansible: Deploy an app to AWS with Ansible
There’re still several problems with both examples (e.g. root user, port 80, no automatic app restart…)
In this example, you will fix these problems and deploy the app in a more secure, reliable way.
-
(As previous example) Use an Ansible Inventory plugin to discover your EC2 instances
# examples/ch3/ansible/inventory.aws_ec2.yml plugin: amazon.aws.aws_ec2 regions: - us-east-2 keyed_groups: - key: tags.Ansible leading_separator: "" -
(As previous example) Use group variables to store the configuration for your group of servers
# examples/ch3/ansible/group_vars/sample_app_instances.yml ansible_user: ec2-user ansible_ssh_private_key_file: ansible-ch3.key ansible_host_key_checking: false -
Use a playbook to configure your group of servers to run the Node.js sample app
# examples/ch3/ansible/configure_sample_app_playbook.yml - name: Configure servers to run the sample-app hosts: sample_app_instances # 1️⃣ gather_facts: true become: true roles: - role: nodejs-app # 2️⃣ - role: sample-app # 3️⃣ become_user: app-user # 4️⃣- 1️⃣: Target the group discovered by the inventory plugin (which are created in the previous example).
- 2️⃣: Split the role into 2 smaller roles: the
nodejs-approle is only responsible for configuring the server to be able to run any Node.js app. - 3️⃣: The
sample-approle is now responsible for running thesample-app. - 4️⃣: The
sample-approle will be executed as the OS userapp-user- which is created by thenodejs-approle - instead of the root user.
-
The Ansible roles
roles └── nodejs-app └── tasks └── main.yml -
The
nodejs-approle: a generic role for any Node.js approles └── nodejs-app └── tasks └── main.yml # The Ansible role's task# examples/ch3/ansible/roles/nodejs-app/tasks/main.yml - name: Add Node packages to yum # 1️⃣ shell: curl -fsSL https://rpm.nodesource.com/setup_21.x | bash - - name: Install Node.js yum: name: nodejs - name: Create app user # 2️⃣ user: name: app-user - name: Install pm2 # 3️⃣ npm: name: pm2 version: latest global: true - name: Configure pm2 to run at startup as the app user shell: eval "$(sudo su app-user bash -c 'pm2 startup' | tail -n1)"- 1️⃣: Install Node.js
- 2️⃣: Create a new OS user called
app-user, which allows you to run yours app with an OS user with limited permissions. - 3️⃣: Install PM2 (a process supervisor4) and configure it to run on boot.
-
The
sample-approle: a specifically role to run thesample-app.roles ├── nodejs-app └── sample-app ├── files │ ├── app.config.js # The configuration file for the process supervisor - PM2 │ └── app.js # Your example-app code └── tasks └── main.yml # The Ansible role's task-
Clone the
example-appcode (from chapter 1):cd examples mkdir -p ch3/ansible/roles/sample-app/files cp ch1/sample-app/app.js ch3/ansible/roles/sample-app/files/ -
The PM2 configuration file
# examples/ch3/ansible/roles/sample-app/files/app.config.js module.exports = { apps : [{ name : "sample-app", script : "./app.js", # 1️⃣ exec_mode: "cluster", # 2️⃣ instances: "max", # 3️⃣ env: { "NODE_ENV": "production" # 4️⃣ } }] }- 1️⃣: PM2 will run the script at
/app.js. - 2️⃣: The script will be run in cluster mode5 (to take advantages of all the CPUs)
- 3️⃣: Use all CPUs available
- 4️⃣: Run Node.js script in “production” mode.
- 1️⃣: PM2 will run the script at
-
The
sample-approle’s task# examples/ch3/ansible/roles/sample-app/tasks/main.yml - name: Copy sample app # 1️⃣ copy: src: ./ dest: /home/app-user/ - name: Start sample app using pm2 # 2️⃣ shell: pm2 start app.config.js args: chdir: /home/app-user/ - name: Save pm2 app list so it survives reboot # 3️⃣ shell: pm2 save- 1️⃣: Copy
app.jsandapp.config.jsto home directory ofapp-user. - 2️⃣: Use PM2 (using the
app.config.jsconfiguration) to start the app. - 3️⃣: Save Node.js processes to restart them later.
- 1️⃣: Copy
-
-
Run Ansible playbook
ansible-playbook -v -i inventory.aws_ec2.yml configure_sample_app_playbook.ymlOutput
PLAY RECAP ************************************ 13.58.56.201 : ok=9 changed=8 3.135.188.118 : ok=9 changed=8 3.21.44.253 : ok=9 changed=8 localhost : ok=6 changed=4- Now you have three secured, reliable instances of your application (with 3 separated endpoint).
[!NOTE] Your application now can be accessed via any of the those endpoints. But should your users need to decide which instance they will access?
- No.
- You should have a load balancer to distribute load across multiple servers of your app.
Example: Deploy a Load Balancer Using Ansible and Nginx
Introduction to Load Balancer
What is load balancer?
load balancer
: a piece of software that can distribute load across multiple servers or apps
: e.g.
: - Apache httpd6, Nginx7, HAProxy8.
: - Cloud services: AWS Elastic Load Balancer, GCP Cloud Load Balancer, Azure Load Balancer.
How load balancer works?
-
You give your users a single endpoint to hit, which is the load balancer.
-
The load balancer
-
forwards the requests it receives to a number of different endpoints.
-
uses various algorithms to process requests as efficiently as possible.
e.g. round-robin, hash-based, least-response-time…
-
The example
In this example, you will run your own load balancer in a separate server (using nginx).
-
(Optional) Deploy an EC2 instance for the load balancer:
You will use the same
create_ec2_instances_playbook.ymlplaybook deploy that EC2 instance:-
Configure the
create_ec2_instances_playbook.ymlplaybook# examples/ch3/ansible/nginx-vars.yml num_instances: 1 base_name: nginx_instances http_port: 80 -
Run the
create_ec2_instances_playbook.ymlplaybookansible-playbook \ -v create_ec2_instances_playbook.yml \ --extra-vars "@nginx-vars.yml"
-
-
Use group variables to configure your
nginx_instancesgroup# examples/ch3/ansible/group_vars/nginx_instances.yml ansible_user: ec2-user ansible_ssh_private_key_file: ansible-ch3.key ansible_host_key_checking: false -
Create a playbook to configure your group of servers to run Nginx
-
The playbook
# examples/ch3/ansible/configure_nginx_playbook.yml - name: Configure servers to run nginx hosts: nginx_instances gather_facts: true become: true roles: - role: nginx -
The playbook’s roles (
nginx)roles ├── nginx │ ├── tasks │ │ └── main.yml │ └── templates │ └── nginx.conf.j2 ├── nodejs-app └── sample-app-
The Ansible role’s template for Nginx configuration
# examples/ch3/ansible/roles/nginx/templates/nginx.conf.j2
user nginx;
worker_processes auto;
error_log /var/log/nginx/error.log notice;
pid /run/nginx.pid;

events {
    worker_connections 1024;
}

http {
    log_format  main  '$remote_addr - $remote_user [$time_local] "$request" '
                      '$status $body_bytes_sent "$http_referer" '
                      '"$http_user_agent" "$http_x_forwarded_for"';

    access_log  /var/log/nginx/access.log  main;

    include             /etc/nginx/mime.types;
    default_type        application/octet-stream;

    upstream backend { #                                       1️⃣
        {% for host in groups['sample_app_instances'] %} #     2️⃣
        server {{ hostvars[host]['public_dns_name'] }}:8080; # 3️⃣
        {% endfor %}
    }

    server {
        listen       80; #                                     4️⃣
        listen       [::]:80;

        location / { #                                         5️⃣
                proxy_pass http://backend;
        }
    }
}
This Nginx configuration file9 will configure the load balancer to load balance the traffic across the servers you deployed to run the
sample-app:- 1️⃣ Use the
upstreamkeyword to define a group of servers that can be referenced elsewhere in this file by the namebackend. - 2️⃣ (Ansible - Jinja templating syntax10) Loop over the servers in the
sample_app_instancesgroup. - 3️⃣ (Ansible - Jinja templating syntax) Configure the
backendupstream to route traffic to the public address and port8080of each server in thesample_app_instancesgroup. - 4️⃣ Configure Nginx to listen on port 80.
- 5️⃣ Configure Nginx as a load balancer, forwarding requests to the
/URL to thebackendupstream.
- 1️⃣ Use the
-
The Ansible role’s task to configure Nginx
# examples/ch3/ansible/roles/nginx/tasks/main.yml - name: Install Nginx # 1️⃣ yum: name: nginx - name: Copy Nginx config # 2️⃣ template: src: nginx.conf.j2 dest: /etc/nginx/nginx.conf - name: Start Nginx # 3️⃣ systemd_service: state: started enabled: true name: nginx- 1️⃣: Install
Nginx(usingyum) - 2️⃣: Render the Jinja template to Nginx configuration file and copy to the server.
- 3️⃣: Start
Nginx(usingsystemdas the process supervisor).
- 1️⃣: Install
-
-
-
Run the playbook to configure your group of servers to run Nginx
ansible-playbook -v -i inventory.aws_ec2.yml configure_nginx_playbook.ymlOutput
PLAY RECAP
xxx.us-east-2.compute.amazonaws.com : ok=4    changed=2    failed=0
Example: Roll Out Updates to Servers with Ansible
note
Some configuration management tools support various deployment strategies.
e.g.
- Rolling deployment: you update your severs in batches:
- Some servers are being updated (with new configuration).
- While others servers keep running (with old configuration) and serving traffic.
-
With Ansible, the easiest way to have a rolling update is to add the
serialparameter to the playbook.# examples/ch3/ansible/configure_sample_app_playbook.yml - name: Configure servers to run the sample-app hosts: sample_app_instances gather_facts: true become: true roles: - role: nodejs-app - role: sample-app become_user: app-user serial: 1 # 1️⃣ max_fail_percentage: 30 # 2️⃣- 1️⃣: Apply changes to the servers in batch-of-1 (1 server at a time)
- 2️⃣: Abort a deployment more than 30% of the servers hit an error during update.
- For this example, it means the deployment will stop if there is any of the server fails.
-
Make a change to the application
sed -i 's/Hello, World!/Fundamentals of DevOps!/g' examples/ch3/ansible/roles/sample-app/files/app.js -
Re-run the playbook
ansible-playbook -v -i inventory.aws_ec2.yml configure_sample_app_playbook.yml
Get your hands dirty with Ansible and server orchestration
- How to scale the number of instances running the sample app from three to four.
- Try restarting one of the instances using the AWS Console.
- How does nginx handle it while the instance is rebooting?
- Does the sample app still work after the reboot?
- How does this compare to the behavior you saw in Chapter 1?
- Try terminating one of the instances using the AWS Console.
- How does nginx handle it?
- How can you restore the instance?
VM Orchestration
What is VM Orchestration
VM orchestration : Create VM images that have your apps & dependencies fully installed & configured : Deploy the VM images across a cluster of servers : - 1 server → 1 VM image : - Scale the number of servers up/down depending on your needs : When there is an app change: : - Create new VM image 👈 Immutable infrastructure approach. : - Deploy that new VM image onto new servers; then undeploy the old servers.
VM orchestration is a more modern approach:
- works best with cloud providers (AWS, Azure, GCP…) - where you can spin up new servers & tear down old ones in minutes.
- or you an use virtualization on-prem with tools from VMWare, Citrix, Microsoft Hyper-V…
important
Key takeaway #2 VM orchestration is an immutable infrastructure approach where you deploy and manage VM images across virtualized servers.
note
With VM orchestration, you will deploy multiple VM servers, aka a cluster (of VM servers)
Most cloud providers has a native way to run VMs across a cluster:
- AWS
Auto Scaling Groups(ASG) - Azure
Scale Sets - GCP
Managed Instance Groups
The following tools are used in the examples for VM orchestration:
- A tool for building VM images:
Packer - A tool for orchestrating VMs: AWS
Auto Scaling Group(ASG) - A tool for managing IaC:
OpenTofu
Example: Build a More Secure, Reliable VM Image Using Packer
An introduction about building an VM image using Packer has already been available at Chapter 2 - Building a VM image using Packer.
This example will make the VM image more secure, reliable:
- Use PM2 as the process supervisor
- Create a OS user to run the app
-
Copy Packer template from chapter 2
cd examples mkdir -p ch3/packer cp ch2/packer/sample-app.pkr.hcl ch3/packer/ -
Copy the app & PM2 configuration file from chapter 3
cp ch3/ansible/roles/sample-app/files/app*.js ch3/packer/ -
Update the Packer template’s build steps to make the VM image more secure, reliable
# examples/ch3/packer/sample-app.pkr.hcl build { sources = [ "source.amazon-ebs.amazon_linux" ] provisioner "file" { # 1️⃣ sources = ["app.js", "app.config.js"] destination = "/tmp/" } provisioner "shell" { inline = [ "curl -fsSL https://rpm.nodesource.com/setup_21.x | sudo bash -", "sudo yum install -y nodejs", "sudo adduser app-user", # 2️⃣ "sudo mv /tmp/app.js /tmp/app.config.js /home/app-user/", # 3️⃣ "sudo npm install pm2@latest -g", # 4️⃣ "eval \"$(sudo su app-user bash -c 'pm2 startup' | tail -n1)\"" # 5️⃣ ] pause_before = "30s" } }- 1️⃣: Copy
app.js&app.config.jsonto the server/tmpfolder (The home folder ofapp-userhasn’t existed yet). - 2️⃣: Create
app-user(and its home folder). - 3️⃣: Move
app.js&app.config.jstoapp-user’s home folder. - 4️⃣: Install
PM2. - 5️⃣: Run
PM2on boot (asapp-user) so if your server ever restarts, pm2 will restart your app.
- 1️⃣: Copy
-
Install Packer plugins (used in the Packer template)
packer init sample-app.pkr.hcl -
Build image from Packer template
packer build sample-app.pkr.hcl
Example: Deploy a VM Image in an Auto Scaling Group Using OpenTofu
In chapter 2, you’ve already used OpenTofu to deploy an AMI on a single EC2 instance using a root module, or using a reusable module.
In this chapter, you will use an OpenTofu reusable module asg to deploy multiples EC2 instances to a cluster
tip
ASG offers a number of nice features:
- Cluster management: You can easily launch multiple instances & manually resize the cluster.
- Auto scaling: Or let ASG resize the cluster automatically (in response to load).
- Auto healing: ASG monitors all instances (in the cluster) and automatically replace any failure instances.
note
The asg module is available in this book code repo at github.com/brikis98/devops-book (in ch3/tofu/modules/asg folder).
The asg module will creates 3 main resources:
- A launch template: ~ the blueprint for the configuration of each EC2 instance.
- An ASG: use the launch template to spin up EC2 instances (in the Default VPC)
- A security group: control the traffic in/out of each EC2 instance.
note
A VPC - virtual private cloud, is an isolated area of your AWS account that has its own virtual network & IP address space.
- Just about every AWS resource deploys into a VPC.
- If you don’t explicitly specify a VPC, the resource will be deployed into the Default VPC, which is part of every AWS account created after 2013.
warning
It’s not a good idea to use the Default VPC for production apps, but it’s OK to use it for learning and testing.
-
To use the
asgmodule, first you need a root modulelive/asg-sample:-
The root module folder
mkdir -p examples/ch3/tofu/live/asg-sample
cd examples/ch3/tofu/live/asg-sample
-
-
The root module’s
main.tf# examples/ch3/tofu/live/asg-sample/main.tf provider "aws" { region = "us-east-2" } module "asg" { source = "github.com/brikis98/devops-book//ch3/tofu/modules/asg" name = "sample-app-asg" # 1️⃣ ami_id = "ami-XXXXXXXXXXXXXXXXX" # 2️⃣ user_data = filebase64("${path.module}/user-data.sh") # 3️⃣ app_http_port = 8080 # 4️⃣ instance_type = "t2.micro" # 5️⃣ min_size = 1 # 6️⃣ max_size = 10 # 7️⃣ desired_capacity = 3 # 8️⃣ }- 1️⃣
name: Base name of all resources inasgmodule. - 2️⃣
ami_id: AMI to use for each EC2 instance. - 3️⃣
user_data: User data script to run on each EC2 instance. - 4️⃣
app_http_port: Port to open in the security group (to allow the app to receive HTTP requests). - 5️⃣
instance_type: Type of EC2 instance. - 6️⃣
min_size: Minimum number of EC2 instances (to run in the ASG). - 7️⃣
max_size: Maximum number of EC2 instances (to run in the ASG). - 8️⃣
desired_capacity: The desired (initial) number of instances (to run in the ASG).
For more information, see:
- The
asgmodule code - The Terraform docs for AWS provider’s ASG resource.
- 1️⃣
-
The user data script used for EC2 instance:
#!/usr/bin/env bash # examples/ch3/tofu/live/asg-sample/user-data.sh set -e sudo su app-user # 1️⃣ cd /home/app-user # 2️⃣ pm2 start app.config.js # 3️⃣ pm2 save # 4️⃣- 1️⃣: Switch to
app-user. - 2️⃣: Go to
app-userhome directory (where the Packer template copied the sample app code). - 3️⃣: Use
PM2to start thesample-app. - 4️⃣: Tell
PM2to save all processes for resurrecting them later.
- 1️⃣: Switch to
-
Apply the OpenTofu code
tofu apply
Example: Deploy an Application Load Balancer Using OpenTofu
The problem with deployed your own load balancer using Nginx
| Aspect | The problem with maintain your own load balancer | Outcome/Example |
|---|---|---|
| 🧬 Availability | You are running only a single instance for your load balancer. | If your load balancer crashes, your users experience an outage. |
| ♾️ Scalability | A single instance of load balancer has limited scaling capability. | If load exceeds what a single server can handle, users will see degraded performance or an outage. |
| 🚧 Maintenance | Keeping the load balancer up to date is entirely up to you | e.g. Update to a new version of Nginx without downtime is tricky |
| 🛡️ Security | The load balancer server is not especially | Easily be attacked. |
| 🔒 Encryption | If you want to encrypt data in transit, you’ll have to set it all up manually. | e.g. Use HTTPS and TLS — which you should for just about all production use cases |
warning
You can address all these issues of Nginx yourself, but:
- it’s a considerable amount of work.
Using cloud providers managed services for load balancing
Most cloud providers offer managed services for solving common problems, including services for load balancing.
e.g. AWS Elastic Load Balancer (ELB), Azure Load Balancer, GCP Cloud Load Balancer
These services provide lots of powerful features out-of-the-box.
For example, AWS Elastic Load Balancer (ELB):
-
ELB out-of-the-box features:
Aspect The out-of-the-box solution from load balancing managed service Example 🧬 Availability Under the hood, AWS automatically deploys multiple servers for an ELB so you don’t get an outage if one server crashes. ♾️ Scalability AWS monitors load on the ELB, and if it is starting to exceed capacity, AWS automatically deploys more servers. 🚧 Maintenance AWS automatically keeps the load balancer up to date, with zero downtime. 🛡️ Security AWS load balancers are hardened against a variety of attacks, including meeting the requirements of a variety of security standards out-of-the-box. e.g. SOC 2, ISO 27001, HIPAA, PCI, FedRAMP… 🔒 Encryption AWS has out-of-the-box support for encryption data e.g. HTTPS, Mutual TLS, TLS Offloading, auto-rotated TLS certs… -
ELB even has multiple types of load balancers, you can choose the one best fit for your needs:
- Application Load Balancer (
ALB) - Network Load Balancer (
NLB) - Gateway Load Balancer (
GWLB) - Classic Load Balancer (
Classic LB)
- Application Load Balancer (
note
An AWS ALB consists of:
- Listeners:
A listener listens for requests on
- a specific port, e.g.
80 - protocol, e.g.
HTTP
- a specific port, e.g.
- Listener rules:
A listener rule specifies
- which requests (that come into a listener)
- to route to which target group, based on rules that match on request parameters:
- path, e.g.
/foo - hostname, e.g.
bar.example.com
- path, e.g.
- to route to which target group, based on rules that match on request parameters:
- which requests (that come into a listener)
- Target groups:
A target group is a group of servers that
- receive requests from the load balancer.
- perform health checks on these servers by
- sending to each server a request on a configuration interval - e.g.
every 30s - only considering the server as healthy if it
- returns an expected response (e.g.
200 OK)- within a time period (e.g.
within 2s)
- within a time period (e.g.
- returns an expected response (e.g.
- sending to each server a request on a configuration interval - e.g.
- only send requests to servers that pass its health checks.
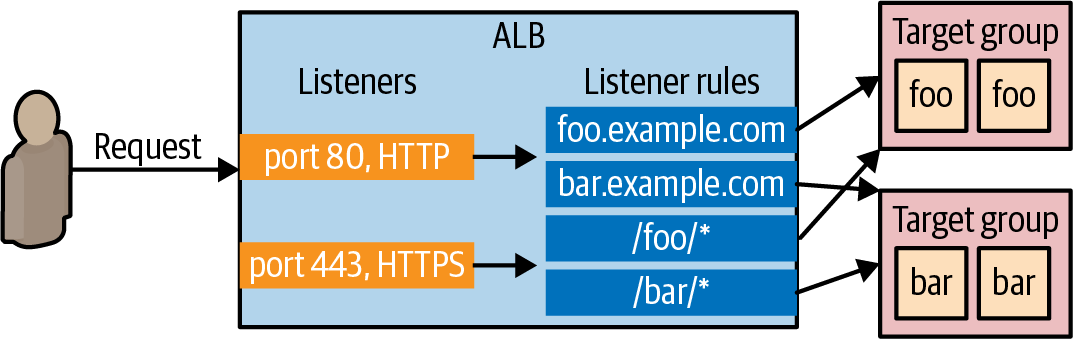
The example code
For this example, you’ll use ALB, which is simple, best fit for a small app:
-
The sample code repo includes a OpenTofu module called
alb(inch3/tofu/modules/albfolder) that deploys a simpleALB. -
Configure a root module
asg-sampleto usesalbmodule:# examples/ch3/tofu/live/asg-sample/main.tf module "asg" { source = "github.com/brikis98/devops-book//ch3/tofu/modules/asg" # ... (other params omitted) ... } module "alb" { source = "github.com/brikis98/devops-book//ch3/tofu/modules/alb" name = "sample-app-alb" # 1️⃣ alb_http_port = 80 # 2️⃣ app_http_port = 8080 # 3️⃣ app_health_check_path = "/" # 4️⃣ }- 1️⃣
name: Base name foralbmodule’s resources. - 2️⃣
alb_http_port: The port the ALB (listener) listens on for HTTP requests. - 3️⃣
app_http_port: The port the app listens on for HTTP requests 👈 The ALB target group will send traffic & health checks to this port. - 4️⃣
app_health_check_path: The path to use when sending health check requests to the app.
- 1️⃣
-
Connect the
ALBto theASG:# examples/ch3/tofu/live/asg-sample/main.tf module "asg" { source = "github.com/brikis98/devops-book//ch3/tofu/modules/asg" # ... (other params omitted) ... target_group_arns = [module.alb.target_group_arn] # 1️⃣ }-
1️⃣
target_group_arns: Attach the ASG to the ALB target group:-
Register all of ASG’s instances in the ALB’s target group, which including:
- The initial instances (when you first launch the ASG).
- Any new instances that launch later: either as a result of a deployment/auto-healing/auto-scaling.
-
Configure the ASG to use the ALB for health checks & auto-healing.
- By default, the auto-healing feature is simple:
- It replaces any instances that crashed 👈 Detect hardware issues.
- If the instance is still running, but the app is not responding, the ASG won’t know to replace it. 👈 Not detect software issues.
- By using ALB’s health checks, the ASG will also any instance that fails the ALB - target group - health check 👈 Detect both hardware & software issues.
- By default, the auto-healing feature is simple:
-
-
-
Output the ALB domain name from the root module
asg-sample:# examples/ch3/tofu/live/asg-sample/outputs.tf output "alb_dns_name" { value = module.alb.alb_dns_name } -
Apply
asg-samplemodule:tofu init tofu applyOutput
Apply complete! Resources: 10 added, 0 changed, 0 destroyed. Outputs: alb_dns_name = "sample-app-tofu-656918683.us-east-2.elb.amazonaws.com"
Example: Roll Out Updates with OpenTofu and Auto Scaling Groups
note
Most of the VM orchestration tools have support for zero-downtime deployments & various deployment strategies.
e.g. AWS ASG has a native feature called instance refresh11, which can update your instances automatically by doing a rolling deployment.
In this example, you will enable instance refresh for the ASG:
-
Update the
asg-samplemodulemodule "asg" { source = "github.com/brikis98/devops-book//ch3/tofu/modules/asg" # ... (other params omitted) ... instance_refresh = { min_healthy_percentage = 100 # 1️⃣ max_healthy_percentage = 200 # 2️⃣ auto_rollback = true # 3️⃣ } }- 1️⃣
min_healthy_percentage: The cluster will never have fewer than the desired number of instances. - 2️⃣
max_healthy_percentage: The cluster will keep all the old instances running, deploy new instances, waiting for all new instances to pass health checks, then undeploy old instances. 👈 ~ Blue/green deployments. - 3️⃣
auto_rollback: If new instances fail to pass health checks, the ASG will auto rollback, putting the cluster back to its previous working condition.
- 1️⃣
-
Make a change to the app
sed -i 's/Hello, World!/Fundamentals of DevOps!/g' examples/ch3/packer/app.js -
Build the new VM image
cd examples/ch3/packer packer build sample-app.pkr.hcl -
Update the
asg-samplemodule’s launch template with the new VM image -
Apply the updated
asg-samplemodulecd examples/ch3/packer tofu applyOutput
OpenTofu will perform the following actions: # aws_autoscaling_group.sample_app will be updated in-place ~ resource "aws_autoscaling_group" "sample_app" { # (27 unchanged attributes hidden) ~ launch_template { id = "lt-0bc25ef067814e3c0" name = "sample-app-tofu20240414163932598800000001" ~ version = "1" -> (known after apply) } # (3 unchanged blocks hidden) } # aws_launch_template.sample_app will be updated in-place ~ resource "aws_launch_template" "sample_app" { ~ image_id = "ami-0f5b3d9c244e6026d" -> "ami-0d68b7b6546331281" ~ latest_version = 1 -> (known after apply) # (10 unchanged attributes hidden) } -
Go to EC2 console to verify that the instance refreshing is progressing.
note
During the instance refreshing, the load balancer URL should always return a successful response (because it’s zero-downtime deployment).
tip
You can check with curl
while true; do curl http://<load_balancer_url>; sleep 1; done
Output
Hello, World!
Hello, World!
Hello, World!
Hello, World!
Hello, World!
Hello, World! # 👈 Only responses from the old instances
Fundamentals of DevOps! # 👈 As new instances start to pass health checks, ALB sends requests to these instances
Hello, World!
Fundamentals of DevOps!
Hello, World!
Fundamentals of DevOps!
Hello, World!
Fundamentals of DevOps!
Hello, World!
Fundamentals of DevOps!
Hello, World!
Fundamentals of DevOps! # 👈 Only responses from the new instances
Fundamentals of DevOps!
Fundamentals of DevOps!
Fundamentals of DevOps!
Fundamentals of DevOps!
Fundamentals of DevOps!
Get your hands dirty with OpenTofu and VM orchestration
- How to scale the number of instances in the ASG running the sample app from three to four.
- How does this compare to adding a fourth instance to the Ansible code?
- Try restarting one of the instances using the AWS Console.
- How does the ALB handle it while the instance is rebooting?
- Does the sample app still work after the reboot?
- How does this compare to the behavior you saw when restarting an instance with Ansible?
- Try terminating one of the instances using the AWS Console.
- How does the ALB handle it?
- Do you need to do anything to restore the instance?
warning
Don’t forget to run tofu destroy to undeploy all your infrastructure created by the OpenTofu module.
Container Orchestration
What is Container Orchestration
container orchestration : Create container images that have your apps & dependencies fully installed & configured : Deploy the container images across a cluster of servers : - 1 server → Multiple containers 👈 Pack the containers as efficiently as possible to each server (bin packing). : - Scale the number of servers and/or containers up/down depending on load. : When there is an app change: : - Create new container image 👈 Immutable infrastructure approach. : - Deploy that new container image onto new containers in the cluster; then undeploy the old containers.
note
Although containers has been around for decades (from the 1970s12),
important
Key takeaway #3 Container orchestration is an immutable infrastructure approach where you deploy & manage container images across a cluster of servers.
The advantages of container orchestration
| Aspect | Advantage | Example |
|---|---|---|
| Speed | - Built fast (especially with caching). | The build & deploy cycle (of a unit): |
| - Deploy fast. . | - For VMs: 10-20 minutes | |
| - For containers: 1-5 minutes | ||
| Efficiency | - Builtin scheduler. | 👉 Automatically decide which server to run which containers |
| - Use the available computing resources as efficiently as possible. | 👈 Using bin-packing algorithms | |
| Portability | - Containers & container orchestration tools can be run everywhere. | e.g. on-prem, cloud-providers |
| - No | 👈 Most container tools are open-source, e.g. Docker/Podman, Kubernetes | |
| Local development | - You can run containers15 & containers orchestration tools16 in your own local dev environment. | ~ Your entire tech stack, e.g. Kubernetes + Docker + Multiple services |
| Functionality | - Container orchestration tools solves more orchestration problems out-of-the-box. | In additional to deployment, updates, auto-scaling/auto-healing, Kubernetes also has built-in solutions for configuration/secrets managements, service discovery, disk management… |
Containers and container orchestration tools
There are many tools for container and container orchestration:
- For container: Docker, Moby, CRI-O, Podman, runc, buildkit
- For container orchestration: Kubernetes, Docker Swarm, Amazon ECS, Nomad (by HashiCorp), Marathon/Mesos (by Apache), OpenShift (by RedHat).
note
Docker & Kubernetes are the most popular.
Their name are nearly synonymous with container & container orchestration.
tip
The examples in this chapter will use
- the most popular container & container orchestration tools - Docker, Kubernetes
- with the most popular cloud provider - AWS.
A Crash Course on Docker
As from Chapter 2 - Server Templating Tools - Container,
- A container image is like a self-contained “snapshots” of the operating system (OS), the software, the files, and all other relevant details.
- (A container emulates the “user space” of an OS).
Install Docker
If you don’t have Docker installed already, follow the instructions on the Docker website to install Docker Desktop for your operating system.
tip
If you’re using Linux, you can install Docker Engine, which doesn’t run a VM as Docker Desktop17.
Basic Docker commands
| Docker command | Synopsis | Purpose | Example |
|---|---|---|---|
run | docker run <IMAGE> [COMMAND] | Create & run a new container from an image | docker run -it ubuntu:24.04 bash18 |
ps | docker ps | List containers | docker ps -a |
start | docker start <CONTAINER> | Start stopped containers | docker start -ia |
build | docker build <PATH> | Build an image from a Dockerfile (at PATH) | |
docker run
For example, let’s run a container from ubuntu:24.04 image:
-
Run the container
docker run -it ubuntu:24.04 bashUnable to find image 'ubuntu:24.04' locally 24.04: Pulling from library/ubuntu Digest: sha256:3f85b7caad41a95462cf5b787d8a04604c Status: Downloaded newer image for ubuntu:24.04 root@d96ad3779966:/# -
Now you’re in Ubuntu: let’s try your new Ubuntu
-
Check the version of Ubuntu
root@d96ad3779966:/# cat /etc/os-release PRETTY_NAME="Ubuntu 24.04 LTS" NAME="Ubuntu" VERSION_ID="24.04" (...)[!NOTE] Isn’t it magic? What just happened?
- First, Docker searches your local filesystem for the
ubuntu:24.04image. - If you don’t have that image downloaded already, Docker downloads it automatically from Docker Hub, which is a Docker Registry that contains shared Docker images.
- The
ubuntu:24.04image happens to be a public Docker image — an official one maintained by the Docker team — so you’re able to download it without any authentication.
- The
- Once the image is downloaded, Docker runs the image, executing the
bashcommand, which starts an interactive Bash prompt, where you can type.
- First, Docker searches your local filesystem for the
-
List the files
root@d96ad3779966:/# ls -al total 56 drwxr-xr-x 1 root root 4096 Feb 22 14:22 . drwxr-xr-x 1 root root 4096 Feb 22 14:22 .. lrwxrwxrwx 1 root root 7 Jan 13 16:59 bin -> usr/bin drwxr-xr-x 2 root root 4096 Apr 15 2020 boot drwxr-xr-x 5 root root 360 Feb 22 14:22 dev drwxr-xr-x 1 root root 4096 Feb 22 14:22 etc drwxr-xr-x 2 root root 4096 Apr 15 2020 home lrwxrwxrwx 1 root root 7 Jan 13 16:59 lib -> usr/lib drwxr-xr-x 2 root root 4096 Jan 13 16:59 media (...)- That’s not your filesystem.
[!NOTE] Docker images run in containers that are isolated at the user-space level:
- When you’re in a container, you can only see the filesystem, memory, networking, etc., in that container.
- Any data in other containers, or on the underlying host operating system, is not accessible to you,
- Any data in your container is not visible to those other containers or the underlying host operating system.
[!NOTE] In other words, the image format is self-contained, which means Docker images run the same way anywhere. 👈 This is one of the things that makes Docker useful for running applications.
-
Write some text to a file
root@d96ad3779966:/# echo "Hello, World!" > test.txt
-
-
Exit the container by hitting
Ctrl+D19[!TIP] You will be back in your original command prompt on your underlying host OS
If you look for the
test.txtfile you’ve just wrote, you’ll see it doesn’t exist. -
Try running the same Docker image again:
docker run -it ubuntu:24.04 bashroot@3e0081565a5d:/#This time,
- Since the
ubuntu:24.04image is already downloaded, the container starts almost instantly.
[!NOTE] Unlike virtual machines, containers are lightweight, boot up quickly, and incur little CPU or memory overhead.
👉 This is another reason Docker is useful for running applications.
- The command prompt looks different. 👈 You’re now in a totally new container
- Any data you wrote in the previous container is no longer accessible to you (👈 Containers are isolated from each other)
- Since the
-
Exit the second container by hitting
Ctrl+D.
docker ps
You’ve just run 2 containers, let’s see them:
$ docker ps -a
CONTAINER ID IMAGE COMMAND CREATED STATUS
3e0081565a5d ubuntu:24.04 "bash" 5 min ago Exited (0) 16 sec ago
d96ad3779966 ubuntu:24.04 "bash" 14 min ago Exited (0) 5 min ago
note
Use docker ps -a to show all the containers on your system, including the stopped ones.
docker start
You can start a stopped container again using docker start <CONTAINER_ID>.
-
Start the first container that you wrote to the text file
$ docker start -ia d96ad3779966 root@d96ad3779966:/#[!NOTE] Using
-iaflags withdocker startto have an interactive shell and allow you type in. (It has same effect as-itofdocker run) -
Confirm that it’s the first container:
root@d96ad3779966:/# cat test.txt Hello, World!
Example: Create a Docker Image for a Node.js app
In this example, you will use a container to run the Node.js sample-app:
-
The source code of this example is in
examples/ch3/dockermkdir -p examples/ch3/docker -
Copy the
sample-appsource code:cp example/ch3/ansible/roles/sample-app/files/app.js example/ch3/docker -
Create a file named
Dockerfile[!NOTE] The
Dockerfileis a template that defines how to build a Docker image.# examples/ch3/docker/Dockerfile FROM node:21.7 # 1️⃣ WORKDIR /home/node/app # 2️⃣ COPY app.js . # 3️⃣ EXPOSE 8080 # 4️⃣ USER node # 5️⃣ CMD ["node", "app.js"] # 6️⃣[!WARNING] Dockerfile doesn’t support a comment that is in the middle of a line.
-
1️⃣
FROM: Create a new build stage from a base image: Use the official Node.js Docker image from Docker Hub as the base.[!NOTE] With Docker, it’s easy to share container image.
- You don’t need to install Node.js yourself.
- There are lots of official images, which are maintained by the official teams, community, e.g. The Node.js Docker Team
-
2️⃣
WORKDIR: Change working directory: Set the working directory for the rest of the image build. -
3️⃣
COPY: Copy files and directories: Copyapp.jsinto the Docker image. -
4️⃣
EXPOSE: Describe which ports your application is listening on: When someone uses this Docker image, they know which ports they wish to expose. -
5️⃣
USER: Set user and group ID: (Instead of therootuser), use thenodeuser - created by the Node.js Docker image - to run the app. -
6️⃣
CMD: Specify default commands: The default command to be executed by container orchestration tool (Docker, Kubernetes).[!IMPORTANT] With containers, you typically do not need to use a process supervisor.
- The container orchestration tools take care of
- process supervisor
- resource usage (CPU, memory…)
- …
[!NOTE] Most of container orchestration tools expect your containers to
- run apps in the “foreground” - blocking until they exit
- log directly to
stdout,stderr
- The container orchestration tools take care of
-
-
Build a Docker image for your sample app from a
Dockerfiledocker build -t sample-app:v1 .-
Use
-t(--tag) flag to specify the Docker image name & tag in the formatname:tagFor this example:
- name
sample-app20 - tag
v1
Later on, if you make change to the sample app, you’ll build a new Docker image with:
- the same name
sample-app21 - a different tag e.g.
v2,v3
- name
-
The dot (
.) at the end tellsdocker buildto run the build in the current directory (which should be the folder that contains yourDockerfile).
-
-
When the build finishes, you can use
docker runcommand to run your new imagedocker run --init sample-app:v1Listening on port 8080- Use
--initflag to ensure Node.js app will exit correctly if you hitCtrl+C.
[!NOTE] Node.js doesn’t handle kernel signals properly, by using
--initflag, you wrap your Node.js process with a lightweight init system that properly handles kernel signals, e.g.SIGINT(CTRL-C)For more information, see Docker and Node.js best practices
- Use
-
Your app is
"listening on port 8080", let’s try your app$ curl localhost:8080curl: (7) Failed to connect to localhost port 8080: Connection refused-
You still can’t connect to your app. Why?
- Your app is up and running, but it’s running inside the container, which is isolated from your host OS - not only for the filesystem but also for networking…
- Your app is listening on port 8080 inside the container., which isn’t accessible from the host OS.
- Your app is up and running, but it’s running inside the container, which is isolated from your host OS - not only for the filesystem but also for networking…
-
If you want to access your app, which is running inside the container, from the host OS:
- You need to expose the port, which is listening on (by your app) inside the container, to the outside of the container (to your host OS).
-
-
Publish a container’s port [to the host] (with
docker run --publish)docker run --publish 8081:8080 --init sample-app:v1Server listening on port 8080-
The port mapping of a container is available via:
-
docker psoutput’sPORTScolumndocker psCONTAINER ID IMAGE COMMAND CREATED STATUS PORTS NAMES ecf2fb27c512 sample-app:v1 "docker-entrypoint.s…" 19 seconds ago Up 18 seconds 0.0.0.0:8081->8080/tcp, :::8081->8080/tcp elegant_hofstadter -
docker portdocker port8080/tcp -> 0.0.0.0:8081 8080/tcp -> [::]:8081
-
-
note
There are a different in the order of the container port & the host port:
- When you run a container (
docker run) or list containers (docker ps), the perspective is from the host (outside the container):--publish [hostPort:]containerPort0.0.0.0:hostPort->containerPort/tcp
- When you list the port mappings of a container (
docker port), the perspective is from inside the container:containerPort/tcp -> 0.0.0.0:hostPort
-
Now you can retry your app:
curl localhost:8081Hello, World!
warning
Using docker run is fine for local testing & learning,
- but not for Dockerized apps in production (which typically require a container orchestration tool, e.g. Kubernetes).
note
Don’t forget to clean up stopped containers:
- Every time you run
docker runand exit, you leave behind stopped container, which take up disk space.
You can clean up stopped containers by:
- Manually run
docker rm <CONTAINER_ID>. - Having
docker runautomatically do it for you with--rmflag.
A Crash Course on Kubernetes
What is Kubernetes?
Kubernetes (K8s) : a container orchestration tool, that solves almost all orchestration problems for running containers.
Kubernetes consists of 2 main pieces: control plane & worker nodes:
-
Control plane 🧠:
- Responsible for managing the Kubernetes cluster:
- Storing the states
- Monitoring containers
- Coordinating actions across the cluster
- Runs the API server, which provides an API - to control the cluster - that can be accessed from:
- CLI tools, e.g.
kubectl - Web UIs, e.g. Kubernetes dashboard, Headlamp
- IaC tools, e.g. OpenTofu/Terraform
- CLI tools, e.g.
- Responsible for managing the Kubernetes cluster:
-
Worker nodes 👐:
- The servers that are used to actually run your containers.
- Entirely managed by the control plane.
Why Kubernetes?
In additional to solving almost all the orchestration problems for running containers:
- Kubernetes is open source
- Kubernetes can be run anywhere: in the cloud, in your data-center, on your PC.
Run Kubernetes on personal computer
-
If you’re using Docker Desktop, you’re just a few clicks away from running a Kubernetes cluster locally:
- Docker Desktop’s Dashboard / Settings / Kubernetes / Enable Kubernetes / Apply & restart
-
After having the running Kubernetes cluster, you need to install
kubectl- the CLI tool for managing the cluster:- Following the instruction on Kubernetes website to install
kubectl.
- Following the instruction on Kubernetes website to install
-
Configure the
kubeconfig(Kubernetes configuration) to access the Kubernetes cluster.[!TIP] If you’re running the Kubernetes cluster via Docker Desktop, the Docker Desktop has already update the config for you.
-
Tell
kubectlto use the context that Docker Desktop addedkubectl config use-context docker-desktopSwitched to context "docker-desktop".[!NOTE] The
kubeconfigcan consists of multiple contexts, each context is corresponding to the configuration for a Kubernetes cluster. e.g.- The context added by Docker Desktop is named
docker-desktop.
[!NOTE] By default,
kubeconfigis at$HOME/.kube/config. - The context added by Docker Desktop is named
-
-
Check if your Kubernetes is working - e.g. by using
get nodescommands:kubectl get nodesNAME STATUS ROLES AGE VERSION docker-desktop Ready control-plane 67m v1.29.2The Kubernetes cluster created by Docker Desktop has only 1 node, which:
- runs the control plane
- also acts as a worker node
How to use Kubernetes?
-
To deploy something in Kubernetes:
-
You
- declare your intent
- by creating Kubernetes objects
- record your intent
- by writing these Kubernetes object to the cluster (via api server)
- declare your intent
-
The Kubernetes cluster runs a reconciliation loop, which continuously
- checks the objects you’ve stored in the it
- works to make the state of the cluster match your intent.
-
-
There are many types of Kubernetes objects available:
- To deploy an application, e.g. the sample app, you use Kubernetes Deployment - a declarative way to manage application in Kubernetes:
- Which Docker images to run
- How many copies of them to run (replicas)
- Many settings for those image, e.g. CPU, memory, port numbers, environment variables…
- To deploy an application, e.g. the sample app, you use Kubernetes Deployment - a declarative way to manage application in Kubernetes:
-
A typical workflow when using Kubernetes:
- Create YAML file to define Kubernetes objects
- Use
kubectl applyto submit those objects to the cluster
note
Kubernetes: Object & Resource & Configuration & Manifest TODO
Example: Deploy a Dockerized App with Kubernetes
-
Create a folder to store the YAML files for the dockerized app
cd examples mkdir -p ch3/kubernetes -
Create the Kubernetes Deployment object
# example/ch3/kubernetes/sample-app-deployment.yml apiVersion: apps/v1 # 0️⃣ kind: Deployment # 1️⃣ metadata: # 2️⃣ name: sample-app-deployment spec: replicas: 3 # 3️⃣ template: # 4️⃣ metadata: # 5️⃣ labels: app: sample-app-pods spec: containers: # 6️⃣ - name: sample-app # 7️⃣ image: sample-app:v1 # 8️⃣ ports: - containerPort: 8080 # 9️⃣ env: # 10 - name: NODE_ENV value: production selector: # 11 matchLabels: app: sample-app-pods-
1️⃣
kind: Specify the “kind” of this Kubernetes object. -
2️⃣
metadata: Specify the metadata of this Kubernetes object, that can be used to identify & target it in API calls.[!NOTE] Kubernetes makes heavy use of metadata (& its labels) to keep the system flexible & loosely coupled.
-
3️⃣: This Deployment will run 3 replicas.
-
4️⃣: The pod template - the blueprint - that defines what this Deployment will deploy & manage.
With pod template, you specify:
- The containers to run
- The ports to use
- The environment variables to set
- …
[!TIP] The pod template is similar to the launch template of AWS Auto Scaling Group
[!NOTE] Instead of deploying one container at a time, in Kubernetes you deploy pods, groups of containers that are meant to be deployed together. e.g.
- You can deploy a pod with:
- a container to run a web app, e.g. the
sample-app - another container that gathers metrics on the web app & send them to a central service, e.g. Datadog.
- a container to run a web app, e.g. the
-
5️⃣: The pods (deployed & managed by this pod template) have its own metadata (so Kubernetes can also identify & target them).
-
6️⃣: The containers run inside the pod.
-
7️⃣: The pod in this example run a single container named
sample-app. -
8️⃣: The Docker image to run for the
sample-appcontainer. -
9️⃣: Tells Kubernetes that the Docker image listens for request on port
8080.[!NOTE] Isn’t this port already specified in the Dockerfile?
- The port specified with
EXPOSEin the Dockerfile acts a document from the person who builds the image. - The person who runs the containers, using that information to run the containers, .e.g.
docker run --publish hostPort:containerPort- Kubernetes’ Pod
spec.containers.[].port.containerPort
- The port specified with
-
10
env: Set the environment for the container. -
11
selector: Tells Kubernetes Deployment what to target (which pod to deploy & manage)[!NOTE] Why doesn’t Deployment just assume that the pod defined within that Deployment is the one you want to target.
Because Kubernetes is trying to be flexible & decoupled:
- The Deployment & the pod template can be defined completely separately.
- But you always need to specify a
selectorto tell Kubernetes what to target.
-
-
Use
kubectl applyto apply the Deployment configurationkubectl apply -f sample-app-deployment.yml -
Interact with the deployments
-
Display the deployment
kubectl get deployments[!TIP] The field
metadata.name’s value is used as the name of the deployment. -
Show details about the deployment
kubectl describe deployments <NAME> -
Display the pods
kubectl get pods -
Show details about the pods
kubectl describe pods <NAME> -
Print the logs for a container in a pod
kubectl logs <POD_NAME>
-
Example: Deploy a Load Balancer with Kubernetes
note
Kubernetes has a built-in support for load-balancing via Service object.
- The Service object is a way to expose an app running in Kubernetes as a service you can tale over the network.
-
Create the Kubernetes Service object
# examples/ch3/kubernetes/sample-app-service.yml apiVersion: v1 kind: Service # 1 metadata: # 2 name: sample-app-loadbalancer spec: type: LoadBalancer # 3 selector: app: sample-app-pods # 4 ports: - protocol: TCP port: 80 # 5 targetPort: 8080 # 6- 1: Specify that this object is a Kubernetes Service
- 2: Specify the name of the Service (via the metadata).
[!NOTE] Every Kubernetes object MUST have the metadata with the
namefield- 3: Configure the Service to be a load balancer.
[!NOTE] The actual type of load balancer you get will be different, depending on:
- What sort of Kubernetes cluster you’re running
- How you configure that cluster
e.g. If you’re run this code
- In AWS, you’ll get an AWS ELB
- In GCP, you’ll get an Cloud Load Balancer
- Locally, you’ll get a simple load balancer (built into the Kubernetes distribution in Docker Desktop)
- 4: Distribute traffic across the pods with the label
app: sample-app-pods(the pods you defined in previous Deployment) - 5: The Service will receive requests on port 80 (the default HTTP port).
- 6: The Service will forward requests to port 8080 of the pods.
-
Use
kubectl applyto apply the Service configurationkubectl apply -f sample-app-service.yml -
Interact with the services
- Display the service
kubectl get services- Show details of the service
kubectl describe services <NAME>
Example: Roll Out Updates with Kubernetes
Just as Ansible, ASG, Kubernetes has built support for rolling updates.
-
Add
strategysection tosample-app-deployment.yaml# example/ch3/kubernetes/sample-app-deployment.yml # ... spec: # ... strategy: type: RollingUpdate rollingUpdate: maxSurge: 3 # 1 maxUnavailable: 0 # 2- 1:
maxSurge: The Deployment can deploy up to 3 extra pods during deployment. - 2:
maxUnavailable: The Deployment only undeploy an old pod after a new one is deployed.
- 1:
-
Apply the updated Deployment
kubectl apply -f sample-app-deployment.yml -
Make a change to the
sample-app(theapp.jsfile)sed -i 's/Hello, World!/Fundamentals of DevOps!/g' examples/ch3/docker/app.js -
To make a change to a containerized app, you need to build the new image, then deploy that new image:
-
Build a new image (tag
sample-app:v2) with the new changesdocker build -t sample-app:v2 -
Update the Deployment to use
sample-app:v2image# examples/ch3/kubernetes/sample-app-deployment.yml # (...) spec: # (...) spec: containers: - name: sample-app image: sample-app:v2 # Change to the new tag image -
Run
kubectl applyto deploy the change:kubectl apply -f sample-app-deployment.yml -
Display the pods (to see the rolling updates)
kubectl get pods
-
Get your hands dirty with Kubernetes and YAML template tools
note
Using YAML (and kubectl) is a great way to learn Kubernetes, and it is used in the examples in this chapter to avoid introducing extra tools,
- but raw YAML is not a great choice for production usage.
- In particular, YAML doesn’t have support for variables, templating, for-loops, conditionals, and other programming language features that allow for code reuse.
When using Kubernetes in production, instead of raw YAML, try out one of the following tools that can solve these gaps for you:
- Helm
- OpenTofu with the Kubernetes provider
- Pulumi with the Kubernetes provider
- Kustomize
- kapp
A Crash Course on AWS Elastic Kubernetes Service (EKS)
Why use a managed Kubernetes service
-
Running Kubernetes is great for learning & testing, but not for production.
-
For production, you’ll need to run a Kubernetes cluster on servers in a data center:
- Kubernetes is a complicated system
- Setting up & maintaining a Kubernetes cluster is a significant undertaking.
-
Most cloud providers have managed Kubernetes services that makes setting up & maintaining a Kubernetes cluster a lot easier.
What is EKS
EKS is the manage Kubernetes service from AWS, which can
- deploy & manage
- the control plane
- worker nodes
Example: Deploy a Kubernetes Cluster in AWS Using EKS
caution
Watch out for snakes: EKS is not part of the AWS free tier!
- While most of the examples in this book are part of the AWS free tier, Amazon EKS is not: as of June 2024, the pricing is $0.10 per hour for the control plane.
- So please be aware that running the examples in this section will cost you a little bit of money.
The eks-cluster OpenTofu module
The sample code repo contains an OpenTofu module named eks-cluster (in ch3/tofu/modules/eks-cluster folder) that can be used to deploy a simple EKS cluster, which includes:
-
A fully-managed control plane
-
Full-manged worker nodes
[!NOTE] EKS supports several types of worker nodes:
- EKS managed node groups
- Self managed nodes
- AWS Fargate
This example uses an EKS manage node group, which deploys worker nodes in an ASG (VM orchestration).
-
IAM roles with the minimal permissions required by the control plane & worker nodes
[!NOTE] An IAM role
- is similar to an IAM user: it’s an entity in AWS that can be granted IAM permissions.
- is not associated with any person, and do not have permanent credentials (password, access keys)
- but can be assumed by other IAM entities, e.g. EKS control plane
IAM role is a mechhanism for granting services permissions to make certian API calls in AWS account.
-
(Everything will be deployed into the Default VPC).
Using the OpenTofu module to deploy an Kubernetes cluster using EKS
-
Create the
eks-sampleOpenTofu module foldercd examples mkdir -p examples/ch3/tofu/live/eks-sample -
Configure the
eks-samplemodule to use theeks-clustermodule# examples/ch3/tofu/live/eks-sample/main.tf provider "aws" { region = "us-east-2" } module "cluster" { source = "github.com/brikis98/devops-book//ch3/tofu/modules/eks-cluster" name = "eks-sample" eks_version = "1.29" instance_type = "t2.micro" min_worker_nodes = 1 max_worker_nodes = 10 desired_worker_nodes = 3 } -
(Optional) Authenicate to AWS
-
Init the OpenTofu module
tofu init -
Apply OpenTofu configuration to create infrastructure (the
eks-cluster’s resources)tofu apply- The cluster deployment takes 3-5 minutes
-
Interact with your Kubernetes cluster
-
Configure Kubenetes configuration to authenticate to the cluster
# aws eks update-kubeconfig --region <REGION> --name <CLUSTER_NAME> aws eks update-kubeconfig --region us-east-2 --name eks-tofu -
Display the nodes
kubectl get nodes -
Example: Push a Docker Image to AWS Elastic Container Registry (ECR)
Container registry and ECR
If you want to deploy your sample-app to the EKS cluster, the Docker image for the sample-app need to be pushed to a container registry that EKS can read from.
There are lots of container registries:
- Docker Hub
- AWS Elastic Container Registry (ECR)
- Azure Container Registry
- Google Artifact Registry
- JFrog Docker Registry
- GitHub Container Registry.
You’ve used AWS for the examples, so ECR is the easiest option.
-
For each Docker image you want to store in ECE, you have to create an ECR repository (ECR repo).
-
The book’s sample code repo includes a module called
ecr-repo(inch3/tofu/modules/ecr-repofolder) that you can use to create an ECR repo.
Using ecr-repo OpenTofu module to create an ECR repo
-
Create the
ecr-sampleOpenTofu module foldercd examples mkdir -p examples/ch3/tofu/live/ecr-sample -
Configure the
ecr-samplemodule to use theeks-repomodule-
main.tf# examples/ch3/tofu/live/ecr-sample/main.tf provider "aws" { region = "us-east-2" } module "repo" { source = "github.com/brikis98/devops-book//ch3/tofu/modules/ecr-repo" name = "sample-app" } -
output.tf# examples/ch3/tofu/live/ecr-sample/outputs.tf output "registry_url" { value = module.repo.registry_url description = "URL of the ECR repo" }
-
-
Init the OpenTofu module
tofu init -
Apply OpenTofu configuration to create infrastructure (the
ecr-repo’s resources)tofu apply
note
By default, docker build command builds the Docker image for whatever CPU architecture that it’s running on.
e.g.
- On a Macbook with ARM CPU (M1, M2…), the Docker image is built for
arm64architecture. - On a PC running Linux, it’s for
amd64architecture.
note
You need to ensure that you build your Docker images for whatever architecture(s) you plan to deploy on.
- Docker now ships with the
buildxcommand which makes it easy to build Docker images for multiple architecture.
-
(The very first time you use buildx) Create a builder named
multi-platform-builderfor your target architectures:docker buildx create \ --use \ # Set the current builder instance --platform=linux/amd64,linux/arm64 \ # Fixed platforms for current node --name=multiple-platform-build # Builder instance name -
Use the
multiple-platform-buildbuilder to build Docker imagesample-app:v3for multiple platformsdocker buildx build \ --platform=linux/amd64,linux/arm64 \ -t sample-app:v3 \ .
-
Re-tag the image using the registry URL of the ECR repo (
registry_url)docker tag \ sample-app:v3 \ <YOUR_ECR_REPO_URL>:v3 -
Authenticate
dockerto the ECR repo:aws ecr get-login-password --region us-east-2 | \ docker login \ --username AWS \ --password-stdin \ <YOUR_ECR_REPO_URL> -
Push Docker image to your ECR repo
docker push <YOUR_ECR_REPO_URL>:v3[!TIP] The first time you push, it may take longer than a minute to update the image.
Subsequent pushes - due to Docker’s layer caching - will be faster.
Example: Deploy a Dockerized App into an EKS Cluster (With Load Balancer)
After having the sample-app Docker image on your ECR repo, you’re ready to deploy the sample-app to EKS cluster:
-
Update the Deployment to use the Docker image from your ECR repo
# examples/ch3/kubernetes/sample-app-deployment.yml # (...) spec: # (...) spec: containers: - name: sample-app image: <YOUR_ECR_REPO_URL>:v3 -
Apply both the Kubernetes object into your EKS cluster:
kubectl apply -f sample-app-deployment.yml kubectl apply -f sample-app-service.yml -
Interact with Kubernetes cluster on EKS (and your app)
-
Display the pods
kubectl get pods -
Display the service
kubectl get services- The
sample-app-loadbalancerhas anEXTERNAL-IPof the domain name of an AWS ELB.
[!TIP] The
EXTERNAL-IPcolumn is showing the domain name, isn’t it weird? - The
-
Get your hands dirty with Kubernetes and container orchestration
-
By default, if you deploy a Kubernetes Service of type LoadBalancer into EKS, EKS will create a Classic Load Balancer, which is an older type of load balancer that is not generally recommended anymore.
- In most cases, you actually want an Application Load Balancer (ALB), as you saw in the VM orchestration section.
- To deploy an ALB, you need to make a few changes, as explained in the AWS documentation.
-
Try terminating one of the worker node instances using the AWS Console.
- How does the ELB handle it?
- How does EKS respond?
- Do you need to do anything to restore the instance or your containers?
-
Try using
kubectl execto get a shell (like an SSH session) into a running container.
Serverless Orchestration
What is Serverless?
serverless : focus entirely on your app : - without having to think about servers at all : - (the servers are fully managed by someone not you)
How Serverless works?
The origiral model referred to as “serverless” was Functions as a Service (FaaS), which works as follows:
-
Create a deployment package, which contains just the source code to run a function (instead of the whole app).
-
Upload that deployment package to your serverless provider, which is typically also a cloud provider, e.g. AWS, GCP, Azure.
[!NOTE] You can use tools like Knative to add support for serverless in your on-prem Kubernetes cluster.
-
Configure the serverless provider to trigger your function in response to certain events, e.g. an HTTP request, a file upload, a new message in a queue.
-
When the trigger goes off, the serverless provider:
- Execute your function
- Passing it information about the event as an input
- (In some case), taking the data the function returns as an output; and passing it on elsewhere (e.g. sending it as an HTTP response).
-
When you need to deploy an update, repeat step 1 and 2: create a new deployment package; upload that deployment package to the cloud provider.
Serverless pros and cons
- Pros:
| Pros | Description | How? | Example |
|---|---|---|---|
| You focus on your code, not on the hardware. | You don’t have to think about the servers at all. | <- The serverless providers manage the servers, auto-scaling/healing to handle any load. | Whether your triggers goes off 1000 times/s or 1 time/year |
| You focus on your code, not on the OS. | - The deployment packages don’t need to include anything about the OS or other toolings. | <- Only code of your app. | |
| - You don’t have to maintain the OS. | <- Handle running, securing & updating the OS. | ||
| You get even more speed. | Serverless deployment are even faster than containers. | <- Deployment packages are tiny; no servers to spin up. | < 1 minute |
| You get even more efficiency. | Serverless can use computing resources more efficient than containers. | <- Short-running functions can move around the cluster quickly to any server that has spare resources. | Serverless is incredibly cheap. |
| Pricing scales perfectly with usage. | Serverless is pay per invocation -> Pricing scales linear with usage; can even scale to zero. | <- Servers, VMs, containers are pay per hour to rent, even if these hardware is sitting completely idle. |
- Cons:
| Cons | Description | Example |
|---|---|---|
| Size limits | There are usually size limits on: deployment package, event payload, response payload. | |
| Time limits | There is usually a maximum amount of time that your functions can run for. | For AWS Lambda: 15 minutes |
| Disk limits | There is only a small ephemeral storage available locally to your functions. | |
| Performance | Little control over hardware, which makes performance tuning difficult. | |
| Debugging | You can’t connect to the servers directly - e.g. via SSH, which makes debugging difficult. | |
| Cold start | The first run (after a period of idleness) can take up several seconds. | |
| Long-running connections | Database connection pools, WebSockets… are more complicated with FaaS. | For AWS Lambda, to have a database connection pool, you need another service (RDS Proxy) |
Type of serverless
Nowaday, serverless has become so popular, the term “serverless” is being applied to many models:
- Serverless functions - FaaS (the original model of serverless), e.g. AWS Lambda (2015), GCP Cloud Functions, Azure Serverless
- “Serverless web-app”, e.g. Google App Engine (GAE - 2008)
- Serverless containers, e.g. AWS Fargate.
- Serverless database, e.g. Amazon Aurora Serverless.
important
Key takeaway #4 Serverless orchestration is an immutable infrastructure approach where you deploy and manage functions without having to think about servers at all.
Example: Deploy a Serverless Function with AWS Lambda
The lambda OpenTofu module
The book sample code repo includes an OpenTofu module named lambda (in ch3/tofu/modules/lambda) that do the following:
- Zip up a folder - you specify - into a deployment package.
- Upload the deployment package as an AWS Lambda function.
- Configure various settings for the Lambda function, e.g. memory, CPU, environment variables.
Using the lambda OpenTofu module to deploy a AWS Lambda function
-
Create folder
live/lambda-sampleto use as a root modulecd examples mkdir -p ch3/tofu/live/lambda-sample cd ch3/tofu/live/lambda-sample -
Configure the
lambdamodule# examples/ch3/tofu/live/lambda-sample/main.tf provider "aws" { region = "us-east-2" } module "function" { name = "lambda-sample" # 1 src_dir = "${path.module}/src" # 2 runtime = "nodejs20.x" # 3 handler = "index.handler" # 4 memory_size = 128 # 5 timeout = 5 # 6 environment_variables = { # 7 NODE_ENV = "production" } # ... (other params omitted) ... }-
1
name: Base name of all resources of thelambdamodule -
2
src_dir: The directory which contains the code for the Lambda function. -
3
runtime: The runtime used this Lambda function.[!NOTE] AWS Lambda supports
- several different runtimes:
Node.js,Python,Go,Java,.NET. - create custom runtimes for any languague
- several different runtimes:
-
4
handler: The handler to call your function, aka entrypoint.[!NOTE] The handler format is
<FILE>.<FUNCTION>:<FILE>: The file in your deployment package.<FUNCTION>: The name of the function to call in that file.
Lambda will pass the event information to this function.
For this example, Lambda will call the
hanlderfunction theindex.jsfile. -
5
memory_size: The amount of memory to give the Lambda function.[!NOTE] Adding more memory also proportionally increases:
- the amount of CPU available
- the cost to run the function.
-
6
timeout: The maximum amount of time the Lambda function has to run.[!NOTE] The timeout limit of Lambda is 15 minutes.
-
7
environment_variables: The environment variables to set for the function.
-
-
Add the handler code at
lambda-sample/src/index.js# examples/ch3/tofu/live/lambda-sample/src/index.js exports.handler = (event, context, callback) => { callback(null, {statusCode: 200, body: "Hello, World!"}); }; -
Init & apply the OpenTofu module
tofu init tofu apply -
Verify that the Lambda function has been deployed by:
- Open the Lambda console
- Click on the function called
sample-app-lambda - You should see your Lambda function & handler code.
- Currently, the function has no triggers:
- You can manually trigger it by clicking the
Testbutton.
- You can manually trigger it by clicking the
note
In this example, you deploy a Lambda function without a trigger, which isn’t very useful.
- Because the function cannot be triggered by anything or anyone except you.
A Crash course on AWS Lambda triggers
You can configure a variety of events to trigger your Lambda function.
You can have AWS automatically run your Lambda function:
-
each time a file is uploaded to Amazon’s Simple Storage Service (S3),
-
each time a new message is written to a queue in Amazon’s Simple Queue Service (SQS),
-
each time you get a new email in Amazon’s Simple Email Service (SES)
[!NOTE] AWS Lambda is a great choice of building event-driven systems and background processing jobs.
-
each time you receive an HTTP request in API Gateway
[!NOTE] API Gateway is a managed service you can use to expose an entrypoint for your apps, managing routing, authentication, throttling, and so on. You can use API Gateway and Lambda to create serverless web apps.
Example: Deploy an API Gateway in Front of AWS Lambda
The api-gateway OpenTofu module
The book’s sample code repo includes a module called api-gateway in the ch3/tofu/modules/api-gateway folder that can deploy an HTTP API Gateway, a version of API Gateway designed for simple HTTP APIs, that knows how to trigger a Lambda function.
Using api-gateway OpenTofu module to deploy an API Gateway in Front of AWS Lambda
-
Configure the
api-gatewaymodule to trigger the Lambda function# examples/ch3/tofu/live/lambda-sample/main.tf module "function" { source = "github.com/brikis98/devops-book//ch3/tofu/modules/lambda" # ... (other params omitted) ... } module "gateway" { source = "github.com/brikis98/devops-book//ch3/tofu/modules/api-gateway" name = "lambda-sample" # 1 function_arn = module.function.function_arn # 2 api_gateway_routes = ["GET /"] # 3 }-
1
name: The base name to use for theapi-gateway’s resources. -
2
function_arn: TheARNof the Lambda function the API Gateway should tirgger when it gets HTTP requests.In this example,
function_arnis set to the output from thelambdamodule. -
3
api_gateway_routes: The routes that should trigger the Lambda functionIn this example, the API Gateway has only 1 route: HTTP GET to
/path.
-
-
Add an output variable
# examples/ch3/tofu/live/lambda-sample/outputs.tf output "api_endpoint" { value = module.gateway.api_endpoint } -
Init & apply OpenTofu configuration
tofu init tofu apply -
Your API Gateway is now routing requests to your Lambda function.
- As load goes up & down,
- AWS will automatically scale your Lambda functions up & down.
- API Gateway will automatically distribute traffic across these functions/
- When there’no load:
- AWS will automatically scale to zero. So it won’t cost you a cent.
- As load goes up & down,
Example: Roll Out Updates with AWS Lambda
note
By default, AWS Lambda natively supports a nearly instantaneous deployment model:
- If you upload a new deployment package, all new requests will start executing the code in that deployment package almost immediately.
-
Update the Lambda function response text
// examples/ch3/tofu/live/lambda-sample/src/index.js exports.handler = (event, context, callback) => { callback(null, { statusCode: 200, body: "Fundamentals of DevOps!" }); }; -
Rerun
applyto deploy the changestofu apply
tip
Under the hood, AWS Lambda does an instanteneous switchover from the old to the new version (~ blue-green deployment).
Get your hands dirty with serverless web-apps and Serverless Orchestration
note
To avoid introducing too many new tools, this chapter uses OpenTofu to deploy Lambda functions
- which works great for functions used for background jobs and event processing,
- but for serverless web apps where you use a mix of Lambda functions and API Gateway, the OpenTofu code can get very verbose (especially the API Gateway parts).
- Moreover, if you’re using OpenTofu to manage a serverless webapp, you have no easy way to run or test that webapp (especially the API Gateway endpoints) locally.
If you’re going to be building serverless web apps for production use cases, try out one of the following tools instead, as they are purpose-built for serverless web apps, keep the code more concise, and give you ways to test locally:
- Serverless Framework
- SAM
Comparing Orchestration Options
In terms of the core orchestration problems
| Problem | Server orchestration | VM orchestration | Container orchestration | Serverless orchestration |
|---|---|---|---|---|
| Deployment | ⭐ | ⭐⭐ | ⭐⭐⭐ | ⭐⭐⭐ |
| Deployments strategies | ⭐⭐ | ⭐⭐ | ⭐⭐⭐ | ⭐⭐⭐ |
| Scheduling | ❌ | ⭐⭐ | ⭐⭐⭐ | ⭐⭐⭐ |
| Rollback | ❌ | ⭐⭐⭐ | ⭐⭐⭐ | ⭐⭐⭐ |
| Auto scaling | ❌ | ⭐⭐ | ⭐⭐ | ⭐⭐⭐ |
| Auto healing | ❌ | ⭐⭐ | ⭐⭐ | ⭐⭐⭐ |
| Configuration | ⭐⭐⭐ | ⭐⭐ | ⭐⭐⭐ | ⭐⭐⭐ |
| Secrets management | ⭐⭐ | ⭐ | ⭐⭐⭐ | ⭐⭐⭐ |
| Load balancing | ⭐ | ⭐⭐⭐ | ⭐⭐⭐ | ⭐⭐⭐ |
| Service communication | ⭐ | ⭐ | ⭐⭐⭐ | ⭐⭐⭐ |
| Disk management | ⭐ | ⭐⭐ | ⭐⭐⭐ | ❌ |
| Sign | Meaning |
|---|---|
| ❌ | Not supported |
| ⭐ | Manually |
| ⭐⭐ | Supported |
| ⭐⭐⭐ | Strong supported |
For more information,see Orchestration - Core Problems Comparison
In terms of core orchestration attributes
| Dimension | Server orchestration | VM orchestration | Container orchestration | Serverless orchestration |
|---|---|---|---|---|
| Deployment speed | ❌ | ⭐ | ⭐⭐ | ⭐⭐⭐ |
| Maintenance | ❌ | ⭐ | ❌ | ⭐⭐⭐ |
| Ease of learning | ⭐⭐ | ⭐⭐ | ❌ | ⭐⭐⭐ |
| Dev/prod parity | ❌ | ❌ | ⭐⭐⭐ | ⭐⭐⭐ |
| Maturity | ⭐⭐ | ⭐ | ⭐⭐ | ❌ |
| Debugging | ⭐⭐ | ⭐⭐⭐ | ❌ | ❌ |
| Long-running tasks | ⭐⭐⭐ | ⭐⭐⭐ | ⭐⭐⭐ | ❌ |
| Performance tuning | ⭐⭐⭐ | ⭐⭐ | ⭐ | ❌ |
| Sign | Meaning |
|---|---|
| ❌ | Weak |
| ⭐ | Moderate |
| ⭐⭐ | Strong |
| ⭐⭐⭐ | Very strong |
For more information, see Orchestration - Attributes Comparison
Conclusion
-
You learn how to run your apps in a way that more closely handles the demand of production (“in a scalable way”):
-
⛓️💥 avoid a single point of failure
- by using multiple replicas
-
☦️ distribute traffic across the replicas
- by deploying load balancers
-
🎢 roll out updates to your replicas without downtime 🔛
- by using deployment strategies
-
-
You’ve seen a number of orchestration approaches to handle all of the above problems:
Orchestration approach …infrastructure approach How it works? Example Server orchestration Mutable … (Old way) A fixed set of servers are maintained, updated in place. Deploy code onto a cluster of servers (using Ansible) VM … Immutable … VM images are deployed & managed across virtualized servers. Deploy VMs into an Auto Scaling Group. Container … Immutable … Containers images are deployed & managed across a cluster of servers. Deploy containers into a Kubernetes cluster. Serverless … Immutable … Functions are deploy & managed without thinking about servers at all. Deploy functions using AWS Lambda.
The no downtime is from users perspective.
The computing resources are CPU, memory, disk space.
The scheduler usually implements some sort of bin packing algorithm to try to use resources available as efficiently as possible.
A process supervisor is a tool to run your apps and do extra things:
- Monitor apps
- Restart apps after a reboot/crash
- Manage apps’ logging
- …
https://nodejs.org/api/cluster.html
Apache httpd
In addition to being a “basic” web server, and providing static and dynamic content to end-users, Apache httpd (as well as most other web servers) can also act as a reverse proxy server, also-known-as a “gateway” server.
nginx [engine x] is an HTTP and reverse proxy server and a generic TCP/UDP proxy server.
- For a long time, it has been running on many heavily loaded Russian sites including Yandex, Mail.Ru, VK, and Rambler
- Nginx is now part of F5
HAProxy - Reliable, High Performance TCP/HTTP Load Balancer
See Nginx documentation for Managing Configuration Files
https://docs.ansible.com/ansible/latest/playbook_guide/playbooks_templating.html
https://docs.aws.amazon.com/autoscaling/ec2/userguide/asg-instance-refresh.html
https://www.aquasec.com/blog/a-brief-history-of-containers-from-1970s-chroot-to-docker-2016/
Docker is a tool for building, running, and sharing containers.
Kubernetes is a container orchestration tool
Compare to VMs, containers:
- have reasonable file sizes
- boot quickly
- have little CPU/memory overhead
There is no practical, easy way to run most VM orchestration tools locally.
- For AWS, there is LocalStack, which emulates some of AWS cloud services locally.
https://docs.docker.com/desktop/faqs/linuxfaqs/#why-does-docker-desktop-for-linux-run-a-vm
Use docker run with -it flag to get an interactive shell & a pseudo-TTY (so you can type)
By hitting Ctrl+D, you send an End-of-Transmission (EOT) character (to docker process)
By hitting Ctrl+C, you send an interrupt signal (SIGINT) (to docker process)
The name of the Docker image is also know as its repository name.
In other words, when you name multiple images with the same name, Docker will use that name as the repository name to group all images of that name.
Chapter 4: How to Version, Build, and Test Your Code
With most real-world code, software development is a team sport, not a solo effort.
You need to figure out how to support many developers collaborating safety and efficiently on the same codebase.
In particular, you need to solve the following problems:
| The problem | How to … | Notes |
|---|---|---|
| Code access | - Allow all developers (in the team) to access the codebase ? | 👈 So they can collaborate |
| Integration | - Integrate changes from all developers - Handle any conflicts - Ensure no one’s work is accidentally lost or overwritten | |
| Correctness | - Prevent bugs & breakages slipping in? | |
| Release | - Release the changes (in your codebase) to production on a regular basis? | 👉 So the code can generate value for users & your company |
These problems are all key part of your software development life cycle (SDLC).
- In the pasts, many companies came up with their own ad-hoc, manual SDLC processes:
- Email code changes back & forth
- Spend weeks integrating changes together manually
- Test everything manually (if they did any testing at all)
- Release everything manually, e.g. Using FTP to upload code to a server
- Now a day, we have far better tools & techniques for solving these problems:
- Version control
- Build system
- Automated testing
Version Control
What is Version Control
version control system (VCS) : a tool that allows you to : - store source code : - share it with your team : - integrate your work together : - track changes over time
Version Control Primer
| Your normal workflow with an essay in Microsoft Word | Your workflow in version control terms |
|---|---|
You start with a file called essay.doc, | You start with essay.doc. |
You realize you need to do some pretty major changes, so you create essay-v2.doc | After some major edits, you commit your changes to a new revision called essay-v2.doc. |
You decide to remove some big pieces, but you don’t want to lose them, so you put those in essay-backup.doc, and move the remaining work to essay-v3.doc; | Then, you realize that you need to break off in a new direction, so you could say that you’ve created a new branch from you original work, and in that new branch, you commit another new revision called essay-v3.doc. |
Maybe you work on the essay with your friend Anna, so you email her a copy of essay-v3.doc | When you email Anna essay-v3.doc, and she starts her work, you could say that she’s working in yet another branch. |
Anna starts making edits; at some point, she emails you back the doc with her updates, which you then manually combine with the work you’ve been doing, and save that under the new name essay-v4-anna-edit.doc | When she emails you back, you manually merge the work in your branch and her branch together to create essay-v4-anna-edit.doc. |
You keep emailing back and forth, and you keep renaming the file, until minutes before the deadline, you finally submit a file called something like essay-final-no-really-definitely-final-revision3-v58.doc. |
 Visualizing your process with Word documents as version control
Your normal workflow with the an essay - copying, renaming, emailing… - is a type of version control, but not a manual version control system.
There are better version control tools, in which you commit, branch, merge… your works.
Version Control Concepts
Repositories : You store files (code, documents, images, etc.) in a repository (repo for short).
Branches
: (You start with everything in a single branch, often called something like main.)
: At any time, you can create a new branch from any existing branch, and work in your own branch independently.
Commits : Within any branch, : - you can edit files, : - when you’re ready to store your progress in a new revision, you create a commit with your updates (you commit your changes) : The commit typically records : - not only the changes to the files, : - but also who made the changes, and a commit message that describes the changes.
Merges
: At any time, you can merge branches together.
: e.g.
: - It’s common to create a branch from main, work in that branch for a while, and then merge your changes back into main.
Conflicts : (VCS tools can merge some types of changes completely automatically), : But if there is a conflict (e.g., two people changed the same line of code in different ways), : - the VCS will ask you to resolve the conflict manually.
History : The VCS tracks every commit in every branch in a commit log, which lets you see : the full history of how the code changed: : - all previous revisions of every file, : - what changed between each revision : - who made each change.
note
There are many version control systems:
- CVS, Subversion, Perforce…
- Mercurial, Git…
These days, the most popular is Git.
Example: A Crash Course on Git
Git basics
-
Install Git: Follow the office guide
-
Let Git know your name & email
git config --global user.name "<YOUR NAME>" git config --global user.email "<YOUR EMAIL>"
-
Initialize a Git repo
[!NOTE] Before initial a Git repo, you need to create a empty folder:
mkdir /tmp/git-practice cd /tmp/git-practice(or you can use an existing repo)
git init[!NOTE] Now, create a text file that will be including in your first commit:
echo 'Hello, World!' > example.txt[!TIP] The contexts of the
git-practicefolder looks like this$ tree -aL 1 . ├── .git └── example.txt[!NOTE] The
.gitfolder is where Git record all information about your branches, commits, revisions… -
Show the working tree status
git status[!NOTE] The
git statusshow the working tree status:- What branch you’re on.
- Any commits you’ve made.
- Any changes that haven’t been committed yet.
-
Before commit your changes, you first need to add the file(s) you want to commit to the staging area using
git addgit add example.txt -
Re-run
git statusgit statusOn branch main No commits yet Changes to be committed: (use "git rm --cached <file>..." to un-stage) new file: example.txt- The
example.txtis now in thestaging area, ready to be committed.
- The
-
To commit the staged changes, use the
git commitgit commit -m "Initial commit"- Use the
-mflag to pass in the commit message.
- Use the
-
Check the commit log using
git loggit logFor each commit in the log, you’ll see
- commit ID
- author
- date
- commit message.
[!NOTE] Each commit has a different ID that you can use to uniquely identify that commit, and many Git commands take a commit ID as an argument.
[!TIP] Under the hood, a commit ID is calculated by taking the SHA-1 hash of:
- the contents of the commit,
- all the commit metadata (author, date, and so on), and
- the ID of the previous commit
[!TIP] Commit IDs are 40 characters long,
- but in most commands, you can use just
- the first 7 characters, as that will be unique enough to identify commits in all but the largest repos.
Let’s make another change and another commit:
-
Make a change to the
example.txtecho 'New line of text' >> example.txt -
Show your working tree status
git statusOn branch main Changes not staged for commit: (use "git add <file>..." to update what will be committed) (use "git restore <file>..." to discard changes in working directory) modified: example.txt- Git is telling you that the changes is current “in working directory” (working tree), and is “not staged for commit”
- Git also tell you the changed files:
modified: example.txt
-
To see what exactly these changes are, run
git diffgit diff$ git diff diff --git a/example.txt b/example.txt index 8ab686e..3cee8ec 100644 --- a/example.txt +++ b/example.txt @@ -1 +1,2 @@ Hello, World! +New line of text[!NOTE] Use
git difffrequently to check what changes you’ve made before committing them:- If the changes look good:
- Use
git add <file>...to stage the changes. - Then use
git committo commit them.
- Use
- If the changes don’t look good:
- Continue to modify the changes
- Or use
"git restore <file>..."to discard changes in working directory.
- If the changes look good:
-
Re-stage the changes and commit:
git add example.txt git commit -m "Add another line to example.txt" -
Use
git logonce more with--oneline:git log --oneline02897ae (HEAD -> main) Add another line to example.txt 0da69c2 Initial commit
important
The commit log is very powerful 👈 It’s has the commit IDs and commit messages:
-
Debugging:
Something breaks -> “What changed?” -> Check commit log’s messages
-
Reverting:
-
You can use
git revert <COMMIT_ID>to create a new commit that reverts all the changes in the commit<COMMIT_ID>.(in other words, undoing the changes in that commit while still preserving your Git history)
-
You yan use
git reset --hard <COMMIT_ID>to get rid of:- all commits after
COMMIT_ID. - including the history about them.
- all commits after
-
-
Comparison:
You can use
git diffto compare not only local changes, but also to compare any two commits. -
Author:
You can use
git blameto annotate each line of a file with information about the last commit that modified that file, (including the date, the commit message, and the author).- Don’t use this to blame someone for causing a bug, as the name implies. It may be war!
- The more common use case is to help you understand where any give piece of code came from, and why that change was made.
Git branching and merging
-
To create a new branch and switch to it, use
git checkout -bgit checkout -b testing[!NOTE] If you want to make sure you never lost your code, you can use
git switch -cto create a new branch and switch to it. -
Check the you’re on new branch with
git statusgit status -
You can also list all the branches (and see which one you’re on) with
git branchgit branch[!TIP] The branch which you’re on is mark with asterisk (
*) -
Any changes you commit now will go into the
testingbranch:-
Try it with the example.txt
echo 'Third line of text' >> example.txt -
Stage and commit the changes
git add example.txt git commit -m "Added a 3tr line to example.txt" -
You git log to check that you have three commits on
testingbranch:git log --oneline
-
-
Switch back to
mainbranch to see thatmainbranch still has only 2 commitsgit switch main git log --oneline
-
Merge the work in your
testingbranch back to themainbranchgit merge testing # Merge testing branch (to current branch - main)Updating c4ff96d..c85c2bf Fast-forward example.txt | 1 + 1 file changed, 1 insertion(+)- It’s a
Fast-forward, Git was able to merge all the changes automatically, as there were no conflicts betweenmain&testingbranches.
- It’s a
Get your hands dirty with Git
-
Learn how to use the
git tagcommand to create tags. -
Learn to use
git rebase.- When does it make sense to use it instead of
git merge?
- When does it make sense to use it instead of
Example: Store your Code in GitHub
-
Git is a distributed VSC:
Every team member can
- have a full copy of the repository.
- do commits, merges, branches completely locally.
-
But the most common way to use Git is using one of the repositories as a central repository, which acts as your source of truth.
- Everyone will initially get their code from this central repo
- As someone make changes, he/she always pushes them back to this central repo.
-
There are many way to run such a central repo:
-
Hosting yourself
-
Use a hosting service, which is the most common approach:
- Not only host Git repos
- But also provide:
- Web UIs
- User management
- Development workflows, issue tracking, security tools…
The most popular hosting service for Git are GitHub, GitLab, BitBucket.
[!NOTE] GitHub is the most popular, and what made Git popular.
- GitHub provides a great experience for hosting repos & collaboration with team members.
- GitHub has become de facto home for most open source projects.
-
In this example, you will push the example code you’ve worked in while reading this book/blog post series to GitHub.
-
Go the folder where you have your code
cd devops-books -
The contents of the folder should look like this:
tree -L 2. ├── ch1 │ ├── ec2-user-data-script │ └── sample-app ├── ch2 │ ├── ansible │ ├── bash │ ├── packer │ └── tofu └── ch3 ├── ansible ├── docker ├── kubernetes ├── packer └── tofu -
Initialize an empty Git repository in
.git/git init -
Show working tree status
git status- There is “no commits yet”, and only “untracked files”.
-
Create gitignore file (
.gitignore)*.tfstate # 1 *.tfstate.backup *.tfstate.lock.info .terraform # 2 *.key # 3 *.zip # 4 node_modules # 5 coverage- 1: Ignore OpenTofu state.
- 2: Ignore
.terraform, used by OpenTofu as a scratch directory. - 3: Ignore the SSH private keys used in Ansible examples.
- 4: Ignore build artifact created by
lambdamodule. - 5: Ignore Node.js’s scratch directories.
[!TIP] Commit the
.gitignorefile first to ensure you don’t accidentally commit files that don’t belong in version control. -
Stage and commit
.gitignoregit add .gitignore git commit -m "Add .gitignore" -
Stage all files/folders in root of the repo:
git add . git commit -m "Example for first few chapters"- The code in now in a local Git repo in your computer.
- In the next section, you’ll push it to a Git repo on GitHub
-
Create a GitHub account if you haven’t one
-
Authenticate to GitHub on the CLI: Follow the official docs
-
Create a new repository in GitHub
-
Add that GitHub repository as a remote to your local Git repository:
[!NOTE] A remote is a Git repository hosted somewhere, i.e. somewhere on the Internet
git remote add origin https://github.com/<USERNAME>/<REPO>.git- This will add your GitHub repo as a remote named
origin
[!TIP] Your remote GitHub repo can be any where, but anyone that access your repo, which now acts as a central repository can refer to it as
origin. - This will add your GitHub repo as a remote named
-
Push your local branch to your GitHub repo
git push origin main[!TIP] You push to
REMOTEaLOCAL_BRANCHwith:git push REMOTE LOCAL_BRANCH -
Refresh your repo in GitHub, you should see your code there.
note
You’ve just push your changes to a remote endpoint, which being halfway to be able to collaborate with other developers.
-
You can click the
Add a READMEbutton, then:- Fill in the README content.
- And commit changes directly to the Git repo.
-
If you do that, your GitHub repo now has a
README.mdfile, but the local repo on your computer doesn’t. -
To get the latest code from the
origin, usegit pull:git pull origin main[!NOTE] The command
git pull REMOTE REMOTE_BRANCHwill:- “Fetch” from
REMOTEtheREMOTE_BRANCH. - Merge that
REMOTE_BRANCHto current branch (in the local repository).
- “Fetch” from
-
If your haven’t have a local copy of the central repository, first you need to clone that repo:
git clone https://github.com/<USERNAME>/<REPO>This command will
- checkout a copy of the repo
<REPO>to a folder called<REPO>in your current working directory. - automatically add the repo’s URL as a remote named origin
- checkout a copy of the repo
You’ve just seen the basic Git workflows when collaboration:
git clone: Check out a fresh copy of a repo.git push origin <LOCAL_BRANCH>: Share your changes to other team members.git pull origin <REMOTE_BRANCH>: Get changes from other team members.
A Primer on Pull Request
pull request
: a request to merge one branch into another branch
: ~ you’re requesting the owner runs git pull on your repo/branch
tip
GitHub popularized the PR workflow as the de facto way to make changes to open source repos
And these days, many companies use PRs to make changes to private repos as well.
A pull request processes is as a follows:
-
You check out a copy of repo
R, create a branchB, and commit your changes to this branch.- If you have write access to repo
R, you can create branchBdirectly in repoR. - However, if you don’t have write access, which is usually the case if repo
Ris an open source repo in someone else’s account, then you- first create a fork of repo
R, which is a copy of the repo in your own account, - then you create branch
Bin your fork.
- first create a fork of repo
- If you have write access to repo
-
When you’re done with your work in branch
B, you open a pull request against repoR:- Requesting that the maintainer of that repo merges your changes from branch
Binto some branch in repoR(typicallymain).
- Requesting that the maintainer of that repo merges your changes from branch
-
The owner of repo
Rthen- uses GitHub’s PR UI to review your changes,
- provide comments and feedback,
- and ultimately, decide to either
- merge the changes in,
- or close the PR unmerged.
Example: Open a Pull Request in GitHub
-
Create a new branch named
update-readmeand switch to itgit switch -c update-readme -
Make a change to the
README.mdfileecho "https://www.fundamentals-of-devops.com/" >> README.md -
Show un-staged changed
git diff -
Stage & commit the changes
git add README.md git commit -m "Add URL to README" -
Push your
update-readmebranch to theoriginremotegit push origin update-readme[!TIP] In the
git pushoutput, GitHub conveniently shows you a URL for creating a pull request.You can also create PRs by
- going to the
Pull Requeststab of your repo in GitHub Web UI - clicking
New Pull Requestbutton.
- going to the
-
Open the URL in a web browser, then
- Fill in the pull request’s title, description.
- Scroll down to see the changes between your
update-readme&mainbranches. - If those changes look OK, click
Create pull requestbutton. - You’ll end up in the GitHub PR UI.
-
You and your team members cana use the Github PR page to
- see the changes
- discuss the changes
- request reviewers, modifies to those changes…
-
If the PR looks gook:
- Click
Merge pull request - Then
Confirm mergeto merge the changes in.
- Click
Version Control Best Practices
-
Always use version control
- Using version control brings massive benefits for software engineering.
- Version control’s easy, cheap/free.
[!IMPORTANT] Key takeaway #1 Always manage your code with a version control system.
-
Write good commit messages
When you’re trying to figure out what caused a bug, an outage,
git logandgit blamecan help you, but only if the commit message are well written.[!NOTE] What is a good commit message?
- Summary: Short, clear summary of the change (< 50 characters).
- Context:
- If you need more than a summary, put a new line after the summary, then provide more information to understand the context.
- Focus on what changed; why it changed (How it changed should be clear from the the code itself).
e.g.
Fix bug with search auto complete A more detailed explanation of the fix, if necessary. Provide additional context that may not be obvious from just reading the code. - Use bullet points - If appropriate Fixes #123. Jira #456.[!TIP] You can go a little further with the commit messages by:
- Following How to Write a Good Commit Message
- Adopting Conventional Commits
-
Commit early and often
Committing as you’re solving a large problem, break it down to small, manageable parts.
[!NOTE] What to commit and PR?
Atomic commit/PR.
In other words, each commit or pull request should do exactly one small, relatively self-contained thing.
[!TIP] Atomic commit: You should be able to describe the commit in one short sentence and use it as the commit message’s summary.
e.g. Instead of a single, massive commit that implements an entire large feature,
- aim for a series of small commits, where each one implements some logical part of that feature:
- a commit for backend logic
- a commit for UI logic
- a commit for search logic
[!TIP] Atomic PR:
- A single PR can contain multiple commits, but it should still represent a single set of cohesive changes - changes that naturally & logically go together.
- If your PR contains unrelated changes, you should break it up into multiple PRs.
e.g. Follow the Boy Scout Rule1 is a good idea, but
- don’t make a PR that contains a new feature, a bug fix, and a refactor
- put each of these changes into its own PR:
- a PR for the new feature
- a PR for the bug fix
- a PR for the refactor
- put each of these changes into its own PR:
[!NOTE] What is the benefit of atomic commits, PRs?
Benefit Description More useful Git history Each commit/PR can fit in oneline in the history. Cleaner mental model Force you to break the work down. Less risk Easy to revert. Easier code reviews Quick to approve. Less risky refactors You can try something new then go back to any commits quickly without losing much work. Lower risk of data loss Commit (and push) act as a data backup. More frequent integration Quick to merge, release. - aim for a series of small commits, where each one implements some logical part of that feature:
-
Use a code review process
[!NOTE] Why any one should have their code review?
In the writing world, even if you’re the smarted, most capable, most experienced, you can’t proofread your own work:
- You’re too close to the concept.
- You can’t put yourself in the shoes of someone who is hearing them for the first time.
The same applies for writing code.
[!TIP] Having your code review by someone else is a highly effective way to catch bugs, reducing defect rates by as much as 55-80% - which is even a higher rate than automated test.
[!NOTE] Code reviews are also an efficient mechanism to
- spread knowledge, culture, training
- provide a sense of ownership throughout the team
[!NOTE] How to do code reviews?
-
Enforce a pull request workflow
You can enforce that
- all changes are done through pull requests
- so the maintainers of each repo can asynchronously review each change before it gets merged.
- all changes are done through pull requests
-
Use pair programming
Pair programming:
-
a development technique where two programmers work together at one computer:
- one person as the driver, responsible for writing the code
- the other as the observer, responsible for
- reviewing the code and
- thinking about the program at a higher level
(the programmers regularly switch roles)
-
results in code review process happens all the time:
- driver will also try to make clear what the code is doing
Pair programming is used:
- by some companies for all their coding
- by other companies for only complex tasks, or ramping up a new hire.
-
-
Use formal inspections
Formal inspection is when you schedule a live meeting for a code review where you:
- present the code to multiple developers
- go through it together, line-by-line.
Formal inspection can be apply for mission critical parts of your systems.
- present the code to multiple developers
[!TIP] Whatever process you pick for code reviews, you should
- define your code preview guidelines up front,
- so everyone can have a process that is consistent & repeatable across the entire team:
- what to look for, e.g. design, functionality, complexity, tests.
- what not to look for, e.g. code formatting (should be automated)
- how to communicate feedback effectively
- so everyone can have a process that is consistent & repeatable across the entire team:
For example, have a look at Google’s Code Review Guidelines.
-
Protect your code:
For many companies these day, the code you write is:
- your most important asset.
- a highly sensitive asset: if someone can slip malicious code into the codebase, it would be a nightmare.
[!NOTE] How to protect your code?
-
Signed commits:
By default, any one can set the email used by Git to any email they want.
-
What if a bad actor introduces some malicious code in your name (email).
-
Fortunately, most VSC hosts (GitHub, GitLab…) allow you to enforce signed commits on your repos, where they reject any commit that doesn’t have a valid cryptographic signature.
Under the hood:
- You give Git the private key; and give the VSC host the public key.
- When you commit, Git will sign that your commits with the private key.
- When you push to central repo on VSC host, VSC host will use the public key to verify that these commit are signed by your private key.
-
-
Branch protection:
Most VCS hosts (GitHub, GitLab, etc.) allow you to enable branch protection, where you can
- enforce certain requirements before code can be pushed to certain branches (e.g.,
main)
For example, you can require that all changes to
mainbranch:- Submitted via pull requests
- Those pull requests are review by at least N other developers.
- Certain checks - e.g. security scans - pass
before these pull requests can be merged.
- enforce certain requirements before code can be pushed to certain branches (e.g.,
Get your hands dirty with Git amend, squash
Build System
What is Build System?
build system (build tools) : the system used by most software project to automate important operations, e.g. : - Compiling code : - Downloading dependencies : - Packaging the app : - Running automated tests…
Why use Build System?
The build system serves 2 audiences:
- The developers on your team, who run the build steps as part of local development.
- The automated tools (scripts), which run the build steps as part of automating your software delivery process.
Which Build System to use?
You can:
- create your own build system from ad-hoc scripts, duct tape & glue.
- or use an off-the-shelf build system.
There are many off-the-shelf build systems out there:
- Some were originally designed for use with a specific programming language, framework. e.g
- Rake for Ruby
- Gradle, Mavan for Java
- SBT for Scale
- NPM for JavaScript (Node.js)
- Some are language agnostic:
- Make: granddad of all build systems.
- Bazel: fast, scalable, multi-language and extensible build system.
tip
Usually, the language-specific tools will give you the best experience with that language.
You should only go with the language-agnostic ones in specific circumstances, such as:
- Massive teams
- Dozens of languages
- Gigantic monorepo
important
Key takeaway #2 Use a build system to capture, as code, important operations and knowledge for your project, in a way that can be used both by developers and automated tools.
Example: Configure your Build Using NPM
The example-app is written is JavaScript (Node,js), so NPM is a good choice for build system.
-
The code for this example will be in
examples/ch4/sample-appcd examples mkdir -p ch4/sample-app -
Clone the
app.jsfrom previous examplecp ch1/sample-app/app.js ch4/sample-app/app.js -
Install Node.js which comes with NPM
-
To use NPM as a build system, you need a
package.jsonfile.[!NOTE] The
package.jsonfile can be- created manually
- scaffold by running
npm init
In this example, you will run
npm initnpm init # npm will prompt you for the package name, version, description...You should have a
package.jsonfile looks like this:{ "name": "sample-app", "version": "1.0.0", "description": "Sample app for 'Fundamentals of DevOps and Software Delivery'", "scripts": { "test": "echo \"Error: no test specified\" && exit 1" } }[!NOTE] NPM has a number of built-in scripts, such as
npm install,npm start,npm test, and so on.All of these have default behaviors, but in most cases, you can define what these script do by
- adding them to the scripts block.
- specify which commands that script should run.
For example
npm initgives you an initialtestscript in the scripts block that just run a command that exits with an error.
-
Add a script named
startto the script block inpackage.json{ "scripts": { "start": "node app.js" } } -
Now you run the
npm startscript to run your app.npm start[!NOTE] By using
npm startto run your app, you’re using a well-known convention:- Most Node.js and NPM users know to use
npm starton a project. - Most tools that work with Node.js know to use
npm startto start a Node.js app.
In other words, you capture how to run your app in the build system.
- Most Node.js and NPM users know to use
-
Create a
Dockerfile# examples/ch4/sample-app/Dockerfile FROM node:21.7 WORKDIR /home/node/app # 1 COPY package.json . COPY app.js . EXPOSE 8080 USER node # 2 CMD ["npm", "start"]This Dockerfile is identical to the one in previous example, except:
- 1: In addition to
app.js, you also copy thepackage.jsonto the Docker image. - 2: Instead of using
node app.js, you usenpm startto start the app.
- 1: In addition to
-
Create a script called
build-docker-image.sh# examples/ch4/sample-app/build-docker-image.sh #!/usr/bin/env bash set -e # (1) version=$(npm pkg get version | tr -d '"') # (2) docker buildx build \ --platform=linux/amd64,linux/arm64 \ -t sample-app:"$version" \ .- 1: Run
npm pkg get versionto get the value of theversionkey inpackage.json. - 2: Run
docker buildx, setting version to the value from 1.
- 1: Run
-
Make the script executable
chmod u+x build-docker-image.sh -
Add a
dockerizescript to thescriptsblock inpackage.json{ "scripts": { "dockerize": "./build-docker-image.sh" } } -
Now instead of trying to figure out how to build the Docker image, your team members can execute
npm run dockerizeto build the Docker image.npm run dockerize[!NOTE] Notice it’s
npm run dockerize(with the extrarun) asdockerizeis a custom script, not a built-in script of NPM.
Dependency Management
dependencies : software packages & libraries that your code uses.
Kind of dependencies
-
Code in the same repo
You can
- break your code in a single repo into multiple modules/packages
- have these modules depend on each other
These modules/packages allow you
- develope different parts of your codebase in
- isolation from the others,
- (possible with completely separate teams working on each part)
-
Code in different repos
You can store code across multiple repos, which
- give you more isolation between different parts of your software
- make it even easier for separate teams to take ownership for each part.
Typically, when code in repo A depends on code in repo B:
-
it’s a specific version of the code in repo B, which may correspond to a specific Git tag.
-
or it’s a versioned artifact published form the repo B
e.g.
- a Jar file in the Java world
- a Ruby Gem in the Ruby world
- give you more isolation between different parts of your software
-
Open source code
Most common type of dependency these days. A type of code in different repos.
Why use a dependency?
Yoy use a dependency so
- you can reply on someone else to solve certain problems for you
- instead of having to
- solve everything yourself from scratch
- (maintain it)
important
Key takeaway #3 Use a dependency management tool to pull in dependencies—not copy & paste.
The problems with copy-paste dependency
-
Transitive dependencies
Copy/pasting a single dependency is easy, but if
- that dependency has its own dependencies, and
- those dependencies have their own dependencies, and
- so on (collectively known as transitive dependencies),
- those dependencies have their own dependencies, and
then copy/pasting becomes rather hard.
- that dependency has its own dependencies, and
-
Licensing
Copy/pasting may violate the license terms of that dependency, especially if you end up modifying that code (because it now sits in your own repo).
[!WARNING] Be especially aware of dependencies that uses GPL-style licenses (known as copyleft or viral licenses),
- if you modify the code in those dependencies,
- you need to release your own code under the same license i.e. you’ll be forced to open source your company’s proprietary code!.
- if you modify the code in those dependencies,
-
Staying up to date
If you copy/paste the code, to get any future updates, you’ll have to
- copy/paste new code, and new transitive dependencies, and
- make sure you don’t lose any changes your team members made along the way.
-
Private APIs
(Since you can access those files locally), you may end up
- using private APIs
- instead of the public ones that were actually designed to be used,
which can lead to unexpected behavior, (and make staying up to date even harder)
- using private APIs
-
Bloating your repo
Every dependency you copy/paste into your version control system makes it larger and slower.
How to use dependencies
-
Instead of copy-paste, use a dependency management tool, which is usually built-in with build systems.
-
You define your dependencies
- as code
- in the build configuration
- including the version (of the dependencies)
the dependency management tools is then responsible for:
- downloading those dependencies (plus any transitive dependencies)
- making them available to your code.
Example: Add Dependencies in NPM
So far, the Node.js example-app has not any dependencies other than the http standard library built in Node.js.
In this example, you will introduce an dependency named Express, which is a popular web framwork for Node.js
-
Install Express & save it to
dependenciesinpackage.jsonnpm install express --save-
The package will now have a new
dependenciessection:{ "dependencies": { "express": "^4.19.2" } }
-
-
There will be 2 new file/folder next to the
package.jsonfile:-
node_modulesfolder: where NPM download & install dependencies- Should be in your
.gitignore; anyone check out this repo the first time can runnpm installto install the dependencies.
- Should be in your
-
package-lock.jsonfile: a dependency lock file, which captures the exact dependencies what were installed.- In
package.json, you can specify a version range instead of a specific version. - Without the
package-lock.json, every time you runnpm install,- you may get a new version of the dependencies,
- which make the builds not reproducible
- you may get a new version of the dependencies,
- With the
package-lock.jsonfile, you can usenpm clean-install(npm ciin short) to- tell NPM to perform a clean install (and install the exact versions in the lock file)
- so the build is reproducible (every time)
- tell NPM to perform a clean install (and install the exact versions in the lock file)
- In
-
-
Re-write the code in
app.jsto use Express frameworkconst express = require("express"); const app = express(); const port = 8080; app.get("/", (req, res) => { res.send("Hello, World!"); }); app.listen(port, () => { console.log(`Example app listening on port ${port}`); });[!TIP] By using the Express framework, it’ll be a lot easier to evolve this code into a real app by leverage all the features built into Express e.g. routing, templating, error handling, middleware, security…
-
Update the Dockerfile to run
npm ciFROM node:21.7 WORKDIR /home/node/app # (1) COPY package.json . COPY package-lock.json . # (2) RUN npm ci --only=production COPY app.js . EXPOSE 8080 USER node CMD ["npm", "start"]- 1: Copy not only
package.json, but alsopackage-lock.jsoninto the Docker image. - 2: Run
npm cito have a clean install with the exact dependencies in the lock file.
[!NOTE] The
--only=productionflag tells NPM to only install the production dependencies.- An NPM package can also have dev-dependencies - which are only used in the dev environment.
- When running in production environment, these dev dependencies are not needed.
- 1: Copy not only
Get your hands dirty with modern frontend build systems
- PNPM
- Yarn
- Turborepo
- Lerna
- Parcel
Automated Testing
Why use automated testing
legacy code : spaghetti code without automated tests, documentation : code that you don’t have the confidence to make changes
To prevent legacy code, you use automated testing, where you:
- write test code to validate that
- your production code works
- the way you expect it to.
- your production code works
By writing automated tests, you might catch some of the bugs,
-
but the most important benefit of having a good suite of automated tests is, you have the confidence to make changes quickly, because:
- you don’t have to keep the whole program in your head
- you don’t have to worry about breaking other people’s
- you don’t have to repeat the same boring, error-prone manual testing over & over agian.
important
Key takeaway #4 Use automated tests to give your team the confidence to make changes quickly.
Types of automated tests
There’re a lot of type of automated tests:
-
Compiler
If you’re using a statically-typed language (e.g., Java, Scala, Haskell, Go, TypeScript), you can pass your code through the complier (compile) to automatically identify
- (a) syntactic issues
- (b) type errors.
If you’re using a dynamically-typed language (e.g., Ruby, Python, JavaScript), you can pass the code through the interpreter to identify syntactic issues.
-
Static analysis / linting
These are tools that read & check your code “statically” — that is, without executing it — to automatically identify potential issues.
Examples:
- ShellCheck for Bash
- ESLint for JavaScript
- SpotBugs for Java
- RuboCop for Ruby.
-
Policy tests
In the last few years, policy as code tools have become more popular as a way to define and enforce company policies & legal regulations in code.
Examples: Open Policy Agent, Sentinel, Intercept.
- Many of these tools are based on static analysis, except they give you flexible languages to define what sorts of rules you want to check.
- Some rely on plan testing, as described next.
-
Plan tests
Whereas static analysis is a way to test your code without executing it at all, plan testing is a way to partially execute your code. This typically only applies to tools that can generate an execution plan without actually executing the code.
For example:
- OpenTofu has a plan command that shows you what changes the code would make to your infrastructure without actually making those changes: so in effect, you are running all the read operations of your code, but none of the write operations.
You can write automated tests against this sort of plan output using tools such as Open Policy Agent and Terratest.
-
Unit tests
This is the first of the test types that fully execute your code to test it.
The idea with unit tests is to execute only a single “unit” of your code:
- What a unit is depends on the programming language, but it’s typically a small part of the code, such as one function or one class. - You typically mock any dependencies outside of that unit (e.g., databases, other services, the file system), so that the test solely executes the unit in question.
To execute the unit tests:
- Some programming languages have unit testing tools built in
e.g.
testingfor Go;unittestfor Python - Whereas other languages rely on 3rd party tools for unit testin
e.g.
JUnitfor Java;Jestfor JavaScript
-
Integration tests
Just because you’ve tested a unit in isolation and it works, doesn’t mean that multiple units will work when you put them together. That’s where integration testing comes in.
With integeration tests, you test
- multiple units of your code (e.g., multiple functions or classes),
- often with a mix of
- real dependencies (e.g., a database)
- mocked dependencies (e.g., a mock remote service).
-
End-to-end (E2E) tests
End-to-end tests verify that your entire product works as a whole, which mean you:
- run
- your app,
- all the other services you rely on,
- all your databases and caches, and so on,
- test them all together.
These often overlap with the idea of acceptance tests, which verify your product works from the perspective of the user or customer (“does the product solve the problem the user cares about”).
- run
-
Performance tests
Most unit, integration, and E2E tests verify the correctness of a system under ideal conditions: one user, low system load, and no failures.
Performance tests verify the stability & responsiveness of a system in the face of heavy load & failures.
Example: Add Automated Tests for the Node.js App
-
How to know if the the Node.js
example-appwork?const express = require("express"); const app = express(); const port = 8080; app.get("/", (req, res) => { res.send("Hello, World!"); }); app.listen(port, () => { console.log(`Example app listening on port ${port}`); }); -
So far, you will do it through manual testing:
- Manually ran the app with
npm start - Then open the app URL in the brower.
- Verify that the output is matched.
- Manually ran the app with
-
What if you have
- hundreds of URLs?
- hundreds of developers making changes?
note
The idea with automated testing is to
- write code that
- performs the testings steps for you.
Then the computer can run these test code and test your app faster, more reliable.
Add unit tests for the Node.js App
-
You’ve start with unit test. To add a unit test, first you need a unit of code, which you will introduce in this example
-
For this example, create a basic module with 2 functions that reverve characters & words in a string. Those 2 functions acts as the unit of code to be tested.
# 1 function reverseWords(str) { return str.split(" ").reverse().join(" "); } # 2 function reverseCharacters(str) { return str.split("").reverse().join(""); } module.exports = { reverseCharacters, reverseWords };- 1:
reverseWordsreverses the words in a string. e.g.hell worldwill be reversed toworld hello - 2:
reverseCharactersreverses the characters in a string e.g.abcdewill be reversed toedcba
- 1:
note
How do you know this code actually works?
- Imagine how the code runs in your head?
- Test the code manually?
- Fire up a REPL - an interactive shell - to manuallt execute code.
- Import the
revervefile - Run the
reverseWords,reverseCharactersfunction with your input> , and check the output. - (When you’re done with the REPL, use
Ctrl+Dto exit).
- Import the
- Capture the steps you did in a REPL in an automated test.
-
In this example, you will use
Jestas the testing framework, andSuperTestas the library for testing HTTP apps. -
Intstall Jest and Supertest (and save them as dev dependencies with
--save-devflag)npm install --save-dev jest supertestYour
package.jsonshould looks like this:{ "dependencies": { "express": "^4.19.2" }, "devDependencies": { "jest": "^29.7.0", "supertest": "^7.0.0" } } -
Update the
testscript (inpackage.json) to run Jest{ "scripts": { "test": "jest --verbose" } }
-
Writing tests for
reserveWordsfunctionconst reverse = require("./reverse"); // 1 describe("test reverseWords", () => { // 2 test("hello world => world hello", () => { const result = reverse.reverseWords("hello world"); // 3 expect(result).toBe("world hello"); // 4 }); });- 1: Use
descibefunction to group server tests together.- The first argument: description of the group of tests.
- The second argument: a function that will run the tests for this group.
- 2: Use
testfunction to define individual tests- The first argument: description of the test.
- The second argument: a function that will run the test
- 3: Call the
reverseWordsfunction and store the result in the variableresult. - 4: Use the
expectmatcher to check that theresultmatches “world hello”. (If it doesn’t match, the test will fail.)
- 1: Use
-
Use
npm testto run the testsnpm test- The test
PASSwithout any error.
- The test
-
Add a second unit test for the
reverseWordsfunctiondescribe("test reverseWords", () => { test("hello world => world hello", () => {}); test("trailing whitespace => whitespace trailing", () => { const result = reverse.reverseWords("trailing whitespace "); expect(result).toBe("whitespace trailing"); }); }); -
Re-run
npm testnpm test- The test
FAIL
- The test
-
Fix whitespace handling in
reverseWordsfunction reverseWords(str) { return str .trim() // 1 .split(" ") .reverse() .join(" "); }- 1: Use the
trimfuncton to strip leading & trailing whitespace.
- 1: Use the
-
Re-run
npm test; it should pass now.
This is a good example of the typical way you write code
- when you have a good suite of automated test to lean on:
- make a change
- re-run the tests
- make another changes
- re-run the tests
- add new tests
- …
With each iteration,
- your test suite gradually improves
- you build more & more confidence in your code
- you can go faster & faster
- you build more & more confidence in your code
The automated tests
- provides a rapid feedback loop that help you being more productive
- acts as regression tests prevent old bugs
important
Key takeaway #5 Automated testing makes you more productive while coding by providing a rapid feedback loop: make a change, run the tests, make another change, re-run the tests, and so on.
important
Key takeaway #6 Automated testing makes you more productive in the future, too: you save a huge amount of time not having to fix bugs because the tests prevented those bugs from slipping through in the first place.
Using code coverage tools to improve unit tests
code coverage : the percent of code got executed by your tests : can be measured by many automated testing tools
-
Update
testscript to also measure code coverage{ "scripts": { "test": "jest --verbose --coverage" } } -
Run
npm testto see the extra information about code coveragenpm test- There is also a new
coveragefolder (next topackage.json), which contains HTML reports about code coverage. - Open the HTML reports, you can see:
- How many time each part of the code were executed
- The part of code that wasn’t executed at all
- There is also a new
-
Now, you know which parts of the code wasn’t tested, you can add unit test for them:
describe("test reverseCharacters", () => { test("abcd => dcba", () => { const result = reverse.reverseCharacters("abcd"); expect(result).toBe("dcba"); }); }); -
Re-run the test and now the code coverage is 100%.
Add end-to-end tests for the Node.js App
In this example, you will add an end-to-end test for the Node.js sample-app: a test that makes an HTTP request to the app, and chcek the response.
-
First, split out the part of the app that listen on a port
// app.js const express = require("express"); const app = express(); app.get("/", (req, res) => { res.send("Hello, World!"); }); module.exports = app;// server.js const app = require("./app"); const port = 8080; app.listen(port, () => { console.log(`Example app listening on port ${port}`); }); -
Update the
startscript inpackage.json{ "scripts": { "start": "node server.js" } } -
Add a end-to-end test for the app
// app.test.js const request = require("supertest"); const app = require("./app"); // 1 describe("Test the app", () => { test("Get / should return Hello, World!", async () => { const response = await request(app).get("/"); // 2 expect(response.statusCode).toBe(200); // 3 expect(response.text).toBe("Hello, World!"); // 4 }); });- 1: Inport the app code from
app.js - 2: Use the SuperTest libary (imported under the name
request) to fire up the app and make an HTTP GET request to it at the/URL. - 3: Check that the reponse status code is a
200 OK - 4: Check that the response body is the text
"Hello, World!"
- 1: Inport the app code from
-
Re-run
npm testnpm test
Get your hands dirty with end-to-end test for Node.js app
- Add a new endpoint to the sample app
- Add a new automated test to validate the endpoint works as expected.
Example: Add Automated Tests for the OpenTofu Code
note
You can write automated tests not only for app code, but also for infrastructure code, too.
The tooling for infrastructure tests isn’t as mature, and the tests take longer to run, but the tests five all the same benefits.
In this example, you will add an automated tests for the lambda-sample OpenTofu module in Chapter 3.
note
There are several approaches to test OpenTofu code:
- Static analysis: Terrascan, Trivy, tflint
- Policy testing: Open Policy Agent, Sentinel
- Plan testing: build-in
testcommand, Open Policy Agent, Terratest - Unit, integration, end-to-end testing:
- Build-in
testcommand: for simple modules, tests. - Terratest : for more complex modules, tests.
- Build-in
-
Copy that module
cd examples mkdir -p ch4/tofu/live cp -r ch3/tofu/live/lambda-sample ch4/tofu/live cd ch4/tofu/live/lambda-sample
Add static analysis for your OpenTofu code using Terrascan
-
Create a config file for Terrascan called
terrascan.toml[severity] level = "high" -
Install Terrscan
-
Run terrascan in the
lambda-samplefolderterrascan scan \ --iac-type terraform \ --non-recursive \ --verbose \ -c terrascan.toml-
--iac-type terraform: Analyze only Terraform or OpenTofu code. -
--non-recursive:By default, Terrascan tries to scan everything in the current folder and all subfolders.
This flag avoids Terrascan scanning the
srcfolder within lambda-sample and complaining that folder doesn’t contain OpenTofu code. -
--verbose: This gives a bit of extra log output, including Rule IDs for any policies that have been violated. -
-c terrascan.toml: Use the settings in the configuration fileterrascan.tomlyou created.
-
Add unit tests for your OpenTofu code using the test command
note
The test in this example will deploy real resources into your AWS accounts.
- It’s closer to integration tests
- But it still test just a single unit - so it’s still a unit test
- Use the
test-endpointmodule (in example code repo atch4/tofu/modules/test-endpoint) to make an HTTP request to an endpoint (from your OpenTofu code)
note
Currently, the test command can only use local modules, so use need to make a copy of it in your test.
-
Clone
test-endpointmodulecd examples mkdir -p ch4/tofu/modules cp -r ../../<EXAMPLE_CODE_REPO>/ch4/tofu/modules/test-endpoint ch4/tofu/modules -
In the
lambda-samplemodule, create a test file# examples/ch4/tofu/live/lambda-sample/deploy.tftest.hcl run "deploy" { command = apply } # (2) run "validate" { command = apply # (3) module { source = "../../modules/test-endpoint" } # (4) variables { endpoint = run.deploy.api_endpoint } # (5) assert { condition = data.http.test_endpoint.status_code == 200 error_message = "Unexpected status: ${data.http.test_endpoint.status_code}" } # (6) assert { condition = data.http.test_endpoint.response_body == "Hello, World!" error_message = "Unexpected body: ${data.http.test_endpoint.response_body}" } }-
1: The first
runblock will runapplyon thelambda-samplemodule itself. -
2: The second
runblock will runapplyas well, but this time on atest-endpointmodule, as described in (3). -
3: This
moduleblock is how you tell therunblock to runapplyon thetest-endpointmodule (the module you copied from the blog post series’s sample code repo). -
4: Read the API Gateway endpoint output from the
lambda-samplemodule and pass it in as theendpointinput variable for thetest-endpointmodule. -
5:
assertblocks are used to check if the code actually works as you expect. This firstassertblock checks that thetest-endpointmodule’s HTTP request got a response status code of 200 OK. -
6: The second
assertblock checks that thetest-endpointmodule’s HTTP request got a response body with the text “Hello, World!”
-
-
(Authenticate to AWS)
-
Run
tofu testtofu test- OpenTofu will
- run
apply, deploy your real resources, and then - at the end of the test, run
destroyto clean everthing up again.
- run
- OpenTofu will
Get your hands dirty with Infrastructure Test
-
Figure out how to encrypt the environment variables in the
lambdamodule, which is a better fix for the Terrascan error. -
Add a new endpoint in your
lambdamodule and add a new automated test to validate the endpoint works as expected.
Testing Best Practices
Which type of test to use? - The test pyramid
The first question with testing: Which testing approach should you use? Unit tests? Integration tests? E2E test?
The answer: A mix of all of them.
- Each type of test can catch different type of errors; and have different strengths & weaknesses.
- The only way to be confident your code works as expected is to combine multiple types of tests. In most cases, he proportion of tests follow the test pyramid.
For more information, see:
What to test
The second question with testing: What should you test?
- Some believe that every line of code must be tested (or you must achieve 100% code coverage).
- But remember, each test has a cost, does the cost bring enough values?
Before deciding if a part of your code should be test, evaluating your testing strategy & making trade-offs between the following factors:
-
The code of bugs
e.g.
- A prototype that will be throw away in a week -> the cost of bug is low
- A payment processing system -> the cost of bug is very high.
Usually, the cost of bug is high for systems that
- touches data storage
- relates to securiy
- cannot be break…
-
The likelehood of bugs
e.g.
- If there is a lot of people working on the same code, there might be more bugs (integration bugs…).
- Math problems.
- Your own distributed consensus algorithm
-
The cost of testing
- Usually, unit tests has low cost
- Integration tests, end-to-end tests, performance tests are more expensive to write, run.
-
The cost of not having tests
Many companies make analysis about cost/benefit of test and conlcude that tests aren’t worth it.
But not have tests has a big cost: FEAR.
- The company may end up having a paralyzed dev team.
When to test
The third question about testing: When to test?
- Add tests several years after you write the code: much expensive, but not as beneficial.
- Add tests a day after you write the code: cheaper, more beneficial.
- Add tests before you write the code: lowest cost, most beneficial.
Test-Driven Development (TDD)
TDD (Test-Driven Development) : You write the test before you write the implementation code : Isn’t it weird? How can you test something not-existed?
With TDD, The tests
- will test the implementation code
- provide a feedback that leads to a better design
By trying to write tests for your code (before you write the implementation codes), you’re forced to take a step back & ask important questions:
- How do I structure the code so I can test it?
- What dependencies do I have?
- What are the common use cases? Corner cases?
tip
If you find that your code is hard to test, it’s almost always
- a sign that it needs to be refactored (for some other reasons) too.
e.g.
- The code uses a lot of mutable state & side effects -> Hard to test & hard to reuse, understand.
- The code has many ocmplex interactions with its dependencies -> It’s tightly coupld & hard to change.
- The code has many use cases to cover -> It’s doing too much, needs to be broken up.
TDD cycle:
- Add basic placeholders for the new functionality (e.g., the function signatures):
- just enough for the code to compile
- but don’t actually implement the functionality.
- Add tests for the new functionality.
1.2. (RED) Run all the tests. The new tests should fail, but all other tests should pass.
- Implement the new functionality.
2.2. (GREEN) Rerun the tests. Everything should now pass.
- (REFACTOR) Refactor the code until you have a clean design, re-running the tests regularly to check everything is still working.
tip
A TDD cycle is also known as Red - Green - Refactor.
note
When using TDD, the design of your code emerges as a result of a repeated test-code-test cycle.
- Without TDD, you often come up with a design and make it your final design.
- With TDD:
- you need to figure how to pass new tests (in each cycle), which forces you to iterate on your design.
- you often ship something more effective.
Which type of test to apply TDD?
- You can apply TDD for many type of tests:
- Unit tests -> Force you consider how to design the small parts of your code.
- Integration tetsts -> Force you to consider how your different parts communicate with each other.
- End-to-end tests -> Force you to consider how to deploy everything.
- Performance tests -> Force you to think what is the bottlenecks are & which metrics you need gather to identify them.
For more information about TDD, see:
- Growing Object-Oriented Software, Guided by Tests by Steve Freeman and Nat Pryce (Addison-Wesley Professional)
- Hello, Startup: A Programmer’s Guide to Building Products, Technologies, and Teams (O’Reilly)
The other benefits of TDD:
- By writing tests first, you increase the chance of having thorough test converage.
- Because you’re forced to write code incrementally. Each incremental code can be tested more easy.
When not to use TDD?
- If you’re doing exploratory coding:
- you don’t yet know exactly what you’re building
- you’re just exploring the problem space by coding & messing with data
How TDD works with legacy codebase (that doesn’t have any tests)?
-
You can use TDD for any changes you make to the codebase
It’s a standard TDD cycle with some extra steps at the front:
A. Write a test for the functionality you’re about to modify. B. Run all the tests. They should all pass. C. Use the standard TDD process for new changes you’re about to make.
So it’s GREEN + Red-Green-Refactor.
tip
TDD can also be used for bug fixing.
- If there’s a bug in production, it’s mean there was no test that caught the bug.
- So you can do Test-Driven Bug Fixing.
Conclusion
To allow your team members to collaborate on your code:
-
Always manage your code with a version control system.
-
Use a build system to capture, as code, important operations and knowledge for your project, in a way that can be used both by developers and automated tools.
-
Use a dependency management tool to pull in dependencies — not copy & paste.
-
Use automated tests to give your team the confidence to make changes quickly.
-
Automated testing makes you more productive while coding by providing a rapid feedback loop: make a change, run the tests, make another change, re-run the tests, and so on.
-
Automated testing makes you more productive in the future, too: you save a huge amount of time not having to fix bugs because the tests prevented those bugs from slipping through in the first place.
-
THE BOY SCOUTS HAVE A RULE: “Always leave the campground cleaner than you found it.”2
https://learning.oreilly.com/library/view/97-things-every/9780596809515/ch08.html
Chapter 5: How to Set Up Continuous Integration (CI) and Continuous Delivery (CD)
Continuous Integration (CI)
Late Integration vs Continuous Integration
late integration : Come up with a final design for all the components of the system : - Have each team works on the components in isolated until it’s finished : When all components are done, assemble at the same time.
continuous integration (CI) : Come up with an initial design fo all the components of the system : - Have each team works on the components : - As teams make progress, they regularly test each component will all the other components & update the design (if there are any problems) : As components are completed, assemble incrementally
The problem with late integration
With late integration, there will a lot of conflicts and design problems:
- What if there are problems when integration between components of 2 teams, which teams should solve that problem?
- If the design has problems, how to go back and fix things?
In software development, late integration is
- developers work in totally isolated feature branches for weeks or months at a time.
- when a release rolls around, these features branches are all merged to the release branch.
When you don’t merge your code together for a long time, you end up with a lot of merge conflicts, e.g.
- 2 teams modified the same file in incompatible ways:
- 1 team made changes in a file, another team deleted it
- 1 team - after a giant refactor - remove all usages of a deprecated service; another teams introduce new usages for that services…
All these conflicts after resolved may still leads to bugs, problems that take days/weeks to stabilized. And the release process turned into a nightmare.
Continuous integration and its benefits
In software development, continuous integration is:
- developers merge their work together on a very regular basic: daily (or multiple times per day)
which will
- exposes problems with these works early in the process
- allows developers to make improvements incrementally (before any problems gone too far)
important
Key takeaway #1 Ensure all developers merge all their work together on a regular basis: typically daily or multiple times per day.
Continuous integration and trunk-based development
trunk-based development
: developers collaboration on a single long-live branches - e.g. main, master, trunk
: developers works on short-live branches; and open pull requests to merge them back into the shared branch on a regular basis
Trunk-based development is the most common way to implement continuous integration (CI)
note
You might think having all developers work on a single branch (main) have a problem with scaling,
- but in fact, it might be the only way to scale.
e.g. By using trunk-based development
- LinkedIn scale from 100 developers to 1000.
- Google scale to tens of thousands of developers, with 2+ billion lines of code, 86TB of source data, 40000 commits per day.
Three questions about continuous integration and trunk-based development
- Wouldn’t you have merge conflicts all the time?
- Wouldn’t the build always be broken?
- How do you make large changes that take weeks or months?
Dealing with Merge Conflicts
note
With late integration (and long-live feature branches), resolving merge conflicts
- occurs right before a release
- is a painful work that you only need to deal with once every few weeks/months.
But with continuous integration (and trunk-based development), you merge your code every day, so you need to resolve conflicts every day? So you need to do the painful work every day?
- If your branches are short-live, the odds of merge conflicts are much lower.
- Even if there are a merge conflicts, it’s much easier to resolve them (if you merge regularly).
tip
Merge conflicts are unavoidable:
- (Don’t try to avoid merge conflicts).
- Make them easy to be done by do them more often.
Preventing Breakages with Self-Testing Builds
-
CI (and trunk-based development) is always used with a self-testing build, which runs automated tests after every commit.
For any commit on any branch,
- every time a developer opens a pull request (PR) to merge a branch to
main- automated tests are run (against their branch)
- test results are shown directly in the PR UI.
- automated tests are run (against their branch)
- every time a developer opens a pull request (PR) to merge a branch to
tip
By having a self-testing build after every commit:
- Code doesn’t pass your test suite doesn’t get merged to
main. - For code does pass you test suite, but cause a breakage:
- as soon as you detect it, you can revert that commit automatically.
How to set up a self-testing build
The most common way to set up a self-testing build is to run a CI server.
CI server : e.g. Jenkins, TeamCity Argo; GitHub Actions, GitLab, CircleCI. : a software that integrates with your VCS to run various automations, e.g. automated tests : - in response to an event (in your VSC), e.g. new commits/branches/PRs…
tip
CI server are such an integral part of CI,
- for many developers, CI server and CI are nearly synonymous.
The benefits of CI (and Automated Tests)
-
Without continuous integration, your software is broken until somebody proves it works, usually during a testing or integration stage.
-
With continuous integration, your software is proven to work (assuming a sufficiently comprehensive set of automated tests) with every new change — and you know the moment it breaks and can fix it immediately.
note
With continuous integration, your code is always in a working & deployable state 👉 You can deploy at any time you want.
tip
The CI server act as a gatekeeper 👮🆔:
- protecting your code from any changes that threaten your ability to deploy at any time.
important
Key takeaway #2 Use a self-testing build after every commit to ensure your code is always in a working & deployable state.
Making Large Changes
For large changes that take weeks/months, e.g. major new feature, big refactor - how can you merge your in-compete work on a daily basis
- without breaking the build
- without releasing unfinished features to users?
important
Key takeaway #3 Use branch by abstraction and feature toggles to make large-scale changes while still merging your work on a regular basis.
Branch by abstraction
branch by abstraction : a technique for making a large-scale change to a software system’s codebase in gradual way, that allows you : - to release the system regularly while the change is still in-progress
Branch by abstraction works at code-level, allow you to
- switch the implementation of the abstract easily (at code-level)
- or even have 2 implementation (versions) of the feature in parallel (at code-level)
For more information, see:
- Branch By Abstraction | Martin Fowler
- Branch by abstraction pattern |AWS Prescriptive Guidance - Decomposing monoliths into microservices
Feature toggles
feature toggle : aka feature flag : you wrap a new feature in conditionals, that let you : - toggle that feature on/off dynamically at deploy time/runtime
By wrap features in conditionals, at code-level,
- you can make some part of your system invisible to the users without changing the code.
e.g.
-
In the Node.js sample-app, you can add a feature toggle to pick between new homepage and the “Hello, World!” text
app.get("/", (req, res) => { if (lookupFeatureToggle(req, "HOME_PAGE_FLAVOR") === "v2") { res.send(newFancyHomepage()); } else { res.send("Hello, World!"); } });- The
lookupFeatureTogglewill check if the feature toggle is enables by querying a dedicated feature toggle service.
- The
For more information, see:
Feature toggle service
A feature toggle service can:
- Store a feature toggle mapping
- Be used to look up feature toggles programmatically
- Update feature toggle values without having to update/deploy code
e.g.
- growthbook, Flagsmith, flagr, OpenFeature
- Managed feature: Split, LaunchDarkly, ConfigCat, Statsig.
Feature toggle and continuous integration
By
- wrapping new features in conditionals (feature toggle check), and
- keep the default value of all feature toggles to off
you can merge your new unfinished feature into main and practice continuous integration.
tip
Feature toggles also give you many super powers, which you can see in the Continuous Delivery section
Example: Run Automated Tests for Apps in GitHub Actions
In this example, you will use GitHub Actions to run the automated tests (that added in Chap 4) after each commit and show the result in pull requests.
-
Copy the Node.js
sample-appand the automated testscd examples mkdir -p ch5 cp -r ch4/sample-app ch5/sample-app -
From the root of the repo, create a folder called
.github/workflowsmkdir -p .github/workflows -
Inside
.github/workflows, create a GitHub workflow file namedapp-tests.yml# .github/workflows/app-tests.yaml name: Sample App Tests on: push # (1) jobs: # (2) sample_app_tests: # (3) name: "Run Tests Using Jest" runs-on: ubuntu-latest # (4) steps: - uses: actions/checkout@v2 # (5) - name: Install dependencies # (6) working-directory: ch5/sample-app run: npm install - name: Run tests # (7) working-directory: ch5/sample-app run: npm test[!NOTE] With GitHub Actions, you use YAML to
- define workflow - configurable automated processes - that
- run one or more jobs
- in response to certain triggers.
- run one or more jobs
[!TIP] If you don’t know about YAMl, see
-
(1)
onblock: The trigger that will cause the workflow to run.In this example,
on: pushconfigure this workflow to run every time you do agit pushto this repo -
(2)
jobsblock: One or more jobs - aka automations - to run in this workflow.[!NOTE] By default, jobs run parallel, but you can
- configure jobs to run sequentially
- (and define dependencies on other jobs, passing data between jobs)
-
(3)
sample_app_tests: This workflow define a single job namedsample_app_tests, which will run the automated tests for the sample app.[!NOTE] GitHub Actions use YAML syntax to define the workflow:
- A YAML node can be one of three types:
- Scalar: arbitrary data (encoded in Unicode) such as strings, integers, dates
- Sequence: an ordered list of nodes
- Mapping: an unordered set of key/value node pairs
- Most of the GitHub Actions’s workflow syntax is a part of a mapping node - with:
- a pre-defined key, e.g.
name,on,jobs, - excepting some where you can specify your own key, e.g.
<job_id>,<input_id>,<service_id>,<secret_id>
- a pre-defined key, e.g.
[!TIP] In this example,
sample_app_testis the<job_id>specified by you - A YAML node can be one of three types:
-
(4)
runs-onblock: Usesubuntu-latestrunner that has:- default hardware configuration (2 CPUs, 7GB RAM, as of 2024)
- software with Ubuntu & a lot of tools (including Node.js) pre-installed.
[!NOTE] Each job runs on a certain type of runner, which is how you configure:
- the hardware (CPU, memory)
- the software (OS, dependencies)
to use for the job.
-
(5)
usesblock: Uses a reusable unit of code (aka action) -actions/checkout- as the first step.[!NOTE] Each job consists of a series of steps that are executed sequentially.
[!NOTE] GitHub Actions allow you to share & reuse workflows, including
- public, open source workflows (available on GitHub Actions Marketplace)
- private, internal workflows within your own organization
-
(6): The second step has a
runblock to execute shell commands (npm install)[!NOTE] A step can has:
- either a
runblock: to run any shell commands - or a
usesblock: to run an action
- either a
-
(7) The thirst step also has a
runblock to execute shell commands (npm test)
- define workflow - configurable automated processes - that
-
Commit & push to your GitHub repo
git add ch5/sample-app .github/workflows/app-tests.yml git commit -m "Add sample-app and workflow" git push origin main -
Verify that the automated tests run
-
Create a new branch
git switch -c test-workflow -
Make a change to the app
sed -i s/Hello, World!/Fundamentals of DevOps!/g ch5/sample-app/app.js -
Commit & push
git add ch5/sample-app git commit -m "Add sample-app and workflow" git push origin main -
Open the GitHub URL for that branch; then “create pull request”
-
Verify that the workflow run
[!TIP] In GitHub PR UI, a workflow run is show as check
-
Open the check detail to know what’s wrong with the check (It’s a fail test).
-
-
Update the automated test to match with the new response text
sed -i s/Hello, World!/Fundamentals of DevOps!/g ch5/sample-app/app.test.js-
Commit & push to the same branch
git add ch5/sample-app/app.test.js git commit -m "Update response text in test" git push origin test-workflow -
GitHub Actions will re-run your automated tests.
-
Open the GitHub PR UI to verify that the automated tests now is passing. (It’s should show “All checks have passed”)
-
Get your hands dirty: Run automated app tests in CI
To help catch bugs, update the GitHub Actions workflow to run a JavaScript linter, such as JSLint or ESLint, after every commit.
To help keep your code consistently formatted, update the GitHub Actions workflow to run a code formatter, such as Prettier, after every commit.
Run both the linter and code formatter as a pre-commit hook, so these checks run on your own computer before you can make a commit. You may wish to use the pre-commit framework to manage your pre-commit hooks.
Machine-User Credentials and Automatically-Provisioned Credentials
If you want to run unit testing with OpenTofu’s test command,
- you need to give the automated tests a way to authenticated to cloud provider
- if these automated tests run on your local machine, they may use a real-user credential - e.g. AWS IAM user credentials, GitHub personal access token -
- if these automated tests run on a CI server, you should never use a real-user credential.
The problem of using real-user credentials for CI server
-
Departures
Typically, when someone leaves a company, you revoke all their access.
If you were using their credentials for automation, then that automation will suddenly break.
-
Permissions
The permissions that a human user needs are typically different than a machine user.
-
Audit logs
If you use same user account for both a human & automation, the audit logs1 aren’t useful for debugging & investigating security incidents anymore.
-
Management
You typically want multiple developers at your company to be able to manage the automations you set up.
- If you use a single developer’s credentials for those automations,
- when he/she need to update the credentials or permissions,
- the other developers won’t be able to access that user account
- when he/she need to update the credentials or permissions,
- If you use a single developer’s credentials for those automations,
important
Key takeaway #4 Use machine user credentials or automatically-provisioned credentials to authenticate from a CI server or other automations.
Machine-user credentials
machine-user : a user account that is only used for automation (not by any human user)
machine-user credential : a credential of a machine-user : usually it’s a long-live credential
How to use a machine-user credential
- Create a machine-user
- Generate credential - e.g. access token - for that machine-user
- Manually copy the credential into whatever tool you’re using, GitHub Actions
Machine-user credentials pros and cons
-
Pros:
- It solves all problems of using a shared real-user credential
-
Cons:
-
You need to manually copy machine-user credentials (just as a password)
-
Machine-user credentials are long-lived credentials
If they are leaked, you would have a big problem.
-
Automatically-provisioned credentials
automatically-provisioned credential : credential that is provisioned automatically (by a system) : - without any need for you to manually create machine users or copy/paste credentials : - so it can be used by another system : usually it’s a short-live credential : e.g. AWS IAM roles
This requires that the two systems
- the system you’re authenticating from, e.g. a CI server
- the system you’re authenticating to, e.g. AWS
have an integration that supports automatically-provision credentials.
The two systems can be
- in the same company’s services 👉 via AWS IAM role (when using with EKS/EC2).
- across companies’ services 👉 via OpenID Connect (OIDC) - an open protocol for authentication.
OpenID Connect (OIDC)
To understand OIDC, let’s examine an example for OIDC integration between GitHub and AWS:
-
You’re authenticate from GitHub to AWS:
- GitHub: the system you’re authenticating from
- AWS: the system you’re authenticating to
-
In other words,
- GitHub system needs to have some permissions to do something with AWS.
- AWS systems will provision the credential that GitHub needs.
-
Under the hood, with OIDC, you configure AWS to
-
trust an IdP (e.g. GitHub)
[!TIP] How can AWS trust an IdP, e.g. GitHub?
OIDC trust is a digital signature system2:
- GitHub has the private key (and use it to sign the OIDC token).
- AWS has the public key (and use it to validate the OIDC token).
-
allow that IdP to exchange an OIDC token3 for short-lived AWS credentials
-
-
Here is how the authenticate from GitHub to AWS works:
- [GitHub] Generate an OIDC token: includes claims about what repo/branch (the workflow is running in).
- [GitHub] Call the
AssumeRoleWithWebIdentityAPI: to specify the IAM Role to assume (and passing the OIDC token to AWS as authentication). - [AWS] Validate the OIDC token: using the public key (that you provide when setting up GitHub as an IdP).
- [AWS] Validate IAM role conditions: against the claims (whether that repo/branch is allowed to assume the IAM role).
- [AWS] Grant short-lived AWS credentials: then send back to GitHub.
- [GitHub] Use the AWS credentials: to authenticate to AWS (and make changes in AWS account)
Example: Configure OIDC with AWS and GitHub Actions
The github-aws-oidc and gh-actions-iam-roles OpenTofu modules
The sample code repo includes 2 OpenTofu modules
-
github-aws-oidcmodule:- in
ch5/tofu/modules/github-aws-oidcfolder - that can provision GitHub as an OIDC provider for AWS account.
- in
-
gh-actions-iam-rolesmodule:- in
ch5/tofu/modules/gh-actions-iam-rolesfolder - that can provision severals IAM roles for CI/CD with GitHub Actions.
- in
Configure github-aws-oidc and gh-actions-iam-roles OpenTofu module
-
Create a new Git branch
git switch -c opentofu-tests -
Create the folder for the OpenTofu root module
cd examples mkdir -p ch5/tofu/live/ci-cd-permissions cd ch5/tofu/live/ci-cd-permissions -
Configure the
github-aws-oidcmodule# examples/ch5/tofu/live/ci-cd-permissions/main.tf provider "aws" { region = "us-east-2" } module "oidc_provider" { source = "github.com/brikis98/devops-book//ch5/tofu/modules/github-aws-oidc" provider_url = "https://token.actions.githubusercontent.com" # (1) }-
1
provider_url: The URL of the IdP[!TIP] The
github-aws-oidcwill use this URL to fetch GitHub’s fingerprint, that used by AWS to validate the OIDC token from GitHub.
-
-
Configure the
gh-actions-iam-rolesmodule to create examples IAM roles (to be assumed from GitHub Actions).# examples/ch5/tofu/live/ci-cd-permissions/main.tf module "oidc_provider" { # ... (other params omitted) ... } module "iam_roles" { source = "github.com/brikis98/devops-book//ch5/tofu/modules/gh-actions-iam-roles" name = "lambda-sample" # (1) oidc_provider_arn = module.oidc_provider.oidc_provider_arn # (2) enable_iam_role_for_testing = true # (3) # TODO: fill in your own repo name here! github_repo = "brikis98/fundamentals-of-devops-examples" # (4) lambda_base_name = "lambda-sample" # (5) }-
1
name: Base name for this module’s resources -
2
oidc_provider_arn: Specify the IdP (the one created bygithub-aws-oidcmodule) that will be allowed to assume created by this module.[!TIP] Under the hood,
gh-actions-iam-rolesmodule will- configure the trust policy in the IAM roles to
- trust this OIDC provider (and allow it to assume the IAM roles)
- configure the trust policy in the IAM roles to
-
3
enable_iam_role_for_testing: Set totrueto create IAM roles used for testing. -
4
github_repo: Specify the GitHub repo that will be allowed to assume the IAM roles.[!TIP] Under the hood, the
gh-actions-iam-rolesmodule- sets certain conditions in the trust policies of each IAM role
- to specify which repos/branches in GitHub
- are allowed to assume that IAM role
- to specify which repos/branches in GitHub
- sets certain conditions in the trust policies of each IAM role
-
5
lambda_base_name: Manually specify the lambda function base name.
-
-
Create the output variables
output "lambda_test_role_arn" { value = module.iam_roles.lambda_test_role_arn } -
Init & apply OpenTofu code
tofu init tofu apply
Automated tests and infrastructure code
Example: Run Automated Tests for Infrastructure in GitHub Actions
-
Copy the infrastructure code
cd examples mkdir -p ch5/tofu/modules cp -r ch4/tofu/live/lambda-sample ch5/tofu/live cp -r ch4/tofu/modules/test-endpoint ch5/tofu/modules -
Remove hard-codes names in
lambda-sample(so the tests can run concurrently)-
Define an input variable for
lambda-sample# examples/ch5/tofu/live/lambda-sample/variables.tf variable "name" { description = "The base name for the function and all other resources" type = string default = "lambda-sample" }- This defines a
namevariable to use as the base name forlambda-samplemodule with the default value"lambda-sample"(same as before).
- This defines a
-
Update
main.tfto usevar.name(instead of hard-coded names)# examples/ch5/tofu/live/lambda-sample/main.tf module "function" { # ... (other params omitted) ... name = var.name } module "gateway" { # ... (other params omitted) ... name = var.name }
-
-
Define the GitHub Actions workflow to run the infrastructure automated tests
The workflow
- runs on
push, - contains 2 jobs:
terrascan,opentofu_test
-
# .github/workflows/infra-tests.yml name: Infrastructure Tests on: push jobs: terrascan: name: "Run Terrascan" runs-on: ubuntu-latest steps: - uses: actions/checkout@v2 - name: Run Terrascan uses: tenable/terrascan-action@main with: iac_type: "terraform" iac_dir: "ch5/tofu/live/lambda-sample" verbose: true non_recursive: true config_path: "ch5/tofu/live/lambda-sample/terrascan.toml" # opentofu_test: -
The first job
terrascan:- checkout code
- install then run
terrascanusingtenable/terrascan-actionaction
-
opentofu_test: name: "Run OpenTofu tests" runs-on: ubuntu-latest permissions: # (1) id-token: write contents: read steps: - uses: actions/checkout@v2 - uses: aws-actions/configure-aws-credentials@v3 # (2) with: # TODO: fill in your IAM role ARN! role-to-assume: arn:aws:iam::111111111111:role/lambda-sample-tests # (3) role-session-name: tests-${{ github.run_number }}-${{ github.actor }} # (4) aws-region: us-east-2 - uses: opentofu/setup-opentofu@v1 # (5) - name: Tofu Test env: TF_VAR_name: lambda-sample-${{ github.run_id }} # (6) working-directory: ch5/tofu/live/lambda-sample # (7) run: | tofu init -backend=false -input=false tofu test -verbose -
The second job
opentofu_test:- 1
permissions: In additional tocontents: read(the default one), addid-token: writepermissions to issue an OIDC token. - 2: Authenticate to AWS with OIDC using
aws-actions/configure-aws-credentialsaction to 👉 This callsAssumeRoleWithWebIdentity) - 3: Manually fill in the IAM role to assume, it’s the IAM role created in the previous example.
- 4: Specify the session name when assume the IAM role 👉 This shows up in audit logs.
- 5: Install OpenTofu using
opentofu/setup-opentofuaction. - 6: Use the environment variable
TF_VAR_nameto set thenameinput variable of thelambda-samplemodule. - 7: Run the tests
Skip backend initialization with
backend=falseflag.
- 1
- runs on
-
Commit & push to
opentofu-testsbranch; then open a PR. -
Verify the infrastructure automated tests run.
Get your hands dirty: Run automated infrastructure tests in CI
To help keep your code consistently formatted, update the GitHub Actions workflow to run a code formatter, such as tofu fmt, after every commit.
Continuous Delivery (CD)
Continuous Delivery and Continuous Deployment
continuous delivery (CD) : a software development practice where you ensure that you can : - deploy to production at any time - e.g. daily, several times a days - in a manner that is fast, reliable, sustainable.
continuous deployment (CD*) : a software development practice where you : - deploy to production after every single commit in a manner that is fast, reliable, sustainable
With continuous delivery (CD), you ensure that the frequency of deployment is
- purely a business decision
- not limited by your technology
important
Key takeaway #5 Ensure you can deploy to production at any time in a manner that is fast, reliable, and sustainable.
To achieve continuous delivery (and continuous deployment), you need to fulfill 2 requirements:
-
The code is always in a working & deployable state:
This is the key benefit of practicing CI:
- Everyone integrates their work regularly
- with a self-testing build and a sufficient suite of tests.
- Everyone integrates their work regularly
-
The deployment process is sufficiently automated:
A manually deployment deployment process typically aren’t fast, reliable, sustainable.
This section focus on the second requirement - automating the deployment process using IaC:
- Implementing deployment strategies
- Implementing a deployment pipeline
deployment strategy : a deployment strategy is how you want to deploy your software
deployment pipeline : a deployment pipeline is a system of automated processes that deploy your software to production
Deployment Strategies
There are many deployment strategies that you can use to deploy (aka roll out) changes:
- some have downtime, others don’t
- some are easy to implement, others are complicated
- some only work with stateless apps4
- some only work with stateful apps5
This section will go over the most common deployment strategies. For each strategy, there are:
- Basic overview
- Advantages & disadvantages
- Common use cases
tip
You can combine multiple strategies together.
Downtime deployment
| Downtime deployment | |
|---|---|
| Overview | 1. (v1 replicas) |
| 2. Undeploy all v1 replicas6 | |
| 3. Deploy v2 replicas (to same servers) | |
| Advantages | - Easy to implement |
| - Works with all type of apps | |
| Disadvantages | - Downtime |
| Common use cases | - Single-replica systems |
| - Data migrations |
Rolling deployment without replacement
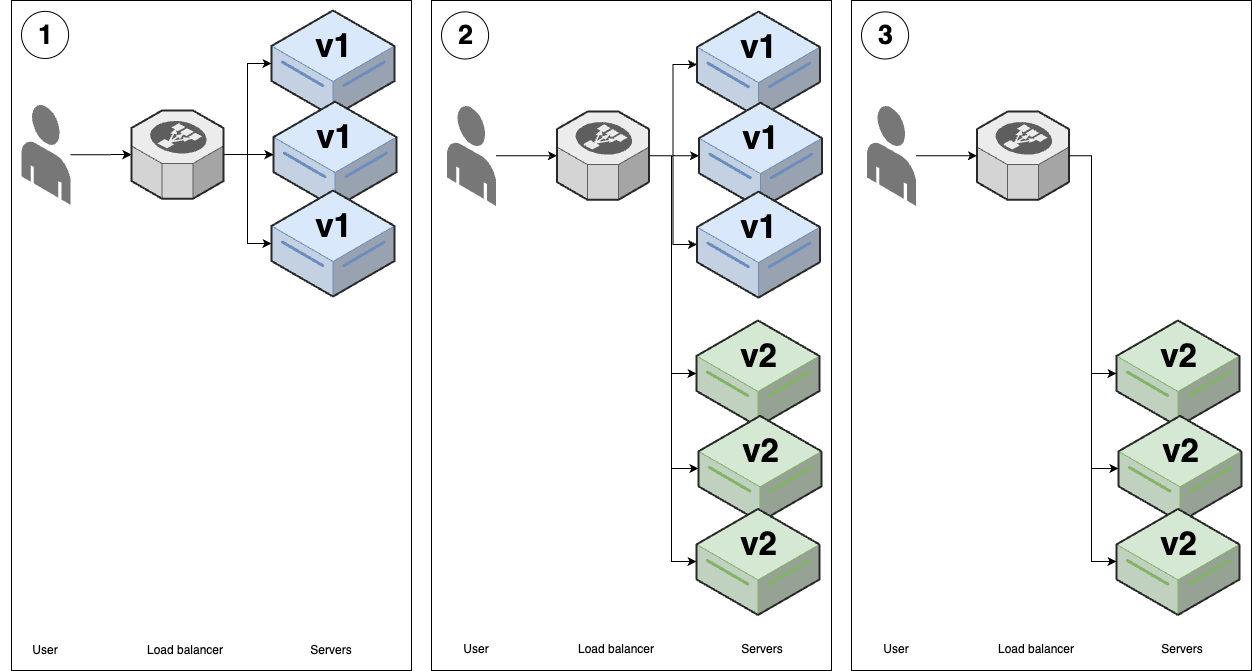
| Rolling deployment without replacement | |
|---|---|
| Overview | 1. (v1 replicas) |
| 2. Deploy v2 replicas (to new server)7 | |
| 3. Gradually undeploy v1 replicas. | |
| Advantages | - No downtime |
| - Widely supported | |
| Disadvantages | - Poor UX |
| - Works only with stateless apps | |
| Common use cases | - Deploying stateless apps |
Rolling deployment with replacement
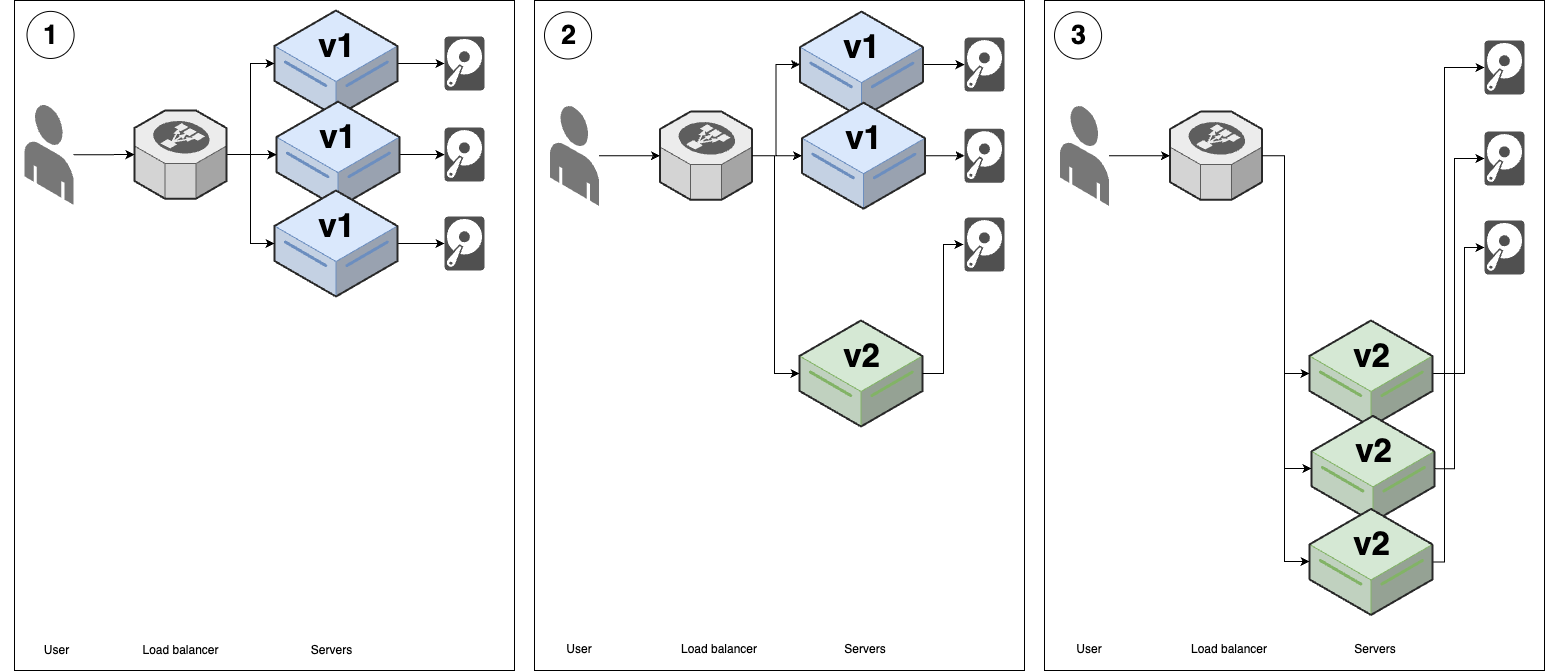
| Rolling deployment with replacement | |
|---|---|
| Overview | 1. (v1 replicas with hard-drive attached) |
| 2. Disconnect one v1 replica; shut down server; move its hard-drive to new v2 server.8 | |
| 3. Repeat for each v1 server | |
| Advantages | - No downtime |
| - Works with all types of apps | |
| - Widely supported | |
| Disadvantages | - Limited support for hard-drive replacement |
| - Poor UX | |
| Common use cases | - Deploying stateful apps |
Blue-green deployment
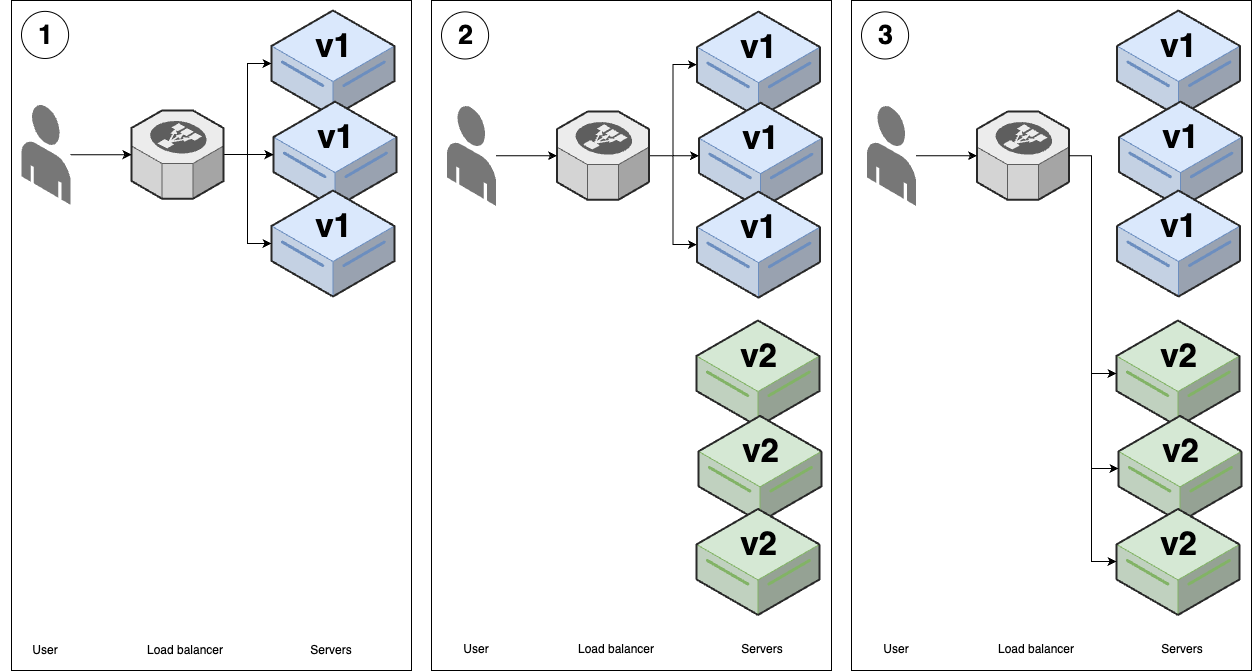
| Blue-green deployment | |
|---|---|
| Overview | 1. (v1 replicas) - aka blue 🔵 |
| 2. Deploy v2 replicas - aka green 🟢9 | |
| 3. When all v2 replicas pass health checks, do an instantaneous switchover. | |
| Advantages | - No downtime |
| - Good UX | |
| Disadvantages | - Limited support |
| - Works only with stateless apps | |
| Common use cases | - Deploying stateless apps |
Canary deployment
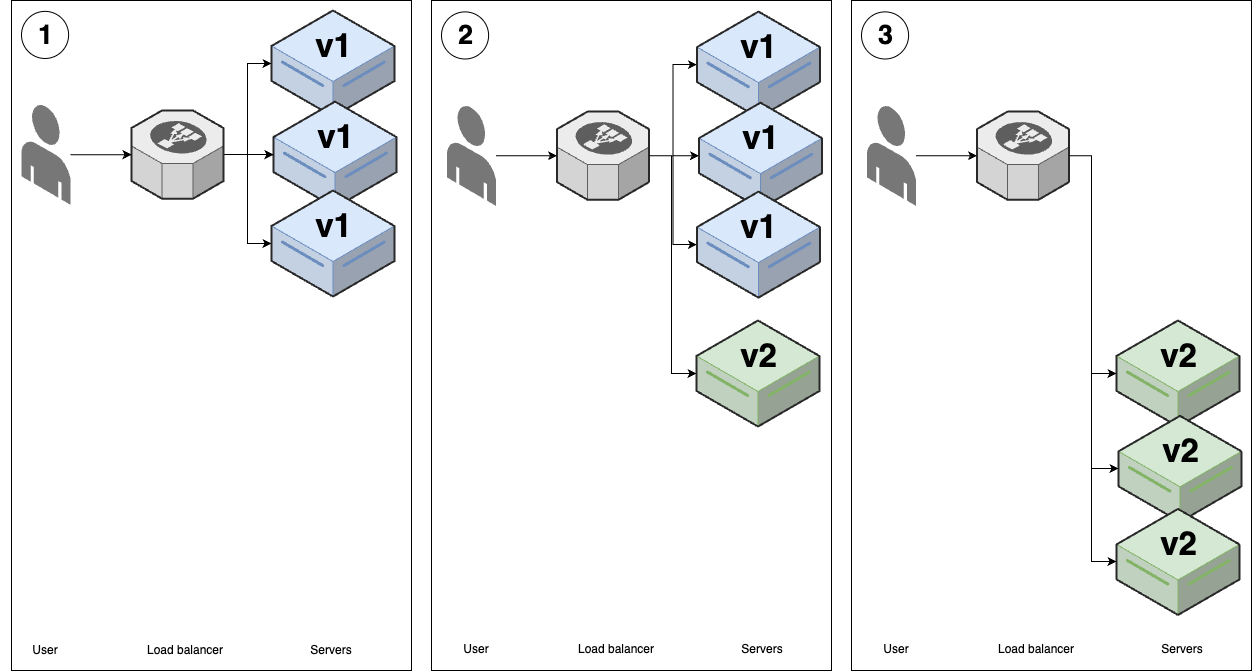
| Canary deployment | |
|---|---|
| Overview | 1. (v1 replicas) |
| 2. Deploy a single v2 replica - aka canary server; - Compare to a control (a random v1 replica)10 | |
| 3. If there isn’t any differences, roll out all v2 replicas using another strategy (e.g. rolling, blue-green) | |
| Advantages | - Catch errors early |
| Disadvantages | - Poor UX |
| Common use cases | - Large deployments |
| - Risky deployments |
Feature toggle deployment
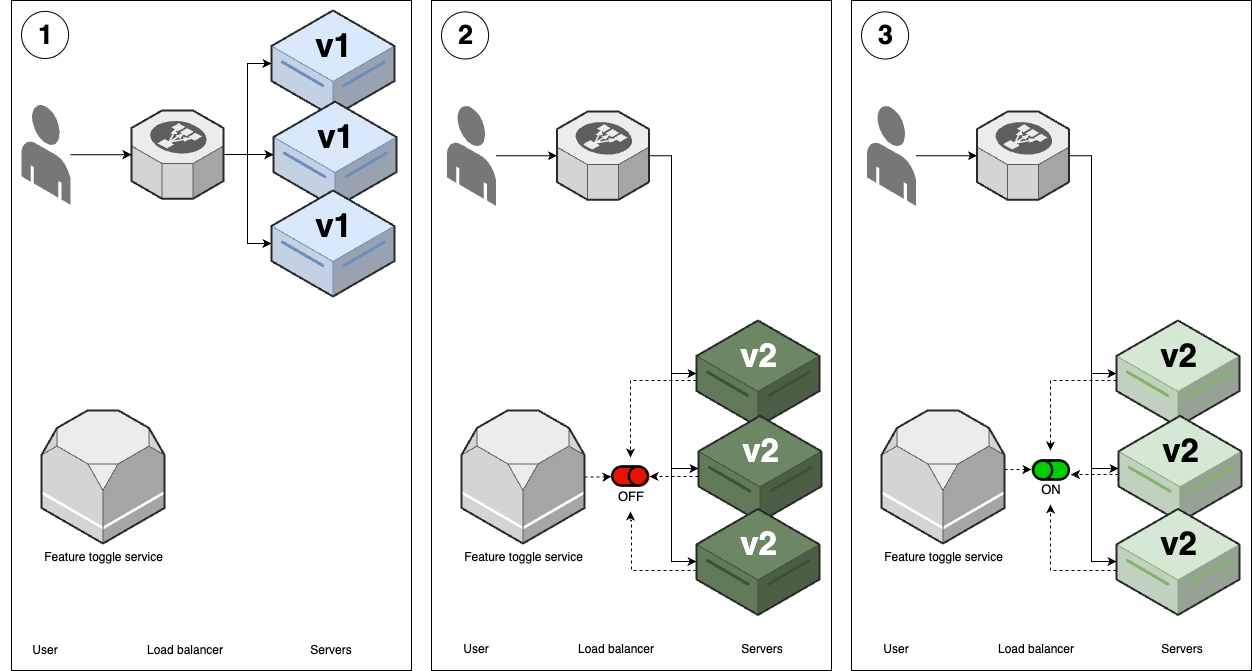
| Feature toggle deployment | |
|---|---|
| Overview | 1. (v1 replicas) |
| 2. Deploy v2 replicas: - Use another strategy, e.g. rolling, blue-green. - Wrap new features in a feature flag (off by default) 11 | |
| 3. Enable v2 features with feature toggle service12 | |
| Advantages | - Separate deployment from release |
| - Resolve issues without deploying new code | |
| - Ramp new features | |
| - A/B test features | |
| Disadvantages | - Requires an extra service |
| - Forked code | |
| Common use cases | - All new feature development |
| - Data-driven development |
Promotion deployment
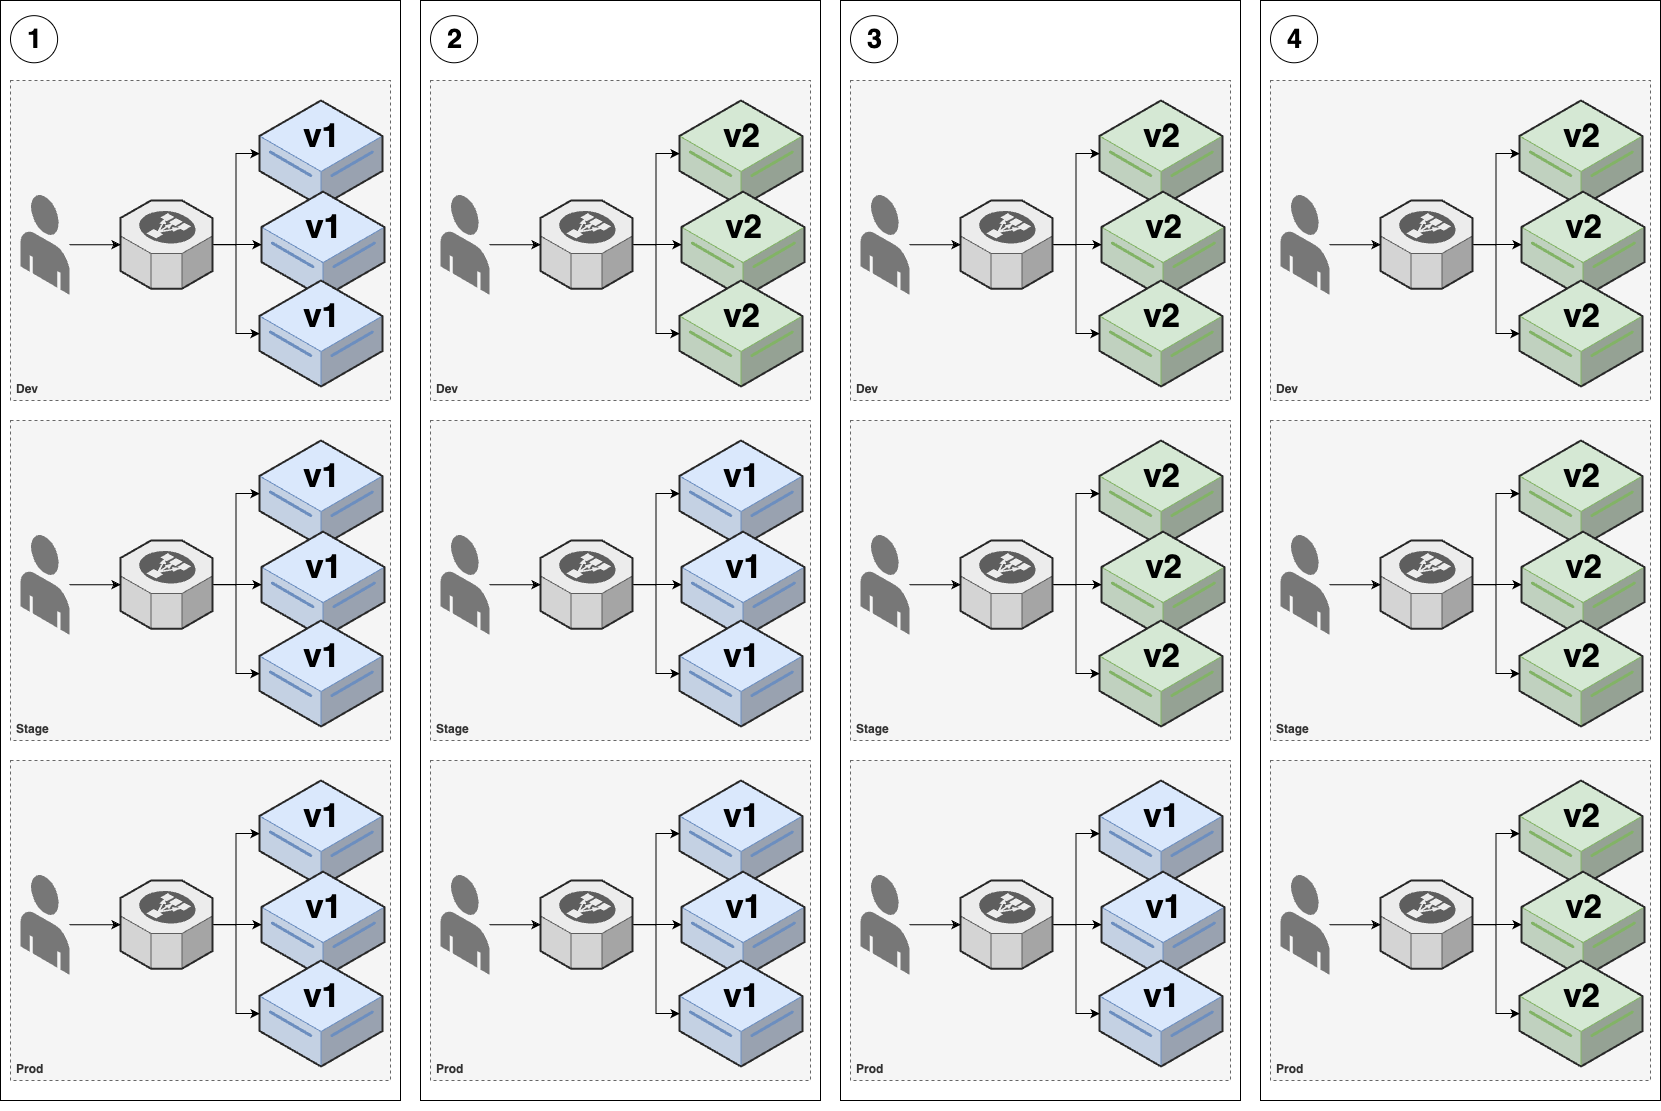
| Promotion deployment | |
|---|---|
| Overview | For example, you have 3 environments (env): dev, stage, prod |
| 1. (v1 replicas is running in all 3 envs) | |
2. Deploy v2 across dev environment (using another strategy, e.g. rolling, blue-green)- Then do a round of testing in dev env | |
3. If everything works well in dev env, deploy exactly the same v2 across stage env (aka promoting)- Then do a round of testing in stage env | |
4. If everything works well in stage env, you finally promote v2 to prod env | |
| Advantages | - Multiple chances to catch errors |
| Disadvantages | - Requires multiple environments |
| Common use cases | - All deployments |
Infrastructure deployment
All the previous deployment strategies (except promotion deployment) only applicable for deploying application code, e.g. apps written in Go, Javascript, Ruby, Python.
For infrastructure code (e.g. OpenTofu, CloudFormation, Pulumi), the deployment strategies are:
- much more limited
- typically binary: make a change or not (no gradual rollout, no feature toggle, no canary…)
| Infrastructure deployment | |
|---|---|
| Overview | 1. (v1 replicas) |
2. Validate plan output: e.g. tofu plan, kubectl apply --dry-run | |
| 3. Use a promotion deployment to promote infrastructure changes between environments | |
| Advantages | - Works with infrastructure deployments |
| - Even more chances to catch errors | |
| Disadvantages | - Requires multiple environments |
| Common use cases | - All infrastructure deployments |
Deployment Pipelines
deployment pipeline : the process that you use to : - go from an idea to live code13 : consists of all the steps (you must go through) to release
Most deployment pipelines include the following steps:
-
Commit
- How do you get code into version control?
- Do you use a pull-request based process?
- Do you use trunk-based development?
-
Build
- 🏗️ What compilation & build steps do you need?
- 📦 How do you package the code?
-
Test
- 🦾 What automated tests do you run against the code?
- 👐 What manual tests?
-
Review
- ❓ What review processes do you use?
- ✅ Who has to sign off & approve merges and deployments?
-
Deploy
- 🔟 How do you get the new code into production?
- ✨ How do you release new functionality to users?
note
Delivery, deploy, release? TODO
Typically, you run a deployment pipeline on a deployment server, which is:
-
the same server used for CI, e.g. GitHub Actions, CircleCI, GitLab CI
-
a server that is designed for a specific technology
e.g. For OpenTofu/Terraform: HashiCorp Cloud Platform, Spacelift, Atlantis, env0, Scalr.
Deployment pipelines are typically defined as code, by using:
- the same Domain-Specific Language (DSL) for CI, e.g. GitHub Actions workflow (via YAML)
- a scripting language, e.g. Ruby, Python, Bash
- build system’s language, e.g. NPM, Maven, Make
- a workflow-specific tool to define workflows that can run on multi platforms, e.g. Dagger, Common Workflow Language (via YAML)
note
In many cases, a deployment pipeline will use multiple languages & tools together.
Example: Configure an automated deployment pipeline in GitHub Actions
In this example, you will deploy a deployment pipeline for the lambda-sample OpenTofu module:
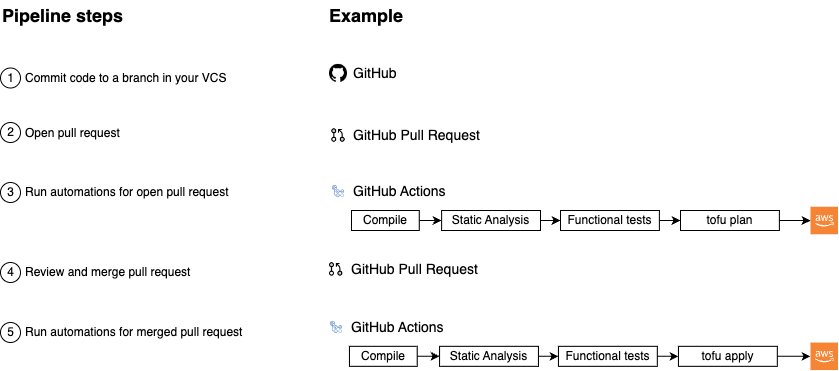
The deployment pipeline has 5 typical steps:
-
Commit code to a branch in your VCS:
First, you make some code changes in a branch.
-
Open a pull request:
Once the changes are ready to review, you open a PR.
-
Run automations for open pull request:
Your deployment server runs automations on the open PR, such as
- compiling the code, static analysis
- functional tests, e.g., unit tests, integration tests…
- generating the plan output by running
tofu plan.
-
Review and merge the pull request:
Your team members
- review the PR:
- the code
- the outputs of the automations, e.g. test results, plan output
- if everything looks good, merge the PR in.
- review the PR:
-
Run automations for the merged pull request:
Finally, your deployment server runs automations for the merged PR, such as
- compiling the code, static analysis, functional tests…
- deploying the changes by running
tofu apply.
note
This type of pipeline, where you drive actions through Git’s operations (e.g. commits, branches, pull requests…) is referred to as GitOps pipeline.
In Example: Run Automated Tests for Infrastructure in GitHub Actions, most of the steps in this deployment pipeline has been implemented, except:
- When you open a PR, run
tofu planon thelambda-samplemodule. - When you merge a PR, run
tofu applyon thelambda-samplemodule.
To implement these 2 items, you need to:
- Share OpenTofu state (by using a remote backend for OpenTofu state)
- Add IAM roles for infrastructure deployments in GitHub Actions.
- Define a pipeline for infrastructure deployments.
Sharing OpenTofu state files
In Chapter 2 - Example: Update Infrastructure Using OpenTofu, you learned that, by default, OpenTofu uses the local backend to store OpenTofu state in .tfstate files (on your local hard drive).
- Local backend works file when you’re learning and working alone.
- If you want to use OpenTofu in a team, you need a way to share these state files.
warning
The problems with sharing state files using version control:
-
Manual error
It’s just a matter of time before someone
- run
tofu applywith out-of-date state files and:- accidentally rolls back
- accidentally duplicates previous deployments
- run
-
No Locking Mechanism
2 teams members might run
tofu applyat the same time (on the same state files). -
Exposed Secrets
OpenTofu state files are just plain-text, which might including secrets (sensitive data from some resources).
- If you store these state file in VCS, any one has access to your infrastructure code also have access to your infrastructure.
The best way to share state files (in a team) is to use a remote backend, e.g. Amazon S3.
-
In additional to solving all problems of using VSC to store state files:
-
No manual error:
When using remote backend, OpenTofu will automatically
- load state files from that backend before each
tofu plan/apply. - store state files in that backend after each
tofu apply.
- load state files from that backend before each
-
Locking mechanism:
Most of the remote backends natively support locking. Before each
tofu apply, OpenTofu will automatically:- acquire a lock
- if the lock is already acquired by someone else, you will have to wait.
-
Secrets are encrypt-in-transit and encrypt-at-rest
-
Example: Use S3 as a remote backend for OpenTofu state
If you’re using OpenTofu with AWS, S3 is the best choice for remote backend. S3:
- supports locking (via DynamoDB)
- supports encryption
- supports versioning 👈 ~ VSC (you can roll back to an older version)
- is designed for 99.999999999% durability and 99.99% availability 👈 no data loss, no outages
- is a managed services 👈 no needs to deploy & manage extra infrastructure
- is inexpensive 👈 almost “free” with AWS Free Tier.
The state-bucket OpenTofu module
The sample code repo includes state-bucket OpenTofu module:
- in
ch5/tofu/modules/state-bucketfolder - that can:
- provision an S3 bucket to store OpenTofu state, including:
- enable versioning on the S3 bucket.
- enable server-side encryption for all files written to the S3 bucket.
- block all public access to the S3 bucket.
- provision a DynamoDB table for OpenTofu locking.
- provision an S3 bucket to store OpenTofu state, including:
Configure state-bucket OpenTofu module
-
Checkout the
mainbranchcd devops-book git checkout main git pull origin main -
Create a folder for the root module
cd examples mkdir -p ch5/tofu/live/tofu-state cd ch5/tofu/live/tofu-state -
Configure the
state-bucketmodule# examples/ch5/tofu/live/tofu-state/main.tf provider "aws" { region = "us-east-2" } module "state" { source = "github.com/brikis98/devops-book//ch5/tofu/modules/state-bucket" # TODO: fill in your own S3 bucket name! name = "fundamentals-of-devops-tofu-state" } -
Init & apply OpenTofu module to create a S3 bucket (that will be used as a remote backend)
tofu init tofu apply
-
Configure S3 bucket and DynamoDB table as a remote backend
# examples/ch5/tofu/live/tofu-state/backend.tf terraform { backend "s3" { # TODO: fill in your own bucket name here! bucket = "fundamentals-of-devops-tofu-state" # (1) key = "ch5/tofu/live/tofu-state" # (2) region = "us-east-2" # (3) encrypt = true # (4) # TODO: fill in your own DynamoDB table name here! dynamodb_table = "fundamentals-of-devops-tofu-state" # (5) } }- 1
bucket: The S3 bucket to use as a remote backend. - 2
key: The path within the S3 bucket, where the OpenTofu state file should be written. - 3
region: The AWS region where you created the S3 bucket. - 4
encrypt: Encrypt the OpenTofu state when store in S3. - 5
dynamodb_table: The DynamoDB table to use for locking.
- 1
-
Re-run
tofu initto initialized the new backend configtofu init
-
Update the same backend configuration for
lambda-samplemodule# examples/ch5/tofu/live/lambda-sample/backend.tf terraform { backend "s3" { # TODO: fill in your own bucket name here! bucket = "fundamentals-of-devops-tofu-state" # (1) key = "ch5/tofu/live/lambda-sample" # (2) region = "us-east-2" encrypt = true # TODO: fill in your own DynamoDB table name here! dynamodb_table = "fundamentals-of-devops-tofu-state" # (3) } }- 1
bucket: Use the same S3 bucket astofu-statemodule. - 2
key: Use a different key fromtofu-statemodule. - 3
dynamodb_table: Use the same DynamoDB table astofu-statemodule.
- 1
-
Re-run
tofu initforlambda-samplemodule.
- Commit your changes to
tofu-stateandlambda-samplemodule; then push tomain.
Example: Add IAM roles for infrastructure deployments in GitHub Actions
In previous section, you have configure an OIDC provider to give GitHub Actions access to your AWS account for running automated tests.
In this example, you will give GitHub Actions access to your AWS account for deployments.
note
Normally, you would deploy to a totally separate environment (separate AWS account) from where you run automated tests.
- So you’d need to configure a new OIDC provider for your deployment environment.
To keep this example simple, you will use the same AWS account for both testing and deployment:
- (You don’t need a new OIDC provider)
- You only need new IAM roles with different permissions:
- For deployment
- For
plan, which is run on any branch before a PR has merged: read-only permissions. - For
apply, which is run onmainafter a PR has merged: read & write permissions.
- For
- For deployment
-
Update the
ci-cd-permissionsmodule to enable IAM roles forplanandapply# examples/ch5/tofu/live/ci-cd-permissions/main.tf module "iam_roles" { # ... (other params omitted) ... enable_iam_role_for_testing = true enable_iam_role_for_plan = true # (1) enable_iam_role_for_apply = true # (2) # TODO: fill in your own bucket and table name here! tofu_state_bucket = "fundamentals-of-devops-tofu-state" # (3) tofu_state_dynamodb_table = "fundamentals-of-devops-tofu-state" # (4) }- 1: Enable IAM role for
plan- This IAM role has read-only permissions.
- The OIDC provider is allowed to assume this role from any branch.
- 2: Enable IAM role for
apply- This IAM role has both read & write permissions.
- The OIDC provider is allowed to assume this role from
mainbranch, which ensures that only merged PRs can be deployed.
- 3, 4: Configure the S3 bucket and DynamoDB table.
- 1: Enable IAM role for
-
Add output variables for new IAM roles
# examples/ch5/tofu/live/ci-cd-permissions/outputs.tf output "lambda_deploy_plan_role_arn" { value = module.iam_roles.lambda_deploy_plan_role_arn } output "lambda_deploy_apply_role_arn" { value = module.iam_roles.lambda_deploy_apply_role_arn } -
Apply the OpenTofu module
ci-cd-permissionstofu apply -
Commit changes to
ci-cd-permissionsand push tomain
Example: Define a pipeline for infrastructure deployments
In this examples, you can finally implement a deployment pipeline for deploying infrastructure (the lambda-sample module):
- When you open a PR, run
planon thelambda-samplemodule. - When you merge a PR, run
applyon thelambda-samplemodule.
dangerous
Watch out for snakes: this is a very simplified pipeline
- The pipeline described here represents only a small piece of a real-world deployment pipeline.
- It’s missing several important aspects.
-
Create workflow for
tofu plan# .github/workflows/tofu-plan.yml name: Tofu Plan on: pull_request: # (1) branches: ["main"] paths: ["examples/ch5/tofu/live/lambda-sample/**"] jobs: plan: name: "Tofu Plan" runs-on: ubuntu-latest permissions: pull-requests: write # (2) id-token: write contents: read steps: - uses: actions/checkout@v2 - uses: aws-actions/configure-aws-credentials@v3 with: # TODO: fill in your IAM role ARN! role-to-assume: arn:aws:iam::111111111111:role/lambda-sample-plan # (3) role-session-name: plan-${{ github.run_number }}-${{ github.actor }} aws-region: us-east-2 - uses: opentofu/setup-opentofu@v1 - name: tofu plan # (4) id: plan working-directory: ch5/tofu/live/lambda-sample run: | tofu init -no-color -input=false tofu plan -no-color -input=false -lock=false - uses: peter-evans/create-or-update-comment@v4 # (5) if: always() env: RESULT_EMOJI: ${{ steps.plan.outcome == 'success' && '✅' || '⚠️' }} with: issue-number: ${{ github.event.pull_request.number }} body: | ## ${{ env.RESULT_EMOJI }} `tofu plan` output ```${{ steps.plan.outputs.stdout }}```-
(1): Run on
pull requests(instead of on push):- on
mainbranch - that have modifications to the
examples/ch5/tofu/live/lambda-samplefolder.
- on
-
(2): Add the
pull-request: writepermission so in (5), the workflow can post a comment on your pull request. -
(3): Assume the
planIAM role. -
(4): Run
tofu initandtofu planwith a few flag to ensure the command run well in a CI environment. -
(5): Use
peter-evans/create-or-update-commentaction to post commend (plan’s output) on the pull requests that run this workflow.
-
-
Create workflow for
tofu apply# .github/workflows/tofu-apply.yml name: Tofu Apply on: push: # (1) branches: ["main"] paths: ["examples/ch5/tofu/live/lambda-sample/**"] jobs: apply: name: "Tofu Apply" runs-on: ubuntu-latest permissions: pull-requests: write id-token: write contents: read steps: - uses: actions/checkout@v2 - uses: aws-actions/configure-aws-credentials@v3 with: # TODO: fill in your IAM role ARN! role-to-assume: arn:aws:iam::111111111111:role/lambda-sample-apply # (2) role-session-name: apply-${{ github.run_number }}-${{ github.actor }} aws-region: us-east-2 - uses: opentofu/setup-opentofu@v1 - name: tofu apply # (3) id: apply working-directory: ch5/tofu/live/lambda-sample run: | tofu init -no-color -input=false tofu apply -no-color -input=false -lock-timeout=60m -auto-approve - uses: jwalton/gh-find-current-pr@master # (4) id: find_pr with: state: all - uses: peter-evans/create-or-update-comment@v4 # (5) if: steps.find_pr.outputs.number env: RESULT_EMOJI: ${{ steps.apply.outcome == 'success' && '✅' || '⚠️' }} with: issue-number: ${{ steps.find_pr.outputs.number }} body: | ## ${{ env.RESULT_EMOJI }} `tofu apply` output ```${{ steps.apply.outputs.stdout }}```-
(1): Run only on
pushto themainbranch that have modifications to theexamples/ch5/tofu/live/lambda-samplefolder. -
(2): Assume the
applyIAM role. -
(3): Run
tofu initandtofu apply, again passing a few flags to ensure the commands run well in a CI environment. -
(4): Use
jwalton/gh-find-current-prto find the pull request that this push came from. -
(5): Use
peter-evans/create-or-update-commentaction to post commend (apply’s output) on the pull requests that run this workflow.
-
-
Commit these new workflows to
mainand push to GitHubgit add .github/workflows git commit -m "Add plan and apply workflows" git push origin main
Let’s try your new deployment pipeline
-
Create a new branch
git switch -c deployment-pipeline-test -
Make a change to
lambda-samplemodule-
Update the Lambda function response text
// examples/ch5/tofu/live/lambda-sample/src/index.js exports.handler = (event, context, callback) => { callback(null, { statusCode: 200, body: "Fundamentals of DevOps!" }); }; -
Update the automation test
# examples/ch5/tofu/live/lambda-sample/deploy.tftest.hcl assert { condition = data.http.test_endpoint.response_body == "Fundamentals of DevOps!" error_message = "Unexpected body: ${data.http.test_endpoint.response_body}" } -
Commit the changes, then push to the
deployment-pipeline-testbranch
-
-
Open a new pull request
-
Verify
- workflow for
tofu planrun as a check. - after the deployment pipeline has finished, the PR should be automatically update with a comment that shows the
planoutput.
- workflow for
Get your hands dirty: Terragrunt
If you’re like me, you’re probably annoyed by all the copy/paste you need to do with these backend configurations.
-
Unfortunately, OpenTofu does not support using variables or any other kind of logic in backend blocks, so some amount of copy/paste is necessary.
-
However, you can try out one of the following approaches to significantly reduce the code duplication:
- Partial backend configuration
- Terragrunt
Get your hands dirty: IAM roles
-
Open up the code for the
gh-actions-iam-rolesmodule and read through it.- What permissions, exactly, is the module granting to those IAM roles?
- Why?
-
Create your own version of the
gh-actions-iam-rolesmodule that you can use for deploying other types of infrastructure, and not just Lambda functions.e.g. try to create IAM roles for deploying EKS clusters, EC2 instances, and so on.
Get your hands dirty: Deployment pipelines
-
Update the pipeline to
- automatically detect changes in an any folder with OpenTofu code (rather than only the
lambda-samplefolder) - automatically run
planandapplyin each one. The open sourcechanged-filesaction can be helpful here.
- automatically detect changes in an any folder with OpenTofu code (rather than only the
-
If a pull request updates multiple folders with OpenTofu code, have the pipeline run plan and apply across multiple folders concurrently by using a matrix strategy.
Deployment pipeline best practices
Automate all the steps that can be automated
In a deployment pipeline, there are steps that
- can not be automated - must be done by humans:
- writing code (for now)
- reviewing code (for now)
- manual testing & verification
- can be automated.
All the steps that can be automated - done without a human - should be automated.
tip
For things that can be automated, the computers are excel over humans.
Deploy only from a deployment server
These automated steps should be run on a dedicated deployment server (not from any developer’s computer) because of:
-
Full automation
By deploying only from a deployment server, it forces you to automate everything that can be automated.
It’s only when you have a fully automated pipeline, that you get a CD pipeline that is fast, reliable & sustainable:
- You will have environments that are truly reproducible (consistent, repeatable)
- You can achieve world-class software delivery (and deploy thousands of times per day.)
[!TIP] Mostly automated vs fully automated
- A mostly automated pipeline still requires a few manual steps.
- A fully automated pipeline doesn’t requires any manual step.
-
Repeatability
If developers run deployment from their own computers, there will be problems due to differences in how their computers are configured:
- OSes, dependencies, configurations
- modified infrastructure code
-
Permissions management
It’s easier to enforce good security practices
- for some dedicated servers
- then a lot of developer’s computer
Protect the deployment server
Typically, a deployment server
- has “admin permissions” (fancy words for arbitrary permissions):
- it can access to sensitive permissions
- it is designed to execute arbitrary code
- is a tempting target for malicious actors
To protect your deployment server, you should:
-
Lock down your deployment server:
- Make it accessible only over HTTPs
- Make it accessible only over VPN connections, your company’s networks
- Require all users to be authenticated
- Ensure all actions are logged
- …
-
Protect your code (version control system)
Since deployment server can execute arbitrary code from your VSC, if an attacker can slip malicious code into your VSC, the deployment server may execute that malicious code.
So protect your code with signed commit and branch protection.
-
Enforce an approval workflow
Each request to deployment should be approved by at least one person (other than the person that make the request).
-
Limit permissions before approval/merge
Before the PR are approved/merged, the pipeline’s steps should have read-only permissions, so the approval workflow cannot be bypassed.
-
Give the deployment server short-lived credentials
Whenever possible,
- use an automatically-managed, short-lived credentials, e.g. OIDC
- instead of manually-managed, long-lived credentials, e.g. machine-user, human-user’s credentials.
-
Limit the permissions granted to each pipeline (What does a pipeline can do?)
Instead of a single pipeline that do everything and therefore needs arbitrary permissions:
- create multiple pipelines, each for a specific tasks:
- grant each pipeline a limited set of permissions (it needs for that specific task).
You can also restrict access to each pipeline so only the developers who needs to use it have access to it.
- create multiple pipelines, each for a specific tasks:
-
Limit the permissions granted to each developer (To which scope a developer can apply their permissions?)
For example,
- a developer can access a pipeline that have “admin permission”
- you might limit the scope to which the developer can use “admin permission” and run arbitrary code:
- only for a specific commands, e.g.
tofu apply - only on code from specific repos, e.g. repos with OpenTofu modules
- only on specific branches, e.g.
main - only in specific folders
- only for a specific commands, e.g.
You should also lock down the workflow definitions, so
- only a set of admins can update them
- only with PR approval from at least one of other admin.
Conclusion
Automating your entire SDLC through the use of CI/CD:
-
CI: Ensure all developers merge all their work together on a regular basis: typically daily or multiple times per day.
- Use a self-testing build after every commit to ensure your code is always in a working and deployable state.
- Use branch by abstraction and feature toggles to make large-scale changes while still merging your work on a regular basis.
-
Security: Use machine user credentials or automatically-provisioned credentials to authenticate from a CI server or other automations.
-
CD: Ensure you can deploy to production at any time in a manner that is fast, reliable, and sustainable.
Most systems maintain an audit log that records who performed what actions in that system.
Digital signature system and public-key encryption system are 2 type of systems that use public-key cryptography (asymmetric cryptography).
OIDC token is a JSON Web Token - a JSON object that contains claims (data that being asserted)
Stateless apps are apps that don’t need to persist (across deployments) any of the data that they store on their local hard drives (e.g., most web frontend apps are stateless)
Stateful apps are apps that need to persist (across deployments) any of the data that they store on their local hard drives (e.g., any sort of database or distributed data system).
For downtime deployment, there is only one version running & serving (outage/downtime).
For rolling deployment without replacement, both versions may be running & serving at the same time.
For rolling deployment with replacement, both versions may be running & serving at the same time.
For blue-green deployment, both versions may be running at the same time, but only v1 replicas are serving.
For canary deployment, both versions may be running & serving
For feature toggle deployment; both versions may be running & serving; but only old features not new features.
The users start to see new features (of new version) only the feature is enabled.
Live code is code that affects your users.
Chapter 6: How to Work with Multiple Teams and Environments
-
CI/CD will allow developers work together efficiently and safety,
-
but as your company grows, there are other type of problems:
- From outside world: more users (more traffic/data/laws/regulations)
- From inside your company: more developers/teams/products 👉 It’s harder to code/test/deploy without hitting lots of bugs/outages/bottlenecks.
-
-
These problems are problems of scale,
- (good problems to have, which indicates your business is becoming more successful).
-
The most common approach to solve these problem of scale is divide and conquer:
- Break up your deployments: into multiple separated, isolated environments.
- Break up your codebase: into multiple libraries, (micro)services
Breaking Up Your Deployments
- In this book, you deploy everything - servers, Kubernetes, cluster, serverless functions, … - into a single AWS account 👈 Fine for learning & testing
- In real world, it’s common to have multiple deployment environments, each environment has its own set of isolated infrastructure.
Why Deploy Across Multiple Environments
Isolating Tests
-
Typically, you need a way to test changes to your software
- before you expose those changes (to users)
- in a way that limits the blast radius (that affects users, production environment).
-
You do that by deploying more environments that closely resemble production.
-
A common setup is having 3 environments:
-
Production: the environment that is exposed to users.
-
Staging: a scaled-down clone of production that is exposed to inside your company.
👉 The releases are staged in staging so other teams - e.g. QA - can test them.
-
Development: another scaled-down clone of production that is exposed to dev team.
👉 Dev teams test code changes in development during development process (before those changes make it to staging).
-
tip
These trio environments have many other names:
- Production:
prod - Staging:
stage,QA - Development:
dev
Isolating Products and Teams
-
Larger companies often have multiple products and teams,
- which may have different requirements in term of uptime, deployment frequency, security, compliance…
-
It’s common for each team/product to have its own isolated set of environments, so:
- each team can customize to their own needs
- limit the blast radius of each team/product
- allows teams to work in isolated from each other (which may be good or bad!)
-
e.g.
- Search team have their software deployed in
search-dev,search-stage,search-prodenvironments. - Profile team have their software deployed in
profile-dev,profile-stage,profile-prodenvironments.
- Search team have their software deployed in
important
Key takeaway #1 Breaking up your deployment into multiple environments allows you to isolate tests from production and teams from each other.
Reducing Latency
What is latency
-
Data needs to travel from users’s device to your servers and back.
- This is measured with a TCP packet round trip (from your server and user device) - aka network latency.
-
Although these TCP packages is traveling at nearly the speed of light,
-
when you build software used across the globe
-
the speed of light is still not fast enough
-
this network latency may become the biggest bottleneck of your software.
Operation How much? Where? Time in (μs) Notes Read (Random) from CPU cache (L1) 0.001 Read (Random) from DRAM - main memory 0.1 Compress with Snappy $1 KB$ 2 Read (Sequentially) $1 MB$ from DRAM 3 Read (Random) from SSD - solid state disk 16 Read (Sequentially) $1 MB$ from SSD 49 TCP packet round trip $1.5 KB$ within same data-center 500 0.5 ms Read (Random) from HDD - rotational disk 2,000 Read (Sequentially) $1 MB$ from HDD 5,000 TCP packet round trip $1.5 KB$ from California to New York
(1 continent)40,000 40 ms TCP packet round trip $1.5 KB$ from California to Australia
(2 continents)183,000 183 ms
-
-
How to reduce latency
-
If you have users around the world,
- you may run your software on server (and data center) that geographically close to those users,
- to reduce the latency1.
- you may run your software on server (and data center) that geographically close to those users,
-
e.g.
- By having the servers in the same continent with your user,
- the latency for each TCP package is reduced more than 100 ms.
- when including the fact that most web page, application sends:
- thousands of KB in size (across many requests)
- this network latency can quickly add up.
- By having the servers in the same continent with your user,
Complying With Local Laws and Regulations
Some countries, industries, customers requires your environments be set up in a specific ways, e.g:
- In EU: GDPR2
- Store/process credit card: PCI DSS3.
- Store/process healthcare information: HIPAA4, HITRUST5
- US government: FedRAMP6
A common pattern is to set up a dedicated, small environment for complying with laws & regulations.
e.g.
prod-pci: meets all the PCI DSS requirements, and is used solely to run payment processing softwareprod: run all other software
Increasing Resiliency
- With only 1 environments, you can still have some level of resilient by having multiple servers. But all these servers can have a single point of failure (the data center that the environment is in).
- By having multiple environments in different data center around the world (e.g.
prod-us,prod-eu,prod-asia), you can have a higher level of resilient.
How to Set Up Multiple Environments
Logical Environments
logical environment : an environment defined solely in software (i.e., through naming and permissions), whereas the underlying hardware (servers, networks, data centers) is unchanged
e.g.
- In Kubernetes, you can create multiple logical environments with namespaces.
tip
In Kubernetes, if you don’t specify a namespace, the namespace default will be used.
-
To create a namespace, use
kubectl createkubectl create namespace <NAME> -
Specify the namespace to
kubectl’s sub-command, e.g.# deploy an app into the development environment kubectl apply --namespace dev # or deploy an app into the staging environment kubectl apply --namespace stg
Separate Servers
You set up each environment in a separate server.
e.g.
-
(Instead of a single Kubernetes cluster for all environments)
-
You deploy one Kubernetes cluster per environment
- Deploy Kubernetes cluster
devindev-servers - Deploy Kubernetes cluster
stginstg-servers
- Deploy Kubernetes cluster
tip
You can go a step further by deploying control plane and worker nodes in separate servers.
Separate Networks
You can put the servers in each environment in a separate, isolated network.
e.g.
- The servers in
dev-envcan only communicate with other servers indev-env. - The servers in
stg-envcan only communicate with other servers instg-env.
Separate Accounts
If you deploy into the clouds, you can create multiple accounts, each account for an environment.
note
By default, cloud “accounts” are completely isolated from each other, including: servers, networks, permissions…
tip
The term “account” can be different for each cloud provider:
- AWS: account
- Azure: subscription
- Google Cloud: project
Separate Data Centers In The Same Geographical Region
If you deploy into the clouds, you can deploy environments in different data centers that are all in the same geographical region.
e.g.
- For AWS, there are
use1-az1,use1-az2,use1-az37
tip
For AWs, data centers that are all in the same geographical region are called Availability Zones - AZs
Separate Data Centers In Different Geographical Regions
If you deploy into the clouds, you can deploy environments in different data centers that are in the different geographical regions.
e.g.
- For AWS, there are
us-east-1,us-west-1,eu-west-1,ap-southeast-1,af-south-18
tip
For AWS, different geographical regions are call regions.
How Should You Set Up Multiple Environments
-
Each approach to set up multiple environments has advantages and drawbacks.
-
When choosing your approach, consider these dimensions:
-
What is the isolated level?
~ How isolated one environment is from another?
- Could a bug in
dev-envsomehow affectprod-env.
- Could a bug in
-
What is the resiliency?
~ How well the environment tolerate an outage? A server, network, or the entire data center goes down?
-
Do you need to reduce latency to users? Comply with laws & regulations?
~ Only some approaches can do this.
-
What is the operational overhead? ~ What is the cost to set up, maintain, pay for?
-
Challenges with Multiple Environments
Increased Operational Overhead
When you have multiple environments, there’re a lot of works to set up and maintain:
- More servers
- More data centers
- More people
- …
Even when you’re using the clouds - which offload much of this overhead (into cloud providers) - creating & managing multiple AWS accounts still has its own overhead:
- Authentication, authorization
- Networking
- Security tooling
- Audit logging
- …
Increased Data Storage Complexity
If you have multiple environments in different geographical regions (around the world):
-
The latency between the data centers and users may be reduced,
- but the latency between parts of your software running in these data centers will be increased.
-
You may be forced to rework your software architecture completely, especially data storage.
e.g. A web app that needed to lookup data in a database before sending a response:
-
When the database and the web app is in the same data center:
~ The network latency for each package round-trip is 0.5ms.
-
When the database and the web app is in different data centers (in different geographical regions):
~ The network latency for each package round-trip is 183ms (366x increase), which will quickly add up for multiple packets.
-
When the database and the web app is in different data centers (in different geographical regions), but the database is in the same region as the web app:
~ In other words, you have one database per region, which adds a lot to your data storage complexity:
- How to generate primary keys?
- How to look up data?
- Querying & joining multiple databases is more complicated.
- How to handle data consistency & concurrency?
- Uniqueness constraints, foreign key constraints
- Locking, transaction
- …
To solve these data storage problems, you can:
- Running the databases in active/standby mode9, which may boost resiliency, but doesn’t help with the origin problems (latency or laws, regulations).
- Running the databases in active/active mode10, which also solves the origin problems (latency or laws, regulations), but now you need to solve more problems about data storages.
important
Key takeaway #2 Breaking up your deployment into multiple regions:
- allows you to reduce latency, increase resiliency, and comply with local laws and regulations,
- but usually at the cost of having to rework your entire architecture.
Increased Application Configuration Complexity
-
When you have multiple environments, you have many unexpected costs in configuring your environments.
-
Each environment needs many different configuration:
Type of settings The settings Performance settings CPU, memory, hard-drive, garbage collection… Security settings Database passwords, API keys, TLS certifications… Networking settings IP address/domain name, port… Service discovery settings The networking settings to use for other services you reply on… Feature settings Feature toggles… -
Pushing configuration changes is just as risky as pushing code changes (pushing a new binary), and the longer a system has been around, the more configuration changes tend to become the dominant cause of outages.
[!TIP] Configuration changes are one of the biggest causes of outages at Google11.
Cause Percent of outages Binary push 37% Configuration push 31% User behavior change 9% Processing pipeline 6% Service provider chang 5% Performance decay 5% Capacity management 5% Hardware 2% [!IMPORTANT] Key takeaway #3 Configuration changes are just as likely to cause outages as code changes.
How to configure your application
-
There a 2 methods of configuring application:
-
At build time: configuration files checked into version control (along with the source code of the app).
[!NOTE] When checked into version control, the configuration files can be:
- In the same language as the code, e.g. Ruby…
- In a language-agnostic format, e.g. JSON, YAML, TOML, XML, Cue, Jsonnet, Dhall…
-
At run time: configuration data read from a data store (when the app is booting up or while it is running).
[!NOTE] When stored in a data store, the configuration files can be stored:
- In a general-purpose data store, e.g. MySQL, Postgres, Redis…
- In a data store specifically designed for configuration data, e.g. Consul, etcd, Zookeeper…
[!TIP] The data store specifically designed for configuration data allows updating your app quickly when a configuration changed
- Your app subscribes to change notifications.
- Your app is notified as soon as any configuration changes.
-
-
In other words, there 2 types of configuration:
- Build-time configuration.
- Run-time configuration.
-
You should use build-time configuration as much as possible:
Every build-time configuration is checked into version control, get code reviewed, and go through your entire CI/CD pipeline.
-
Only using run-time configuration when the configuration changes very frequently, e.g. service discovery, feature toggles.
Example: Set Up Multiple Environments with AWS Accounts
note
IAM and environments
-
IAM has no notion of environments
Almost everything in an AWS account is managed via API calls, and by default, AWS APIs have no first-class notion of environments, so your changes can affect anything in the entire account.
-
IAM is powerful
- You can use various IAM features - such as tags, conditions, permission boundaries, and SCPs - to create your own notion of environments and enforce isolation between them, even in a single account.
- However, to be powerful, IAM is very complicated. Teams can mis-use IAM, which leads to disastrous results.
note
The recommend way to organize multiple AWS environments is using multiple AWS accounts12:
- You use AWS Organizations to create and manage your AWS accounts,
- with one account at the root of the organization, called the management account,
- and all other accounts as child accounts of the root.
e.g.
-
An AWS organization with one management account (
management), and 3 child accounts (e.g.,dev,stage,prod)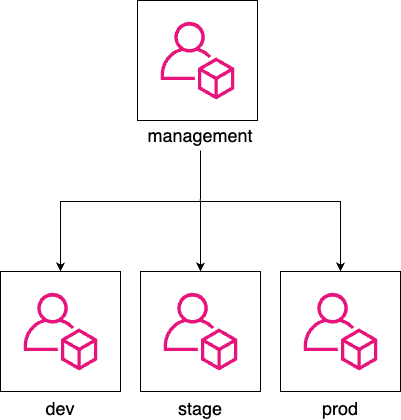
tip
Using multiple AWS accounts gives you isolation between environments by default, so you’re much less likely to get it wrong.
Create child accounts
In this example, you will
-
Treat the initial AWS account as the management account
[!CAUTION] The management account should only be used to create & manage other AWS accounts.
-
Configure initial account as the management account of an AWS Organization.
-
Use AWS Organizations to create 3 other accounts as child accounts (for
dev,stage,prod).
To treat the initial AWS account as the management account, you need to undeploy everything deployed in earlier chapters:
- Run
tofu destroyon any OpenTofu modules previously deployed. - Use EC2 Console to manually undeploy anything deployed via Ansible, Bash…
-
The code for this example (the OpenTofu
child-accountsroot module) will be intofu/live/child-accountsfolder:mkdir -p ch6/tofu/live/child-accounts cd ch6/tofu/live/child-accounts[!TIP] Under the hood, the root module will use the OpenTofu module
aws-organizationsin the sample code repo atch6/tofu/modules/aws-organizationsfolder. -
The OpenTofu module
main.tf# examples/ch6/tofu/live/child-accounts/main.tf provider "aws" { region = "us-east-2" } module "child_accounts" { # (1) source = "github.com/brikis98/devops-book//ch6/tofu/modules/aws-organization" # (2) Set to false if you already enabled AWS Organizations in your account create_organization = true # (3) TODO: fill in your own account emails! dev_account_email = "username+dev@email.com" stage_account_email = "username+stage@email.com" prod_account_email = "username+prod@email.com" }-
(1): Use the
aws-organizationmodule. -
(2): Enable AWS Organizations before using it.
-
(3): Fill in root user’s email address for
dev,stage,prodaccounts.[!TIP] If you’re using Gmail, you can create multiple aliases for a a single email address by using plus sign (
+).
-
-
Proxy output variables from the
aws-organizationmodule# examples/ch6/tofu/live/child-accounts/outputs.tf # (1) output "dev_account_id" { description = "The ID of the dev account" value = module.child_accounts.dev_account_id } output "stage_account_id" { description = "The ID of the stage account" value = module.child_accounts.stage_account_id } output "prod_account_id" { description = "The ID of the prod account" value = module.child_accounts.prod_account_id } # (2) output "dev_role_arn" { description = "The ARN of the IAM role you can use to manage dev from management account" value = module.child_accounts.dev_role_arn } output "stage_role_arn" { description = "The ARN of the IAM role you can use to manage stage from management account" value = module.child_accounts.stage_role_arn } output "prod_role_arn" { description = "The ARN of the IAM role you can use to manage prod from management account" value = module.child_accounts.prod_role_arn }- (1): The IDs of created accounts
- (2): The IAM role’s ARN used to manage child accounts from management account.
-
Deploy
child-accountsmoduletofu init tofu apply
Access your child accounts
To access child accounts, you need to assume the IAM role that has permission to access them (OrganizationAccountAccessRole).
To assume the IAM role OrganizationAccountAccessRole, you can use:
-
AWS Web Console:
- Click your username / Choose
Switch role - Enter the information to switch role:
- account ID
- IAM Role
- display name
- display color
- Click
Switch role
- Click your username / Choose
-
Terminal:
One way to assume IAM role in the terminal is to configure an AWS profile (in the AWS config file) for each child account.
[!TIP] The AWS config file is default at
~/.aws/confige.g. To assume IAM role for
devchild account:-
Create an AWS profile named
dev-admin[profile dev-admin] # (1) role_arn=arn:aws:iam::<ID>:role/OrganizationAccountAccessRole # (2) credential_source=Environment # (3)- (1): The AWS profile will be named
dev-admin. - (2): The IAM role that this profile will assume.
- (3): Use the environment variable as credential source.
- (1): The AWS profile will be named
-
Specify the profile when you use AWS CLI with
--profileargumente.g. Use
aws sts get-caller-identitycommand to get the identity of thedev-adminprofileaws sts get-caller-identity --profile dev-admin
-
Deploy into your child accounts
Now you will re-deploy the lambda-sample module into dev, stage, prod accounts.
-
Copy the
lambda-samplemodule (and its dependencytest-endpointmodule) from chapter 5cd fundamentals-of-devops/examples mkdir -p ch6/tofu/live cp -r ch5/tofu/live/lambda-sample ch6/tofu/live mkdir -p ch6/tofu/modules cp -r ch5/tofu/modules/test-endpoint ch6/tofu/modules -
Update to copied module to use new path
# ch6/tofu/live/lambda-sample/backend.tf key = "ch6/tofu/live/lambda-sample" -
Add support for AWS profiles
# ch6/tofu/live/lambda-sample/variables.tf variable "aws_profile" { description = "If specified, the profile to use to authenticate to AWS." type = string default = null }# ch6/tofu/live/lambda-sample/main.tf provider "aws" { region = "us-east-2" profile = var.aws_profile }[!NOTE] Later, you will specify the AWS profile via
-var aws_profile=XXXflag when runningtofu apply. -
Dynamically show the environment name
-
Update the Lambda function to response with the environment name
// examples/ch6/tofu/live/lambda-sample/src/index.js exports.handler = (event, context, callback) => { callback(null, { statusCode: 200, body: `Hello from ${process.env.NODE_ENV}!`, }); }; -
Dynamically set the
NODE_ENVto the value ofterraform.workspace# examples/ch6/tofu/live/lambda-sample/main.tf module "function" { source = "github.com/brikis98/devops-book//ch3/tofu/modules/lambda" # ... (other params omitted) ... environment_variables = { NODE_ENV = terraform.workspace } }[!NOTE] What is OpenTofu workspace?
-
In OpenTofu, you can use workspaces to manage
- multiple deployments of the same configuration.
-
Each workspace:
- has its own state file
- represents a separate copy of all the infrastructure
- has a unique name (returned by
terraform.workspace)
-
If you don’t specify a workspace explicitly, you end up using a workspace called
default.
-
-
-
(Optional) Authenticate to your management account
-
Initialize the OpenTofu module
cd examples/ch6/tofu/live/lambda-sample tofu init -
Create a new workspace for
devenvironment and deploy the environment to thedevaccount:-
Create workspace
tofu workspace new development -
Deploy infrastructure and the lambda function
tofu apply -var aws_profile=dev-admin -
Verify that the lambda function works
curl <DEV_URL>
-
-
Do the same for
stageandprodenvironmentstofu workspace new stage tofu apply -var aws_profile=stage-admin curl <STAGE_URL>tofu workspace new production tofu apply -var aws_profile=prod-admin curl <PROD_URL> -
Congratulation, you have three environments, across three AWS accounts, with a separate copy of the serverless webapp in each one, and the OpenTofu code to manage it all.
Use different configurations for different environments
In this example, to have different configurations for different environments, you’ll use JSON configuration files checked into version control.
-
Create a folder called
configfor the configuration filesmkdir -p src/config -
Create configs for the each environment:
-
Dev:
ch6/tofu/live/lambda-sample/src/config/development.json{ "text": "dev config" } -
Stage:
ch6/tofu/live/lambda-sample/src/config/stage.json{ "text": "stage config" } -
Production:
ch6/tofu/live/lambda-sample/src/config/production.json{ "text": "production config" }
-
-
Update the lambda function to load the config file (of the current environment) and return the
textvalue in the response:// examples/ch6/tofu/live/lambda-sample/src/index.js const config = require(`./config/${process.env.NODE_ENV}.json`); // (1) exports.handler = (event, context, callback) => { callback(null, { statusCode: 200, body: `Hello from ${config.text}!` }); // (2) };- (1): Load the config file (of the current environment).
- (2): Response with the
textvalue from the config file.
-
Deploy the new configurations (of each environment) in each workspace (AWS account):
-
Switch to an OpenTofu workspace
tofu workspace select development -
Run the OpenTofu commands with the corresponding AWS profile
tofu apply -var aws_profile=dev-admin
-
-
Repeat for the other environments.
[!TIP] To see all OpenTofu workspaces, use the
tofu workspace listcommand.$ tofu workspace list default development staging * production
Close your child accounts
caution
AWS doesn’t charge you extra for the number of the child accounts, but it DOES charge you for the resources running in those accounts.
- The more child accounts you have, the more chance you accidentally leave resources running.
- Be safe and close any child accounts that you don’t need.
-
Undeploy the infrastructure in each workspace (corresponding to an AWS account):
-
For
dev:tofu workspace select development tofu destroy -var aws_profile=dev-admin -
For
stage:tofu workspace select stage tofu destroy -var aws_profile=stage-admin -
For
prodtofu workspace select production tofu destroy -var aws_profile=prod-admin
-
-
Run
tofu-destroyon thechild-accountsmodule to closing the child accountscd ../child-accounts tofu destroy[!TIP] The destroy may fail if you create a new AWS with the OpenTofu module.
- It’s because an AWS Organization cannot be disabled until all of its child accounts are closed.
- Wait 90 days then re-run the
tofu destroy.
note
When you run close an AWS account:
-
Initially, AWS will suspense that account for 90 days,
This gives you a chance to recover anything you may have forgotten in those accounts before they are closed forever.
-
After 90 days, AWS will automatically close those accounts.
Get Your Hand Dirty: Manage Multiple AWS accounts
-
The child accounts after created will not have a password:
- Go through the root user password reset flow to “reset” the password.
- Then enable MFA for the root user of child account.
-
As a part of multi-account strategy,
- in additional to workload accounts (
dev,stage,prod) - AWS recommends several foundation accounts, e.g. log account, backup account…
Create your own aws-organizations module to set up all these foundational accounts.
- in additional to workload accounts (
-
Configure the
child-accountsmodule to store its state in an S3 backend (in the management account).
Get Your Hand Dirty: Managing multiple environments with OpenTofu and AWS
-
Using workspaces to manage multiple environments has some drawbacks, see this blog post to learn about
- these drawbacks
- alternative approaches for managing multiple environments, e.g. Terragrunt, Git branches.
-
Update the CI/CD configuration to work with multiple AWS accounts
You’ll need to
- create OIDC providers and IAM roles in each AWS account
- have the CI/CD configuration authenticate to the right account depending on the change
- configure, e.g.
- Run
tofu testin thedevelopmentaccount for changes on any branch - Run
plan,applyin thestagingaccount for any PR againstmain - Run
plan,applyin theproductionaccount whenever you push a Git tag of the formatrelease-xxx, e.g.release-v3.1.0.
- Run
Breaking Up Your Codebase
Why Break Up Your Codebase
Managing Complexity
Software development doesn’t happen in a chart, an IDE, or a design tool; it happens in your head.
(Practices of an Agile Developer)
-
Once a codebase gets big enough:
- no one can understand all of it
- if you need to deal with all of them at once:
- your pace of development will slow to a crawl
- the number of bugs will explode
-
According to Code Completion:
-
Bug density in software projects of various sizes
Project size (lines of code) Bug density (bugs per 1K lines of code) < 2K 0 – 25 2K – 6K 0 – 40 16K – 64K 0.5 – 50 64K – 512K 2 – 70 > 512K 4 – 100 -
Larger software projects have more bugs and a higher bug density
-
-
The author of Code Completion defines “managing complexity” as “the most important technical topic in software development.”
-
The basic principle to manage complexity is divide and conquer:
- So you can focus on one small part at a time, while being able to safely ignore the rest.
tip
One of the main goals of most software abstractions (object-oriented programming, functional programming, libraries, microservices…) is to break-up codebase into discrete pieces.
Each piece
- hide its implementation details (which are fairly complicated)
- expose some sort of interface (which is much simpler)
Isolating Products And Teams
As your company grows, different teams will have different development practices:
- How to design systems & architecture
- How to test & review code
- How often to deploy
- How much tolerance for bugs & outages
- …
If all teams work in a single, tightly-coupled codebase, a problem in any team/product can affect all the other teams/product.
e.g.
- You open a pull request, there is an failed automated test in some unrelated product. Should you be blocked from merging?
- You deploy new code that includes changes to 10 products, one of them has a bug. Should all 10 products be roll-backed?
- One team has a product in an industry where they can only deploy once per quarter. Should other teams also be slow?
By breaking up codebase, teams can
- work independently from each other
- teams are now interact via a well-defined interfaces, e.g. API of a library/web service
- have total ownership of their part of the product
tip
These well-defined interfaces allows everyone to
- benefit from the outputs of a team, e.g. the data return by they API
- without being subject about the inputs they need to make that possible
Handling Different Scaling Requirements
Some parts of your software have different scaling requirements than the other parts.
e.g.
- A part benefit from distributing workload across a large number of CPUs on many servers.
- Another part benefits from a large amount of memory on a single server
If everything is in one codebase and deployed together, handling these different scaling requirements can be difficult.
Using Different Programming Languages
Most companies start with a single programming language, but as you grow, you may end up using multiple programming languages:
- It may be a personal choice of a group of developers.
- The company may acquire another company that uses a different language.
- A different language is a better fit for different problems.
For every new language,
- you have a new app to deploy, configure, update…
- your codebase consists of multiple tools (for each languages)
How to Break Up Your Codebase
Breaking A Codebase Into Multiple Libraries
-
Most codebase are broken up into various abstractions - depending on the programming language - such as functions, interfaces, classes, modules…
-
If the codebase get big enough, it can be broken up even further into libraries.
A library
-
is a unit of code that can be developed independently from other units
-
has these properties:
-
A library exposes a well-defined API to the outside world
-
A well defined API is an an interface with well-defined inputs/outputs.
-
The code from the outside world can interact with the library only via this well-defined API.
-
-
A library implementation can be developed independently from the rest of the codebase
- The implementation - the internal - of the library are hidden from the outside world
- can be developed independently (from other units and the outside world)
- as long as the library still fulfills its promises (the interface)
- The implementation - the internal - of the library are hidden from the outside world
-
You can only depend on versioned artifact produced by a library, without directly depending on its source code
The exact type of artifact depends on a programming language, e.g.
- Java: a
.jarfile - Ruby: a Ruby Gem
- JavaScript: an npm package
As long as you use artifact dependencies, the underlying source code can live in anywhere:
- In a single repo, or
- In multiple repos (more common for library)
- Java: a
-
Example of a codebase before and after break up:
| Before break up | Break up | After break up |
|---|---|---|
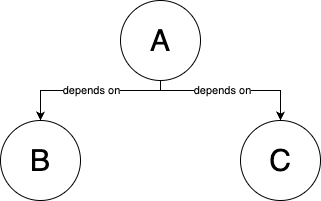 | 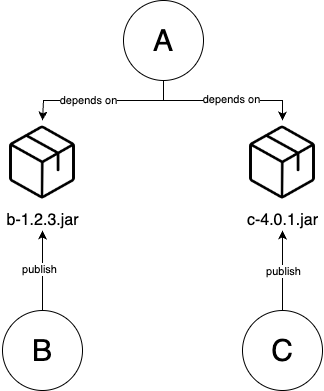 | |
| A codebase with 3 parts: A, B, C | Turn B, C into libraries that publish artifacts , e.g. a.jar, b.jar files | Update A to depend on a specific version of these artifacts |
| Part A depends directly on source code of B and C | Part A depends on artifacts published by libraries B and C |
The advantage of breaking up codes base into libraries:
- Managing complexity
- Isolating teams/products
- The team that develope a library can work independently (and publish versioned artifact)
- The other teams that use that library
- instead of being affects immediately by any code changes (from the library)
- can explicitly choose to pull the new versioned artifact
important
Key takeaway #4 Breaking up your codebase into libraries allows developers to focus on one smaller part of the codebase at a time.
Best practices to break a codebase into multiple libraries
Sematic versioning
Semantic versioning (SemVer) : What? A set of rules for how to assign version numbers to your code : Why? Communicate (to users) if a new version of your library has backward incompatible changes13
With SemVer:
-
you use the version numbers of the format
MAJOR.MINOR.PATCH, e.g.1.2.3 -
you increment these 3 parts of the version number as follows:
-
Increment the
MAJORversion when you make incompatible API changes. -
Increment the
MINORversion when you add functionality in a backward compatible manner. -
Increment the
PATCHversion when you make backward compatible bug fixes.
-
e.g. Your library is currently at version 1.2.3
- If you’ve made a backward incompatible change to the API -> The next release would be
2.0.0 - If you’ve add functionality that is backward compatible -> The next release would be
1.3.0 - If you’ve made a backward compatible bug fix -> The next release would be
1.2.4
note
With SemVer:
1.0.0is typically seen as the firstMAJORversion (first backward compatible release)0.x.yis typically used by new software to indicate incompatible change (breaking change) may be introduced anytime.
Automatic updates
Automatic updates : What? A way to keep your dependencies up to date : Why? When using a library, you can explicitly specify a version of library: : - This give you the control of when to use a new version. : - But it’s also easy to forget to update to a new version and stuck with an old version - which may have bugs or security vulnerabilities - for months, years. : - If you don’t update for a while, updating to the latest version can be difficult, especially if there any many breaking changes (since last update).
This is another place where, if it hurst, you need to do it more often:
-
You should set up an automatically process where
- dependencies are updated to source code
- the updates are rolled out to production (aka software patching 14)
-
This applies to all sort of dependencies - software you depend on - including:
- open source libraries
- internal libraries
- OS your software runs on
- software from cloud providers (AWS, GCP, Azure…)
-
You can setup the automation process
-
to run:
- on a schedule, e.g. weekly
- in response to new versions being released
-
using tools: DependaBot, Renovate, Snyk, Patcher
These tools will
- detect dependencies in your code
- open pull requests to update the code to new versions
You only need to:
- check that these pull requests pass your test suite
- merge the pull requests
- (let the code deploy automatically)
-
Breaking A Codebase Into Multiple Services
What is a service
| Before | After |
|---|---|
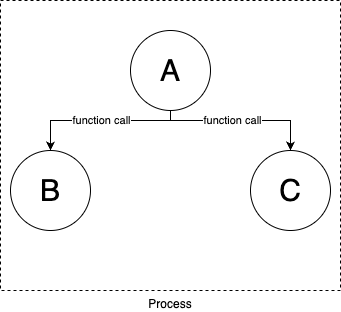 | 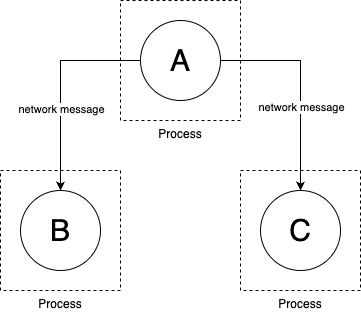 |
| Codebase are broken up into source code, library/artifact dependencies | Codebase are broken up into separate services |
| All the parts of the codebase | Each part of the codebase (a service): |
| - run in a single process | - runs in a separate process (typically on a separate server) |
| - communicate via in-memory function calls | - communicates by sending messages over the network |
A service has all properties of a library:
- It exposes a well-defined API to the outside world
- Its implementation can be developed independently of the rest of the codebase
- It can be deployed independently of the rest of the codebase
with an additional property:
- You can only talk to a service via messages over the network (via messages)
How to break up codebase into services
There are many approaches to build services:
| Approach to build services | How | Example |
|---|---|---|
| Service-oriented architecture (SOA) | Build large services that handle all the logic for an entire business/product within a company | API exposed by companies - aka Web 2.0 e.g. Twitter, Facebook, Google Map… |
| Microservices | Build smaller, more fine-grain services that handle one domain within a company | - One service to handle user profiles - One service to handle search - One service to do fraud detection |
| Event-driven architecture | Instead of interacting synchronously15, services interact asynchronously16 |
Why breaking a codebase into services
The advantages of breaking a codebase into services:
-
Isolating teams
Each service is usually owned by a different team.
-
Using multiple programming languages
- For each service, you can pick the programming language that are best fit for a certain problem/domain.
- It’s also easier to integrate code bases from acquisitions & other companies (without rewrite all the code).
-
Scaling services independently
e.g. You can:
- Scale one service horizontally (across multiple servers as CPU load goes up)
- Scale another service vertically (on a single server with large amount of RAM)
important
Key takeaway #5 Breaking up your codebase into services allows different teams to own, develop, and scale each part independently.
Challenges with Breaking Up Your Codebase
caution
In recent years, it became trendy to break up a codebase, especially into microservices, almost to the extent where “monolith” became a dirty word.
- At a certain scale, moving into services is inevitable.
- But until you get to that scale, a monolith is a good thing
Challenges With Backward Compatibility
note
Libraries and services consist of 2 parts:
- The public API.
- The internal implementation detail.
When breaking up your codebase:
- the internal implementation detail can be changed much more quickly 👈 each team can have full control of it
- but the public API is much more difficult to be changed 👈 any breaking changes can cause a lot of troubles for the users
e.g. You need to change a function’s name from foo to bar
B is part of your codebase | B is a library | B is a service |
|---|---|---|
| 1. Discuss with your team if you really need a breaking change | 1. Discuss with your team if you really need a breaking change | |
1. In B, rename foo to bar | 2. In B, rename foo to bar | 2. Add new version of your API and/or new endpoint that has bar |
- Don’t remove foo yet | ||
| 3. Create a new release of B: | 3. Deploy the new version of your service that has both foo and bar | |
- Update the MAJOR version number | 4. Notify all users | |
| - Add release notes with migration instructions | - Update your docs to indicate there is a new bar endpoint and that foo is deprecated | |
| 4. Other teams choose when to update the new version: | 5. You wait for every team to switch from foo to bar in their code and to deploy a new version of their service. | |
| - It’s a breaking change, they’ll wait longer before update. | ||
| - They decide to upgrade | ||
2. Find all usages of foo (in the same codebase) and rename to bar. | - They all usages of foo and rename to bar | |
- You might even monitor the access logs of B to see if the foo endpoint is still being used, identify the teams responsible, and bargain with them to switch to bar. | ||
| - Depending on the company and competing priorities, this could take weeks or months. | ||
6. At some point, if usage of foo goes to zero, you can finally remove it from your code, and deploy a new version of your service. | ||
| - Sometimes, especially with public APIs, you might have to keep the old foo endpoint forever. | ||
| 3. Done. | 5. Done | 7. Done |
tip
You may spend a lot of time over your public API design.
- But you’ll never get it exactly right
- You’ll always have to evolve it overtime.
Public API maintenance is always a cost of breaking up your codebase.
Challenges With Global Changes
When breaking up your codebase, any global changes - changes that require updating multiple libraries/services - become considerably harder.
e.g.
-
LinkedIn stared with a single monolithic application, written in Java, called Leo.
-
Leo became bottleneck to scaling (more developers, more traffic).
-
Leo is broken into libraries/services.
- Each team was able to iterate on features within their libraries/services much faster.
- But there are also global changes.
-
Almost every single service relied on some security utilities in a library called
util-security.jar. -
When a vulnerability in that library was found, rolling out new version to all services took an enormous effort:
- A few developers is assigned to lead the effort
- They dig through dozens of services (in different repos) to find all services that depends on
util-security.jar - They update each of those services to new version, which can:
- be a simple version number bump.
- require a number of changes throughout the service’s code base to upgrade through many breaking changes.
- They open pull request, wait for code reviews (from many teams) and prodding each team.
- The code is merged; then they have to bargain with each team to deploy their service.
- Some of the deployments have bugs or cause outages, which requires: rolling back, fixing issues, re-deploying.
important
Key takeaway #6 The trade-off you make when you split up a codebase is that you are optimizing for being able to make changes much faster within each part of the codebase, but this comes at the cost of it taking much longer to make changes across the entire codebase.
Challenges With Where To Split The Code
If you split the codebase correctly:
- Changes done by each team are within their own part of the codebase, which
- allows each team to go much faster.
If you split the codebase wrong,
- Most changes are global changes, which
- makes you go much slower.
caution
When to break up a codebase?
Don’t split the codebase too early
- It’s easy to identify the “seam” in a codebase that has been around for a long time.
- It’s hard to predict/guess in a totally new codebase.
Some hints for where the codebase could be split:
-
Files that change together
e.g.
- Every time you make a change of type
X, you update a group of filesA - Every time you make a change of type
Y, you update a group of filesB
Then
AandBare good candidates to be broken out into separate libraries/services. - Every time you make a change of type
-
Files that teams focus on
e.g.
- 90% of the change by team
Zare in a group of filesC - 90% of the change by team
Ware in a group of filesD
Then
CandDare good candidates to be broken out into separate libraries/services. - 90% of the change by team
-
Parts that could be open sourced our outsourced
If you could envision a part of your codebase that would be:
- a successful, standalone open source project
- exposed as as successful, standalone APIs
then that part is a good candidate to be broken into a library/service.
-
Performance bottlenecks
e.g.
- If 90% of the time it takes to serve a request is spent in part
Eof your code,- and it’s most limited by RAM then part E is a good candidate to be broken out in to a service (to be scaled vertically).
- If 90% of the time it takes to serve a request is spent in part
caution
Don’t try to predict any of these hints! Especially for performance bottlenecks17.
The only way to know where to split the code is:
- Start with a monolith18
- Grow it as far as you can
- Only when you can scale it any further, then break it up into smaller pieces
Challenges With Testing And Integration
caution
Breaking up a codebase into libraries/services is the opposite of continuous integration.
When you’ve break up your codebase, you choose to
- allow teams to work more independently from each other
- in the cost of doing late integration (instead of continuous integration)
So only break up those parts that are truly decoupled, independent from other parts.
warning
If you split up the parts are tightly coupled, there would be many problems.
Teams will try to
- work independently, and not doing much testing and integration with other teams…
- or integrate all the time and make a lot of global changes…
important
Key takeaway #7 Breaking up a codebase into multiple parts means you are choosing to do late integration instead of continuous integration between those parts, so only do it when those parts are truly independent.
Dependency Hell
If you break up your codebase into libraries, you may face dependency hell:
-
Too many dependencies
If you depends on dozens of libraries
- each library depends of dozens more libraries
- each library depends of dozens more libraries
- …
- each library depends of dozens more libraries
Then only to download all your dependencies can take up a lot of time, disk space & bandwidth.
- each library depends of dozens more libraries
-
Long dependency chains
e.g.
- Library
Adepends onBBdepends onC- …
Xdepends onYYdepends onZ
- …
- If you need to make an important security patch to
Z, how to roll it out toA?- Update
Z, release new version forZ- Update
Y, release new version forY- …
- Update
B, release new version forB- Update
A, release new version forA
- Update
- Update
- …
- Update
- Update
- Library
-
Diamond dependencies
e.g.
Adepends onB,CBdepends onD(at1.0.0)Cdepends onD(at1.0.0)
- Then you upgrade
C:Bstill depends onDat1.0.0Cnow depends onDat2.0.0
You can’t have 2 conflicts versions of
Dat onces, now you’re stuck unless:BupgradeDto2.0.0- or you can’t upgrade
C
Operational Overhead
-
Each application need its own mechanism for software delivery: CI/CD pipeline, testing, deployment, monitoring, configuration…
-
If you split up a monolith into services that
- using the same programming language, each services needs its own CI/CD pipelines… for delivery. In other words, there will be many duplications, which means more operation overhead.
- using different programming languages, each services needs its own CI/CD pipelines that are completely different, which means even more operational overhead.
Dependency Overhead
With $N$ services,
- you have $N$ services to deploy & manage.
- but there are also the interactions between those services, which grows at a rate of $N^2$.
e.g.
-
Service
Adepends on serviceB- Add endpoint
footoB(Bat versionv2) - Update the code in
Ato make calls tofooendpoint (Aat versionv2)
- Add endpoint
-
When to deploy
Av2 andBv2?- If
Av2 is deployed beforeBv2,Amay try to callfooendpoint, which cause a failure (becauseBv1 doesn’t have thefooendpoint yet) BMUST be deployed beforeA👈 This is called deployment ordering
- If
-
Bitself may depend on servicesCandDand so on…- Now you need to have a deployment graph to ensure the right services are deployed in the right order.
-
If service
Chas a bug, you need to:- rollback
C - rollback the services that depends on
Cand so on… - things become so much messy
- rollback
tip
Deployment ordering can be avoided if
-
the services are written in a way that they can be deployed/rolled back in any order & at any time.
- one way to do that is use feature flags.
e.g.
- Service
Adepends on serviceB- Add endpoint
footoB(Bat versionv2)
- Add endpoint
- Update the code in
Ato make calls tofooendpoint (Aat versionv2)- Wrap that code in an if-statement which is off by default 👈 The new functionality is wrapped in a feature flag.
- Now
AandBcan be deployed in at any order & at any time- When you’re sure both the new versions of
AandBare deployed, then you turn the feature toggle on.- Everything should start working.
- If there is any issue with
AorB(or any of their dependencies), you turn the feature toggle off, then roll back the services.
- When you’re sure both the new versions of
Debugging Overhead
-
If you have dozens of services, and users report a bug:
- You have to investigate to figure out which service is at fault.
-
To track down a bug across dozens of services can be a nightmare:
Monolith Services Logs In a single place/format In different places/formats How to reproduce bug? Run a single app locally Run dozens of services locally How to debug? Hook a debugger (to a single process) and go through the code step-by-step Use all sorts of tracing tools to identify dozens of processes (that processing a single request) How long to debug? A bug that take an hour to figure out The same bug could takes weeks to track down -
Even if you you figure out the service at fault, there are still other problems:
- Each team will immediately blame other teams, because no one want to take ownership the bug.
- Your services are communicate over the network, there are a lot of new, complicated failure conditions that are tricky to debug.
Infrastructure Overhead
When you have multiple services:
- In additional to deploy the services themselves
- You need to deploy a lot of extra infrastructure to support the services.
- The more services you have, the more infrastructure you need to support them.
e.g. To deploy 12 services, you may also need to deploy:
- an orchestration tool, e.g. Kubernetes
- a service mesh tool, e.g. Istio 👈 To help services communicate more securely
- an event bus, e.g. Kafka
- a distributed tracing tool, e.g. Jaeger 👈 To help with debugging & monitoring
- (You also need to integrate a tracing library - e.g. OpenTracing - to all services)
Performance Overhead
When you breaking your codebase into services:
-
the performance may be improved 👈 you can handle different scaling requirements by horizontally or vertically scaling some parts of your software.
-
or the performance may also be worse.
This is due to:
-
Networking overhead
Operation How much? Where? Time in $μs$ Notes Read (Random) from DRAM - main memory $0.1$ TCP packet round trip 1.5 KB within same data-center $500$ $0.5 ms$ TCP packet round trip 1.5 KB from California to New York
(1 continent)$40,000$ $40 ms$ TCP packet round trip 1.5 KB from California to Australia
(2 continents)$183,000$ $183 ms$ - For a monolith, different parts (of the codebase) run in a single process, and communicate via function calls (in the memory) 👈 A random read from main memory takes $0.1μs$
- For services, different parts (of the codebase) run in multiple processes, and communicate over network 👈 A roundtrip for a single TCP package in the same data center takes $500μs$
The mere act of moving a part of your code to a separate service makes it at least $5,000$ times slower to communicate.
-
Serialization19 overhead
When communicating over the network, the messages need to be processed, which means:
- packing, encoding (serialization)
- unpacking, decoding (de-serialization)
This includes:
- the format of the messages, e.g. JSON, XML, Protobuf…
- the format of the application layer, e.g. HTTP…
- the format for encryption, e.g. TLS
- the format for compression, e.g. Snappy 👈 Just compressing 1 KB with Snappy is 20 times slower than random read from main memory.
-
warning
When splitting a monolith into services, you often minimize this performance overhead by
- rewriting a lot of code for:
- concurrency
- caching
- batching
- de-dupling
But all of these things make your code a lot more complicated (compare to keeping everything in a monolith)
Distributed System Complexities
Splitting a monolith into services is a MAJOR shift: your single app is becoming a distributed system.
Dealing with distributed system is hard:
-
New failure modes
-
For a monolith, there are only several types of errors:
- a function return
- an expected error
- an unexpected error
- the whole process crash
- a function return
-
For services that run in separate processes that communicate over the network, there are a lot of possible errors:
The request may fail because
- the network
- is down
- is misconfigured, and send it to the wrong place
- the service
- is down
- takes too long to response
- starts responding but crash halfway through
- sends multiple responses
- sends response in wrong format
- …
You need to deal with all of these errors, which makes your code a lot more complicated.
- the network
-
-
I/O complexity
Sending a request over the network is a type of I/O (input/output).
-
Most types of I/O are extremely slower than operations on the CPU or in memory (See Reducing Latency section)
-
Most programming languages use special code to make these I/O operations faster, e.g.
- Use synchronous I/O that blocks the thread until the I/O completes (aka use a thread pool)
- Use asynchronous I/O that is non-blocking so code
- can keep executing while waiting for I/O,
- will be notified when that I/O completes
-
| Approach to handle I/O | synchronous I/O | asynchronous I/O |
|---|---|---|
| How? | Blocks the thread until the I/O completes 👈 aka use a thread pool | The I/O is non-blocking: |
| - Code can keep executing (while waiting for I/O) | ||
| - Code will be notified when the I/O completes | ||
| Pros | Code structure is the same | Avoid dealing with thread pool sizes |
| Cons | The thread pools need to be carefully sized: | Rewrite code to handle those notifications |
| - Too many threads: CPU spends all its time context switching between them 👈 thrashing | - By using mechanisms: callbacks, promises, actors… | |
| - Too few threads: code spends all time waiting 👉 decrease throughput |
-
Data storage complexity
When you have multiple services, each service typically manages its own, separate data store:
- allow each team to store & manage data to best fits their needs, and to work independently.
- with the cost of sacrificing the consistency of your data
warning
If you try to have data consistent you will end up with services that are tightly coupled and not resilient to outages.
In the distributed system world, you can have all both of data consistent and services that are highly decoupled.
important
Key takeaway #8 Splitting up a codebase into libraries and services has a considerable cost: you should only do it when the benefits outweigh those costs, which typically only happens at a larger scale.
Example: Deploy Microservices in Kubernetes
In this example, you’ll
- Convert the simple Node.js
sample-appinto 2 apps:
-
backend: represents a backend microservice that-
is responsible for data management (for some domain within your company)
- exposes the data via an API - e.g. JSON over HTTP - to other microservices (within your company and not directly to users)
-
-
frontend: represents a frontend microservice that-
is responsible for presentation
- gathering data from backends
- showing that data to users in some UI, e.g. HTML rendered in web browser
-
- Deploy these 2 apps into a Kubernetes cluster
Creating a backend sample app
-
Copy the Node.js
sample-appfrom chap 5cd examples cp -r ch5/sample-app ch6/sample-app-backend -
Copy the Kubernetes configuration for Deployment and Service from chap 3
cp ch3/kubernetes/sample-app-deployment.yml ch6/sample-app-backend/ cp ch3/kubernetes/sample-app-service.yml ch6/sample-app-backend/ -
Update the
sample-app-backendapp-
app.jsMake the
sample-appact like a backend:- by exposing a simple API that
- response to HTTP requests with JSON
app.get("/", (req, res) => { res.json({ text: "backend microservice" }); });[!TIP] Normally, a backend microservice would look up data in a database.
- by exposing a simple API that
-
package.json{ "name": "sample-app-backend", "version": "0.0.1", "description": "Backend app for 'Fundamentals of DevOps and Software Delivery'" } -
sample-app_deployment.ymlmetadata: name: sample-app-backend-deployment # (1) spec: replicas: 3 template: metadata: labels: app: sample-app-backend-pods # (2) spec: containers: - name: sample-app-backend # (3) image: sample-app-backend:0.0.1 # (4) ports: - containerPort: 8080 env: - name: NODE_ENV value: production selector: matchLabels: app: sample-app-backend-pods # (5) -
sample-app_service.ymlmetadata: name: sample-app-backend-service # (1) spec: type: ClusterIP # (2) selector: app: sample-app-backend-pods # (3) ports: - protocol: TCP port: 80 targetPort: 8080-
(2): Switch the service type from
LoadBalancertoClusterIP[!NOTE] A service of type
ClusterIPis only reachable from within the Kubernetes cluster.
-
-
Build and deploy the backend sample app
-
Build the Docker image (See Chap 4 - Example: Configure your Build Using NPM)
npm run dockerize -
Deploy the Docker image into a Kubernetes cluster
In this example, you’ll use a local Kubernetes cluster, that is a part of Docker Desktop.
-
Update the config to use context from Docker Desktop
kubectl config use-context docker-desktop -
Deploy the Deployment and Service
kubectl apply -f sample-app-deployment.yml kubectl apply -f sample-app-service.yml -
Verify the Service is deployed
kubectl get services
-
Creating a frontend sample app
-
Copy the Node.js
sample-appfrom chap 5cd examples cp -r ch5/sample-app ch6/sample-app-frontend -
Copy the Kubernetes configuration for Deployment and Service from chap 3
cp ch3/kubernetes/sample-app-deployment.yml ch6/sample-app-frontend/ cp ch3/kubernetes/sample-app-service.yml ch6/sample-app-frontend/ -
Update the
sample-app-frontendapp-
app.jsUpdate the frontend to make an HTTP request to the backend and render the response using HTML
const backendHost = "sample-app-backend-service"; // (1) app.get("/", async (req, res) => { const response = await fetch(`http://${backendHost}`); // (2) const responseBody = await response.json(); // (3) res.send(`<p>Hello from <b>${responseBody.text}</b>!</p>`); // (4) });-
(1): This is an example of service discovery in Kubernetes
[!NOTE] In Kubernetes, when you create a Service named
foo:- Kubernetes will creates a DNS entry for that Service
foo. - Then you can use
fooas a hostname (for that Service)- When you make a request to that hostname, e.g.
http://foo,- Kubernetes routes that request to the Service
foo
- Kubernetes routes that request to the Service
- When you make a request to that hostname, e.g.
- Kubernetes will creates a DNS entry for that Service
-
(2): Use
fetchfunction to make an HTTP request to the backend microservice. -
(3): Read the body of the response, and parse it as JSON.
-
(4): Send back HTML which includes the
textfrom the backend’s JSON response.[!WARNING] If you insert dynamic data into the template literal as in the example, you are opened to injection attacks.
- If an attacker include malicious code in that dynamic data
- you’d end up executing their malicious code.
So remember to sanitize all user input.
- If an attacker include malicious code in that dynamic data
-
-
package.json{ "name": "sample-app-frontend", "version": "0.0.1", "description": "Frontend app for 'Fundamentals of DevOps and Software Delivery'" } -
sample-app_deployment.ymlmetadata: name: sample-app-frontend-deployment # (1) spec: replicas: 3 template: metadata: labels: app: sample-app-frontend-pods # (2) spec: containers: - name: sample-app-frontend # (3) image: sample-app-frontend:0.0.1 # (4) ports: - containerPort: 8080 env: - name: NODE_ENV value: production selector: matchLabels: app: sample-app-frontend-pods # (5) -
sample-app_service.ymlmetadata: name: sample-app-frontend-loadbalancer # (1) spec: type: LoadBalancer # (2) selector: app: sample-app-frontend-pods # (3)- (2): Keep the service type as
LoadBalancerso the frontend service can be access from the outside world.
- (2): Keep the service type as
-
Build and deploy the frontend sample app
Repeat the steps in Build and deploy the backend sample app
tip
When you’re done testing, remember to run kubectl delete for each of the Deployment and Service objects to undeploy them from your local Kubernetes cluster.
Get Your Hands Dirty: Running Microservices
-
The frontend and backend both listen on port 8080.
- This works fine when running the apps in Docker containers,
- but if you wanted to test the apps without Docker (e.g., by running
npm startdirectly), the ports will clash.
Consider updating one of the apps to listen on a different port.
-
After all these updates, the automated tests in
app.test.jsfor both the frontend and backend are now failing.- Fix the test failures.
- Also, look into dependency injection and test doubles (AKA mocks) to find ways to test the frontend without having to run the backend.
-
Update the frontend app to handle errors:
e.g. The HTTP request to the backend could fail for any number of reasons, and right now, if it does, the app will simply crash.
- You should instead catch these errors and show users a reasonable error message.
-
Deploy these microservices into a remote Kubernetes cluster: e.g., the EKS cluster you ran in AWS in Part 3.
Conclusion
When your company grows, there will be scaling problems, which you can solve by
- breaking up your deployment into multiple environments
- breaking up your codebase into multiple libraries & services
Both approaches have pros and cons
| Pros | Cons | |
|---|---|---|
| Breaking up your deployment | 1. Isolate: | |
| - tests from production | ||
| - teams from each other | ||
| 2. If the environments are in different regions: | ||
| - Reduce latency | (at the cost of) having to rework your entire architecture | |
| - Increase resiliency | ||
| - Comply with local laws/regulations | ||
| 3. Configuration changes can cause outages (just as code changes) | ||
| Breaking up your codebase | 4. … into libraries: Developers can focus on a smaller part (of codebase) at a time | |
| 5. … into services: Different teams can own, developer & scale each part independently | ||
| 6. You can make change much faster within each part (library, service) | (at the cost of) it taking longer to make change across the entire codebase | |
| 7. You choose to do late integration (instead of continuous integration), so it only works for those parts are truly independent | ||
| 8. Has a considerable cost, so only do it when the benefits outweigh the cost, which only happens at a larger scale |
Latency is the amount of time it takes to send data between your servers and users’ devices.
GDPR (Global Data Protection Regulation)
HIPAA (Health Insurance Portability and Accountability Act)
HITRUST (Health Information Trust Alliance)
PCI DSS (Payment Card Industry Data Security Standard);
FedRAMP (Federal Risk and Authorization Management Program)
With active/standby mode, you have:
- One active database that serves live traffic.
- Other standby databases in other data centers that doesn’t serves live traffic.
When the active database went down, another standby database would become the new active database, and serve live traffic.
With active/active mode, you have multiple databases that serve live traffic at the same time.
TODO
A backward incompatible change (of a library) is a change that would require the users to
- update how they use the library in their code
- in order to make use of this new version (of the library)
e.g.
- you remove something (that was in the API before)
- you add something (that is now required)
Synchronously means each service
- messages each other
- wait for the responses.
Asynchronously means each service
- listens for events (messages) on an event bus
- processes those events
- creates new events by writing back to the event bus
For performance bottlenecks, you can never really predict without running a profiler against real code and real data.
Serialization is the process of
- translating a data structure or object state into a format that can be
- stored (e.g. files in secondary storage devices, data buffers in primary storage devices) or
- transmitted (e.g. data streams over computer networks) and
- reconstructed later (possibly in a different computer environment).
Chapter 7: How to Set Up Networking
Networking is what needed to:
- connect 👉 services need to communicate over the network
- secure 👉 environment need to be isolated from each other (so they can’t talk to each other)
your applications.
This chapter will walkthrough the concepts and examples:
| Concept | Description | Example |
|---|---|---|
| Public networking | Expose your apps to the public internet via | |
| - public IPs | - Deploy servers with public IPs in AWS | |
| - domain names | - Register a domain name for them in Route 53 | |
| Private networking | Run apps in private network to | - Create a Virtual Private Cloud (VPC) in AWS |
| - protect them from public internet access | - Deploy servers into VPC | |
| Network access | Securely access private networks | Connect to a server in a VPC in AWS using |
| - using SSH, RDP, VPN | - SSH and a bastion host | |
| Service communication | Connect & secure communicate between apps | Use Istio as a service mesh |
| - in a (micro)services architecture | - for microservices running in Kubernetes |
Public Networking
Almost everything you’ve deployed so far has been accessible directly over the public internet.
e.g.
- An EC2 instance with a public IP address like
3.22.99.215 - A load balancer with a domain name like
sample-app-tofu-656918683.us-east-2.elb.amazonaws.com
Public IP Addresses
IP : Internet Protocol : a protocol (set of rules) for : - routing : - addressing : … data across networks
tip
There are 2 major versions of IP: IPv4 & IPv6.
- IPv4: First major version, around since 1980s, is the dominant protocol of the internet.
- IPv6: The successor version, introduced in 2006, is gradually graining adoption
IP Address (IPv4 address)
: 👕 unique identifier used to determine who is who on the Internet
: 👔 a numerical label such as 192.0.2.1 that is assigned to a device connected to a computer network that uses the Internet Protocol for communication
: IP addresses serve two main functions:
: - network interface identification 👈 Which host is it?
: - location addressing 👈 Where is the host?
An IPv4 addresses
- is fixed length of four octets (32 bits)1 👈 There are $2^{32}$ IPv4 addresses.
- begins with a network number,
- followed by local address (called the “rest” field).
note
Running out of IPv4 addresses is one of the reason
- the world is moving to IPv6, which
- uses 128-bit addresses that are typically displayed as
- eight groups of four hexadecimal digits2, such as
2001:0db8:85a3:0000:0000:8a2e:0370:7334.
- eight groups of four hexadecimal digits2, such as
- uses 128-bit addresses that are typically displayed as
Though, IPv6 adoption is still under 50%, because millions of old networking devices still don’t support IPv6.
Represent of an IPv4 address:
IPv4 Example Decimal value of the IPv4 address In dot-octal notation o.o.o.o(4 octets)$013_{8}.014_{8}.015_{8}.016_{8}$3 👇4 In binary notation xxxxxxxx xxxxxxxx xxxxxxxx xxxxxxxx(32 bits)$00001011 00001100 00001101 00001110_{2}$ $185 339 150_{10}$ In dot-decimal notation Y.Y.Y.Y$11_{10}.12_{10}.13_{10}.14_{10}$ 👆5
note
If your computer is connected to the internet, to communicate with another computer (on public internet), you only need that computer’s IP address.
How to having your computer “connect to the internet”?
Your computer needs to have a valid IP address (in your network):
In other words, your computer need to know:
- where it is 👈 Which network (of type A, B, C) or subnet6?
- what its ID is 👈 Which host it is?
There are 2 main methods for allocating the IP addresses:
-
Classful networking address: 👈 The network prefix has fixed-length (7, 14, 21 bits)
There are 3 main classes of internet addresses:
- In class a, the high order bit is zero, the next 7 bits are the network, and the last 24 bits are the local address;
- In class b, the high order two bits are one-zero, the next 14 bits are the network and the last 16 bits are the local address;
- In class c, the high order three bits are one-one-zero, the next 21 bits are the network and the last 8 bits are the local address.
-
Classless Inter-Domain Routing (CIDR): 👈 The network prefix has variable length
[!TIP] CIDR grants finer control of the sizes of subnets allocated to organizations, hence slowing the exhaustion of IPv4 addresses from allocating larger subnets than needed.
Represent of an IP address:
-
in bit array7 (in binary number)
x: indicates a bit. n: indicates a bit used for the network number (aka network ID). H: indicates a bit used for the local address (aka host ID).0xxxxxxx xxxxxxxx xxxxxxxx xxxxxxxx (Class A) 0nnnnnnn HHHHHHHH HHHHHHHH HHHHHHHH <-----> <------------------------> 7 bits 24 bits Network add. Local address10xxxxxx xxxxxxxx xxxxxxxx xxxxxxxx (Class B) 10nnnnnn nnnnnnnn HHHHHHHH HHHHHHHH <-------------> <---------------> 14 bits 16 bits Network address Local address110xxxxx xxxxxxxx xxxxxxxx xxxxxxxx (Class C) 110nnnnn nnnnnnnn nnnnnnnn HHHHHHHH <---------------------> <------> 21 bits 8 bits Network address Local address -
in decimal notation (in decimal number)
In bit array In decimal-dot notation Leading bits Network’s
bit fieldLeadings bits & network bits Address ranges of networks Address ranges of each network Address ranges of whole class Class A 07 bits
($2^7$ networks)0nnn nnnn👉 From 00.0.00.0.0.0to 127255.255.255127.255.255.255Class B 1014 bits
($2^{14}$ networks)10nn nnnn nnnn nnnn👉 From 128.00.0128.0.0.0to 191.255255.255191.255.255.255Class C 11021 bits
($2^{21}$ networks)110n nnnn nnnn nnnn nnnn nnnn👉 From 192.0.00192.0.0.0to 223.255.255255223.255.255.255
tip
There are a lot of names, don’t be confused:
Network addressis akanetwork ID,routing prefixLocal addressis akarest field,host identifier
For more information about IP Address, see:
All the public IP addressed are owned by IANA, which assigns them in hierarchical manner:
-
Top-level: IANA delegates blocks of IP addresses to Internet registries (that cover regions of the worlds)
-
These Internet registries, in turn, delegate blocks of IP addresses to network operators8, such as
- Internet Service Provider (ISPs)
- cloud providers, e.g. AWS, Azure, GCP
- enterprise companies…
-
Finally, these network operators assign IP addresses to specific devices.
e.g.
-
important
Key takeaway #1 You get public IP addresses from network operators such as cloud providers and ISPs.
For more information, see:
- What is the Internet Protocol (IP)? | CloudFlare Learning Center
- What is my IP address? | CloudFlare Learning Center
For even more information, see:
Domain Name System (DNS)
note
Before DNS, TCP/IP has another name system - the simple host table name system.
tip
An example host table on Linux - the file /etc/hosts - looks like this
# Loopback entries; do not change.
# For historical reasons, localhost precedes localhost.localdomain:
127.0.0.1 localhost localhost.localdomain localhost4 localhost4.localdomain4
::1 localhost localhost.localdomain localhost6 localhost6.localdomain6
# See hosts(5) for proper format and other examples:
# 192.168.1.10 foo.mydomain.org foo
# 192.168.1.13 bar.mydomain.org bar
name system : technology that allow computers on a network to be given both : - a conventional numeric address : - a more “user-friendly” human-readable name
domain name
: 👕 a unique, easy-to-remember address used to access websites, such as google.com (instead of a IP address 142.251.10.100)
Domain Name System (DNS) : new, current name system of the Internet Protocol Suite (TCP/IP)
How DNS works
-
DNS stores
- the mapping from names to IP addresses
- in a globally-distributed hierarchy of nameservers
- the mapping from names to IP addresses
-
When you enter
www.google.cominto your web browser,-
your computer doesn’t talk directly to the nameservers
- instead it send sends a request to a local DNS resolver11.
-
-
The DNS resolver takes the domain name processes the parts in reverse order by making a series of queries to the hierarchy name servers
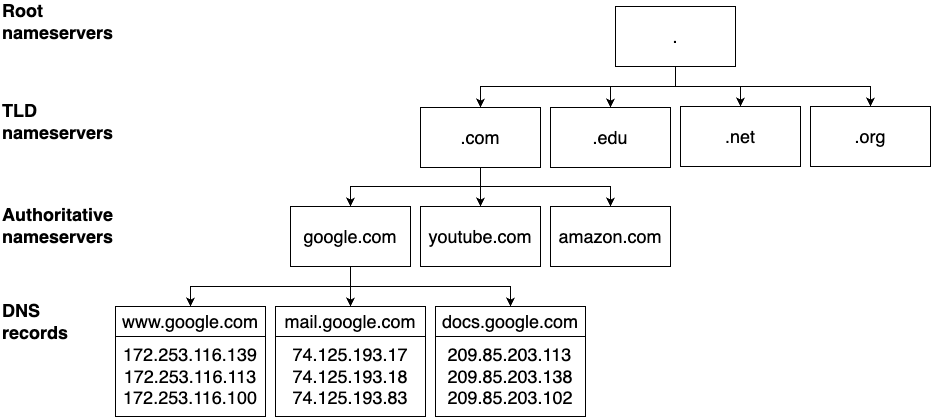
-
The DNS resolver’s first query goes to the root nameservers12 13:
The root nameservers return
- the IP addresses of the top-level domain (TLD) nameservers for the TLD you requested (
.com).
- the IP addresses of the top-level domain (TLD) nameservers for the TLD you requested (
-
The DNS resolver’s second query goes to the TLD nameservers14.
The TLD nameservers return
- the IP addresses of the authoritative nameservers for the domain you requested (
google.com).
- the IP addresses of the authoritative nameservers for the domain you requested (
-
Finally, the DNS resolver’s third query goes to these authoritative nameservers15
The authoritative nameservers return
- the DNS records that contain the information that is associated with the domain name you requested (
www.google.com)
- the DNS records that contain the information that is associated with the domain name you requested (
-
note
It takes 3 queries to get some DNS records of a domain name. Isn’t it too many round-trips?
- DNS is pretty fast
- There is a lot of caching that will reduce the number of look ups e.g. browser, OS, DNS resolvers, …
DNS records
DNS record : contains the information that is associated a domain name
There are many types of DNS records, each stores different kinds of information, such as:
- DNS
Arecord: stores the IPv4 address - DNS
AAAArecord: stores the IPv6 address - DNS
CNAMErecord: “canonical name” record thats stores alias for domain name. - DNS
TXTrecord: stores arbitrary text
When your browser looks up www.google.com, it typically requests A or AAAA records.
important
Key takeaway #2 DNS allows you to access web services via memorable, human-friendly, consistent names.
DNS Registration
-
The domain names are also owned and managed by IANA, who delegates the management to
- accredited registrars,
- who are allowed to “sell” domain names to end users
- are often (but not always) the same companies that run authoritative name services.
- accredited registrars,
-
After you lease a domain name, you have the permission to
- configure the DNS records for that domain
- in its authoritative name servers.
- configure the DNS records for that domain
-
Only after that, users all over the world can access your servers via that domain name.
note
Technically, you never own a domain name, you can only pay an annual fee to lease it.
Example: Register and Configure a Domain Name in Amazon Route 53
In this example, you’ll:
- Deploy a web app 👈 A simple HTTP server on several EC2 instances
- Set up a domain name (for it) 👈 Using Amazon Route 53 as the domain name registrar.
Register a domain name
Registering domain involves manual steps:
- Open Route 53 dashboard > Choose
Register a domain> ClickGet started - In the next page:
- In the
Search for domainsection > Use the search box to find an available domain - Click
Selectto add the domain to your cart. - Scroll to the bottom > Click
Proceed to checkout.
- In the
- In the next page:
- Fill out other details: How long? Registration auto-renew?
- Click
Next
- In the next page:
- Fill out contact details16
- [Optional] Enable privacy protection
- Click
Next
- Review the order in the summary page, then click
Submit - Open your email to confirm that you own the email address.
- Check your domain in registered domains page
- [For this example] Open the hosted zones page and copy the hosted zone ID.
tip
You can monitor the your registration process on the registration requests page
note
When you register a domain in Route 53, it automatically
- configures its own servers as the authoritative nameservers for that domain.
- creates Route 53 hosted zone for the domain
warning
Watch out for snakes: Registering domain names is not part of the AWS free tier!
The pricing varies based on the TLD:
- Domain with
.comTLD cost $14 per year (in September 2024)
Deploy EC2 instances
This example will
- use the
ec2-instances17 OpenTofu module, which is available at the sample code repo atch7/tofu/modules/ec2-instances - to deploy 3 EC2 instances
-
The OpenTofu root module
ec2-dns-
main.tf# examples/ch7/tofu/live/ec2-dns/main.tf provider "aws" { region = "us-east-2" } module "instances" { source = "github.com/brikis98/devops-book//ch7/tofu/modules/ec2-instances" name = "ec2-dns-example" num_instances = 3 # (1) instance_type = "t2.micro" ami_id = "ami-0900fe555666598a2" # (2) http_port = 80 # (3) user_data = file("${path.module}/user-data.sh") # (4) }- (1): Deploy 3 EC2 instances
- (2): Use the Amazon Linux AMI
- (3): Expose the port 80 for HTTP requests
- (4): Run the
user-data.shscript
-
Copy the user data script from chapter 2:
cd examples copy ch2/bash/user-data.sh ch7/tofu/live/ec2-dns/
[!WARNING] Watch out for snakes: a step backwards in terms of orchestration and security
This example has all the problems in Chapter 1 | Example Deploying An App Using AWS
-
Output the public IP addresses of the EC2 instances
output "instance_ips" { description = "The IPs of the EC2 instances" value = module.instances.public_ips }
-
-
Deploy the
ec2-dnsmoduletofu init tofu apply -
Verify the the app is deployed on these EC2 instance
curl http:<EC2_INSTANCE_IP_ADDRESS>
Configure DNS records
In this example, you’ll point your domain name at the EC2 instances (deployed in previous section)
-
Add the configuration for a DNS A record to the
ec2-dnsmodule# examples/ch7/tofu/live/ec2-dns/main.tf provider "aws" { # ... } module "instances" { # ... } resource "aws_route53_record" "www" { # TODO: fill in your own hosted zone ID! zone_id = "Z0701806REYTQ0GZ0JCF" # (1) # TODO: fill in your own domain name! type = "A" # (2) name = "www.fundamentals-of-devops-example.com" # (3) records = module.instances.public_ips # (4) ttl = 300 # (5) }The DNS record
- (1): … created in this hosted zone
- (2): … of type A
- (3): … for the sub-domain
www.<YOUR_DOMAIN> - (4): … point to the IPv4 addresses (of the EC2 instances you deployed)
- (5): … with the time to live (TTL)18 of 300 seconds.
For more information, see
aws_route53_recordOpenTofu resource’s docs -
Add output variable for the domain name
# examples/ch7/tofu/live/ec2-dns/outputs.tf output "domain_name" { description = "The domain name for the EC2 instances" value = aws_route53_record.www.name }
-
Re-apply the
ec2-dnsmoduletofu apply -
Verify the domain name works
curl http://www.<YOUR_DOMAIN>
Get your hands dirty: Managing domain names
-
Instead of several individual EC2 instances,
- use one of the orchestration approaches from Part 3,
- such as an ASG with an ALB
- figure out how to configure DNS records for that approach.
- use one of the orchestration approaches from Part 3,
-
Figure out how to automatically redirect requests for your root domain name (sometimes called the apex domain or bare domain) to your
www.sub-domain:e.g. redirect
fundamentals-of-devops-example.comtowww.fundametals-of-devsop.com.This is a good security practice because of how browsers handle cookies for root domains.
-
DNSSEC (DNS Security Extensions) is a protocol you can use to protect your domain from forged or manipulated DNS data.
- You may have noticed that in the Details section for your domain in your Route53 hosted zone page, it said that the
DNSSSEC statuswasnot configured. - Fix this issue by following the Route 53 DNSSEC documentation.
- You may have noticed that in the Details section for your domain in your Route53 hosted zone page, it said that the
Private Networking
private network : a network set up by an organization solely for that organization’s use : e.g. : - a home network : - an office network : - an university network : - a data center network : is locked down so only authorized individuals (from within that organization) can access it
Private Network’s Advantages
Defense in depth
defense-in-depth strategy : establish multiple layers of security : - providing redundancy in case there is a vulnerability in one of the layers
You should build your software in a similar manner with building a castle - using defense-in-depth strategy - establish multiple defense layers, if one of them fails, the others are there to keep you safe.
e.g. The servers (EC2 instances) deploy so far:
- has one layer of security - the firewall (security group) that block access to all ports by default
- one mistakes and these servers might become vulnerable, e.g. Someone will misconfigure the firewall and leave a port open, which be scanned all the time by malicious actors.
note
Many incidents are not the result of a brilliant algorithmic code cracking, but of opportunists jumping on easy vulnerabilities due to someone making a mistake.
warning
If one person making a mistake is all it takes to cause a security incident, then
- the fault isn’t with that person
- but with the way you’ve set up your security posture.
By putting your servers in a private networks, you have at least 2 layers of protections:
- First, a malicious actor have to get into your private network.
- Second, the actor have to find a vulnerability in your server.
tip
A good private network can create many more layers of security.
important
Key takeaway #3 Use a defense-in-depth strategy to ensure you’re never one mistake away from a disaster.
Isolate workloads
Separate private networks is one of the way to setup isolated environment.
e.g.
- Deploy different products, teams in separate private networks.
- Deploy data store servers and application servers in separate private networks.
If the workloads in separate private networks needs to communicate, you only allow traffic between specific IPs and ports.
tip
The other ways to setup isolated environments: different servers, different accounts, different data centers…
Better control and monitoring
Private networks give you fine-grained control over routing of:
- north-south traffic: traffic between your servers and the outside worlds
- east-west traffic: traffic between servers within your network.
This allows you to:
- add better security control
- setup monitoring
You should
-
almost always have all servers in a private network
-
only expose some highly-locked down servers, e.g. load balancers e.g. Capture flow logs that show all traffic going through your private network
-
manage traffic patterns
e.g. Shift traffic around as part of deployment or experiment
important
Key takeaway #4 Deploy all your servers into private networks by default, exposing only a handful of locked-down servers directly to the public Internet.
Physical Private Networks
note
Lossy compression Networking is a huge topic, what you’re seeing here is a highly simplified picture.
-
How to connect computers together?
How many computers? How to connect? Two computers 
Use a single cable N computers
(aka a network)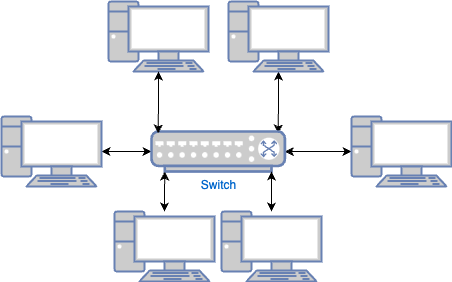
Use a switch
(instead of $N^2$ cables)Two networks 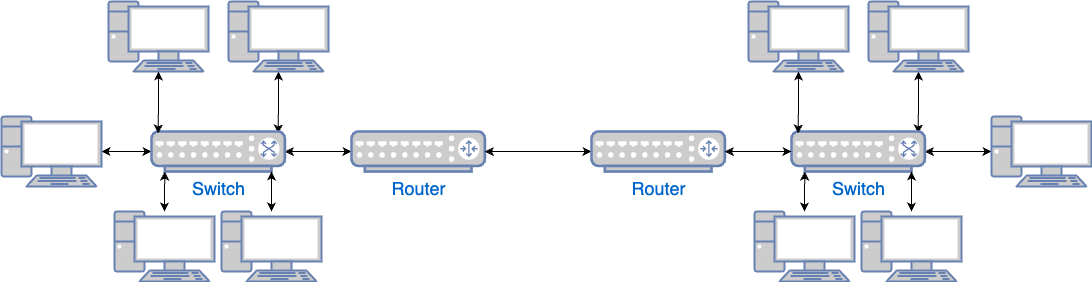
Use two routers N networks 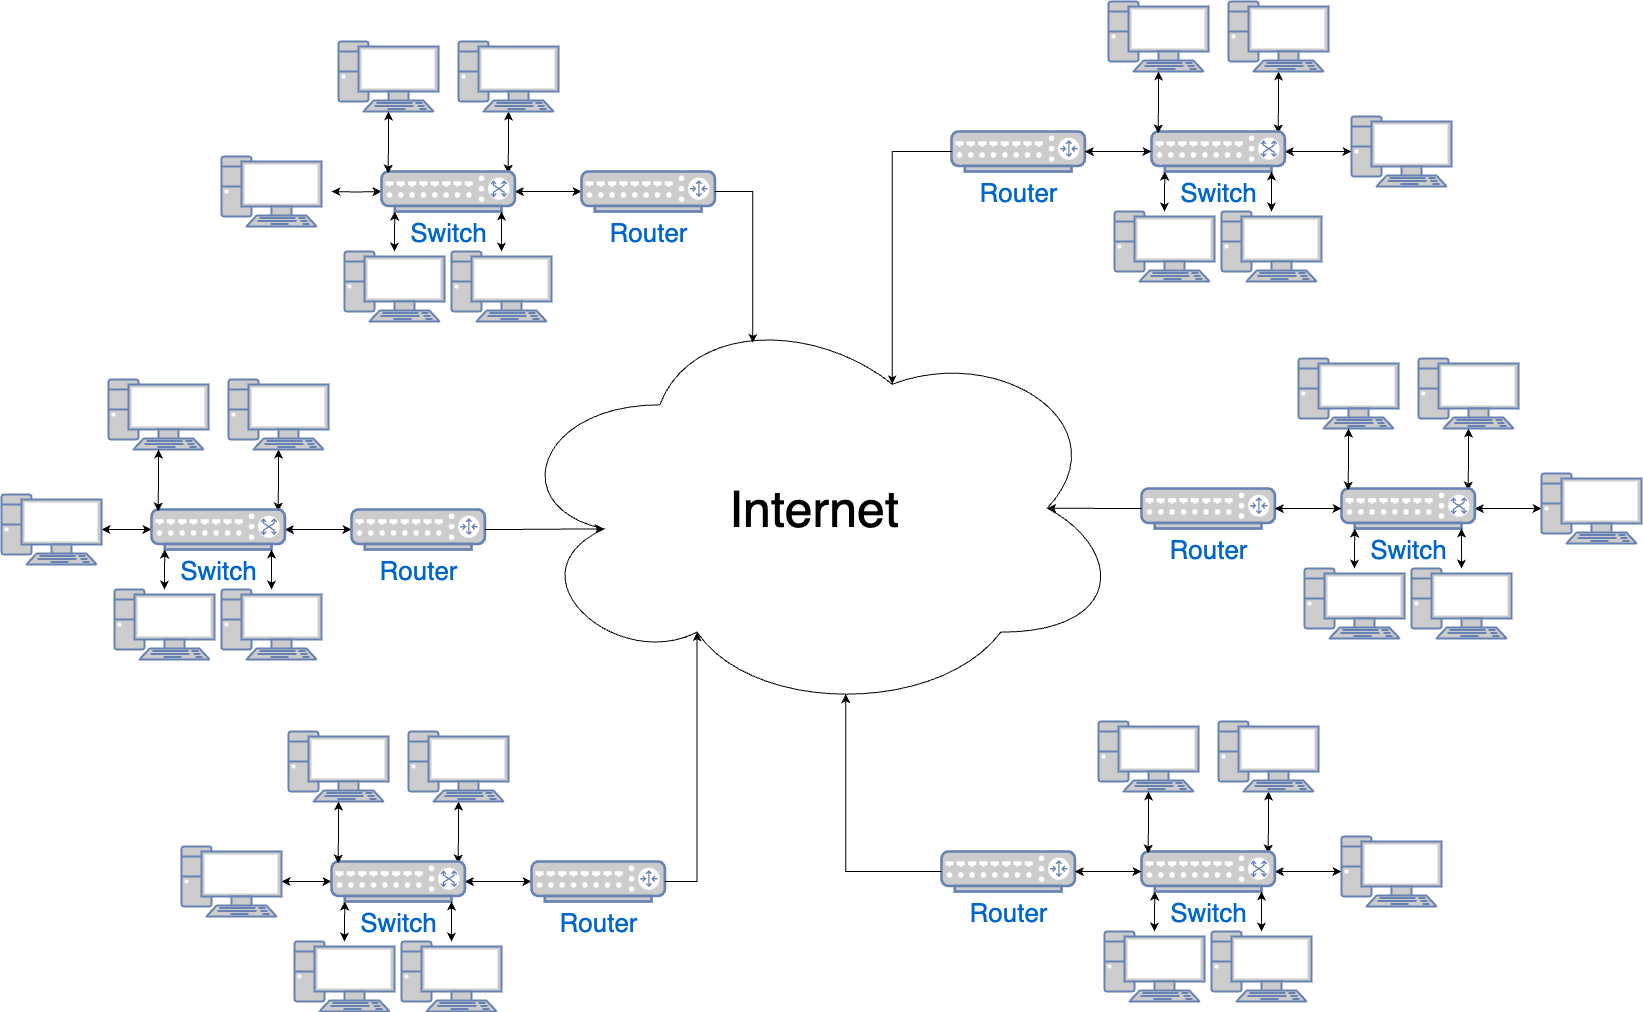
Use the internet19 -
Most of the networks of the internet is private network.
-
There are 2 common type of private networks:
-
Private network in your house (aka home network)
The ISP gives use a device that’s both a router & a switch, which
- allows devices in your home to talk to each other.
-
Private network in a data center:
The technicians set up various switches & routers,
- allows the servers in that the data center talk to each other.
-
Private networks’s key characteristics
Only authorized devices may connect to the private network
e.g.
-
For private network in your home:
Connect to the ISP router with
- an ethernet cable
- or Wi-Fi (with in the range of the antenna & a password)
-
For private network in a data center:
Get into the data center; plug in a cable into the routers and switches.
The private network uses private IP address ranges
The IANA reserves 3 blocks of the IP address space for private internets:
| From | To | In CIDR notation | Note |
|---|---|---|---|
10.0.0.0 | 10.255.255.255 | 10.0.0.0/8 | Class A |
172.16.0.0 | 172.31.255.255 | 172.16.0.0/12 | Class B |
192.168.0.0 | 192.168.255.255 | 192.168.0.0/16 | Class C Used in most private networks at home |
tip
With CIDR notation, the format of IPv4 address is a.b.c.d/e:
a.b.c.d: an IP addresse: a decimal number that represents how many bits of the IP address, when expressed in binary, stay the same20.
note
Every public IP address must be unique.
These 3 blocks of private IP addresses
- can be used over and over again
- as they can only used for private networks.
The private network defines connectivity rules
-
For a home network, you can define some basic control over connectivity.
e.g. Depending on your router, you can:
- Block outbound access to specific websites
- Block inbound requests from specific IP addresses
- Block specific port number from being used.
-
For a data center network,
-
you have full control over connectivity:
-
e.g. For every device (in the network), you can specify:
- What IP address it gets assigned
- What ports it’s allowed to use
- Which other devices it can talk to
- How traffic get routed to and from that device
-
using:
- hardware
- software: based on the configuration in switches, routers
-
-
-
It’s common to
- partition the private network (in a data center) into subnets
- assign specific rules to all devices in a subnet.
e.g.
- A subnet called a DMZ (demilitarized zone):
- allows access (to these servers) from the public Internet
- run a small handful of servers (such as load balancers)
- A private subnet:
- is not accessible from the public Internet
- run the rest of your servers
Most devices in a private network access the public Internet through a gateway
note
A device in a private network (with a private IP address) can also have a public IP address.
e.g. You assign a public IP address to a server in your DMZ, that server have both
- a private IP address: it uses to communicate with the devices in the DMZ
- a public IP address: it used to communicate with the Internet
-
Assigning a public IP to every device in a private network defeats the purpose of having a private network:
- keeping those devices secure
- avoiding running of of IPv4 addresses
-
Therefore, most of the devices in a private network access the public Internet through a gateway21.
Common types of gateways
Load balancers
A load balancer allows requests that
- originate from the public Internet
- to be routed to servers in your private network
- based on rules you define (in that load balancer)
e.g. If a user makes a request to the load balancer
- on port 80 for domain
foo.com, forward it to a specific app on port 8080.
NAT gateway
A Network Address Translation (NAT) gateway allows requests that
- originate in a private network
- to be routed out to the public Internet.
A common approach with NAT gateway is to do port address translation (PAT).
e.g. A server wants to make an API call to some-service.com
-
The server sends that request to the NAT Gateway, which:
- “translating” (modifying) the request to make it look like it
- originated from (the public IP of) the NAT gateway at a specific port number
- then send the modified request to
some-service.com
- “translating” (modifying) the request to make it look like it
-
When the response comes back from
some-service.com,The NAT Gateway:
- (knows which server to forward the response to)
- translate the request to make it look like it
- cam directly from
some-service.com.
- cam directly from
Outbound proxy
An outbound proxy is like a specialized NAT gateway that only allows an apps to make outbound requests to an explicitly-defined list of trusted endpoints.
note
Networking is all about layers of defense
- Most of those layers are about keeping attackers out
- An outbound proxy is the opposite - it keeps the attackers in:
- The attackers won’t be able to escape with your data.
ISP router
On your home network, the IPS router is typically configured as a NAT gateway.
- All devices send all requests to the public Internet via the ISP router, which
- also use PAT to get you response
- while keeping those devices hidden
Virtual Private Networks (VPNs)
If you deploy into the cloud,
- all the physical networking: servers, cables, switches, routers…
- are already taken care of by the cloud provider
- largely in a way you can’t see or control
- are already taken care of by the cloud provider
- what you can control is a virtual private network (VPN) - a network you configure entirely in software, which makes it a software-defined networking.
Virtual networks in the cloud
Each cloud provider offers slightly different networking features, but they typically have the following basic characteristics in common:
You can create a VPN
Most cloud providers allow you to create a VPN, although they may call it different:
- For AWS, GCP: VPN is call virtual private cloud (VPC)
- For Azure: VPN is call virtual network (VNet)
note
Most of the examples in this book use AWS, so VPN will be called VPC in the rest of book.
The VPC consists of subnets
Each VPC contains one or more subnets.
- Each subnet has an IP address range of the private internet as in previous section
e.g.
10.0.0.0/24
The subnets assign IP addresses
The resources deploy in a subnet will get an IP address from that subnet’s IP address range.
e.g. Three servers
- deployed in a subnet with the IP address range
10.0.0.0/24 - might have 3 IPs:
10.0.0.110.0.0.210.0.0.3
You enable connectivity with route tables
Each subnet has a route table that control how traffic is routed within that subnet.
-
Each route (in a route table) - corresponding to a row - typically defines
- a destination
- a target: where to route traffic (sent to that destination)
Route Destination Target What does it looks like? 10.0.0.0/16VPC Foo What does it exactly mean? Final target Immediate target Compare with a transit flight Paris (Final destination) Taiwan’s Airport (Transit airport)
Each time the VPC needs to route a packet, it will go through the route table, and
- use the most specific route that matches that packet’s destination (then route traffic to that route’s target)
e.g.
-
A route table with 3 routes
Destination Target 10.0.0.0/16VPC Foo 10.1.0.0/16VPC Bar 0.0.0.0/0NAT gateway - Traffic with a destination matches with
10.0.0.0/16will be routed to VPC Foo. - Traffic with a destination matches with
10.1.0.0/16will be routed to VPC Bar. - All other traffic (destination matches with
0.0.0.0/10) will be routed to the NAT Gateway (and go to the public Internet)
- Traffic with a destination matches with
You block connectivity with firewalls
Each cloud provider provides different types of firewalls to block traffic:
-
Some firewalls apply to individual resources, and typically block all traffic by default.
e.g. Each EC2 instance has a security group:
- You need to explicitly open IP/ports in the security group.
-
Other firewalls apply to entire subnets/VPCs, and typically allow all traffic by default.
e.g. AWS network firewall that filter inbound, outbound traffic across an entire VPC.
You access the public Internet through gateways
e.g. Load balancers, NAT Gateways
note
To make it easier to get started, most cloud providers allow you to deploy resources without creating a VPC.
e.g.
- AWS gives you a Default VPC out-of-the-box, which is suitable launching public instances such as a blog or simple website22
warning
To have better security and full control of the network, you should design your own networking and create your own VPC.
Virtual networks in orchestration tools
Some orchestration tools
-
include their own virtual network
e.g.
- Kubernetes Networking
- OpenShift Networking
- Marathon Networking
-
which is responsible for:
-
IP address management
Assigning IP addresses to apps (running in the orchestration tool).
-
Service communication
Allowing multiple apps (running in the orchestration tool) to communicate with each other.
-
Ingress
Allowing apps (running in the orchestration tool) to receive requests from the outside world.
-
These orchestration tools need their own virtual network because:
-
these orchestration tools are design to work in any data center or cloud
-
to solve the core orchestration problems
- that involve networking, e.g. load balancing, service communication
- in a portable way
note
When using an orchestration tool (which has its own virtual network), you have to integrate 2 sets of networking technologies:
- From the orchestration tool
- From the data center, cloud provider
To help you integrate with different cloud providers, these orchestration tools offer plugins to handle the integration.
e.g.
- Kubernetes supports:
- Container Network Interface (CNI) plugins: to manage cluster networking
- ingress controllers: to manage ingress
Comparing the behavior of networking plugins for Kubernetes in various clouds:
| Cloud | Typical CNI plugin | IP address management | Service communication | Typical ingress controller | Ingress | ||
|---|---|---|---|---|---|---|---|
| AWS | Amazon VPC CNI plugin | IPs from AWS VPC | Use AWS VPC routing | AWS Load Balancer Controller | Deploy AWS Elastic Load Balancers | ||
| GCP | Cilium GKE plugin | IPs from Cloud VPC subnets | Use Cloud VPC routing | GKE ingress | Deploy Cloud Load Balancers | ||
| Azure | Azure CNI plugin | IPs from VNet subnets | Use VNet routing | Nginx ingress controller | Deploy Nginx |
Example: Create a VPC in AWS
In this example, you will:
- Create a custom VPC in AWS
- Deploy some EC2 instances into it
The vpc OpenTofu module
-
from the sample code repo at
ch7/tofu/modules/vpcfolder -
can create a VPC as follow:
with the configuration for:
Configure the root module to use the vpc and ec2-instances OpenTofu modules:
-
The
vpc-ec2root module will be insamples/ch7/tofu/live/vpc-ec2cd examples mkdir -p ch7/tofu/live/vpc-ec2 cd ch7/tofu/live/vpc-ec2 -
Configure
main.tfto deploy a VPC and an EC2 instance in the public subnet (aka public instance)# examples/ch7/tofu/live/vpc-ec2/main.tf provider "aws" { region = "us-east-2" } module "vpc" { source = "github.com/brikis98/devops-book//ch7/tofu/modules/vpc" name = "example-vpc" # (1) cidr_block = "10.0.0.0/16" # (2) }module "public_instance" { source = "github.com/brikis98/devops-book//ch7/tofu/modules/ec2-instances" name = "public-instance" # (1) num_instances = 1 # (2) instance_type = "t2.micro" ami_id = "ami-0900fe555666598a2" http_port = 80 user_data = file("${path.module}/user-data.sh") # (3) vpc_id = module.vpc.vpc.id # (4) subnet_id = module.vpc.public_subnet.id # (5) }Configure the instance to run:
- (4): … in the VPC created by
vpcmodule. - (5): … in the public subnet of the created VPC.
- (4): … in the VPC created by
-
The user data script (at
examples/ch7/tofu/live/vpc-ec2/user-data.sh)#!/usr/bin/env bash set -e curl -fsSL https://rpm.nodesource.com/setup_21.x | bash - yum install -y nodejs export MY_IP=$(hostname -I) # (1) tee app.js > /dev/null << "EOF" const http = require('http'); const server = http.createServer((req, res) => { res.writeHead(200, { 'Content-Type': 'text/plain' }); res.end(`Hello from ${process.env.MY_IP}!\n`); // (2) }); const port = 80; server.listen(port,() => { console.log(`Listening on port ${port}`); }); EOF nohup node app.js &- (1): Look up the private IP address of the server
- (2): Include (the private IP address of the server) in the HTTP response
-
Configure
main.tfto deploy an EC2 instance in the private subnet (aka private instance)# examples/ch7/tofu/live/vpc-ec2/main.tf module "private_instance" { source = "github.com/brikis98/devops-book//ch7/tofu/modules/ec2-instances" name = "private-instance" # (1) num_instances = 1 instance_type = "t2.micro" ami_id = "ami-0900fe555666598a2" http_port = 80 user_data = file("${path.module}/user-data.sh") vpc_id = module.vpc.vpc.id subnet_id = module.vpc.private_subnet.id # (2) } -
Output the public & private IP addresses of the EC2 instances
# examples/ch7/tofu/live/vpc-ec2/outputs.tf output "public_instance_public_ip" { description = "The public IP of the public instance" value = module.public_instance.public_ips[0] } output "public_instance_private_ip" { description = "The private IP of the public instance" value = module.public_instance.private_ips[0] } output "private_instance_public_ip" { description = "The public IP of the private instance" value = module.private_instance.public_ips[0] } output "private_instance_private_ip" { description = "The private IP of the private instance" value = module.private_instance.private_ips[0] }
-
Deploy
vpc-ec2moduletofu init tofu apply -
Verify that the instance work:
curl http://<public_instance_public_ip>
note
To be able to test the instance in the private, subnet, you’re need to know how access private network.
Get your hands dirty: Working with VPCs
Update the VPC module to
-
deploy a NAT gateway
… so that resources running in the private subnet can access the public Internet.
-
deploy each type of subnet (public and private) across multiple availability zones
… so that your architecture is resilient to the failure of a single AZ.
note
Note: AWS offers a managed NAT gateway, which works very well and is easy to use, but is not part of the AWS free tier.
Accessing Private Networks
Castle-and-Moat Model
Castle-and-moat model is the traditional approach for managing a access to private networks.
Castle-and-moat model is an analogy between:
-
a castle
- with extremely secure perimeter (moat, walls…): it’s hard to get inside
- but soft interior: once you’re inside, you can freely move around
-
a private network:
- doesn’t allow you to access anything from outside the network
- but once you’re “in” the network, you can access anything
Bastion Host
In a physical network, with castle-and-moat model, merely being connected to the network means you’re in.
e.g. With many corporate office networks,
- if you’re plugged into the network via a physical cable, you can access everything in that network: wiki pages, issue tracker…
However, how do you connect to it if you’re outside the physical network:
- you’re working from home
- your’re infrastructure deployed in a VPC in the cloud
The common solution is to deploy a bastion host, a server that
-
is designed to be visible outside the network (e.g. in the DMZ)
-
has extra security hardening and monitoring, so it can better withstand attacks.
[!TIP] In a fortress, a bastion is a structure that is designed to stick out of the wall, allowing for more reinforcement and extra armaments, so that it can better withstand attacks.
The bastion host acts as the sole entrypoint to that network:
- There is only one bastion host, so you can put a lot of effort into making it as secure as possible.
- Authenticated users can
- connect to the bastion host using secured protocol (SSH, RDP, VPN)
- and have access to everything in the network.
e.g. A castle-and-moat networking model with a bastion host as the sole access point

- If you are able to connect to the bastion host (
11.22.33.44), you can access everything in the private subnets of that VPC:- The private servers (
10.0.0.20,10.0.0.21) - The database server (
10.0.0.22)
- The private servers (
Castle-and-moat model security concerns
The castle-and-moat model worked well-enough in the past, but in the modern work, it leads to security concerns.
In the past:
- Companies owns buildings with physical networks of routers, switchers, cables…
- To access that physical network, the malicious actor needs to
- be in a building owned by the company
- use a computer owned and configured by the company
note
In the past, your location on the network mattered:
- some locations could be trusted
- while others could not
Today:
- Many of the networks are virtual, e.g. VPC
- More and more employees work remotely, and needs to be able to connect to company network from a variety of locations: homes, co-working spaces, coffee shops, airports…
- Lots of devices need to connect to the company networks: laptops, workstations, tablets, phones…
The ideal of secure perimeter and soft interior no longer makes sense.
- There’s no clear “perimeter”, or “interior”
- There’s no location that can be implicitly trusted
Zero-Trust Model
With zero-trust architecture (ZTA), it’s now “never trust, always verify”.
- You never trust a user or device just because they have access to some location on the network.
Core principles of zero-trust architecture (ZTA)
Authenticate every user
Every connections requires the user to authenticate, using
- single sign-on (SSO)
- multi-factor authentication (MFA)
Authenticate every device
Every connections requires the user’s device (laptop, phone, tablet) to authenticate.
You can use a lot more devices to connect, but each one still need to be
- approved,
- added to a device inventory,
- configured with adequate security controls.
Encrypt every connection
All network communicate must be over encrypted connection.
e.g. No more http
Define policies for authentication and authorization
Each piece of software (you run) can
-
define flexible policies for:
- who is allowed to access that software 👈 authentication
- what level of trust & permissions they will have 👈 authorization
-
base on a variety of data sources:
- what location is the user connecting from? Home, office or unexpected continent?
- time of the day they are connecting, e.g. Work hours, 3 a.m
- how often they are connecting? First time today or 5000 times in latst 30 seconds
Enforce least-privilege access controls
With ZTA model, you follow the principle of least privilege, which means you get access
- only to the resources you absolutely need to do a specific task,
- and nothing else
e.g. If you get access to the internal wiki, you can only access to the wiki, not the issue tracker…
Continuously monitor and validate
With ZTA, you assumes that you’re constantly under attack,
- so you need to continuously log & audit all traffic to identify suspicious behaviour.
The zero-trust model has been evolving for many years. Some of the major publications on it:
-
No More Chewy Centers: Introducing The Zero Trust Model Of Information Security by John Kindervag
The term “Zero Trust Model” came from this.
-
BeyondCorp: A New Approach to Enterprise Security by Google
This paper is arguably what popularized the zero-trust model, even though the paper doesn’t ever use that term explicitly, but the principles are largely the same.
-
Zero Trust Architecture by NIST
In the BeyondCorp paper, there are even more controversial principles:
- Google no longer requires employees working remotely to use VPN to access internal resources
- Those internal resources are accessible directly via the public Internet.
tip
By exposing internal resources to the public, Google forces itself to put more effort into securing them than merely relied on the network perimeter.
A simplified version of the architecture Google described in BeyondCorp:
-
Internal resources are exposed to the public Internet via an access proxy, which
- use user database, device registry, access policies
- to authenticate, authorize, and encrypt every single connection.
[!NOTE] This zero-trust architect might look like the castle-and-moat architecture: both reply on a single entrypoint to the network:
- For castle-and-moat approach: it’s the bastion host
- For zero-trust approach: it’s the access proxy
-
(In additional to the bastion host,) every single private resources is also protected:
To access any private resources, you need to go through the authorization process with the access proxy.
note
Instead of a singe, strong perimeter around all resources in your network, the zero-trust approach
- put a separate, strong perimeter around each individual resource.
Zero-trust should be integrated into every part of your architecture
User and device management
One of the first steps with using ZTA is to get better control over users & devices.
-
For users, you want to ensure the authentication of all the software - email, version control system, bug tracker, cloud accounts… - is done through
-
a single identity provider (SSO) that requires MFA
-
using tools like: JumpCloud, Okta, OneLogin, Duo, Microsoft Entra ID, and Ping Identity.
-
-
For devices, you want to manage the devices with a device registry:
- to track, secure, authenticate these devices
- using Mobile Device Management (MDM) tools: JumpCloud, Rippling, NinjaOne, Microsoft Intune, and Scalefusion.
Infrastructure access
For infrastructure, you need to
-
grant access to:
- servers, e.g. SSH, RDP
- databases, e.g. MySQL client, PostGres client
- containers, e.g. Docker container in Kubernetes
- networks, e.g. VPC in AWS
-
in a manner that works with zero-trust approach.
This is tricky because there’re lots if technologies in terms of protocols, authentication, authorization, encryption…
Fortunately, there’re tools like Teleport, Tailscale, Boundary, and StrongDM.
Service communication
With ZTA, you have to rework hove your (micro)services communicate with each other.
-
Many microservices (e.g. the example microservices - with a frontend and a backend - you deployed in Kubernetes) are
- designed with castle-and-moat model
- (reply on network perimeter to protect those services)
- designed with castle-and-moat model
-
This will no longer works in ZTA world, instead you need to figure out how to secure the communication between your services.
Implement a true ZTA is a tremendous effort, and very few companies are able to fully do it.
It’s a good goal for all companies to strive for, but it depends on the scale of your company:
- Smaller startups: Start with castle-and-moat approach
- Mid-sized companies: Adopt a handful of ZTA principles, e.g. SSO, securing microservices communication
- Large enterprises: Go for all ZTA principles
And remember to adapt the architecture to the needs & capabilities of your company.
important
Key takeaway #5 In the castle-and-moat model, you create a strong network perimeter to protect all the resources in your private network; in the zero-trust model, you create a strong perimeter around each individual resource.
SSH
What is SSH
SSH (Secure Shell) : a protocol that allows you to connect to a computer over the network to execute commands : uses a client-server architecture
e.g. Using SSH to connect to a bastion host
-
The architecture
-
The client: computer of a developer in your team (Alice)
-
The server: the bastion host
-
When Alice connects to the bastion host over SSH,
- she gets a remote terminal, where she can:
- run commands
- access the private network
- as she was using the bastion host directly
- she gets a remote terminal, where she can:
How to use SSH
-
Configure a client, e.g. Alice’s computer
-
Configure server(s), e.g. The bastion host
-
Run SSH as a daemon27
This is typically done by running the
sshdcommand, which is enabled by default on many servers. -
Update the server’s firewall to allow SSH connections, typically on port $22$.
-
Add public keys (of Alice) to the authorized keys file of an OS user on the server.28
e.g.
- For AWS EC2 instance - default OS user is
ec2-user- you’ll need to add Alice’s public key to/home/ec2-user/.ssh/authorized_keys
- For AWS EC2 instance - default OS user is
-
-
Use SSH client to connect to the server
e.g. On Alice computer
ssh -i <PRIVATE_KEY> <OS_USER>@<SERVER_PUBLIC_IP>
After you connect to the server (e.g. the bastion host), you’ll:
-
get a terminal where you can run commands as if you were sitting directly at that server.
-
get access to that server’s network
e.g. Now Alice can
- run
curl(in the terminal) - to access the server in the private subnet at
10.0.0.20.
- run
-
tip
With SSH, you can do many more cool things:
- Transmit arbitrary data (aka tunneling)
-
Forward port (aka port forwarding)
e.g.
-
Alice use SSH to forward
- (from) port 8080 on her local computer
- (via the bastion host)
- to port 8080 of the server at
10.0.0.20(in the private subnet)
-
Any request she made from her own computer to
localhost:8080will be sent to10.0.0.20:8080.
-
-
Run a SOCKS proxy
e.g.
-
Alice
-
use SSH to run a SOCKS proxy
- on port
8080on her local computer - (via the bastion host)
- to the public Internet
- on port
-
then, configure an app that supports SOCKS proxies (e.g. a web browser )
- send all traffic via
localhost:8080(the SOCKS proxy)
- send all traffic via
-
-
When Alice uses her web browser (e.g. Chrome),
- The traffic will be routed through the bastion host, as if she was browsing the web directly from the bastion host.
With a SOCKS proxy, you can
- hide your IP from online services
- change to virtual location (aka location spoofing)
-
Example: SSH bastion host in AWS
In previous example, you deployed:
- a VPC
- 2 EC2 instances:
- one in a public subnet 👈 you could access
- one in a private subnet 👈 for now, you couldn’t access
In this example, you will update that example, so both instances can be access (over SSH)
- by using an EC2 key pair29
warning
Watch out for snakes: EC2 key pairs are not recommended in production
-
In this example, you’ll use the EC2 key-pair to experience with SSH.
-
However, AWS only supports associating a single EC2 key-pair with each C2 instance
👉 For a team, every members need to share a permanent, manually-managed private key, which is not a good security practice.
-
For production, the recommended way to connect to EC2 instance is:
Both uses automatically-managed, ephemeral key:
- generated for individual members on-demand
- expire after a short period of time
Let’s get started:
-
Create a key-pair:
-
Open the EC2 key-pairs page
-
Make sure you select the same region as the one that you deploy the VPC
-
Click
Create key pair- Enter the name for the key-pair
- Leave all settings as defaults
- Click
Create key pair
-
Download the private key (of the key-pair)
[!NOTE] AWS will store the created key-pair in its own database, but not the private key.
- It will prompt you once to download the private key.
-
Save it in a secure location, e.g.
~/.aws/.ssh
-
-
Add a passphrase to the private key, so only you can access it
ssh-keygen -p -f <KEY_PAIR>.pem -
Set the permission so the private key can be only by your OS user
chmod 400 <KEY_PAIR>.pem
-
-
Now, the only thing left is to add your public key to the authorized keys file of the root user on each of those EC2 instances.
[!TIP] If you specify a key-pair when launching an EC2 instance, AWS will add the public key to the root users of its AMIs.
-
Update the
main.tfinvpc-ec2root module to specify your key pairmodule "public_instance" { source = "github.com/brikis98/devops-book//ch7/tofu/modules/ec2-instances" # ... key_name = "<YOUR_KEY_PAIR_NAME>" } module "private_instance" { source = "github.com/brikis98/devops-book//ch7/tofu/modules/ec2-instances" # ... key_name = "<YOUR_KEY_PAIR_NAME>" }
[!NOTE] When you specify a
key_name, theec2-instancesmodule will opens up port 22 (in the security group), so you can access that instance via SSH.-
Apply the changes
tofu apply
-
Now let’s access the private instance:
-
SSH into the public instance
ssh -i <KEY_PAIR>.pem ec2-user@<PUBLIC_IP>-
Confirm you know the key-pair’s passphrase
-
Confirm you want to connect to the host
'<PUBLIC_IP>'30sshwill show use the key finder[!TIP] If you are diligent, you can manually verify that the host
<PUBLIC_IP>is really the EC2 instance deployed by you:- Go to the EC2 console
- View the system log of the instance (you’re connecting to)
- Select the instance
- In the nav op top, click
Actions>Monitor and troubleshoot>Get system log
- Verify the
SSH Host Key Fingerprintmatch with thekey fingerprintshow bysshcommand (on your local computer).
[!TIP] The fingerprint is generated from the public key.
-
You can show the fingerprint of a public key with
ssh-keygen -lssh-keygen -l -f <PUBLIC_KEY>
-
-
Now, you’re in the public instance, with a prompt like this:
Amazon Linux 2023 https://aws.amazon.com/linux/amazon-linux-2023 [ec2-user@ip-10-0-1-26 ~]$-
Check the simple web app:
curl localhost # Hello from 10.0.1.26 -
Access the private instance:
curl <PRIVATE_IP> # Hello from <PRIVATE_IP>
-
note
In this example, the public instance acts as a bastion host.
- You SSH into the bastion host, then access the private instance (from the point of view of the bastion).
You can even go a step farther, and SSH into the private instance (via the bastion host), which can be done by:
- Forwarding the SSH authentication to remote hosts (aka agent forwarding)
- Connect to a target host by first making an ssh connection to the jump host
tip
To disconnect from the SSH session:
- Send an
EOLby pressCtrl + D, or - Use the shell build-in command
exit
tip
You can use SSH agent - a key manager for SSH - to store private key in memory, so you can authenticate without specifying a key or passphrase.
-
Use
ssh-addto add a key to SSH agentssh-add <KEY_PAIR>.pem # Confirm the passphrase -
Verify that you can run SSH commands without specifying the key or passphrase
ssh -A ec2-user@<PUBLIC_IP>-
By using
-Aflag, you’re forwarding the authentication from the SSH Agent to remote machines(Local computer -> bastion host (public instance) -> private instance)
-
-
Since you’ve forwarded the SSH authentication from your local computer, you can SSH into the private instance (from the public instance)
ssh ec2-user@<PRIVATE_IP> -
Verify that’s you’re in the private instance
curl localhost # Hello from <PRIVATE_IP>
tip
To disconnect from the private instance, you need to hit Ctrl+D twice
- The first time to disconnect from the private instance
- The second time to disconnect from the public instance
Get your hands dirty: SSH
-
Instead of EC2 key pairs, try using EC2 instance connect or Session Manager
How do these options compare when connecting to the public instance? And the private instance?
-
Try using the
-Lflag to set up port forwarding from your local computer to the private server at<PRIVATE_IP>:e.g.
- run
ssh -L 8080:<PRIVATE_IP>:8080 ec2-user@<PUBLIC_IP>and - then open http://localhost:8080 in your browser.
- run
-
Try using the
-Dflag to set up a SOCKS proxy:e.g.
- run
ssh -D 8080 ec2-user@<PUBLIC_IP>, - configure your browser to use
localhost:8080as a SOCKS proxy - then open
http://<PRIVATE_IP>:8080in your browser.
- run
note
When you’ve done testing, don’t forget to run tofu destroy to clean everything up in your AWS account.
Advantages of SSH
-
Widely available
- Linux, MacOS support SSH natively
- Windows: there are also many clients
-
Secure
- SSH is a mature & secure protocol
- It has a massive community: vulnerabilities are rare and fixed quickly.
-
No extra infrastructure
Just run
sshd(which you don’t even need to install) on your server. -
Powerful dev tools
In additional to providing a way to access servers in private networks, SSH is also a daily dev tools with many features: terminal, tunneling, proxying…
Disadvantages of SSH
-
Managing keys can be difficult, especially at scale
For SSH, it’s difficult to:
- Supports hundreds of servers/developers/keys
- Key rotation and revocation
- Have different levels of permissions & access
[!TIP] There are many tools that solve this problem:
- From cloud providers:
- AWS: EC2 instance connect, Session Manager
- Google Cloud: metadata-managed SSH connections
- From cloud-agnostic 3rd-parties: Teleport, Boundary, StrongDM
-
It’s primarily a dev tool, not for everyone
SSH is not suitable for
- everyone: Product Manager, Designer…
- quickly access private network without the CLIs.
RDP
What is RDP
RDP (Remote Desktop Protocol) : a protocol that allows you to connect to a Windows computer over the network to manage it with a user interface : ~ SSH + UI (but only Windows)
How to use RDP
RDP also use client-server architecture (just like SSH):
-
Configure the RDP server:
-
Enable RDP in Windows server settings.
-
In front of the servers, deploy:
- a VPN
- or a Remote Desktop Gateway (RD Gateway)
-
Update the server’s firewall to allow RDP connects (port 3389) from previous devices.
-
Prepare the username & password of the Windows OS user account on the server:
e.g.
-
For AWS: EC2 instance - using the default Windows AMI - has an Administrator user built in with a randomly-generated password that can be retrieved from the EC2 console.
-
For Azure: you specify the username& password when launching the Windows server
-
If you’re using a identity provider (such as Active Directory, Microsoft 365), use that’s identity provider’s login.
-
-
-
Configure the RDP client:
- For Windows, the RDP client is pre-installed.
- For Mac, Linux, you needs to install the RDP client.
-
Use the RPD client to connect to the RPD server:
- Specify the IP address of the RDP Gateway/VPN
- Enter the username & password
Advantages of RDP
-
You get a fully-working Windows UI
-
Works for all employees
Disadvantages of RDP
-
Windows-only
-
Not secure without extra infrastructure
RDP has many security vulnerabilities:
- Exposing RDP port (
3389) to public Internet is not recommended. - You should run extra infrastructure (VPN or RD Gateway) in front of the RDP server .
- Exposing RDP port (
-
Not your own computer
RDP gives you access to another computer, and whatever private network it can access. But sometimes you access the private network directly from your computer (which has your apps, data).
VPN
What is VPN
VPN (Virtual Private Network) : a way to extend a private network across multiple other networks/devices
By using VPN:
- software (on any device) can communicate with the private network as if the device is “in” the network
- all traffic to the private network is encrypted (even if the traffic is over an untrusted medium, such as the public Internet)
Use cases for VPNs
Connect remote employees to an office or data center network
The VPC acts as bastion host that allow you:
- Connect to your company office network as if you were in the office
- Connect to a data center (on-prem or VPC in cloud account) as you were in the data center
VPN vendors of this use case: Cisco, Palo Alto Networks, Juniper Networks, Barracuda, SonicWall, Fortinet, OpenVPN, WireGuard, Tailscale, AWS Client VPN, and Google Cloud VPN.
Connect two data centers together
A site-to-site VPN can connect 2 data centers together.
e.g.
- 2 on-prem data centers connects together
- An on-prem data center connect to a VPC in the cloud
The VPC acts as a proxy between the data centers:
- Securely forwarding
- certain traffic in one private network
- to certain endpoints in another private network
This use case needs 2 type of VPN vendors:
- On the on-prem side: the same as office network, e.g. Cisco, Palo Alto, Juniper
- On the cloud side: site-to-site VPN services from cloud provider, e.g. AWS Virtual Private Gateways, Google Cloud VPN.
Hide Internet browsing behavior
You can use a VPN as a way to
- bypass geographical restrictions, or censorship
- keep your browsing history anonymous
The office network VPNs are overkill for this use case, it’s more common to use consumer VPN services, e.g. NordVPN, ProtonVPN, ExpressVPN.
How to use VPN
To connect remote employees to an office
The VPN for this use case is typically use a client-server architecture
-
Configure the VPN server
-
Deploy a VPN server (as the bastion host) and configure VPN software on it
-
Update the server’s firewall to alow VPN connections:
e.g.
- VPNs based on IPSec will use ports
500,4500,50,51… - VPNs based on TLS will use port
443
- VPNs based on IPSec will use ports
-
Configure the VPN server with the ability to authenticate users
e.g.
-
Traditional approach, used by old tool (e.g. OpenVPN):
- use certificates (based on public-key cryptography)
- but allow mutual authentication31
This approach is hard to securely sign, distribute, revoke/manage certificates.
-
Modern approach, used by new tool (e.g. Tailscale), allow users to authenticate
- using existing identity provider (e.g. Active Directory, Google, Okta)
- including MFA
under the hood, the certificate logic is handle transparently.
-
-
-
Configure the VPC client
-
Install the VPN client:
It’s usually a desktop/mobile app (with UI). Some OSes even have VPN clients built-in.
-
Following the VPN client’s instruction (in the UI) to authenticate.
-
Once configured/authenticated, the VPN will:
-
establish an encrypted tunnel to the VPN server
-
update the device’s networking settings to
-
route all network traffic through this tunnel (aka full tunnel mode)
[!WARNING] In split tunnel mode, all traffic (whether it from your working software or Youtube/Netflix) will be routed through the VPN, which may
- put a lot of load on VPN server
- cost a lot of bandwidth (and money)
[!NOTE] Some VPN client supports split tunnel mode, where only certain traffic is routed to the VPN server e.g.
- Only some traffic for specific domain names and CIDR block that corresponding to your company internal software go though the VPN tunnel
- Everything else goes through public Internet.
-
-
-
To connect two data centers
The high level steps looks like this:
-
Setup a site-to-site VPN device
In an on-prem data center, it might be a physical appliance from Cisco, Palo Alto, Juniper…
In the cloud, it’s be a virtual configuration, e.g. Virtual Private Gateway in AWS.
-
Configure routing
Route certain CIDR blocks from one data center (through the VPN connection) to the other data center.
e.g.
- On-prem data center network uses CIDR block
172.16.0.0/12. - Configure the route table in AWS VPC to route all traffic with destiantion match that CIDR block
172.16.0.0/12to your Virtual Private Gateway.
- On-prem data center network uses CIDR block
-
Configure connectivity and authentication
For each data center, you’ll need configure
- IP address
- Identifying information: Border Gateway Protocol (BGP) Autonomous System Number (ASNs)
- a way to authenticate & encrypt the connection
-
Create the VPN tunnel
Advantages of VPN
-
You get network transparent32 access from your own computer
With VPN, you can access a private network, from your own computer, as if you were directly a part of that network.
-
Works for all employees
-
Works with all operating systems
-
Secure
Most VPN tools are build around IPSec or TLS, both are mature and secure.
Disadvantages of VPN
-
Extra infrastructure to run
You have to deploy a VPN server, possibly multiple servers for high availability.
-
Certificate management can be difficult
Most VPN tools are build around certificates, which is difficult to manage.
-
Performance overhead
- Traffic a route through another server, which increase latency.
- Too much traffic may degrade your network throughput.
Service Communication in Private Networks
In chapter 6, you saw that a common way to deal with problems of scale (more traffic, more employees), is to
- break codebase into multiple (micro)services that are
- deployed independently, typically on separates servers.
These services communicate (with each other) by sending messages over the network.
In order to allow services communicate over the network, you have to make following technical decisions:
| The technical decision | What does it mean? |
|---|---|
| Service discovery | How (one service know what endpoint) to reach another service? |
| Service communication protocol | What is the format of the messages (that a service send to another service)? |
| Service mesh | How to handle security, resiliency, observability, traffic management? |
Service Discovery
Although service discovery may looks easy
- to talk with service B, service A only needs service B’s IP address
but when you have:
- multiple services
- each with multiple replicas that
- runs on multiple servers
- each with multiple replicas that
- the number of replicas, servers change frequently as:
- you deploy new versions
- replicas crashed and replaced
- you scale up/down
- …
service discovery can be a challenging problem.
important
Key takeaway #6 As soon as you have more than one service, you will need to figure out a service discovery solution.
Service discovery tools
Generic tools
Configuration files
The simplest soluction is to hard-coded server IP address in configuration files.
e.g.
- Service A have a config file with hard-coded IP address of the servers where B is deployed.
note
This works as long as the IP address used by B don’t change too ofter, such as
- an on-prem data center
- in the cloud but you’re using private static IP address for B’s virtual servers
(Internal) load balancers
You can:
- deploy an internal load balancers in front of all services.
- hard-code the endpoints of the load balancer (for each environment).
Then service discovery can be done by using:
-
a convention for the path
e.g.
- Service A reaches service B at
/Bpath of the load balancer.
- Service A reaches service B at
DNS
tip
Service discovery is about translating a name (of the service) to a set of IP addresses.
Isn’t it the DNS?
You can
- use a private DNS server (from the cloud provider)
- create a DNS record that points to the IP address for each service
Then service discovery can be done by using:
-
a convention for the domain
e.g.
- Service A reach service B at the domain
B.internal
- Service A reach service B at the domain
Dedicated service discovery tools
Service discovery tools with service discovery library
Tool sucs as Consul, Curator and ZooKeeper, Eureka comes with 2 components:
-
a service registry: a data store that
- stores the endpoint data for services
- performs health checks (to detech when endpoints are up & down)
- allows services to subscribe to updates (and notify immediately when endpoints are updates)
-
the service discovery library: a library you incorporate into your application code to:
- add endpoints (to the service registry) when your services ares booting
- fetch endpoint data (from the service registry)
- subscribe to updates 👉 you can make service calls by looking up the latest service endpoint data in memory
Service discovery tools with local proxy
Tools such as
-
built-in mechanism of orchestration tools
e.g.
- Kubernetes and the platforms built on top of it (EKS, GKE, AKS…)
- Nomad, Mesos
come with 2 components:
- a service registry (same as service discovery library)
- a local proxy: a proxy that run on the same servers as your apps, by:
- deploying it as a sidebar container33 (~ in another container)
- or running it as a daemon (in the same container)
These local proxy:
- does the exactly same thing as the server discovery library: add endpoints, fetch endpoints, subscribe to updates.
- but
- is completely transparent (to the application)
- does not requires any changes to your application code.
To use a local proxy,
-
you:
- override network settings in each container/server to send all traffic throug this proxy
- or use the proxy as a local DNS server
-
the local proxy
- uses its local service registry data
- to route your app’s requests to the proper endpoints
- without the app be aware of the service discovery tool - local proxy
Service discovery tool comparison
The key trade-offs to consider when picking a service discovery tool:
| Trade-off | What to consider? | Notes |
|---|---|---|
| Manual error | Any solution that involves hard-coding data is error-prone. | |
| Update speed | - Hard-code IPs: slow | |
| - DNS: low TTL -> faster with the cost of latency | ||
| - Dedicated service discovery tools: subscribe -> quickly | ||
| Scalability | - Hard-code IPs: always hit scaling bottlenecks | |
| - Load balancers: difficult to scale if you have lots of traffic | ||
| Transparency | - Some tools require you to update your code app | To incorporate service discovery logic |
| - Other tools don’t require you to update your code (called transparent) | The code app still need to use some mechanis to make a service call | |
| Latency | - DNS: add an extra network hop (the DNS server) | You can cache the DNS response, but that reduces update speed |
| - Service-side tools (load balancers): requires extra network hops -> increase latency | ||
| - Client-side tools (library): endpoints are cache locally -> no extra network hops | ||
| - Local proxy: also has an extra hop, but it’s locally | ||
| CPU, memory usage | - Local proxy: extra code run with every container/servers | |
| Extra infrastructure | - Load balancer, service registry: requires deploying/managing extra infrastructure |
| Configuration files | Load balancers | DNS | Registry + Library | Registry + Local proxy | |
|---|---|---|---|---|---|
| ⬇️ Manual error | ❌ | ⭐ | ⭐⭐⭐ | ⭐⭐⭐ | ⭐⭐⭐ |
| Update speed | ❌ | ⭐⭐⭐ | ⭐ | ⭐⭐⭐ | ⭐⭐⭐ |
| Scalability | ❌ | ⭐⭐ | ⭐⭐ | ⭐⭐⭐ | ⭐⭐⭐ |
| Transparency to app | ⭐ | ⭐⭐ | ⭐⭐⭐ | ❌ | ⭐⭐⭐ |
| ⬇️ Latency overhead | ⭐⭐⭐ | ❌ | ⭐ | ⭐⭐⭐ | ⭐⭐ |
| ⬇️ CPU, memory overhead | ⭐⭐⭐ | ⭐⭐⭐ | ⭐⭐⭐ | ⭐⭐⭐ | ❌ |
| ⬇️ Infrastructure overhead | ⭐⭐⭐ | ⭐ | ⭐⭐ | ❌ | ❌ |
| Sign | Meaning |
|---|---|
| ❌ | Poor |
| ⭐ | Moderate |
| ⭐⭐ | Strong |
| ⭐⭐⭐ | Very Strong |
Service Communication Protocol
Message encoding vs Network encoding
Breaking codebase into services 👈 Define/maintain APIs 👈 Protocol decisions for APIs
message encoding : How will you serialize34 data? : e.g. JSON, Protocol Buffers; HTML, XML
network encoding : How will you send that data over the network? : e.g. HTTP, HTTP/2
Common protocols for Service Communication
REST APIs: HTTP + JSON
REST : Representation State Transfer : de factor standard for building web APIs
For REST:
- network encoding: HTTP
- message encoding: JSON (or HTML)
Serialization libraries
Serialization libraries supports:
- defining a schema
- compling stubs for various programming languages
e.g. Protocol Buffers, Cap’n Proto 35, FlatBuffers 36, Thrift, Avro
Serialization libraries:
- can use HTTP
- but for better performance: they will use HTTP/2
RPC libraries
RPCs libraries : one level up from serialization libraries : designed for remote procedure call (RPC), where : - a calling to a remote procedure, is : - the same as a calling to a local procedure : generate both client & server stubs : HTTP/2 + Protocol Buffers
e.g. gRPC, Connect RPC, drpc, Twirp
| Examples | Network encoding | Message encoding | |
|---|---|---|---|
| REST | HTTP | JSON | |
| Serialization libraries | HTTP/2 | Protocol Buffers, Cap’n Proto, FlatBuffers… | |
| RPC libraries | gRPC, Connect RPC | HTTP/2 | Protocol Buffers |
Key factors of Service Communication Protocol
| Key factor | What to consider? | Notes |
|---|---|---|
| Programming language support | - Which programming languages are used at your company? | |
| - Does they support the message encoding you need? | - JSON: is supported by almost any programming languages- Serizization protocols: are supported in popular ones | |
| Client support | - Which clients do your APIs need to support? | - Web browsers, mobiles, IoT… |
| - Which protocols do these clients support? | - HTTP + JSON: every clients, native to web browsers- Serizization protocols: hit or miss, especially with web browsers | |
| Schema and code generation | Does the message encoding supports: | |
| - defining a schema? | - HTTP + JSON: doesn’t support (but can use other tools, e.g. OpenAPI)- Serialization/RPC libraries: strong | |
| - generate client stubs? | ||
| - generate documentation? | ||
| Ease of debugging | How hard is it to test an API (built with this tool) or to debug problems? | - HTTP + JSON: easy, any HTTP client can be used: - web browser - UI tools, e.g. Postman - CLI tools, e.g. curl |
- Serialization/RPC libraries: require special tooling | ||
| Performance | How efficient are the message/network encoding in terms of bandwidth/memory/CPU usage? | HTTP + JSON < Serialization/RPC libraries |
| Ecosystem | - Documentation? Updates? | - HTTP + JSON: largest ecosystem |
| - Tools, plugin, related projects | - Serialization/RPC libraries: small | |
| - Hire new developers | ||
| - Find answers on the Internet (StackOverflow) | ||
tip
The generate rule is:
-
Use HTTP + JSON for most APIs
-
Only consider alternatives in special cases
e.g. At very large scales:
- hundreds of servies
- thousands of queries per second
Service Mesh
What is a service mesh
service mesh : a networking layer that help manage communication betweens micro(services)
Why use a service mesh
A service mesh provides a single, unified solution for many problems:
-
Security
In Chapter 6 - Example: Deploy Microservices In Kubernetes,
- as long as someone has network access (to your cluster)
- they could talk to any service (in your cluster) (the services respond blindly to any request came in)
You can have some level of protection by:
- putting these microservices in a private network 👈 castle-and-moat model
- hardening the security by enforcing encryption, authentication, authorization 👈 zero-trust model
-
Observability
With (micro)services architecture,
-
Debugging a failure/bug is hard:
- A single request may result in dozens of API calls to dozens of services.
- There are many new failure modes because of the network.
-
Observability tools: tracing, metrics, logging… become essensial.
-
-
Resiliency
The more services you have; the more bugs, issues, errors happens.
- If you have to manually deal with every bugs, issues, errors, you’d never be able to sleep.
To have a maintainable, resilient (micro)services, you need tools/techniques to:
- avoid
- recover
errors automtatically.
e.g. retries, timoutes, circuit breakers, rate limiting
-
Traffic management
(Micro)services is a distributed system.
To manage a large distributed system, you need a lot of fine-grained control over network traffic.
e.g.
-
Load balancing between services
e.g. ⬇️ latency, ⬆️ throughput
-
Canary deployment
e.g. Send traffic to a new replica (of an app as in Chap 5 - Canary Deployment)
-
Traffic mirroring
e.g. Duplicate traffic to an extra endpoint for analysis/testing
-
Almost all of these are problems of scale:
-
If you are a small team, with only some services and not much of load
1️⃣ in other words, when you don’t have the scaling problems, a service mesh
- don’t help you
- but it may be an unnecessary overhead.
-
If there are hundreds of services owned by dozens of teams, processing thousands of requets per seconds,
-
in other words, when you have scaling problems:
2️⃣ you may try to solve these problems individually, one at a time, but it will
- be a huge amount of work 👈 each problems needs its own tool, solution…
- that have many frictions 👈 each change is a global changes to every single service…
- take a very long time 👈 … rolling global change across services is a big challenge
3️⃣ or you can use a service mesh - all-in-one solutions to the these scaling problems
- in a transparent way
- does not require making changes to application code
-
important
Key takeaway #7 A service mesh can improve a microservices architecture’s
- security, observability, resiliency, and traffic management
without having to update the application code of each service.
When not to use a service mesh
A service mesh can feel like a magical way to dramatically upgrade the security and debuggability of your (micro)service architecture.
- But when things doesn’t work, the service mesh itself can be difficult to debug.
- It introduces a lot of moving parts (encryption, authentication, authorization, routing, firewalls, tracing…)
- that can be the source of new problems.
- The overhead of a service mesh can be huge: understanding, installing, configuring, managing…
Three types of service meshes
Use with Kubernetes
- Linkerd: This is the project that coined the term “service mesh”
- Istio: Most popular
- Cilium : Use the eBPF features of the Linux kernel
- Traefik Mesh: Base on API Gateway Traefik
Managed services from cloud providers
Use with any orchestration approach in any deployment environment
Example: Istio Service Mesh with Kubernetes Microservices
tip
Istio is one of the most popular service mesh for Kubernetes:
- created by Google, IBM, Lyft
- open sourced in 2017
In this example, you will use Istio to manage the 2 microservices in Chapter 6 - Example: Deploy Microservices In Kubernetes.
-
Copy the previous example
cd examples cp -r ch6/sample-app-frontend ch7/ cp -r ch6/sample-app-backend ch7/ -
Update Kubernetes config to use the same cluster as previous example
kubectl config use-context docker-desktop -
Fowllow the official guide to install
Istioctl- a CLI tool that help use install Istio into your Kubernetes cluster -
Use
istioctlto install Istio with a minimal profile37istioctl install --set profile=minimal -y -
Configure Istio to inject its sidecar into all Pod you deploy into the default namespace
kubectl label namespace default istio-injection=enabled[!NOTE] That sidecar is what provides all service discovery features: security, observability, resiliency, traffic management
- without you having to change your application code.
-
Use the sample add-ons that come with the Istio installer, which include:
- a dashboard (Kiali)
- a database for monitoring data (Prometheus)
- a UI for visualizing monitoring data (Grafana)
- a distributed tracing tool (Jaeger)
kubectl apply -f samples/addons kubectl rollout status deployment/kiali -n istio-system[!NOTE] Istio also supports other integration
-
Very everthing is installed correctly
istioctl verify-install
-
Deploy the frontend & backend as before
cd ../sample-app-backend kubectl apply -f sample-app-deployment.yml kubectl apply -f sample-app-service.yml cd ../sample-app-frontend kubectl apply -f sample-app-deployment.yml kubectl apply -f sample-app-service.yml -
Make a request to the frontend
curl localhost
-
Check if Istio is doing anything by opening up the Kiali dashboard
istioctl dashboard kiali -
Open
Traffic Graphto see a visualization of the path your request take through your microservices -
Open
Workloads/Logsto see- logs from your backend
- as well as access logs from Istio components, e.g. Envoy Proxy
By default, to make it possible to install Istio without breaking everything, Istio intially allows unencrypted, unauthenticated, unauthorized requests to go through.
-
Let’s add authentication & authorization policy for Istio
# examples/ch7/istio/istio-auth.yml apiVersion: security.istio.io/v1beta1 kind: PeerAuthentication # (1) metadata: name: require-mtls namespace: default spec: mtls: mode: STRICT --- # (2) apiVersion: security.istio.io/v1 kind: AuthorizationPolicy # (3) metadata: name: allow-nothing namespace: default spec: {}-
(1): Create an authentication policy that requires all service calls to use mTLS (mutual TLS)
- This will enforce that every connection is encrypted & authenticated
- Istio will handle mTLS for you, completely transparently.
-
(2): Use
---divider to put multiple Kubernetes configurations in a single YAML file. -
(3): Create an authorization policy that will block all service calls by default.
- You will need to add addtional authorization to allow just the service communication that you know is valid.
-
-
Hit
Ctrl+Cto shutdown Grafana ??? -
Deploy these policies
cd ../istio kubectl apply -f istio-auth.yml -
Let’s try to access the frontend app again
curl localhost # curl: (52) Empty reply from server- Since your request (to the the frontend) wasn’t using mTLS, Istio rejected the connection immediately.
-
Add an authentication policy to disable the mTLS requirement for the frontend
# examples/ch7/sample-app-frontend/kubernetes-config.yml apiVersion: apps/v1 kind: Deployment # ... --- apiVersion: v1 kind: Service # ... --- apiVersion: security.istio.io/v1beta1 kind: PeerAuthentication metadata: name: allow-without-mtls namespace: default spec: selector: matchLabels: app: sample-app-frontend-pods # (1) mtls: mode: DISABLE # (2)- (1): Target the frontend Pods
- (2): Disable the mTLS requirement
-
Deploy the new policy
cd ../sample-app-frontend kubectl apply -f kubernetes-configuration.yml -
Access the frontend again
curl --write-out '\n%{http_code}\n' localhost # RBAC: access denied # 403- Use
--write-outflag socurlprints the HTTP response after the response body.
This time it’s a
403 Forbiddenstatus withaccess deniedin the response body.- The
allow-nothingauthorization policy is still blocking all requests.
[!TIP] To fix this, you need to add authorization policies to the backend & frontend.
- This requires that Istio has some way to identify the frontend & backend (authentiacation).
[!NOTE] Istio uses Kubernetes service accounts as identities:
-
It provides a TLS certificate to each application based on its service identity
-
Then it uses mTLS to provide mutual authentication.
- Istio will have the frontend verify it is really taling to the backend.
- Istio will have the backend verify the request is from the frontend.
All the TLS details will be handled by Istio, all you need to do is:
- assiciating the frontend & backend with their own K8s service accounts
- adding an authorization to each one
- Use
-
Configure the frontend with a service account and authorization policy
# examples/ch7/sample-app-frontend/kubernetes-config.yml apiVersion: apps/v1 kind: Deployment spec: replicas: 3 template: metadata: labels: app: sample-app-frontend-pods spec: serviceAccountName: sample-app-frontend-service-account # (1) containers: - name: sample-app-frontend # ... (other params omitted) ... --- apiVersion: v1 kind: ServiceAccount metadata: name: sample-app-frontend-service-account # (2) --- apiVersion: security.istio.io/v1 kind: AuthorizationPolicy # (3) metadata: name: sample-app-frontend-allow-http spec: selector: matchLabels: app: sample-app-frontend-pods # (4) action: ALLOW # (5) rules: # (6) - to: - operation: methods: ["GET"]- (1): Configure the frontend’s Deployment with a service account (will be created in (2))
- (2): Create a service account
- (3): Add an authorization policy
- (4): Target the frontend’s Pods
- (5): Allow requests that match the rules in (6)
- (6): Allow the frontend to receive requests from all source, but only for HTTP GET requests.
-
Apply the configuration
kubectl apply -f kubernetes-config.yml
-
Combine the backend’s configuration then configure the backend with a service account & authorization policy
# examples/ch7/sample-app-backend/kubernetes-config.yml apiVersion: apps/v1 kind: Deployment spec: replicas: 3 template: metadata: labels: app: sample-app-backend-pods spec: serviceAccountName: sample-app-backend-service-account # (1) containers: - name: sample-app-backend # ... (other params omitted) ... --- apiVersion: v1 kind: ServiceAccount metadata: name: sample-app-backend-service-account # (2) --- apiVersion: security.istio.io/v1 # (3) kind: AuthorizationPolicy metadata: name: sample-app-backend-allow-frontend spec: selector: matchLabels: app: sample-app-backend-pods # (4) action: ALLOW rules: # (5) - from: - source: principals: - "cluster.local/ns/default/sa/sample-app-frontend-service-account" to: - operation: methods: ["GET"]- (1): Configure the backend’s Deployment with a service account. The service account itself is created in (2).
- (2): Create a service account (for the backend).
- (3): Add an authorization policy (for the backend).
- (4): Apply the authorization policy to the backend’s Pods.
- (5): Define rules that allow HTTP GET requests to the backend from the service account of the frontend.
-
Apply the configuration:
cd ../sample-app-backend kubectl apply -f kubernetes-config.yml
-
Test the frontend one more time
curl --write-out '\n%{http_code}\n' localhost # <p>Hello from <b>backend microservice</b>!</p> # 200It’s now a
200 OKreponse, with the expected HTML reponse body.Your microservices are
- running in a Kubernetes cluster
- using service discovery
- communicating securely via a service mesh
Get your hands dirty: Service meshes and Istio
-
Try out some of Istio’s other observability functionality.
e.g. Using Grafana to view your metrics:
istioctl dashboard grafana. -
Try out some of Istio’s traffic management functionality.
e.g. request timeouts, circuit breaking, and traffic shifting.
-
Consider if Istio’s ambient mode is a better fit for your workloads than the default sidecar mode.
After you’ve finished testing, cleanup your Kubernetes cluster:
-
Clean up the apps
cd ../sample-app-frontend kubeclt delete -f kubernetes-config.yml cd ../sample-app-backend kubeclt delete -f kubernetes-config.yml -
Uninstall Istio:
-
Remove policies
cd ../istio kubectl delete -f istio-auth.yml -
Uninstall addons
cd ../istio-<VERSION> kubectl delete -f samples/addons -
Uninstall Istio itself
istioctl uninstall -y --purge kubectl delete namespace istio-system kubectl label namespace default istio-injection-
-
Conclusion
-
Networking plays a key role in connectivity and security:
-
You get public IP addresses from network operators such as cloud providers and ISPs.
-
DNS allows you to access web services via memorable, human-friendly, consistent names.
-
Use a defense-in-depth strategy to ensure you’re never one mistake away from a disaster.
-
Deploy all your servers into private networks by default, exposing only a handful of locked-down servers directly to the public Internet.
-
In the castle-and-moat model, you create a strong network perimeter to protect all the resources in your private network; in the zero-trust model, you create a strong perimeter around each individual resource.
-
As soon as you have more than one service, you will need to figure out a service discovery solution.
-
A service mesh can improve security, observability, resiliency, and traffic management in a microservices architecture, without having to update the application code of each service.
-
-
A full network architecture
If the IP address has a leading 0, the ping tool assumes the numbers is octal.
For the dot-decimal notation:
- Each decimal number can be treated as a 256-base number.
- Or convert each decimal number to binary then combine all binary numbers together to make a single binary number, then convert to decimal.
For the dot-octal notation, to get the decimal value of the IP address:
- Convert each octal number to decimal then treat each one as a 256-base number, or
- Convert each octal number to binary then combine all binary numbers together to make a single binary number, then convert to decimal.
A network (of type A, B, C) can be split into multiple smaller networks (called subnets)
A hexadecimal digit can be represent by 4 bits (called nibble)
The DNS resolver is
- the ISP (at your home)
- the cloud provider (in the cloud)
The root nameservers run at 13 IP addresses that are
- managed by IANA
- hard-coded into most DNS resolver.
The TLD nameservers are also managed by IANA.
The authoritative nameservers are operated
- by yourself, or
- variety of companies (Amazon Route 53, Azure DNS, GoDaddy, Namecheap, CloudFlare DNS…)
IANA requires every domain to have contact details, which anyone can look up using whois command.
This module is similar to the OpenTofu code you wrote in Chapter 2 to deploy an EC2 instance, except the ec2-instances module can deploy multiple EC2 instances.
DNS resolvers should cache the DNS record for the amount specified with TTL.
- Longer TTLs will reduce latency for users & load on your DNS servers, but any updates will take longer to take effect.
The term “Internet” is derive from interconnected networks - a networks of networks
The ranges of IPs is defined by all the other bits that can change.
A gateway … allows data to flow from one discrete network to another (https://en.wikipedia.org/wiki/Gateway_(telecommunications)).
In AWS, to make a subnet public, you have to do 3 things:
-
Create an Internet Gateway38
-
In the’s subnet’s route table, create a route to send traffic to the Internet Gateway
- This is typically done via a catch-all route (
0.0.0.0/0): any traffic that doesn’t match a more specific destination will be routed (via the Internet Gateway) to the public Internet .
- This is typically done via a catch-all route (
-
Configure the VPC to assign public IP addresses to any EC2 instances deployed in it.
(The public subnet will also assign a private IP address to each EC2 instance)
The vpc module handles all of this for you.
Internet Gateway is an AWS-specific component that allows communication between the public Internet and your VPC.
In AWS, subnets are private by default, which means
- servers in those subnets will be able to talk to other resources within the VPC,
- but
- nothing outside the VPC will be able to talk to those servers, and,
- those servers also won’t be able to talk to anything outside the VPC (such as the public Internet) unless you add a NAT gateway (which this vpc module does not do)
This will
- makes it harder both for malicious actors
- to get in to your servers in private subnets, and,
- to get any data out (if they somehow do get in)
- ensure you can’t accidentally (or maliciously) install software from the public Internet (if you’re using server templating and immutable infrastructure practices, this is a good thing, as it makes your servers more secure and easier to debug.)
SSH uses public-key cryptography for authentication and encryption. You’ll more about authentication an encryption in Chapter 8.
Storing the private key in a secure manner is not an easy task.
A daemon is a background process.
The authorized keys file
- Typically at
~/.ssh/authorized_keys - Lists the public keys (DSA, ECDSA, Ed25519, RSA) that can be used for logging in as this user. (Source:
man ssh) - Each line of the file contains one key (empty lines and lines starting with a ‘#’ are ignored as comments) (Source:
man sshd)- Public keys consist of the following space-separated fields:
options, keytype, base64-encoded key, comment. - The options field is optional.
- Public keys consist of the following space-separated fields:
EC2 key-pair is an SSH key-pair that AWS can create for you and use with its EC2 instances
The first time you SSH to any new server, your SSH client can’t be sure that this is
- really the server you want to login to
- but not a fake server from a malicious actor
With mutual authentication:
- the client can verify the VPN server (is really who it says it is) using the server’s certificate,
- the server can verify the user (is really who they say they are) using the client’s certificate.
Network transparency, in its most general sense, refers to the ability of a protocol to transmit data over the network in a manner which is not observable (“transparent” as in invisible) to those using the applications that are using the protocol. https://en.wikipedia.org/wiki/Network_transparency
A sidecar container is a container that is always deployed in tandem with every one of your application containers.
Serialization is the process of
- translating a data structure or object state into a format that can be
- stored (e.g. files in secondary storage devices, data buffers in primary storage devices) or
- transmitted (e.g. data streams over computer networks) and
- reconstructed later (possibly in a different computer environment).
For Cap’n Proto, there is no encoding/decoding step.
- The Cap’n Proto encoding is appropriate both as a data interchange format and an in-memory representation
- Once your structure is built, you can simply write the bytes straight out to disk!
FlatBuffers is an efficient cross platform serialization library. It was originally created at Google for game development and other performance-critical applications.
For production usage, see Istio install instructions
Chapter 8: How to Secure Communication, Storage, and Authentication
Data is one of the biggest asset of your company.
A secure networking is the first layer of defense for your company’s data, (system & business secret).
But it’s important to have more layers of defense for your data, via:
-
Secure communication:
Protect your data from unauthorized snooping, interference while it travels over the network, with:
- Encryption-in-transit
- Secure transport protocols: TLS, SSH, IPSec…
-
Secure storage:
Protect your data from unauthorized snooping, interference while it’s in the storage, with:
- Encryption-at-rest
- Secrets management
- Password storage
- Key management
This chapter will walk you through a several hand-on examples about secure data:
- Encrypt data with AES, RSA
- Verify file integrity with SHA-256, HMAC, digital signatures
- Store secrets with AWS Secrets Manager
- Serve your apps over HTTPs, by setting up TLS certificates with Let’s Encrypt
Cryptography Primer
cryptography : the study of how to protect data from adversaries (aka bad actors)
warning
Don’t confuse cryptography with crypto, which these days typically refers to cryptocurrency.
-
Cryptography aims to provide 3 key benefits - aka CIA:
-
Confidentiality (C)
Data can be seen only by intended parties.
-
Integrity (I)
Data can’t be modified by unauthorized parties.
-
Authenticity (A)
Data are communicated only between intended parties.
-
-
Cryptography combines multiple disciplines: mathematics, computer science, information security, electrical engineering…
-
If you’re not a professional, do not invent your own cryptography.
-
Anyone, from the most clueless amateur to the best cryptographer, can create an algorithm that he himself can’t break. It’s not even hard. What is hard is creating an algorithm that no one else can break, even after years of analysis.
- Schneir’s law
-
Cryptography isn’t like other software:
- For most softwares, you’re dealing with
- users with mildly engaged at best
- minor bugs
- For cryptography, you’re dealing with
- determined opponents who are doing everything to defeat you
- any bug found by them can be completely catastrophic
- For most softwares, you’re dealing with
-
After centuries of existence, the number of techniques, attacks, strategies, schemes, tricks in cryptography are exceeds what any one person - without extensive training - could conceive.
e.g.
- side-channel attacks, timing attacks, man-in-the-middle attacks, replay attacks, injection attacks, overflow attacks, padding attacks, bit-flipping attacks…
- and countless others
[!TIP] Some of these attacks are brilliant, some are hilarious, some are devious and many are entirely unexpected.
-
Just as all software, all cryptography has vulnerabilities, but only after years of extensive usage and attacks - those vulnerabilities are found and fixed.
-
[!IMPORTANT] Key takeaway #1
Don’t roll your own cryptography: always use mature, battle-tested, proven algorithms and implementations.
This section provides 2 foundational concepts of cryptography at a high level:
- Encryption
- Hashing
Encryption
What is encryption
encryption : the process of transforming data so that only authorized parties can understand it
The data
-
in its original form (called plaintext)
- with a secret encryption key
-
is passed through an algorithm called a cipher
-
so it can be encrypted
- into a new form called the ciphertext.
[!TIP] Without the encryption key, the ciphertext should be completely unreadable, indistinguishable from a random string.
Original data --> Encrypt --> Encrypted data (plaintext) (with a cipher algorithm) (ciphertext) + Encryption key
The only way to get back the original plaintext is to
-
use the cipher with the encryption key to
-
decrypt the cipher back into the plain text
Original data <-- Decrypt <-- Encrypted data (plaintext) (with that cipher algorithm (ciphertext) and the encryption key)
Most modern cryptography systems
-
Are built according to Kerckhoffs’s principle, which states that the system should remain secure even if everything about the system, except the encryption key, is public knowledge.
[!TIP] Kerckhoffs’s principle is essentially the opposite of security through obscurity, where your system is only secure as long as adversaries don’t know how that system works under the hood, an approach that rarely works in the real world
-
Should still not be feasible[^1]1 for the adversary to turn the cipher text back into plaintext (without the encryption key)
- even if the adversary knows every single detail of how that system works
Three types of encryptions
Symmetric-key encryption
What is symmetric-key encryption
Symmetric-key encryption : uses a single encryption key, which must be kept a secret, for both encryption and decryption
e.g.
-
Alice uses a symmetric-key cipher and an encryption key to encrypt plaintext for Bob, and Bob uses the same encryption key to decrypt the ciphertext
How symmetric-key encryption works
Under the hood, symmetric-key encryption algorithms use the encryption key to perform a number of transformations on the plaintext, mostly consisting of substitutions and transpositions.
-
A substitution is where you exchange one symbol for another:
e.g. Swap one letter in the alphabet for another, such as shifting each letter by one, so A becomes B, B becomes C, and so on.
-
A transposition is where the order of symbols is rearranged:
e.g. Anagrams, where you randomly rearrange the letters in a word, so that “hello” becomes “leohl”
Modern encryption algorithms also use substitution and transposition, but in much more complicated, non-uniform patterns that depend on the encryption key.
Symmetric-key encryption algorithms
There are many well-known symmetric-key encryption algorithms: DES, 3DES, RC2, RC4, RC5, RC6, Blowfish, Twofish, AES, Salsa20, and ChaCha20.
-
Most of them are outdated and considered insecure.
-
As of 2024, the symmetric-key encryption algorithms you should use are:
-
AES (Advanced Encryption Standard):
- Winner of a competition organized by NIST, official recommendation of the US government
- Extremely fast2
- Consider the facto standard: widely supported, after 2 decades still considered highly secure
[!TIP] You should use the version of AES that includes a MAC3 (message authentication code) - the AES-GSM.
-
ChaCha:
- Winner of a competition organized by eSTREAM
- Extremely fast:
- On CPUs with AES instruction sets, slower than AES
- On general hardware, faster than AES
- Newer cipher, highly secure (more than AES in theoretically against certain types of attacks), but not widely supported
[!TIP] You should use also use the version of ChaCha that includes a MAC - the ChaCha20-Poly1305
[!TIP] In August 2024, NIST released a final set of encryption tools designed to withstand the attack of a quantum computer.
For more information, see:
-
Advantages & disadvantages of symmetric-key encryption
-
Advantages
- Faster
- More efficient
-
Disadvantages
-
It’s hard to distribute the encryption key in a secure manner
-
Before 1970s, the only solution was to share encryption keys via an out-of-band channel,
e.g. Exchanging them in person
-
From 1970s, there is a new solution - asymmetric-key encryption - another type of encryption.
-
-
Asymmetric-key encryption
What is asymmetric-key encryption
asymmetric-key encryption : aka public-key encryption : uses a pair of related keys (called key pair), which include : - a public key that can be shared with anyone and used to encrypt data : - a corresponding private key, which must be kept a secret, and can be used to decrypt data
e.g.
- Alice uses an asymmetric-key cipher and Bob’s public key to encrypt plaintext for Bob, and Bob uses his private key to decrypt the ciphertext
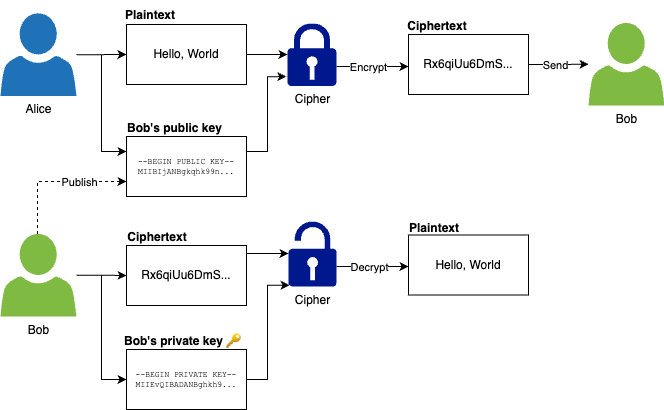
How asymmetric-key encryption works
The public/private key and the encryption/decryption are all based on mathematical functions.
All the high level:
- you can use these functions to create a linked public & private key,
- the data encrypted with the public key can only be decrypted with the corresponding private key
- it’s safe to share the public key4
Asymmetric-key encryption algorithms
The two most common asymmetric-key algorithms you should use are:
-
RSA5
- One of the first asymmetric-key algorithm.
- Based on prime-number factorization, easy to understand.
- Introduce in 1970:
- Widely used
- Has vulnerabilities in early versions
[!TIP] You should you the RSA version with Optimal Asymmetric Encryption Padding - the RSA-OAEP6:
-
Elliptic Curve Cryptography (ECC)7
- New asymmetric-key algorithm.
- Based on math of elliptic curves.
- More secure
[!TIP] You should use ECIES8 (Elliptic Curve Integrated Encryption Scheme)
[!TIP] For SSH, you should use Edwards-curve Digital Signature Algorithm (EdDSA), which is also a type of Elliptic Curve Cryptography.
Advantages & disadvantages of asymmetric-key encryption
-
Advantages
You don’t need to share an encryption key in advance9.
[!NOTE] Asymmetric-key encryption makes it possible to have secure digital communications over the Internet, even with total strangers, where you have no pre-existing out-of-band channel to exchange encryption keys.
-
Disadvantages
-
Slower
-
Limited in the size of messages you can encrypt
[!NOTE] It’s rare to use asymmetric-key encryption by itself.
-
Hybrid encryption
What is hybrid encryption
hybrid encryption : combines both asymmetric and symmetric encryption: : - using asymmetric-key encryption initially to exchange an encryption key : - then symmetric-key encryption for all messages after that.
e.g. Alice wants to send a message to Bob
- First, she generates a random encryption key to use for this session, encrypts it using Bob’s public key and asymmetric-key encryption.
- Then, she sends this encrypted message to Bob.
- Finally, she uses symmetric-key encryption with the randomly-generated encryption key to encrypt all subsequent messages to Bob
Advantages of hybrid encryption
-
Performance
Most the encryption is done with symmetric-key encryption, which is fast, efficient (and has no limits on message sizes).
-
No reliance on out-of-band channels
Asymmetric-key encryption is used to exchange the encryption key that will be use for symmetric-key encryption.
-
Forward secrecy
Even in the disastrous scenario where a malicious actor is able to compromise Alice’s private key, they still won’t be able to read any of the data in any previous conversation.
e.g. Alice wants to send multiple messages to Bob:
- Each of those messages is encrypted with a different, randomly-generated encryption key, which Alice never stores.
note
ECIES, the recommended for asymmetric-key encryption in the previous section, is actually a hybrid encryption approach:
It is a trusted standard for doing:
- a secure key exchange using elliptic curve cryptography for asymmetric-key encryption,
- followed by symmetric-key encryption using one of several configurable algorithms, e.g., AES-GCM.
Example: Encryption and decryption with OpenSSL
[!WARNING] Watch out for snakes: Don’t use OpenSSL to encrypt data in production
The OpenSSL binary is available on most systems,
- so it’s convenient for learning and experimenting,
- but don’t use it to encrypt data for production, as
- the algorithms it supports are dated and incomplete (e.g., it doesn’t support AES-GCM)
- the defaults it exposes are insecure and error-prone.
For production use cases, use
mature cryptography libraries built into programming languages
e.g.
-
Symmetric encryption
-
Encrypt: Encrypt the text “Hello, World” using AES with a 128-bit key and the CBC (Cipher Block Chaining) encryption mode
echo "Hello, World" | openssl aes-128-cbc -base64 -pbkdf2 # enter AES-128-CBC encryption password: # Verifying - enter AES-128-CBC encryption password: # U2FsdGVkX1+2EfpXt+6xFrLk+mt524auRPHhdyk7Cis= 👈 This is the ciphertext (from the plaintext "Hello, World")-
opensslprompt you for the password twice:-
Use the
-pbkdf2flag to tell OpenSSL to use a key derivation function called PBKDF2 to derive a 128-bit key from that password.[!TIP] For production, you should use a randomly-generated, 128-bit key instead of a password.
-
The output
U2Fsdis the ciphertext.
-
-
-
Decrypt: Decrypt using the same algorithm and key (password)
echo "<CIPHERTEXT>" | openssl aes-128-cbc -d -base64 -pbkdf2 # enter AES-128-CBC decryption password: # Hello, World- Use the
-dflag to tel OpenSSL to decrypt
- Use the
-
-
Asymmetric encryption
-
Create a key pair
-
Generate a RSA private key by using
openssl genrsaopenssl genrsa -out private-key.pem 2048 -
Generate the public key from the private key by using
openssl rsa -puboutopenssl rsa -pubout -in private-key.pem -out public-key.pem
-
-
Encrypt: Use
openssl pkeyutl -encryptto encrypt the text “Hello, World” (with the public key)echo "Hello, World" | \ openssl pkeyutl -encrypt -pubin -inkey public-key.pem | \ openssl base64 # IXHy488ItT...# 👈 CIPHERTEXT- By default, the output of
openssl pkeyutl -encryptis standard output. - Pipe the
stdouttoopenssl base64to encode the binary data (a file) to base64.
- By default, the output of
-
Decrypt: Use
openssl pkeyutl -decryptto decrypt the ciphertext back to the plaintext (with the private key)echo "<CIPHERTEXT>" | \ openssl base64 -d | \ openssl pkeyutl -decrypt -inkey private-key.pem # Hello, World- First, decode the ciphertext (base64) back to the binary format (a file).
- Then, use
openssl pkeyutl -decryptto decrypt the ciphertext.
-
Hashing
What is hashing
hashing : the process of map data (of arbitrary size) to fixed-size values
hash function : a function that can : - take data (e.g. string, file) as input, and : - convert it to a fixed-size value (aka a hash value, a digest, a hash), in a deterministic manner, so that : given the same input, you always get the same output.
e.g. The SHA-256 hash function
- always produces a 256-bit output, whether you feed into it a file that is 1 bit long or 5 million bits long, and
- given the same file, you always get the same 256-bit output.
Hash functions are one-way transformations:
- it’s easy to feed in an input, and get an output,
- but given just the output,
- there is no way to get back the original input.
note
This is a difference from encryption functions, which are two-way transformations, where
- given an output (and an encryption key),
- you can always get back the original input.
Two types of hash functions
Non-cryptographic hash functions
Used in application that don’t have rigorous security requirements.
e.g.
- Hash tables (in programming languages)
- Error-detecting codes
- Cyclic redundancy checks
- Bloom filters
Cryptographic hash functions
Have special properties that are desirable for cryptography, including:
-
Pre-image resistance
Given a hash value (the output), there’s no way to
- figure out the original string (the input) that
- was fed into the hash function to produce that output
- figure out the original string (the input) that
-
Second pre-image resistance
Given a hash value (the output), there’s no way to
- find any inputs (the original string or any other input) that
- could be fed into the hash function to produce this output.
- find any inputs (the original string or any other input) that
-
Collision resistance
There’s no way to
- find any two strings (any two inputs) that
- produce the same hash value (the same output).
- find any two strings (any two inputs) that
Cryptographic hashing algorithms
The common cryptographic hashing algorithms out there are
- MD5
- SHA10 families: SHA-0, SHA-1, SHA-2, SHA-3
- SHAKE, and cSHAKE
Many of them are no longer considered secure, except:
-
SHA-2 and SHA-3
SHA-2 family: including
SHA-256,SHA-512SHA-3 family: includingSHA3-256,SHA3-512 -
Based on SHA-3, added the ability to produce an output of any length you specified (aka extendable output functions)
Use cases of cryptographic hash functions
Verifying the integrity of messages and files
When making a file available for download, it’s common to share the hash of the file contents, too.
e.g.
- The binary release of Golang 1.23.1 for Linux x86-64 is available
- as a file at go1.23.1.linux-amd64.tar.gz
- with a SHA256 Checksum of
49bbb517cfa9eee677e1e7897f7cf9cfdbcf49e05f61984a2789136de359f9bd(Source)
tip
When using to verify the integrity of a file, the hash value is aka checksum.
tip
There are projects that provides even more transparent for how your private key is used to sign a file.
e.g. Sigsum
Message authentication codes (MAC)
A message authentication code (MAC) : combines a hash with a secret key : to create an authentication tag for some data that : allows you to verify : - not only the integrity of the data (that no one modified it), : - but also the authenticity (that the data truly came from an intended party)
e.g. For a cookie with username on your website
- If you store just the username, a malicious actor could create a cookie pretending to any user.
- So you store:
- the username
- an authentication tag, which is computed from
- the username
- a secret key
- Every time you get a cookie, you
- compute the authentication tag from
- the username 👈 may be changed by malicious actor
- your secret key 👈 only you have this
- compare with the authentication in the cookie
- if these 2 authentication tags match, you can be confident that the cookie is written you.
- compute the authentication tag from
Common MAC algorithms:
-
HMAC (Hash-based MAC)
A standard based on various hash function, e.g. HMAC-SHA256
-
KMAC
Based on cSHAKE.
Authenticated encryption
note
If you only use symmetric-key encryption, unauthorized parties:
- can’t see the data
- but they might modified that data
Instead of using symmetric-key encryption by itself, you almost always use it with a MAC, which are called authenticated encryption:
-
The symmetric-encryption encryption:
- The message is impossible to understand without the secret key 👈 confidentiality
-
The MAC:
-
For every encrypted message, you:
- calculate an authenticated tag, then include it (as plaintext) with the messages, aka associated data (AD)
-
When you receive a message, you:
-
calculate another authenticated tag from:
- the message + the AD
- your secret key (that only you have) 👈 authenticity
-
if the two authenticated tag match, you can be sure both:
- the message
- the AD
could not have been tampered with 👈 integrity
-
-
tip
The two recommended symmetric-key encryption algorithms in previous chapter - AES-GCM and ChaCha20-Poly1305 - are actually authenticated encryption with associated data (AEAD)13.
Digital signatures
digital signature : combine a hash function with asymmetric-key encryption : allow validating the integrity and authenticity
You
- take any message
- pass it along with your private key
- get an output called a signature
- then send that signature with the original message
Anyone can validate the signature using your public key and the message.
e.g. Bob signs a message with his private key, and sends the message and signature to Alice, who can validate the signature using Bob’s public key
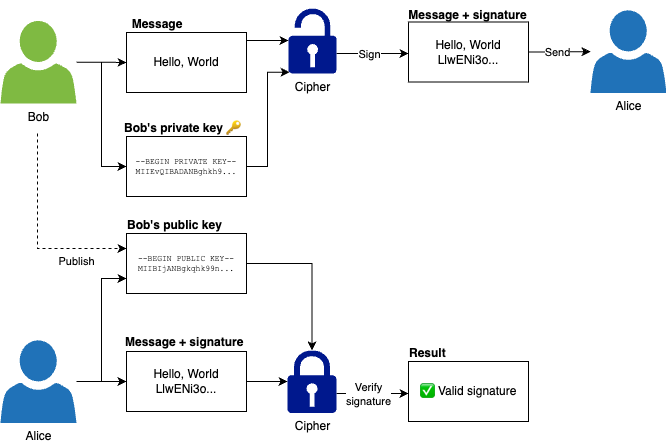
Password storage
There a a set of cryptographic hashing algorithms used specifically for storing user passwords.
warning
For user passwords, do not use encryption, instead using hashing (with the specialized password hashing functions).
Summary the use cases of cryptographic hash functions
| Encryption | Hashing | Other | Result | CIA |
|---|---|---|---|---|
| Hashing | Verifying the integrity of messages/files | _I_ | ||
| Hashing | Secret key | Message authentication codes (MAC) | _IA | |
| Symmetric-key encryption | Hashing (MAC) | Secret key (MAC) | Authenticated encryption | CIA |
| Asymmetric-key encryption | Hashing | Digital signatures | _IA | |
| Hashing (Special algorithms) | Storing user passwords | C__ |
Example: File integrity, HMAC, and signatures with OpenSSL
-
Using hash functions to check integrity of a file
-
Create a file
echo "Hello, World" > file.txt -
Calculate the hash using SHA-256
openssl sha256 file.txt # SHA2-256(file.txt)= 8663bab6d124806b9727f89bb4ab9db4cbcc3862f6bbf22024dfa7212aa4ab7d -
Make a change to the file
sed -i 's/W/w/g' file.txt -
Re-calculate the hash using SHA-256
openssl sha256 file.txt # SHA2-256(file.txt)= 37980c33951de6b0e450c3701b219bfeee930544705f637cd1158b63827bb390👉 Changing a single character, but the hash is completely different.
-
-
Using MAC to check integrity & authenticity of a file
-
Use the
passwordstring as the secret key for HMACopenssl sha256 -hmac password file.txt # HMAC-SHA2-256(file.txt)= 3b86a735fa627cb6b1164eadee576ef99c5d393d2d61b7b812a71a74b3c79423 -
Change the letter
Htohsed -i 's/H/h/g' file.txt -
Re-calculate the HMAC using the same secret key
openssl sha256 -hmac password file.txt # HMAC-SHA2-256(file.txt)= 1b0f9f561e783df65afec385df2284d6f8419e600fb5e4a1e110db8c2b50e73d -
Re-calculate the HMAC using a different secret key
openssl sha256 -hmac password1 file.txt # HMAC-SHA2-256(file.txt)= 7624161764169c4e947f098c41454986d934f7b07782b8b1903b0d10b90e0d8a- If malicious actors don’t have the your secret key, they can’t get back the same HMAC as your.
-
-
Digital signature
-
Reuse the key pair from previous example
-
Compute the signature for
file.txtusing your private keyopenssl sha256 -sign private-key.pem -out file.txt.sig file.txt -
Validate the signature using your public key
openssl sha256 -verify public-key.pem -signature file.txt.sig file.txt # Verified OK
-
Modify anything: the signature in
file.txt.sig, the contents offile.txt, the private key, the public key and the signature verification will fail.sed -i 's/, / /g' file.txt -
Re-validate the signature
openssl sha256 -verify public-key.pem -signature file.txt.sig file.txt # Verification failure # ...bad signature...
-
Secure Storage
By using encryption, you can:
- store your data in a secure way 👈 aka encryption at rest (This is one of the topic of this section)
- communicate over the network in a secure way 👈 aka encryption in transit (This is the topic of later section)
But to store your data in a secure way (by using encryption)
- you need to store the secret key (a prerequisite of encryption) in a secure way
Isn’t it a chicken-and-egg dilemma?
Secrets Management
Your software will need to handles a lot of secrets (not just the one use for encryption), it’s your responsibility to keep all those secrets secure.
To keep the secrets secures you need to know about secrets management.
Two rules when working with secrets
-
The first rule of secrets management is: | “Do not store secrets as plaintext”
-
The second rule of secrets management is: | “DO NOT STORE SECRETS AS PLAINTEXT”
Do not
-
store secrets as plaintext
- in your code, in your version control
- in a
.txtfile - in Google Docs
-
or send secrets as plaintext
- via email
- via chat
warning
If you store your secrets as plaintext, it may be accessed by:
-
Everyone with access to the plaintext
-
e.g.
- Someone that can access to your PC
- Someone that can access to your VCS
- Someone that can access to your Google Docs, email, chat accounts
-
-
Every software runs on your computer
-
Every vulnerability in any software on your computer
[!TIP] What happens if a secret (as plaintext) is committed to VSC?
The secrets may end up in thousands of computers:
Computers used … Example by developers on your team Alice’s PC, Bob’s PC by the VCS itself GitHub, GitLab, BitBucket for CI GitHub Actions, Jenkins, CircleCI for deployment HashiCorp Cloud Platform, AWS CloudFormation, Env0, Spacelift to host your software AWS, Azure, GCP to backup your data iCloud, CrashPlan, S3, BackHub … If the repo is public, it might even be indexed by the search engines, e.g. Google, Bing
[!IMPORTANT] Key takeaway #2
Do not store secrets as plaintext.
- (Instead, use a proper secret management tool)
Three types of secrets
| Type of secret | What is it? | Example |
|---|---|---|
| 1. 🤓 Personal secrets | - Belong to a single person - Or shared by multiple people | - Username/password of websites - SSH keys - Credit card numbers |
| 2. 🖧 Infrastructure secrets | Need to exposed to the servers that - run your software | - Database passwords - API keys - TLS certificates |
| 3. 🧑🤝🧑 Customer secrets | Belong to the customers that - use your software | - Username/password of customers - Personally Identifiable Info - PII - Personal Health Information - PHI |
mindmap
id(Secret)
id)🤓 Personal secrets(
::icon(fa fa-user)
Username/password of websites
SSH keys
Credit card numbers
id)🖧 Infrastructure secrets(
::icon(fa fa-server)
Database passwords
API keys
TLS certificates
id)🧑🤝🧑 Customer secrets(
::icon(fa fa-users)
Username/password of customers
Personally Identifiable Info - PII
Personal Health Information - PHI
How to avoid storing secrets
Single-sign on (SSO)
With single-sign on (SSO), you
- allow users to login to your app
- via an existing identity provider (IdP)
- by using a standard such as SAML, OAuth, OpenID, LDAP, Kerberos
e.g. To login to your app, users can use:
- Their works accounts 👈 IdP is Google Workspace, or Active Directory
- Their social media accounts 👈 IdP is Facebook, Twitter, or GitHub
- Their email accounts14 👈 IdP are any email providers
Third-party services
Instead of store the secrets yourself, you could offload this work to reputable third-party services:
- For credit card numbers: use Stripe, PayPal, Square, Chargebee, Recurly
- For passwords: use an authentication services such as: Auth0, Okta, Amazon Cognito, Google Firebase Authentication, Supabase Authentication, Stytch, or Supertokens
Don’t store the secrets at all
If it isn’t absolutely necessary for your business to store some data - e.g. PII, PHI - then don’t.
[!IMPORTANT] Key takeaway #3
Avoid storing secrets whenever possible by using SSO, 3rd party services, or just not storing the data at all.
Working with secrets
If you can’t avoid storing the secrets, make sure to use the right tools for the job.
Working work personal secrets
Password manager
To store personal secrets, you should use a password manager15:
- Standalone: 1Password, Bitwarden, NordPass, Dashlane, Enpass, KeePassXC
- OS built-in: macOS Keychain, macOS Password, Windows Credential Manager
- Web-browser built-in: Google/Edge16/Firefox Password Manager.
note
These “password manager” are primarily designed to help you manage passwords,
- but many of them also support other types of personal secrets: API tokens, credit card numbers…
How a password manager works
- A password manager requires you to memorizes a single password - aka master password - to login.
- After you login, you can
- store new secrets
- access secrets that you stored previously
tip
Under the hood, a password manager use
- symmetric-key encryption
- with your master password acts as the encryption key
warning
The master password is the only layer of defense for all of your personal secrets, you should pick a strong password.
What make a password strong?
-
Unique
If you use the same password for multiple websites,
- then if one of those websites is compromised and your password leaks - aka data breach - which happens all the time,
- a malicious actor can use that password to access all other accounts as well.
[!TIP]
A unique password can’t help to prevent the compromise of a website,
- but it can minimize the blast radius of a data breach.
- then if one of those websites is compromised and your password leaks - aka data breach - which happens all the time,
-
Long
The longer the password, the harder it is to break.
[!NOTE] Using special characters (number, symbols, lowercase, uppercase) helps too, but the length is the most important factor
[!TIP] A 8-character password needs a few hours to break.
- But a 15-character password would take several centuries to break.
-
Hard-to-guess
A hacker won’t try to brute force your password, which takes too much effort but not much returns.
In most case, the malicious actor
- get access to the the hashed password - from a hacked system17 or a data breach
- then use a rainbow table18 - precomputed table for caching the outputs of a cryptographic hash function - to recover the plain text password.
By using a hard-to-guess password19, you minimize the chance that your hashed password appear in those rain table.
tip
How to know if your password is strong?
How to come up with a strong password?
One of the best strategy to come up with a strong password (a unique, long, hard-to-guess password) is to use Diceware, where you:
-
Take a list of thousands of easy-to-remember English words that are each 4-6 characters.
-
Roll the dice a bunch of times to pick 4-6 such words at random.
-
Glue them together to create a password that is unique, long, and hard-to-guess but easy to memorize.
 Password Strength by Randall Munroe of XKCD
tip
The passwords generated with Diceware is a type of passphrase
tip
To generate Diceware passphrase, you can:
- Follow the instruction on Diceware
- Use a web-based generator, e.g. Diceware Password Generator, Bitwarden Password Generator
- Use a CLI: https://github.com/ulif/diceware
- Use the built-in password generator of most password managers.
[!IMPORTANT] Key takeaway #4
Protect personal secrets, such as passwords and credit card numbers, by storing them in a password manager.
What make a good password manager?
-
Security practices
-
It’s security practices need to be 100% transparent
e.g.
[!TIP] Review these practice against what you’re learning in this book.
-
It should use end-to-end encryption.
Your password should be encrypted before it leaves your device.
[!WARNING] With end-to-end encryption, if you forget the master password of your password manager, you will lose all stored passwords.
-
-
Reputation
Do your best to vet the reputation of a vendor password manager before you use it:
-
Online reviews
-
Online communities, e.g. reddit
-
Security audits, certification
e.g.
-
Previous incidents
e.g. LastPass incidents
-
-
Unique, randomly-generated passwords
The password manager should have a password generator built-in which can generate a different, random, strong password for every website you use.
-
Secure account access
The password manager should supports other MFA, and convenient login methods, e.g. TouchID, FaceID, PassKeys…
-
Secure sharing with families and teams
Although these are “personal” secrets, in some case you will need to share them to your families, colleagues.
The password manager should support family or team plans, with:
- Have tools for inviting new users, removing users, recovering user accounts, sharing.
- Have flows for onboarding, off-boarding, revoking access, rotate secrets.
-
Platform support
The password manager should supports all platforms you use: e.g.
- Desktop: Mac, Windows, Linux
- Mobile: iOS, Android
- Web
- CLI
note
The password managers are designed to store personal secrets that
- aren’t change much often 👈 aka long-term credential
- are accessed by a human being
Working work infrastructure secrets
For infrastructure secrets that are accessed by
- by your software, by automated software 👈 aka machine users
- and also by sys-admins, DevOps Engineer… 👈 human users
The secret store solution for infrastructure code needs to support authentication for:
- machine-users, which can use:
- manually-managed machine-user credentials
- automatically-provisioned credentials
- human-users, which can use:
- password
- single-sign on
Two kinds of secret store for infrastructure secrets
-
Key management systems (KMS)
In cryptography, a key management systems (KMS) is a secret store designed
- specifically for encryption keys.
- to work as a “service”20 to ensure the underlying encryption key never leaves the secret store.
You can have a KMS by using
- a hardware security module (HSM)21, e.g. Thales, Utimaco, Entrust, Yubico
- a managed-service (which uses HSM under the hood), e.g. AWS KMS, Azure Key Vault, Google Cloud Key Management, and Akeyless
A KMS use optimized for security, not speed.
[!TIP] The common approach to encrypt large amount of data is using envelope encryption
-
You generate an encryption key (call data key) that is used to encrypt/decrypt the data.
This data key will be encrypted and stored with the data. 👈 The data and the data key is store together (hence the name envelope encryption).
-
You use the KMS to manage a root key that is to encrypt/decrypt the data key.
[!WARNING] KMS may also stand for Key Management Service, a Microsoft technology
-
General-purpose secret store
A general-purpose secret store is a data store designed to
-
securely store different kinds of secrets, such as:
- encryption keys 👈 can act as a KMS
- database password, TLS certificate…
-
perform various cryptographic tasks, such as:
- encryption
- hashing
- signing…
There are 3 kind of vendors for general-purpose secret store:
-
standalone secret stores
e.g. HashiCorp Vault, OpenBao, Doppler, Infisical, Keywhiz
-
secret stores from cloud providers
e.g. AWS Secrets Manager, AWS Systems Manager Parameter Store, Google Cloud Secret Manager
-
secret stores built into orchestration tools
e.g. Kubernetes Secrets
-
mindmap
Secret store for infrastructure secrets
id)KMS(
HSM
Managed-service from 3rd-parties
id)General-purpose secret store(
Standalone
From cloud providers
Built into orchestration tools
How to use a secret store for infrastructure secrets?
For example, an app in a Kubernetes cluster that needs access to a secret such as a database password.
A typical workflow of using a KMS to manage the database password:
-
When you are writing the code, you do the following:
- Authenticate to AWS on the command-line as an IAM user.
- Use the AWS CLI to make an API call to AWS KMS to have it encrypt the database password and get back ciphertext.
- Put the ciphertext directly into your application code and commit it to Git.
-
When the app is booting up, it does the following:
- Authenticate to AWS using an IAM role.
- Use the AWS SDK to make an API call to AWS KMS to have it decrypt the ciphertext and get back the database password.
warning
When using a KMS to manage infrastructure secrets, you will have of ciphertext all over your codebase and infrastructure.
A typical workflow of using a generic-purpose secret store to manage the database password:
-
When you are writing the code, you do the following:
-
Authenticate to AWS in a web browser as an IAM user.
-
Use the AWS CLI to store the database password in AWS Secrets Manager.
-
-
When the app is booting up, it does the following:
-
Authenticate to AWS using an IAM role.
-
Use the AWS SDK to make an API call to AWS Secrets Manager to get the database password.
-
note
When using a general-purpose secret store, the secrets are centralized, in a single place (the secret store).
[!IMPORTANT] Key takeaway #5
Protect infrastructure secrets, such as database passwords and TLS certificates, by using a KMS and/or a general-purpose secret store.
Why centralized secret store is becoming more popular?
-
Audit logging
Every time a secret is accessed, a centralized secret store can record that in a log, along with who is accessing that secret.
-
Revoking & rotating secrets
With a centralized secret store, you can
- easily revoke a secret 👈 when you know it was compromised
- rotate a secret on a regular basic
- revoke the current one 👈 you can’t know whether the current secret was compromised, but you do this regularly to reduce the window of time of the secret
- start using a new one
-
On-demand & ephemeral secrets
You can go a step father by not having long-term secrets at all.
A secret is
- generated when someone needs to use it 👈 aka on-demand
- automatically expired after a short period of time 👈 aka ephemeral secret
Working work customer secrets
Two type of customer secrets
-
Customer password 👈 Requires special techniques
[!Tip] Customer passwords need to be handle specially because:
- They are the most common attack vector.
- You don’t need to store the original customer password at all.
-
Everything else: financial data, health data…
How to store customer password
-
Store the hash of the password
You
- don’t need to store the original password
- only need to store the hash of the password (after passing it through a cryptographic hash function).
If you use a standard hash function (e.g. SHA-2), the malicious attacker can:
- try all the possible strings 👈 aka brute force attack
- reduce the possibilities by only trying from:
- commonly-used words
- previously-leaked passwords 👈 aka dictionary attack
- pre-compute all the hashes 👈 aka rainbow table attack
-
Use specialized password hash functions
-
Instead of a standard hash functions, you mush use specialized password hash functions, such as:
-
Argon2 (2015 - Recommend):
- Winner of the Password Hashing Competition in 2015
- Prefer Argon2id variant
-
scrypt (2009): Password-based key derivation function
-
bcrypt (1999): Blowfish-based password-hashing function
-
PBKDF2 (2017): Password-Based Key Derivation Function 2
- Recommended by NIST and has FIPS-140 validated implementations
-
-
These password hash functions are designed for security, so they takes a lot of compute resources (CPU, RAM)
e.g.
- Agron2 is ~ 1000 slower compare to SHA-256
For more information, see
-
-
Use salt & pepper
salt : a unique, random string that you generate for each user : (is not a secret) that stored in plaintext next to the user’s other data in your user database.
pepper : a shared string that is the same for all your users : a secret that stored in an encrypted form separately from your user database : e.g. : - Stored in a secret store with your other infrastructure secrets
When using salt & pepper,
-
the hash you store in your user database
- is actually a hash of the combination of:
- user’s password
- unique salt (of that password)
- shared pepper (for all passwords)
- is actually a hash of the combination of:
-
you defeat the dictionary & rainbow table attack.
[!TIP] When using salts, evens users with identical passwords end up with different hashes.
-
[!IMPORTANT] Key takeaway #6
Never store user passwords (encrypted or otherwise).
Instead,
use a password hash function to
- compute a hash of each password with a salt and pepper,
and store those hash values.
When working with passwords, try to stay up to date with the latest best practice, by checking guides such as OWASP’s Password Storage Cheat Sheet See:
Encryption at Rest
Why stored data is a tempting target for attackers?
-
Many copies of the data
In additional to the original database, the data is also in:
- database replicas, caches, app server’s hard drives
- backups, snapshots, archives
- distributed file systems, event logs, queues
- data warehouses, machine learning pipelines
- in some cases, developers even copy customer data onto their own computers
A single vulnerability in any of those copy can lead so serious data breach.
-
Long time frames, little monitoring
Those copies of the data can sit around for years (or forever22), often to the extent where no one at the company even knows the data is there.
With those forgotten data, attackers can do whatever they want, for how long they want, with little risk of being noticed23.
Three levels of encryption-at-rest
Encryption-at-rest is the final layer of protection data when the attackers gets access to a copy of your data.
Full-disk encryption
full-disk encryption (FDE) : all the data is encrypted before written to disk : - with an encryption key that is derived from your login password.
The disk encryption can be handled by:
-
software
-
built into OS
e.g.
-
from 3rd-party, e.g. BestCrypt, TrueCrypt
-
-
hardware 👈 aka Hardware-FDE
-
cloud-provider (using the encryption keys from that cloud’s provider KMS)
e.g.
Full-disk encryption is a type of transparent data encryption (TDE): data is automatically encrypted or decrypted as it is loaded or saved.
- It protects against attackers who manage to steal a physical hard drive.
warning
Full-disk encryption doesn’t protect against attackers who gets access to a live (authenticated) OS.
Data store encryption
-
Some data store also supports TDE, which encrypt
-
the entire data store
or parts of the data store, e.g. one column in a database table
-
using an encryption key you provide when the data store is booting up
e.g.
- MySQL Enterprise Transparent Data Encryption (TDE)
- PostgreSQL via pg_tde plugin
-
-
Cloud providers also support encryption for their managed data stores, using the encryption key from that cloud provider’s KMS.
e.g.
- AWS RDS encryption uses encryption keys from AWS KMS 👈 SQL data store
- Azure SQL Database encryption uses encryption keys from Azure Key Vault 👈 SQL data store
- DynamoDB encryption with encryption keys from AWS KMS 👈 NoSQL data store
- AWS S3 encryption with encryption keys from AWS KMS 👈 distributed file system
Data store encryption provides a higher level of protection than full-disk encryption:
- It’s the data store (not the OS) that is doing the encryption
- You get protection against attackers
- who manage to steal a physical hard drive.
- who gets access to a live (authenticated) OS.
warning
Data store encryption doesn’t protect against attackers who is able to authenticate to the data store software.
e.g. If the attackers can access the data store, they can run SQL queries.
Application-level encryption
You could implement encryption in your application code, so your app encrypt the data, in-memory, before storing in in a data store or on disk.
e.g. When a user adds some new data, you
- fetch an encryption key for a secret store
- use AES-GCM with the encryption key to encrypt the data in memory
- store the ciphertext in a database or on disk
Advantages of application-level encryption
-
Highest level of protection
Even if the attackers can:
- Get access the live OS on your server
- Compromise your data store and run SQL queries
without the encryption key (from your secret store), they still couldn’t the data.
-
Granular control over the encryption
You can you different encryption keys for different type of data
e.g. For different users, customers, tables…
-
Allow you to securely store data even in untrusted systems
e.g. System doesn’t support FDE.
Dis-advantages of application-level encryption
-
Application code needs to be changed
(TDE options are completely transparent)
-
Difficult to query the data
(The data you store is now opaque to your data stores)
e.g. Queries that look up data in specific columns or full-text search are very difficult to do if the data is stored as unreadable ciphertext.
[!IMPORTANT] Key takeaway #7
You can encrypt data at rest using full-disk encryption, data store encryption, and application-level encryption.
tip
Start with:
- full-disk encryption 👈 for all your company servers & computers
- data-store encryption 👈 for all your data store
Only use application level-encryption when:
- You need the highest level of security
- No other types of encryption are supported
Secure Communication
Secure Communication and Encryption-in-transit
How to secure communication? How to send data over the network in a way that provides confidentiality, integrity, and authenticity?
- The answer is use encryption, which is often referred to as encryption in transit.
Encryption in transit usually relies on hybrid encryption:
- Using asymmetric-key encryption to
- protect the initial communication
- do a key exchange
- Using symmetric-key encryption to
- encrypt the following messages
Common protocols for encryption-in-transit
-
TLS
Secure
- web browsing (HTTPs)
- server-to-server communications
- instant messaging, email, some types of VPNs…
-
SSH
Secure
- connections to remote terminals as in Chap 7
-
IPSec
Secure
- some types of VPNs as in Chap 7
mindmap
Encryption-in-transit
id)TLS(
web browsing (HTTPS)
server-to-server communications
instant messaging, email, some types of VPNs...
id)SSH(
remote terminals
id)IPSec(
some types of VPNs
Transport Layer Security (TLS)
What is TLS
TLS - Transport Layer Security : a cryptographic protocol designed to provide communications security over a computer network : widely used in applications: email, instant messaging… and especially in securing HTTPS : builds on the now-deprecated SSL (Secure Sockets Layer) specifications
tip
You should use TLS 1.3 or 1.2.
- All other versions of TLS (1.1, 1.0) are deprecated
- All versions of SSL also deprecated.
Why use TLS
TLS is responsible for ensuring confidentiality, integrity, and authenticity, especially against man-in-the-middle (MITM) attacks24.
-
To ensure confidentiality, TLS
- encrypts all messages with hybrid encryption, preventing malicious actors from
readingthose messages.
- encrypts all messages with hybrid encryption, preventing malicious actors from
-
To ensure integrity, TLS
- uses authenticated encryption, so every message
- includes a MAC, preventing malicious actors from
modifyingthose messages; - includes a nonce25, preventing malicious actors from
reorderingor replaying messages
- includes a MAC, preventing malicious actors from
- uses authenticated encryption, so every message
-
To ensure authenticity, TLS
- uses asymmetric-key encryption
How TLS works
TLS is a client-server protocol.
e.g.
- The client might be your web browser, and the server might be one of the servers running
google.com, or - Both client and server could be applications in your microservices architecture.
TLS protocol contains 2 phases:
-
Handshake
- Negotiation
- Authentication
- Key exchange
-
Messages Exchange
The detail of each phases are as following:
-
Handshake
-
Negotiation
The client and server negotiate
- which TLS version, e.g. 1.2, 1.3
- which cryptographic algorithms, e.g. RSA, AES256
[!TIP] You’ll need to find a balance between
- allowing only the most modern TLS versions and cryptographic algorithms to maximize security
- allowing older TLS versions and cryptographic algorithms to support a wider range of clients.
This typically works by
- the client sending over the TLS versions and algorithms it supports
- the server picking which ones to use from that list, so when configuring TLS on your servers
-
Authentication 👈 Tricky part
To protect against MITM attacks, TLS supports authentication.
-
For web browsing, you typically only do one-sided authentication, with the web browser validating the server (but not the other way around)
-
For applications in a microservices architecture, ideally, you use mutual authentication, where each side authenticates the other, as you saw in the service mesh example in Chap 7.
You’ll see how authentication works shortly.
-
-
Key exchange
The client and server
- agree to a randomly-generated encryption key to use for the second phase of the protocol,
- securely exchanging this secret using asymmetric-key encryption.
-
-
Messages Exchange
The client and server
- start exchanging messages
- encrypting all the communication
- using the encryption key & symmetric-key encryption algorithm from the handshake phase.
Chain of trust
How can your web browser be sure it’s really talking to
google.com?
- It’s
AinCIA- authenticity.- All the use cases in summary the cases of cryptographic hash functions will not works.
You may try asymmetric-key encryption:
- Google signs a message with its private key
- Your browser checks whether the message really come from Google
- by validating the signature with Google’s public key.
But how do you get the public key of Google?
- What stops a malicious actor from
- doing a MITM attack, and
- swapping their own public key instead of Google’s
If you use encryption for the public key, how do exchange the encryption key. Now, it’s an chicken-and-egg problem.
To prevents MITM attack targeting public keys, TLS establishing a chain of trust.
-
The chain of trust starts by hard-coding data about a set of entities you know you can trust.
- These entities are called root certificate authorities (root CAs).
- The hard-coding data consists the root CAs’ certificates, which contains:
- a public key
- metadata, e.g. domain name, identifying information of the owner…
- a digital signature
-
When you’re browsing the web, your browser and operating system come with a set of certificates for trusted root CAs built-in, including a number of organizations around the world, such as VeriSign, DigitCert, LetsEncrypt, Amazon, and Google.
[!TIP] For Linux, it’s usually the
ca-certificatespackage, which is installed at/etc/pki/ca-trust/extracteddirectory. -
When you’re running apps in a microservices architecture, you typically run your own private root CA, and hard-code its details into your apps.
[!TIP] To install your private root CA, see:
How the TLS certificate (for your website) is used?
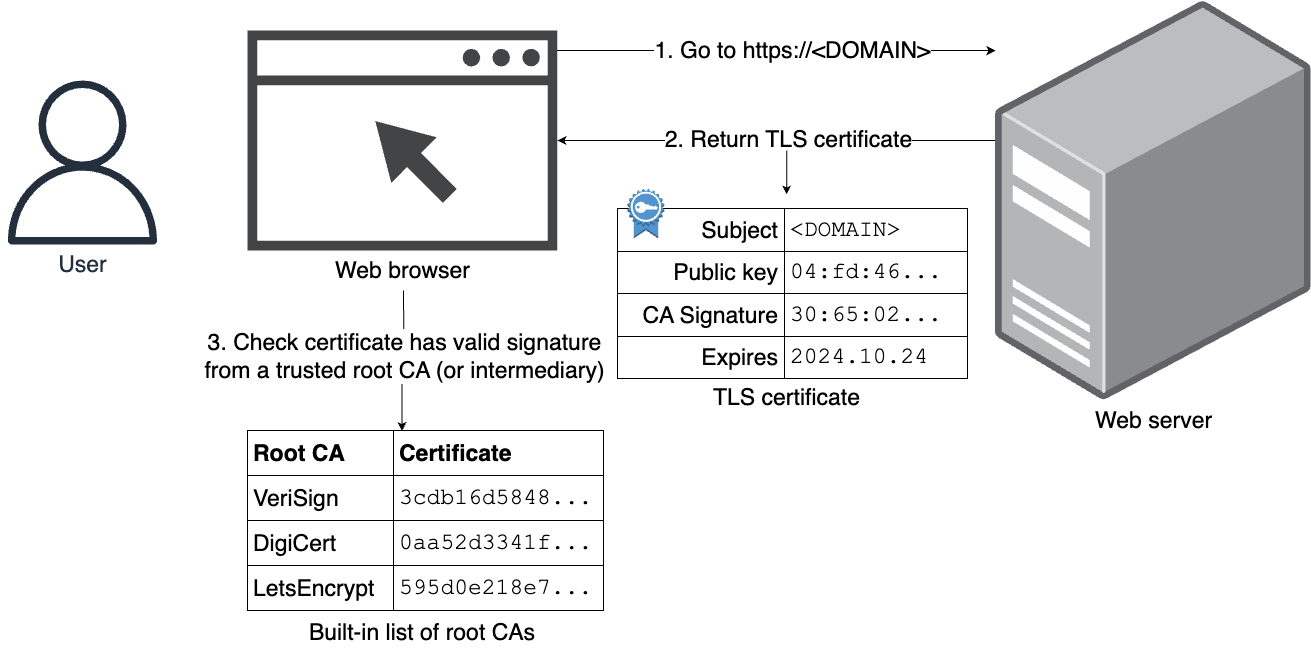
-
You visit some website in your browser at
https://<DOMAIN>. -
During the TLS handshake, the web server
- sends over its TLS certificate, which includes
- the web server’s public key
- a CA’s signature.
- signs the message with its private key.
- sends over its TLS certificate, which includes
-
Your browser validates
- the TLS certificate
- is for the domain
<DOMAIN> - was signed by one of the root CAs you trust (using the public key of that CA).
- is for the domain
- the web server actually owns the public key in the certificate (by checking the signature on the message).
If both checks pass, you can be confident that you’re really talking to
<DOMAIN>, and not someone doing a MITM attack26. - the TLS certificate
tip
A TLS certificate is a type of public key certificate, which includes
- the public key (and information about it),
- information about the identity of its owner (called the subject), and
- the digital signature of an entity that has verified the certificate’s contents (called the issuer)
If the device examining the certificate
- trusts the issuer and
- finds the signature to be a valid signature of that issuer,
then it can use the included public key to communicate securely with the certificate’s subject.
note
Some root CAs don’t sign website certificates directly, but instead, they sign certificates for one or more levels of intermediate CAs (extending the chain of trust), and it’s actually one of those intermediate CAs that ultimately signs the certificate for a website.
In that case, the website returns the full certificate chain, and as long as that chain ultimately starts with a root CA you trust, and each signature along the way is valid, you can then trust the entire thing.
How to get a TLS certificate (for a website) from a CA?
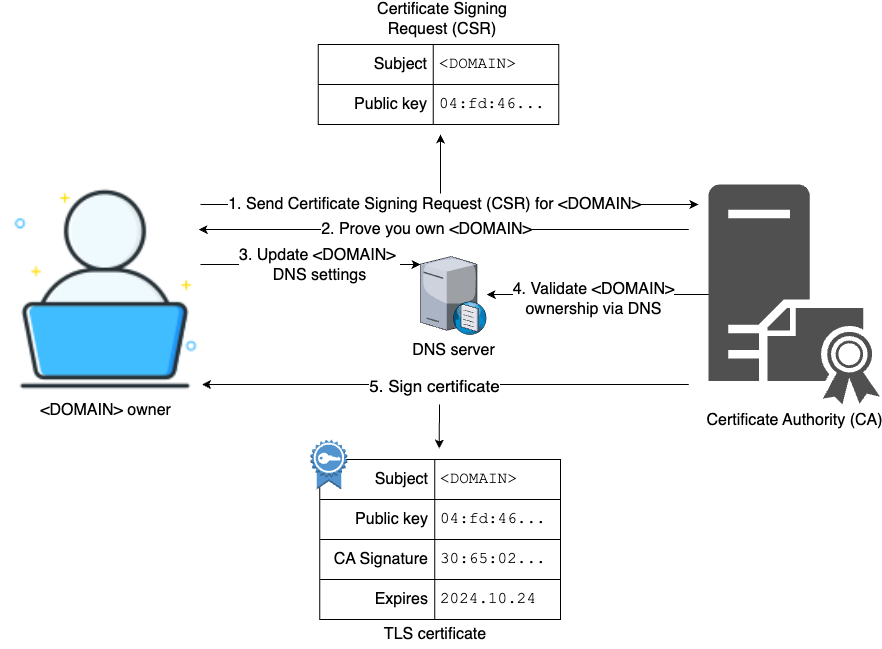
-
You submit a certificate signing request (CSR) to the CA, specifying
- your domain name,
- identifying details about
- your organization, e.g., company name, contact details
- your public key,
- and a signature27.
-
The CA will ask you to prove that you own the domain.
Modern CAs use the Automatic Certificate Management Environment (ACME) protocol for this.
e.g. The CA may ask you to
-
host a file with specific contents at a specific URL within your domain
e.g.
your-domain.com/file.txt -
add a specific DNS record to your domain with specific contents
e.g. a
TXTrecord atyour-domain.com
-
-
You update your domain with the requested proof.
-
The CA checks your proof.
-
If the CA accepts your proof, it will send you back
- a certificate with the data from your CSR,
- the signature of the CA.
This signature is how the CA extends the chain of trust: it’s effectively saying:
“If you trust me as a root CA, then you can trust that the public key in this certificate is valid for this domain.”
[!IMPORTANT] Key takeaway #8
You can encrypt data in transit using TLS.
You get a TLS certificate from a certificate authority (CA).
Public key infrastructure (PKI)
The system of CAs is typically referred to as public key infrastructure (PKI).
There are two primary types of PKIs:
-
Web PKI
Your web browser and most libraries that support HTTPS automatically know how to use the web PKI to authenticate HTTPS URLs for the public Internet.
To get a TLS certificate for a website, you can use
-
Free CAs: community-efforts to make the web more secure
-
CAs from cloud providers: free, completely managed for use, but can only be used with that’s cloud provider’s services.
e.g. AWS Certificate Manager (ACM), Google-managed SSL certificates
-
Traditional CAs, domain name registrars: cost money
[!TIP] Only use get TLS certificate from traditional CAs, domain registrars when:
- you need a type of certificate that the free CAs don’t support, e.g. wildcard certificates
- your software can’t meet the verification and renewal requirements of the free CAs.
-
-
Private PKI
For apps in a microservices architecture, you typically run your own private PKI.
-
If you use a service mesh, it already handles the PKI for you.
-
If you’re don’t use a service mesh, you can:
-
Use self-hosted private PKI tools:
e.g. HashiCorp Vault / OpenBAO, step-ca, cfssl, Caddy, certstrap, EJBCA, Dogtag Certificate System, OpenXPKI
-
Use a managed private PKI from cloud providers:
-
use a managed private PKI from a cloud-agnostic vendor:
e.g. Keyfactor, Entrust PKI, Venafi, or AppViewX.
-
-
Example: HTTPS with Let’s Encrypt and AWS Secrets Manager
tip
Let’s Encrypt
- formed in 2014
- one of the first companies to offer free TLS certificates
- nowadays, one of the largest CAs
You can get TLS certificates from Let’s Encrypt using a tool called Certbot.
-
The idiomatic way to use Certbot is to
- connect to a live web-server (e.g., using SSH),
- run Certbot directly on that server, and Certbot will automatically
- request the TLS certificate,
- validate domain ownership, and
- install the TLS certificate for you.
This approach is
- great for manually-managed websites with a single user-facing server, but it’s not as
- is not for automated deployments with multiple servers that could be replaced at any time.
-
Therefore, in this section, you’re instead going to
- use Certbot in “manual” mode to get a certificate onto your own computer
- store that certificate in AWS Secrets Manager
- run some servers that will know how to retrieve the certificate from AWS Secrets Manager.
Example: Get a TLS certificate from Let’s Encrypt
-
Install Certbot on your computer
Follow the installation instructions
-
Create a temporary folder for the TLS certificate
mkdir -p /tmp/certs/live/ cd /tmp/certs/live/ -
Use Certbot to manually request a TLS certificate
certbot certonly --manual \ # (1) --config-dir . \ # (2) --work-dir . \ --logs-dir . \ --domain www.<YOUR-DOMAIN> \ # (3) --certname example \ # (4) --preferred-challenges=dns # (5)- (1): Run Certbot in manual mode, where it’ll solely request a certificate and store it locally, without trying to install it on a web server for you.
- (2): Override the directories Certbot uses to point to the current working directory, which should be the temporary folder you just created. This ensures the TLS certificate will ultimately be written into this temporary directory.
- (3): Fill in your domain name here.
- (4): Configure Certbot to use
exampleas the name of the certificate. This has no impact on the contents of the certificate itself; it just ensures the certificate is written to a subfolder with the known nameexample. - (5): Configure Certbot to use DNS as the way to validate that you own the domain in (3). You’ll have to prove that you own this domain, as explained next.
-
Certbot will prompt you for: email…
-
Certbot then show you instructions to prove that you own the domain
Please deploy a DNS TXT record under the name: _acme-challenge.www.<YOUR-DOMAIN> with the following value: <SOME-VALUE>
-
Create a DNS TXT record for your domain
For the previous domain that you registered with Route 53, go to the Route 53 hosted zone pages:
- Click on the hosted zone for that domain
- Click
Create record - Fill in the record’s name, type, value , TTL.
- Click
Create records
-
Wait for the record to propagate
-
Head back to the terminal, and press Enter
You should see a message:
Successfully received certificate. Certificate is saved at: /tmp/certs/live/example/fullchain.pem Key is saved at: /tmp/certs/live/example/privkey.pem
note
TLS certificate are usually store in .pem files, which contains:
- normal text
- based64-encoded text
Decode the base64 part and you get data encoded in a format call DER (Distinguished Encoding Rules)28.
Decode the DER data and you get the original certificate data in X.50929 format.
tip
The easiest way to read the certificate is to tell OpenSSL to part it for you:
openssl x509 -noout -text -in /tmp/certs/live/example/fullchain.pem
Certificate:
Data:
# ...
Subject: C=US, ST=California, L=Los Angeles, O=Internet Corporation for Assigned Names and Numbers, CN=www.example.org
Subject Public Key Info:
Public Key Algorithm: rsaEncryption
Public-Key: (2048 bit)
Modulus:
00:86:85:0f:bb:0e:f9:ca:5f:d9:f5:e0:0a:32:2c:
# ...
Exponent: 65537 (0x10001)
# ...
Signature Algorithm: sha256WithRSAEncryption
Signature Value:
04:e1:6e:02:3e:0d:e3:23:46:f4:e3:96:35:05:93:35:22:02:
# ...
Subject: The entity that the certificate is belongs to.Subject Public Key Info: The public key belonging to the certificate subject.Signature Algorithm: The algorithm used for the signature.Signature Value: The signature itself.
Example: Store the TLS certificate in AWS Secrets Manager
tip
AWS Secrets Manager is a general-purpose secret store that provides a way to
- store secrets in encrypted format,
- access secrets via API, CLI, or a web UI, and
- control access to secrets via IAM.
Under the hood, the secrets are
- encrypted using AES and envelope encryption,
- with a root key stored in AWS KMS:
- you can either create a custom key to use in KMS, or
- if you don’t, it will use a default key created specifically for Secrets Manager in your AWS account.
note
The typical way to store secrets in AWS Secrets Manager is to format them as JSON.
In this example, you will
-
store the
- the private key certificate tan
- the TLS certificate
-
in JSON format:
{ "cert": "<CERTIFICATE>", "key": "<PRIVATE-KEY>" }
-
Use jq to encode the certificate and the private key in JSON
CERTS_JSON=$(jq -n -c -r \ --arg cert "$(cat live/example/fullchain.pem)" \ --arg key "$(cat live/example/privkey.pem)" \ '{cert:$cert,key:$key}') -
Use AWS CLI to store the JSON string in AWS Secrets Manager
aws secretsmanager create-secret \ --region us-east-2 \ --name certificate \ --secret-string "$CERTS_JSON" -
Go to the AWS Secrets Manager console to verify that the secret’s been created
- Select the secret named
certificate - Click
Retrieve secret value
- Select the secret named
-
Delete the TLS certificate from your own computer
certbot delete \ --config-dir . \ --work-dir . \ --logs-dir .
Example: Deploy EC2 instances that use the TLS certificate
-
Copy the code from Example: Register and Configure a Domain Name in Amazon Route 53 | Chapter 7
cd examples mkdir -p ch8/tofu/livecp -r ch7/tofu/live/ec2-dns ch8/tofu/live/ec2-dns-tls cd ch8/tofu/live/ec2-dns-tls -
Open the port
443instead of port80# examples/ch8/tofu/live/ec2-dns-tls/main.tf module "instances" { source = "github.com/brikis98/devops-book//ch7/tofu/modules/ec2-instances" name = "ec2-dns-tls-example" #... http_port = 443 # (1) #... } -
Update the IAM role for the EC2 instances to allow them to read from AWS Secrets Manager
# examples/ch8/tofu/live/ec2-dns-tls/main.tf resource "aws_iam_role_policy" "tls_cert_access" { # (1) role = module.instances.iam_role_name policy = data.aws_iam_policy_document.tls_cert_access.json } data "aws_iam_policy_document" "tls_cert_access" { # (2) statement { effect = "Allow" actions = ["secretsmanager:GetSecretValue"] resources = [ "arn:aws:secretsmanager:us-east-2:${local.account_id}:secret:certificate-*" ] } } locals { account_id = data.aws_caller_identity.current.account_id } data "aws_caller_identity" "current" {}-
(1): Attach a new IAM policy to the IAM role of the EC2 instances.
-
(2): The IAM policy allows those instances to
- call the
GetSecretValueAPI in AWS Secrets Manager, - but only to fetch the secret with the name starting with
certificate-.
[!TIP] The full ARN includes a randomly-generated ID after the secret name
If you want to be even more secure, or to use a different AWS region, you can update this code with the full ARN (which you can find in the Secrets Manager web console) instead of the
*wildcard. - call the
-
-
Update the server code (The Node.js code in user data script) to call
GetSecretValueAPI to fetch the secret from AWS Secrets Manager# examples/ch8/tofu/live/ec2-dns-tls/user-data.sh export CERTIFICATE=$(aws secretsmanager get-secret-value \ # (1) --region us-east-2 \ --secret-id certificate \ --output text \ --query SecretString) tee app.js > /dev/null << "EOF" const https = require('https'); // (2) const options = JSON.parse(process.env.CERTIFICATE); // (3) const server = https.createServer(options, (req, res) => { // (4) res.writeHead(200, { 'Content-Type': 'text/plain' }); res.end('Hello, World!\n'); }); const port = 443; // (5) server.listen(port,() => { console.log(`Listening on port ${port}`); }); EOF-
(1): Use the AWS CLI to
-
fetch the TLS certificate from AWS Secrets Manager and
-
export it as an environment variable called
CERTIFICATE.[!TIP] Using an environment variable allows you to pass the TLS certificate data to the Node.js app in memory, without ever writing secrets to disk.
-
-
(2): Instead of using the
httpNode.js library, use thehttpslibrary. -
(3): Read the AWS Secrets Manager data from the
CERTIFICATEenvironment variable, parse it as JSON, and store it in a variable calledoptions. -
(4): Use the
httpslibrary to run an HTTPS server, and pass it the options variable as configuration.The Node.js
httpslibrary looks for TLS certificates under thecertandkeyfields inoptions: not coincidentally, these are the exact field names you used when storing the TLS certificate in AWS Secrets Manager. -
(5): Listen on port
443rather than port80.
-
-
Deploy the
ec2-dns-tlsOpenTofu moduletofu init tofu apply -
Grab the output variable
domain_name -
Open the
https://<DOMAIN_NAME>to verify that the request is over an HTTPS connection.
Get your hands dirty: Securing communications and storage
-
Let’s Encrypt certificates expire after 90 days.
Set up automatic renewals by
- running Certbot on a regular schedule and
- having it update
- the data in AWS Secrets Manager,
- as well as any running servers.
One way to do this is to run a Lambda function every 60 days (using scheduled events) which
- runs Certbot with the certbot-dns-route53 plugin (to automate the DNS verification),
- updates the data in AWS Secrets Manager,
- if the update is successful: redeploys all your servers, so they fetch the latest certificate value.
-
Instead of individual EC2 instances, try
- deploying an ASG with an ALB, and
- using AWS ACM to provision a free, auto-renewing TLS certificate for your ALB.
note
When you’re done experimenting, undeploy this example by running tofu destroy.
[!WARNING] AWS Secrets Manager is free only during the trial period Don’t forget to mark the
certificatesecret for deletion in the AWS Secrets Manager console
End-to-End Encryption
What is End-to-End Encryption
-
For most companies that use the castle-and-moat networking approach, the connections are only encrypted from the outside word to the load balancers
-
TLS connections are terminated after the load balancers, aka terminating TLS connection
-
all others connections within the data center are encrypted
e.g.
- Between 2 microservices
- Between a microservice and a data store
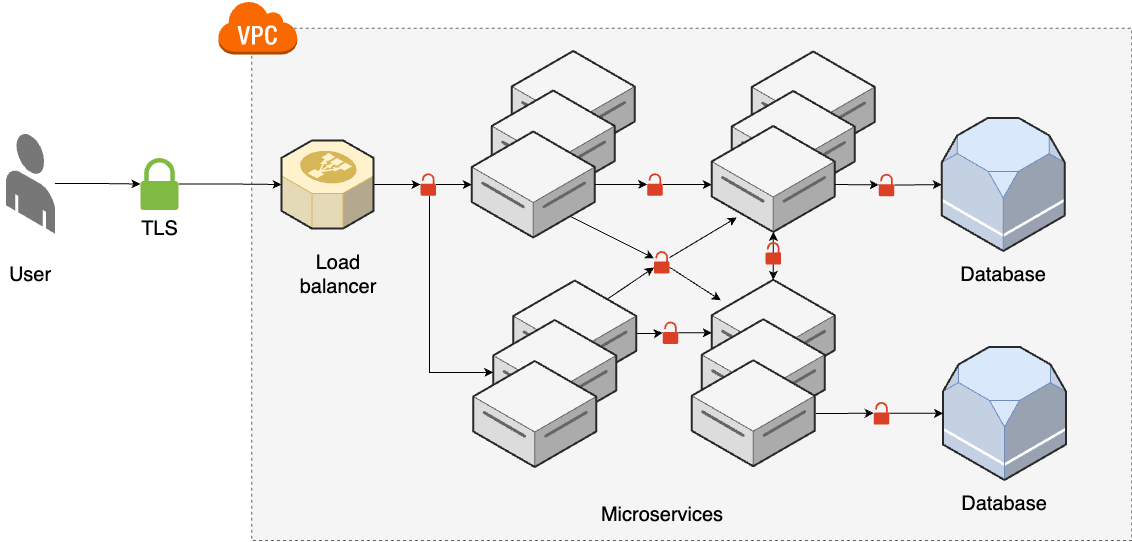
-
-
As companies move more towards the zero-trust architecture approach, they instead require that all network connections are encrypted (encryption-in-transit everywhere).

-
The next steps is to enforce encryption-at-rest everywhere (by using full-disk encryption, data store encryption, and application-level encryption)

Requiring all data to be encrypted in transit (green, closed lock) and at rest (blue, closed lock)
[!NOTE] Encrypting all data at rest and in transit used to be known as end-to-end (E2E) encryption.
- Assuming you do a good job of protecting the underlying encryption keys, this ensures that
- all of your customer data is protected at all times,
- there is no way for a malicious actor to get access to it.
- But it turns out there is one more malicious actor to consider: you. That is, your company, and all of its employees.
- Assuming you do a good job of protecting the underlying encryption keys, this ensures that
The modern definition of end-to-end encryption that applies in some cases is that
- not even the company providing the software should be able to access customer data.
e.g.
- In messaging apps (e.g. WhatsApp, Signal), where you typically don’t want the company providing the messaging software to be able to read any of the messages.
- In password managers (e.g. 1Password, Bitwarden), where you don’t want the company providing the password manager software to be able to read any of your passwords.
With this definition of E2E encryption:
-
the only people who should be able to access the data are the customers that own it
-
the data needs to be encrypted client-side, before it leaves the customer’s devices.
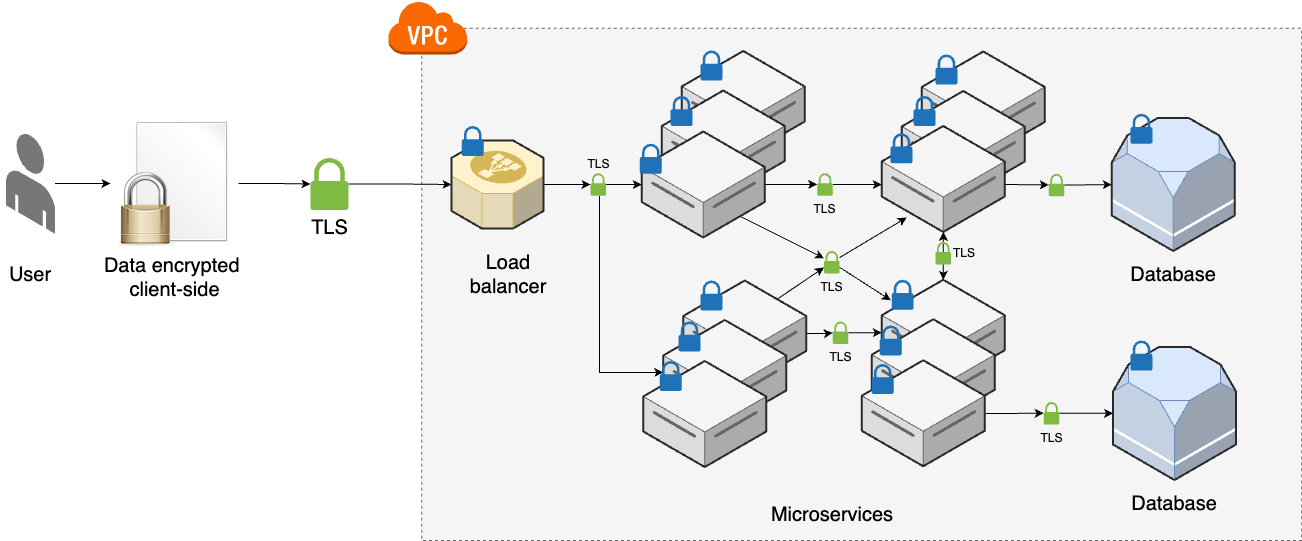
[!IMPORTANT] Key takeaway #9
Use end-to-end encryption to protect data so that
- no one other than the intended recipients can see it
- not even the software provider.
| Model | Encryption in Transit | Encryption at Rest | Note | |
|---|---|---|---|---|
| Castle-and-Moat | Only to load balancers (then terminate TLS) | N/A | ||
| Zero-Trust Architecture | Every connections | Optional | ||
| Encryption-at-Rest and in-Transit | Every connections | Full-disk, data store, application-level encryption | - Protects from external malicious actors, not from internal malicious actors | |
| Modern E2E Encryption | Encrypted client-side before data leaves customer’s devices | Every connections | Full-disk, data store, application-level encryption | - Protects from both external & internal malicious actors - Used in messaging apps, password managers… |
Working with End-to-End Encryption
Which type of data key do you use for E2E encryption?
Most E2E-encrypted software uses envelope encryption.
-
The root key is typically
-
derived from whatever authentication method you use to access the software:
e.g. The password you use to log in to the app.
-
used to encrypt & decrypt one or more data keys, which are stored in encrypted format, either
- on the user’s device, or
- in the software provider’s servers
Once the data key is decrypted, the software typically
- keeps it in memory
- uses it to encrypt & decrypt data client-side.
-
-
The data keys can be
-
the encryption keys used with symmetric-key encryption:
e.g., a password manager may use AES to encrypt & decrypt your passwords.
-
the private keys used with asymmetric-key encryption:
e.g., a messaging app may give each user
- a private key that is stored on the device and used to decrypt messages
- a public key that can be shared with other users to encrypt messages.
-
What data needs to be E2E encrypted and what doesn’t?
Not all data can be encrypted client-side. There is always some minimal set of data that must be visible to the software vendor, or the software won’t be able to function at all.
e.g.
- For an E2E-encrypted messaging app, at a minimum, the software vendor must be able to see the recipients of every message so that the message can be delivered to those recipients.
Beyond this minimum set of data, each software vendor has to walk a fine line.
-
The more data you encrypt client-side, the more you protect your user’s privacy and security.
-
But encrypting more client-side comes at the cost of limiting the functionality you can provide server-side.
e.g.
- For Google, the more they encrypt client-side, the harder it is to do server-side search and ad targeting.
Can you trust E2E-encrypted software?
-
The software vendor could be lying
Many companies that claimed their software offered end-to-end encryption were later found out to be lying or exaggerating.
e.g. Although claiming that Zoom provided E2E encryption for user communication, “Zoom maintained the cryptographic keys that could allow Zoom to access the content of its customers’ meetings”30.
-
The software vendor could have back-doors
The vendor genuinely tries to provide end-to-end encryption, but a government agency forces the vendor to install back-doors31
e.g. After Microsoft bought Skype, despite claiming Skype is E22 encryption, Microsoft collaborated with NSA to add back-doors to Skype32.
-
The software could have bugs
And provide unintentional ways to bypass E2E encryption.
-
The software (or hardware) could be compromised
Technology can help, but it’s not the full solution. At some point, you need to make a judgment call to trust something, or someone, and build from there.
Conclusion
-
Key takeaways for secure data:
You … … type of data Example Note Don’t roll your own cryptography always use mature, battle-tested, proven algorithms & implementations. Avoid storing secrets by using SSO, 3rd-party services, or not storing it at all If you can’t avoid storing secrets do not store them as plaintext Protect - personal secrets password, credit card by using a password manager Protect - infrastructure secrets TLS certificate, database password by using a KMS and/or a general-purpose secret store Never store - passwords (encrypted or unencrypted) instead use a hash function (with a salt & pepper), and store the hash values Encrypt data-at-rest using:
- full-disk encryption
- data store encryption
- application-level encryptionEncrypt data-in-transit using TLS (that you get from a certificate authority - CA) Use end-to-end encryption for data that only the intended recipients can see it Signal messages Not even you, NSA, or FBI can see it. -
A cheat sheet of how to handle common cryptographic use cases
Use case Solution Example recommended tools Store personal secrets (e.g., passwords) Use a password manager 1Password, Bitwarden Store infrastructure secrets (e.g., TLS certificate) Use a secret store or KMS OpenBao, AWS Secrets Manager, AWS KMS Store customer passwords Store the hash of (password + salt + pepper) Argon2id, scrypt, bcrypt Encrypt data at rest Use authenticated encryption AES-GCM, ChaCha20-Poly1305 Encrypt data in transit over the public Internet Use TLS with a certificate from a public CA Let’s Encrypt, AWS Certificate Manager Encrypt data in transit in a private network Use TLS with a certificate from a private CA Istio, Linkerd, OpenBao, step-ca Validate data integrity (e.g., no one tampered with a file) Use a cryptographic hash function SHA-2, SHA-3 Validate data integrity and authenticity (e.g., no one faked a cookie) Use a MAC HMAC, KMAC
The vast majority of ciphers aim for computational security, where the resources and time it would take to break the cipher are so high, that it isn’t feasible in the real world.
-
To put that into perspective, a cryptographic system is considered strong if the only way to break it is through brute force algorithms, where you have to try every possible encryption key.
-
If the key is N bits long, then to try every key, you’d have to try $2^N$ possibilities, which grows at an astonishing rate, so by the time you get to a $128$-bit key, it would take the world’s fastest supercomputer far longer than the age of the universe to try all $2^{128}$ possibilities.
As of 2024, the world’s fastest distributed computer is the Frontier system at Oak Ridge National Laboratory, which was able to perform $1.2 exaFLOPS$, or about $1.2$ x $10^{18}$ floating point operations per second.
- That’s a remarkable accomplishment, but even if you generously assume that you could try one key per floating point operation, this system would need to run for roughly $9$ trillion years to perform $2^{128}$ floating point operations, which is $650$ times longer than the age of the universe ($13.8$ billion years).
You could only say “not be possible” about the small number of ciphers that offer perfect secrecy (AKA information-theoretic security), where they are secure even against adversaries with unlimited resources and time.
e.g. For example, with the one-time pad cipher, you convert plaintext to ciphertext by applying the exclusive or (XOR) operator to each bit of the plaintext with a bit from the encryption key, where the encryption key is a randomly-generated set of data that is at least as long as the plaintext, that you use once, and then never again (hence the “one-time” in the name).
Some CPUs even have built-in AES instruction sets to make it even faster
Not the MAC as in MAC address (medium access control address)
As there’s no way to derive the corresponding private key from a public key (other than brute force, which is not feasible with the large numbers used in asymmetric-key encryption).
The name RCA is based on the surnames (Rivest, Shamir, Adleman) of its creators
RSA-OAEP is a part of Public-Key Cryptography Standards (PKCS) #2 - the second family of standards - the latest of which is v2.2 from October 2012.
ECIES is actually a hybrid approach that combines asymmetric-key and symmetric-key encryption, as discussed next.
Each user shares their public keys, and all other users can use those to encrypt data.
https://blog.cloudflare.com/a-relatively-easy-to-understand-primer-on-elliptic-curve-cryptography/
The Secure Hash Algorithm (SHA) family is a set of cryptographic hash functions created by the NSA
SHAKE (Secure Hash Algorithm and KECCAK)
cSHAKE (customizable SHAKE)
https://en.wikipedia.org/wiki/Authenticated_encryption#Authenticated_encryption_with_associated_data
Each time a user wants to login, you email the them a temporary, one-time sign-in link (called magic link)
- they can open that magic link and login to your account.
Password manager is a piece of software specifically designed to provide secure storage and access for personal secrets.
Password Manager is part of Wallet feature https://answers.microsoft.com/en-us/microsoftedge/forum/all/how-to-manage-saved-passwords-in-microsoft-edge/e80f5472-5e37-4053-a857-5ec1e5f4fa94
For a KSM:
- You send them data
- They
- perform the encryption and hashing on the KMS server
- send you back the result
A HSM is a physical devices that include a number of hardware and software features to safeguard your secrets and prevent tampering.
Data is rarely, if ever, deleted.
Especially as compared to live, active systems, which are usually more closely monitored.
In man-in-the-middle (MITM) attacks, a malicious actor may try to intercept your messages, read them, modify them, and impersonate either party in the exchange.
A nonce is a number that is incremented for every message.
The signature is the proof that you own the corresponding private key.
A malicious actor has no way to get a root CA to sign a certificate for a domain they don’t own, and they can’t modify even one bit in the real certificate without invalidating the signatures.
Back-doors are hidden methods to access the data.
Chapter 9: How to Store Data: SQL, NoSQL, Queues, Warehouses, and File Stores
-
Almost all software needs to store data.
-
For most companies, data is one of the most valuable, longest-lived assets.
-
There are many types of data and many different ways to store them:
Type of data / data store How to store? Local storage If your application needs to store data locally, you write it to a hard drive. Primary data store The general-purpose workhorse and the source of truth for most companies is the relational database. Caching If you need to speed up data retrieval, you can cache responses in key-value stores and content distribution networks (CDNs). File storage To store and serve files, you turn to file servers & object stores. Semi-structured data and search If you need to store non-uniform data or to search and filter that data, you turn to a document store. Analytics To extract insights from your data, you turn to columnar databases. Asynchronous processing To process data and events in the background, and to decouple your systems, you turn to queues and streams. -
To meet scalability & availability requirements, you use partitioning & replication.
-
To ensure your data isn’t lost in a disaster scenario, you use snapshots, continuous backups, and replication.
This chapter will walk you through various hands-on examples:
- deploying a PostgreSQL database, automating schema migrations
- serving files from S3, and using CloudFront as a CDN
- configuring backups and replication
Local Storage: Hard Drives
The challenges of storing data using custom file format
-
Querying the data
It’s hard to extract insights from data.
-
Evolving the data format
It’s hard to evolve the data format without incompatible issues with older files.
-
Handling concurrent access to the data
It’s impossible to reading/writing the data from different computers.
warning
Storing data using custom file format directly on local storages is usually a bad idea if the software requirements need to be changed.
Stateful and stateless software
stateful software : Software that reads & writes persistent data to the local hard drive. : - Use custom format for data, stored them as files in local hard drive.
stateless software : Software that does not rely on persistent data on the local hard drive. : Persistent data is stored in a dedicated data store. : - The only stateful system in your software architecture. : Easier to deploy, update, scale, and maintain.
note
Both type of software can still write ephemeral data1 - e.g. log files - to local hard drives.
[!IMPORTANT] Key takeaway #1 Keep your applications stateless. Store all your data in dedicated data stores.
Types of hard drives
| Storage Type | Where? | Description | Examples | Protocols / Technologies | Pros | Cons |
|---|---|---|---|---|---|---|
| Physical Hard Drives | On-premises | Hard drives physically attached to on-prem servers. | Magnetic, SSD.. | - SATA, NVMe… - RAID | Direct control, fast access | Requires on-prem infrastructure |
| Network-attached Hard Drives | Cloud | Hard drives attached to cloud VMs over the network. | Amazon EBS 2 Google Persistent Disk Azure Disk Storage | Detachable, re-attachable3 for VMs (for stateful apps) | Higher latency compared to local drives | |
| Shared Hard Drives | Cloud, on-premises | Single drive shared among multiple servers for shared access. | Amazon EFS 4 Google Cloud Filestore Azure Files | Network File System (NFS) Common Internet File System (CIFS) Server Message Block (SMB) | Shared access5 for multiple servers | Higher latency compared to local drives |
| Volumes in Container Orchestration6 | Cloud, on-premises | Persistent volumes7 for data storage in container environments. | Amazon EBS (AWS EKS) Google Persistent Disk (GKE) Azure Disk Storage (AKS)Local disk, e.g. Docker Desktop | Data persists7 even when containers are redeployed | ||
| ______________________________ | ________________________ | _____________________________________________ | __________________________________ | __________________________________________ | __________________________________________________ | _____________________________________________ |
tip
Whether you’re using a physical hard drives, or any other types of storages, all look and behave exactly like a local, physically-attached hard drive:
- To your software, it looks like any local file system that you can read from and write to.
[!WARNING] Don’t run data stores in containers
You’re one config mistake from losing your company’s data - the most valuable asset.
Containers are designed to be easy to distribute, scale, and throw away (hence the default of ephemeral disks), which
- is great fit for stateless apps and local development
- but is not a good fit for data stores in production
Using persistent volume for data store is not easy:
- Persistent volume
- needs to support varies widely amongst orchestration tools
- is generally less mature than other orchestration features
- Integration with tooling can be trickier (if that tooling wasn’t designed for containers)
- Support from database vendors may be trickier (not all of them support containerized deployments).
Primary Data Store: Relational Databases
relational database : The most dominant data storage solution for decades: : Flexible : - Handle a remarkably wide range of use cases8 : - Remarkable scalability & availability : Reliable : - Ensure data integrity & consistency : - Store data efficiently (temporally & spatially) : - Strong security model : The most mature9 data storage technology available : - Massive ecosystem of tools, vendors, expert developers
note
Most companies use relational databases as their primary data stores — the source of truth for their data.
Just as cryptography:
-
always use mature, battle-tested, proven off-the-shelf solutions.
-
Don’t roll out your own data store, except if you have:
- use cases that all existing data stores can’t handle, which only happens at massive scale, e.g. Google, Facebook, Twitter
- at least a decade10 to spare
[!IMPORTANT] Key takeaway #2 Don’t roll your own data stores: always use mature, battle-tested, proven off-the-shelf solutions.
Writing & Reading Data
A relational database
- stores data in tables, where
- each item is stored in a row,
table : represents a collection of related items
row : represents an item
note
Each row in a table has the same columns
e.g. A website for a bank store data about the customers
-
in a
customerstable, where -
each row represents one customer as a tuple of
id,name,date_of_birth, andbalanceid name date_of_birth balance 1 Brian Kim 1948-09-23 1500 2 Karen Johnson 1989-11-18 4853 3 Wade Feinstein 1965-02-29 2150
To interact with a relational database, you use a language called Structured Query Language (SQL).
-
To write data in to a table, you use the
INSERT INTOstatementINSERT INTO <table> ( <columns> ) VALUES ( <values> );e.g.
-
INSERT INTO customers (name, date_of_birth, balance) VALUES ('Brian Kim', '1948-09-23', 1500); INSERT INTO customers (name, date_of_birth, balance) VALUES ('Karen Johnson', '1989-11-18', 4853); INSERT INTO customers (name, date_of_birth, balance) VALUES ('Wade Feinstein', '1965-02-25', 2150); -
(This example assume the schema is already exists)
[!NOTE] Relational databases require you to define a schema to describe the structure of each table before you can write any data to that table (as in Schemas and Constraints).
-
-
To read all data from a table, you use
SELECTstatement to form an SQL query.SELECT <columns> FROM <table>;[!NOTE] Use the wildcard
*for all columnse.g.
-
SELECT * FROM customers;id | name | date_of_birth | balance ----+----------------+---------------+--------- 1 | Brian Kim | 1948-09-23 | 1500 2 | Karen Johnson | 1989-11-18 | 4853 3 | Wade Feinstein | 1965-02-25 | 2150
-
-
To read and keep only some of the data (aka filtering query), you use
SELECTstatement with aWHEREclause:SELECT <columns> FROM <table> WHERE <conditions>;e.g.
-
SELECT * FROM customers WHERE date_of_birth > '1950-12-31';id | name | date_of_birth | balance ----+----------------+---------------+--------- 2 | Karen Johnson | 1989-11-18 | 4853 3 | Wade Feinstein | 1965-02-25 | 2150
-
tip
Relational databases allow query data in countless ways:
WHEREto filter dataORDER BYto sort dataGROUP BYto group dataJOINto query data from multiple tablesCOUNT,SUM,AVG, and a variety of other aggregate functions to perform calculations on your data,- indices to make queries faster,
- and much more.
[!WARNING] Watch out for snakes: SQL has many dialects SQL:
- In theory, is a language standardized by ANSI and ISO that is the same across all relational databases.
- In practice, is a slightly different dialect of SQL for each every relational database .
note
This books focuses on SQL concepts that apply to all relational databases, but technically, the examples use the PostgreSQL dialect.
ACID Transactions
transaction : a set of coherent operations that should be performed as a unit
In relational databases, transactions must meet the following four properties:
Property Description Note Atomicity Either all the operations in the transaction happen, or none of them do. Partial successes or partial failures are not allowed. Consistency The operations always leave the data in a state that is valid Valid state is a state that according to all the rules and constraints you’ve defined in the database. Isolation Even though many transactions may be happening concurrently, the database should end up in the exact same state As if the transactions had happened sequentially (in any orders). Durability Once a transaction has completed, it is recorded to persistent storage (typically, to a hard drive) It isn’t lost, even in the case of a system failure. -
These 4 properties form the acronym ACID, which is one of the defining property of a relational database.
e.g.
-
Deduct $100 from every customer (transaction across single statement)
UPDATE customers SET balance = balance - 100;For a relational database, this statement will be execute to all customers in a single ACID transaction:
- either the transaction will complete successfully, and all customers will end up with $100 less,
- or no customers will be affected at all.
[!TIP] For a data store that doesn’t support ACID transactions:
- It would be possible for those data stores to crash part way through this transaction
- The data end up with some customers with $100 less and some unaffected (No atomicity)
-
Transfer $100 from customer 1 to customer 2 (transaction across multiple statements)
START TRANSACTION; UPDATE customers SET balance = balance - 100 WHERE id = 1; UPDATE customers SET balance = balance + 100 WHERE id = 2; COMMIT;For a relational database, all the statements between
START TRANSACTIONandCOMMITwill execute as a single ACID transaction, ensuring that:- one account has the balance decreased by $100, and the other increased by $100
- or neither account will be affected at all.
[!TIP] For a data store that doesn’t support ACID transactions, the data could end up in an in-between state that is inconsistent:
e.g.
- The first statement completes, subtracting $100.
- Then the data store crashes before the second statement runs, and as a result, the $100 simply vanishes into thin air (No atomicity)
Schemas and Constraints
note
Relational databases require you to define a schema for each table before you can read and write data to that table.
Defining a schema
To define a schema, you use CREATE TABLE statement
CREATE TABLE <table> (
<column_name> <column_type>,
<...>
);
e.g.
-
Create a table called
customerswith columns calledid,name,date_of_birth, andbalanceCREATE TABLE customers ( id SERIAL PRIMARY KEY, name VARCHAR(128), date_of_birth DATE, balance INT );
Schema’s integrity constraints
The schema includes a number of integrity constraints to enforce business rules:
-
Domain constraints:
Domain constraints limit what kind of data you can store in the table.
e.g.
-
Each column has a type, such as
INT,VARCHAR, andDATE, so the database will prevent you from inserting data of the wrong type -
The
idcolumn specifiesSERIAL, which is a pseudo type (an alias) that gives you a convenient way to capture three domain constraints:
-
-
Key constraints
A primary key is a column or set of columns that can be used to uniquely identify each row in a table
e.g.
- The
idcolumn specifiesPRIMARY KEY, which means this column is the primary key for the table, so the database will ensure that every row has a different value for this column.
- The
-
Foreign key constraints
A foreign key constraint is where a column in one table can contain values that are references to a column in another table.
e.g. Bank customers could have more than one account, each with their own balance,
-
Instead of having a single
balancecolumn in thecustomerstable -
You could create a second table called
accounts, where each row represents one accountCREATE TABLE accounts ( account_id SERIAL PRIMARY KEY, (1) account_type VARCHAR(20), (2) balance INT, (3) customer_id INT REFERENCES customers(id) (4) );The
accountstable has 4 columns:-
1: A unique ID for each account (the primary key).
-
2: The
account_type: e.g., checking or savings. -
3: The
balancefor the account. -
4: The ID of the customer that owns this account.
[!NOTE] The
REFERENCESkeyword labels this column as a foreign key into theidcolumn of thecustomerstable.- This will prevent you from accidentally inserting a row into the
accountstable that has an invalid customer ID (i.e., one that isn’t in thecustomerstable).
- This will prevent you from accidentally inserting a row into the
-
[!TIP] Foreign key constraint
-
is one of the defining characteristics of relational databases, as they
- allow you to define and enforce relationships between tables.
👉 This is what the “relational” in “relational database” refers to.
-
is critical in maintaining the referential integrity of your data
👉 another major reason to use a relational database as your primary source of truth.
-
[!IMPORTANT] Key takeaway #3 Use relational databases as your primary data store (the source of truth), as
they are
- reliable
- secure
- mature
they support
- schemas
- integrity constraints
- foreign key relationships
- joins
- ACID transactions
- and a flexible query language (SQL).
Schema modifications and migrations
To modify the schema for existing tables, you can use ALTER TABLE
warning
You should be careful when modifying a schema, or you will run into backward compatibility issues.
When use have a lot of modification to the schema, you can:
-
Manage the schemas manually
- Connecting directly to the database
- Executing
CREATE TABLE,ALTER TABLEby hand
-
Manage the schemas as code using a schema migration tool, such as Flyway, Liquibase, Atlas, Bytebase, Alembic, migrate, Squitch, ActiveRecord, Sequel, Knex.js, GORM.
When using a schema migration tool:
-
You define
-
your initial schemas
-
all the modifications as code, in an ordered series of migration files that you check into version control.
e.g.
-
Flyway uses standard SQL in
.sqlfilesv1_create_customers.sql v2_create_accounts.sql v3_update_customers.sql -
Knex.js uses a JavaScript DSL in
.jsfiles20240825_create_customers.js 20240827_create_accounts.js 20240905_update_customers.js
-
-
-
You apply these migration files using the schema migration tool, which keeps track of
- which of your migration files have already been applied, and
- which haven’t
so no matter
- what state your database is in, or
- how many times you run the migration tool,
you can be confident your database will end up with the desired schema.
As you make changes to your app, new versions of the app code will rely on new versions of your database schema.
To ensure these versions are automatically deployed to each environment, you will need to integrate the schema migration tool into your CI/CD pipeline
The schema migration tools can be run:
-
As part of app’s boot code
Advantages:
-
This will works in any environments:
- shared environments, e.g.
dev,stage,prod - or any developer’s local environment
- shared environments, e.g.
-
The migration are constantly being tested.
Disadvantages:
-
The migrations sometimes take a long time, which cause the app boot slowly, which might be a big problem:
-
some orchestration tools may redeploy the app before the migration can finish.
-
for serverless apps because of the cold starts.
-
-
-
As a separate strep in deployment pipeline, just before you deploy the app
Example: PostgreSQL, Lambda, and Schema Migrations
In this example, you’ll
- Deploy PostgreSQL in AWS using RDS13.
- Define the schema for this database as code using Knex.js
- Deploy a Lambda function and API Gateway to run a Node.js serverless web app that
- uses Knex.js to connect to the PostgreSQL database over TLS
- run queries
- return the results as JSON
Create an OpenTofu root module for PostgreSQL, Lambda, API Gateway
Use the rds-postgres OpenTofu module to deploy PostgreSQL on RDS:
-
Create the folder
cd examples mkdir -p ch9/tofu/live/lambda-rds cd ch9/tofu/live/lambda-rds -
The root module
main.tffor deploying Postgres on RDS# examples/ch9/tofu/live/lambda-rds/main.tf provider "aws" { region = "us-east-2" } module "rds_postgres" { source = "github.com/brikis98/devops-book//ch9/tofu/modules/rds-postgres" name = "bank" # (1) instance_class = "db.t4g.micro" # (2) allocated_storage = 20 # (3) username = var.username # (4) password = var.password # (5) }- 1: Set the name of the RDS instance, and the logical database within it, to
bank - 2: Use a
db.t4g.microRDS instance (2 CPUs and 1GB of memory, is part of the AWS free tier) - 3: Allocate 20 GB of disk space for the DB instance.
- 4: Set the username for the master database user to
var.username(an input variable). - 5: Set the password for the master database user to
var.password(an input variable).
- 1: Set the name of the RDS instance, and the logical database within it, to
-
Add input variables for the username/password of the database
# examples/ch9/tofu/live/lambda-rds/variables.tf variable "username" { description = "Username for master DB user." type = string } variable "password" { description = "Password for master DB user." type = string sensitive = true }
Use lambda and api-gateway modules to deploy a Lambda function and an API Gateway
-
The
main.tffor deploying a Lambda Function and API Gateway:# examples/ch9/tofu/live/lambda-rds/main.tf module "app" { source = "github.com/brikis98/devops-book//ch3/tofu/modules/lambda" name = "lambda-rds-app" src_dir = "${path.module}/src" # (1) handler = "app.handler" runtime = "nodejs20.x" memory_size = 128 timeout = 5 environment_variables = { # (2) NODE_ENV = "production" DB_NAME = module.rds_postgres.db_name DB_HOST = module.rds_postgres.hostname DB_PORT = module.rds_postgres.port DB_USERNAME = var.username DB_PASSWORD = var.password } } module "app_gateway" { source = "github.com/brikis98/devops-book//ch3/tofu/modules/api-gateway" name = "lambda-rds-app" # (3) function_arn = module.app.function_arn api_gateway_routes = ["GET /"] }- 1: The source code for the function will be in the
srcfolder. You’ll see what this code looks like shortly. - 2: Use environment variables to pass the Lambda function all the details about the database, including the database name, hostname, port, username, and password.
- 3: Create an API Gateway so you can trigger the Lambda function using HTTP requests.
- 1: The source code for the function will be in the
-
Add output variables for API Gateway’s endpoint, and database’s name, host, port
output "app_endpoint" { description = "API Gateway endpoint for the app" value = module.app_gateway.api_endpoint } output "db_name" { description = "The name of the database" value = module.rds_postgres.db_name } output "db_host" { description = "The hostname of the database" value = module.rds_postgres.hostname } output "db_port" { description = "The port of the database" value = module.rds_postgres.port }
Create schema migrations with Knex.js
-
Create a folder for the schema migrations
mkdir -p src cd srcThe schema migrations is a Node package (Knex.js uses JavaScript).
-
Create a
package.json{ "name": "lambda-rds-example", "version": "0.0.1", "description": "Example app 'Fundamentals of DevOps and Software Delivery'", "author": "Yevgeniy Brikman", "license": "MIT" } -
Install dependencies
npm install knex --save # (1) npm install knex --global # (2) npm install pg --save # (3)- (1): Install Knex.js as a dependency, so it’s available to Lambda function.
- (2): Install Knex.js as a CLI tool.
- (3): Install
node-postgreslibrary that Knex.js use to talk to PostgreSQL.
-
When Knex.js apply schema migrations, it will connect to PostgreSQL over the network.
-
The connection to PostgreSQL database on RDS is encrypted using TLS.
- Because the PostgreSQL database is internal, AWS use its root CA certificate to sign the TLS certificate.
-
To validate the database’s TLS certificate, you need to:
-
Download the root CA certificate14 that is used to sign the database TLS certificate
curl https://truststore.pki.rds.amazonaws.com/us-east-1/us-east-1-bundle.pem -o src/rds-us-east-2-ca-cert.pem -
Configure your app to trust the root CA certificate
// examples/ch9/tofu/live/lambda-rds/src/knexfile.js const fs = require("fs").promises; module.exports = { // (1) client: "postgresql", connection: async () => { // (2) const rdsCaCert = await fs.readFile("rds-us-east-2-ca-cert.pem"); // (3) return { database: process.env.DB_NAME, host: process.env.DB_HOST, port: process.env.DB_PORT, user: process.env.DB_USERNAME || process.env.TF_VAR_username, password: process.env.DB_PASSWORD || process.env.TF_VAR_password, ssl: { rejectUnauthorized: true, ca: rdsCaCert.toString() }, }; }, };-
(1): Use the PostgreSQL library (
node-postgres) to talk to the database. -
(2): Read the root CA certificate from AWS.
-
(3): This JSON object configures the connection to
- use the database name, host, port, username, and password from the environment variables you passed to the Lambda function in the OpenTofu code,
- validate the TLS certificate using the CA cert you read in (2).
[!TIP] You’re using the same environment variables to pass the username and password to both the OpenTofu module and to Knex.js.
-
-
-
Create your first schema migration
knex migrate:make create_customers_tablesThis will create
- a
migrationsfolder, and within it,- a file called
<TIMESTAMP>_create_customers_table.js, whereTIMESTAMPis a timestamp representing when you ran theknex migrate:makecommand.
- a file called
- a
-
Define the schema migration for the
customerstable// <TIMESTAMP>_create_customers_table.js // (1) exports.up = async (knex) => { // (2) await knex.schema.createTable("customers", (table) => { table.increments("id").primary(); table.string("name", 128); table.date("date_of_birth"); table.integer("balance"); }); // (3) return knex("customers").insert([ { name: "Brian Kim", date_of_birth: "1948-09-23", balance: 1500 }, { name: "Karen Johnson", date_of_birth: "1989-11-18", balance: 4853 }, { name: "Wade Feinstein", date_of_birth: "1965-02-25", balance: 2150 }, ]); }; // (4) exports.down = async (knex) => { return knex.schema.dropTable("customers"); };
With Knex.js, you define your schemas, and any updates to them, in sequential .js files as follows:
-
(1): Within each
.jsfile, theupfunction is where you define how to update the database schema. -
(2): This code creates the
customerstable with the exact same schema you first saw in Defining a schema, except- instead of using raw SQL (
CREATE TABLE), you use a JavaScript API (createTable()).
- instead of using raw SQL (
-
(3): This code populates the database with some initial data, adding the exact same three customers to the
customerstable that you initially saw in Writing and Reading, again- using a fluent JavaScript API instead of raw SQL.
-
(4): Within each
.jsfile, thedownfunction is where you define how to undo the schema changes in theupfile.-
This gives you a way to roll back changes in case of bugs, outages, or as part of testing.
-
The code here deletes the
customertable that was created in theupfunction.
-
Create the Lambda function that query PostgreSQL
The Lambda function will
- uses Knex.js to connect to the PostgreSQL database over TLS
- run queries
- return the results as JSON
-
Create
app.js- the entrypoint of the Lambda functionconst knex = require("knex"); const knexConfig = require("./knexfile.js"); // (1) const knexClient = knex(knexConfig); // (2) exports.handler = async (event, context) => { const result = await knexClient("customers") // (3) .select() .where("date_of_birth", ">", "1950-12-31"); // (4) return { statusCode: 200, headers: { "Content-Type": "application/json" }, body: JSON.stringify({ result }), }; };[!TIP] Knex.js can also be used to query the database
- (1): Load the database connection configuration from knexfile.js.
- (2): Create a Knex.js client, using the configuration from (1) to connect it to the PostgreSQL database.
- (3): Use the Knex.js client to perform the exact database query you saw in Writing and Reading data, which fetches all customers born after 1950.
- (4): Return the results of the query as JSON.
Deploy the example
-
Set environment variables for username/password
export TF_VAR_username=<username> # FILL IN export TF_VAR_password=<password> # FILL IN[!TIP] Save these credentials in a password manager, such as 1Password
-
Initialize and apply the OpenTofu module
cd .. tofu init tofu apply -
When apply completes (which can take 5-10 minutes for RDS to be deployed), you should see the output variables:
app_endpoint = "https://765syuwsz2.execute-api.us-east-2.amazonaws.com" db_name = "bank" db_port = 5432 db_host = "bank.c8xxxxxx7qwb.us-east-2.rds.amazonaws.com"
After the PostgreSQL database is deployed, you use the Knex CLI to apply schema migrations.
-
Expose the database name, host, port to the Knex CLI (using environment variables)
export DB_NAME=bank export DB_PORT=5432 export DB_HOST=<db_host> # value of db_host output variable -
Apply the schema migrations
cd src knex migrate:latestBatch 1 run: 1 migrationsIf the migrations apply successfully, your database should be ready to use.
-
Verify that the app is working
curl https://<app_endpoint>{ "result":[ {"id":2,"name":"Karen Johnson","date_of_birth":"1989-11-18","balance":4853}, {"id":3,"name":"Wade Feinstein","date_of_birth":"1965-02-25","balance":2150} ] }
Get your hands dirty: Working with relational databases
-
In order to allow the Lambda function to access the PostgreSQL database, the
rds-postgresmodule makes the database accessible over the public Internet, from any IP, which is not a good security posture.Update the code to
-
The Lambda function is using the master user for the database, which means it has permissions to do anything.
Update the code to follow the principle of least privilege
- creating a more limited database user that only has the permissions the function needs, e.g., read access to one table
- passing the credentials of this new database user to the Lambda function.
-
Any secrets you pass into OpenTofu resources, such as the database master user password, are stored in OpenTofu state.
To ensure these secrets are stored securely,
-
Make sure to enable encryption for your OpenTofu state backend, as in Chap 5 - Example: Use S3 as a remote backend for OpenTofu state.
-
Alternatively, use a different approach to manage the password so it doesn’t end up in OpenTofu state at all, such as
-
Caching: Key-Value Stores and CDNs
Cache
What is cache
cache : a component that stores data so that future requests for that data can be served faster15
To achieve low latency, the cache is stored
- in the memory (instead of on on disk)
- in a format that optimized
- for rapid retrieval, e.g. hash table
- rather than flexible query mechanics, e.g. relational tables
Uses cases for cache
-
Slow queries
If queries to your data stores take a long time, you can cache the results for faster lookups.
-
Slow aggregates
Sometimes, individual queries are fast, but you have to issue many queries, and aggregating all of them takes a long time.
-
High load
If you have a lot of load on your primary data store, queries may become slow due to contention for limited resources (CPU, memory, etc).
Using a cache to offload many of the requests can reduce load on the primary data store, and make
- those requests faster
- all other requests faster, too
An simple version of cache
You can have a cache by using an in-memory hash table directly in your application code:
e.g.
-
A cache in JavaScript
const cache = {}; // (1) function query(key) { // (2) if (cache[key]) { return cache[key]; } const result = expensiveQuery(key); // (3) cache[key] = result; return result; }This is an example of cache-aside strategy16:
-
(1): The cache is a hashtable (aka map or object) that the app stores in memory.
-
(2): When you want to perform a query, the first thing you do is
- check if the data you want is already in the cache.
- If so, you return it immediately (without having to wait on an expensive query).
- check if the data you want is already in the cache.
-
(3): If the data isn’t in the cache, you
-
perform the expensive query
e.g. send a query to the primary data store
-
store the result in the cache (so future lookups are fast)
-
then return that result.
-
-
This cache - with cache-aside strategy - is a “simplified” cache because:
| Aspect | The problem | Note | |
|---|---|---|---|
| 1. Memory usage | The cache will grow indefinitely, which may cause your app to run out of memory. | You need a caching mechanism to evict data when the cache size is exceeded its limit | Can be solved with better code |
| 2. Concurrency | The code doesn’t handle multiple concurrent queries that all update the cache. | You may have to use synchronization primitives, e.g., locking | Can be solved with better code |
| 3. Cold starts | Every single time you redeploy the app, it will start with an empty cache, which may cause performance issues. | You need a way to store the cache to disk so it’s persistent | |
| 4. Cache invalidation17 | The code only handles read operations, but not write operations, so future queries may return stale data. | You need some way to update (when you write data) or invalidate that data in the cache |
note
For more complicated cases, the typical way to handle caching is by deploying a centralized data store that is dedicated to caching, e.g. key-value stores, CDNs.
With centralized data store:
-
You avoid cold starts
-
You have only a single to update when do cache invalidation
e.g.
- You might do write-through caching, where whenever you write to your primary data store, you also update the cache.
Key-Value Stores
What is key-value store
key-value store : data store that is optimized for extremely fast lookup by a key : ~ a distributed hash table : acts as a cache between your app servers & primary data store

How key-value store works
Requests with the corresponding keys that:
- are in the cache (aka a cache hit) will
- be returned extremely fast (without having to talk to the primary data store)
- aren’t in the cache (aka a cache miss) will
- go to the primary store
- be added to the cache (for future cache hits)
The API for most key-value stores primarily consists of just 2 type of functions:
- a function to insert a key-value pair
- a function to lookup a value by key
e.g.
-
With Redis, they’re
SETandGET$ SET key value OK $ GET key value
Key-value stores do not require you to define a schema ahead of time, so you can store any kind of value you want.
caution
Key-value store is sometimes referred to as schema-less, but this is a misnomer (as you see in Schema & constraints of document stores).
Typically, the values are either
- simple scalars, e.g., strings, integers…
- or blobs that contain arbitrary data that is opaque to the key-value store.
warning
Since key-value store is only aware of keys and very basic types of values, the functionality is typically limited compared to relational database.
[!IMPORTANT] Key takeaway #4 Use key-value stores to cache data, speeding up queries and reducing load on your primary data store.
Which key-value store solutions are in the market
You can:
-
self-host key value stores with Some of the major players in the key-value store space include Redis / Valkey 18, Memcached, Riak KV
-
or use a managed service Redis Cloud, Amazon ElastiCache, Amazon DynamoDB 19, Google Cloud Memorystore, Azure Cache for Redis, and Upstash.
After you have a key-value store deployed, many libraries can automatically use them for cache-aside and write-through caching without you having to implement those strategies manually.
e.g.
- WordPress has plugins that automatically integrate with Redis and Memcached
- Apollo GraphQL supports caching in Redis and Memcached
- Redis Smart Cache plugin can give you automatic caching for any database you access from Java code via the Java Database Connectivity (JDBC) API.
CDNs
What is CDN
content delivery network (CDN) : a group of servers - called Points of Presence (PoPs) - that are distributed all over the world : - cache data from your origin servers, i.e. your app servers : - serve that data to your users from a PoP that is as close to that user as possible. : acts as a cache between your users & your app servers
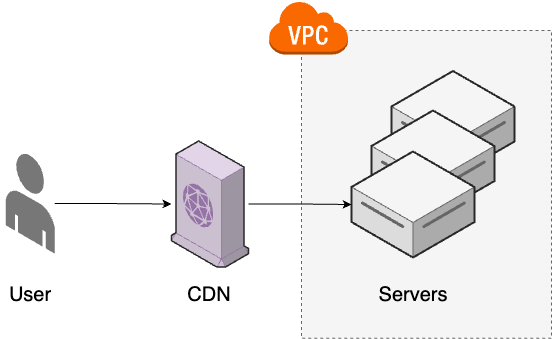
How CDN works
When a user makes a request, it first goes to the CDN server that is closest to that user, and
- if the content is already cached, the user gets a response immediately.
- If the content isn’t already cached, the CDN forwards the request to your origin servers:
- fetches the content
- caches it (to make future requests fast)
- then returns a response
Why use CDN
-
Reduce latency
CDN servers are distributed all over the world
e.g.
- Akamai has more than 4,000 PoPs in over 130 countries
which:
- allows you to serve content from locations that are physically closer to your users, which can significantly reduce latency (See common latency numbers)
- without your company having to invest the time and resources to deploy and maintain app servers all over the world.
-
Reduce load
Once the CDN has cached a response for a given key, it no longer needs to
- send a request to the underlying app server for that key
- at least, not until the data in the cache has expired or been invalidated.
If you have a good cache hit ratio20, this can significantly reduce the load on the underlying app servers.
-
Improve security
Many CDNs these days can provide additional layers of security, such as
- a web application firewall (WAF), which can inspect and filter HTTP traffic to prevent certain types of attacks, e.g. SQL injection, cross-site scripting, cross-site forgery
- Distributed Denial-of-Service (DDoS) protection, which shields you from malicious attempts to overwhelm your servers with artificial traffic generated from servers around the world.
-
Other benefits
As CDNs become more advanced, they offer more and more features that let you take advantage of their massively distributed network of PoPs:
- edge-computing, where the CDN allows you to run small bits of code on the PoPs, as close to your users (as close to the “edge”) as possible
- compression, where the CDN automatically uses algorithms such as Gzip or Brotli to reduce the size of your static content and thereby, reduce bandwidth usage
- localization, where knowing which local PoP was used allows you to choose the language in which to serve content.
[!IMPORTANT] Key takeaway #5 Use CDNs to cache static content, reducing latency for your users and reducing load on your servers.
When to use CDN
You can use CDN to cache many types of contents from your app server:
- dynamic content: content that is different for each user and request
- static content: content that
- (a) is the same for all of your users, and
- (b) doesn’t change often.
But CDNs provides most value when be used to cache static content (static files):
- images, videos, binaries
- HTML, CSS, JavaScript
e.g.
- News publications can usually offload a huge portion of their traffic to CDNs, as once an article is published:
- every user sees the same content, and
- that content isn’t updated too often.
Which CDN to use
Some of the major players in the CDN space include
File Storage: File Servers and Object Stores
Why you shouldn’t store static files in a database
You can store static files (as a blob) in a database, which
-
may has some benefits:
- all data is kept in a single system where you already have security controls, data backups, monitoring…
-
but also has many disadvantages:
-
Slower database
Storing files in a database bloats the size of the database, which:
- makes the database itself slower
- makes the scalability & availability of the database worse (the database itself is already a bottleneck)
-
Slower & more expensive replicas & backups
The bigger the database the slower & more expensive to make replicas and backups.
-
Increased latency
Serving files from your database to a web browser requires you to
- proxy each file through an app server, which
- significantly increases latency
- compared to serving a file directly, e.g. via the
sendfilesyscall
- proxy each file through an app server, which
-
CPU, memory, and bandwidth overhead
Proxying files in a database through an app server
- increases bandwidth, CPU, and memory usage,
- both on the app server and the database (which makes the database even more of a bottleneck).
-
note
Instead of storing static files in a database, you typically store and serve them from dedicated file servers
File Servers
What is a file server
file server : a server that is designed to store & serve static files (aka static content), such as images, videos, binaries, JavaScript, CSS
Why use file servers
By using dedicated file servers,
- all static content are handle by file servers.
This allows your app servers to focus entirely on
- serving dynamic content (content that is different for each user & request)
How to use file servers
Files servers are usually used together with CDNs and your app server.
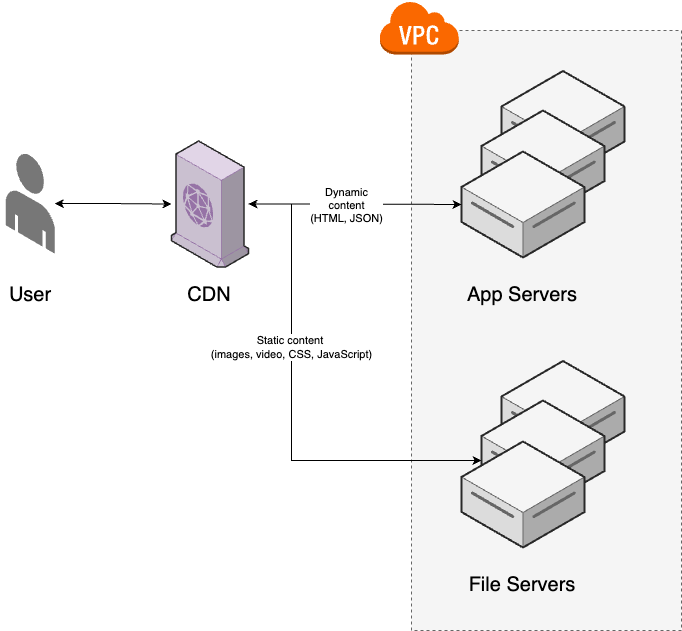
Users requests first go to a CDN, which
- if it is already cached, returns a response immediately
- if not, the CDN uses
- file servers as origin servers for static content
- app servers as origin servers for dynamic content
Which file servers to use
Almost any web server software can be configured to serve files.
e.g. Apache, Nginx, HAProxy Varnish, Lighttpd, Caddy, Microsoft IIS.
The challenges when working with file servers
Serving files is straightforward; the hard part is handling
-
Storage
You need to provide sufficient hard drive capacity to store the files.
-
Metadata
In additional to the files, you need to store metadata related to the files, e.g. names21, owner, upload date…
You could store the metadata
- on the file system next to the files themselves, or
- in a separate data store (e.g., a relational database), which makes it easier to query the metadata 👈 more common approach
-
Security
You need to
- control who can can create files, read files, update files, and delete files.
- encrypt data at rest and in transit.
-
Scalability & availability
You could host all the files on a single server, but a single server is a single point of failure (as you know from Why use an orchestration | Chapter 3)
To support a lot of traffic, and to be resilient to outages, you typically need to figure out how to host files across multiple servers.
note
Instead of using file servers and solving all these problems yourself, which requires
- many custom toolings
- a lot of servers, hard drives…
You can offload these work to a 3rd-party object store.
Object Stores
What is Object Store
object store : aka blob store : a system designed to : - store opaque objects (blobs) : - often in the form of files with associated metadata. : ~ file server as a service (from cloud providers)
Which Object Store to use
The major players in this space are
Why use Object Store
-
Object stores provide out-of-the-box solutions to the challenges with file servers:
-
Storage
Object stores provide nearly unlimited disk space, usually for dirt-cheap prices.
e.g.
- Amazon S3 is around two cents per gigabyte per month, with a generous free tier.
-
Metadata
Most object stores allow you to associate metadata with each file you upload.
e.g.
- S3 allows you to configure both
- system-defined metadata (e.g., standard HTTP headers such as entity tag
- content type, as you’ll see later in this blog post)
- user-defined metadata (arbitrary key-value pairs).
- S3 allows you to configure both
-
Security
Most object stores offer fine-grained access controls and encryption.
e.g.
- S3 provides
- IAM for access control,
- TLS for encryption in transit
- AES (using a KMS) for encryption at rest.
- S3 provides
-
Scalability & availability
Object stores typically provide scalability and availability at a level few companies can hope to achieve.
e.g.
- S3 Standard provides
- unlimited scalability
- 99.99% availability
- 99.999999999% durability23.
- S3 Standard provides
-
-
Many object stores also provide many other useful features:
-
replication across data centers in different regions
-
search & analytics across all the files you store in the object store
e.g.
- Amazon Athena allows allows you to use SQL to query CSV, JSON, ORC, Avro, or Parquet files stored in S3
-
integration with compute to help automate workflows
e.g.
- you can have S3 automatically trigger a Lambda function each time you upload a file
-
automatic archival or deletion of older files (to save money)
These features is why even companies who otherwise keep everything on-prem often turn to the cloud and object stores for file storage.
[!IMPORTANT] Key takeaway #6 Use file servers and object stores to serve static content, allowing your app servers to focus on serving dynamic content.
Example: Serving Files With S3 and CloudFront
Create an S3 bucket configured for website hosting
note
The s3-website OpenTofu module
-
in sample code repo at
ch9/tofu/modules/s3-websitefolder -
will:
- creates an S3 bucket
- makes its contents publicly accessible
- configures it as a website, which means it can support
- redirects
- error pages
- accessing logging, and so on.
In this example, you will use the s3-website OpenTofu module to create an S3 bucket configured for website hosting
-
Create an folder for the root module
cd examples mkdir -p ch9/tofu/live/static-website cd ch9/tofu/live/static-website -
The
main.tfroot module# examples/ch9/tofu/live/static-website/main.tf provider "aws" { region = "us-east-2" } module "s3_bucket" { source = "github.com/brikis98/devops-book//ch9/tofu/modules/s3-website" # TODO: fill in your own bucket name! name = "fundamentals-of-devops-static-website" # (1) index_document = "index.html" # (2) }-
(1): The name to use for the S3 bucket.
[!NOTE] S3 bucket names must be globally unique, so you’ll have to fill in your own bucket name here.
-
(2): The suffix to use for directory requests.
- If you set this to
index.html, a request for the directory/foowill return the contents of/foo/index.html.
- If you set this to
-
-
Proxy the
s3_website_endpointfroms3_bucketto root module# examples/ch9/tofu/live/static-website/outputs.tf output "s3_website_endpoint" { description = "The endpoint for the website hosted in the S3 bucket" value = module.s3_bucket.website_endpoint }
Upload static content to the S3 bucket
-
Create a simple HTML page
-
Create the
contentfolder within thestatic-websitefolder:mkdir -p content -
Create 3 files in
contentfolder-
index.html<!-- examples/ch9/tofu/live/static-website/content/index.html --> <html lang="en"> <head> <title>Fundamentals of DevOps and Software Delivery</title> <link rel="stylesheet" href="styles.css" /> </head> <body> <h1>Hello, World!</h1> <p> This is a static website hosted on S3, with CloudFront as a CDN. </p> <img src="cover.png" alt="Fundamentals of DevOps and Software Delivery" /> </body> </html> -
style.css/* examples/ch9/tofu/live/static-website/content/style.css */ html { max-width: 70ch; margin: 3em auto; } h1, p { color: #1d1d1d; font-family: sans-serif; } -
cover.png(examples/ch9/tofu/live/static-website/content/cover.png)Copy any
pngimage to the content folder, and name itcover.png.
-
-
-
Update that HTML page to your S3 bucket (using OpenTofu
aws_s3_objectresource)-
Update the
main.tfto useaws_s3_objectresourceprovider "aws" { # ... } module "s3_bucket" { # ... } resource "aws_s3_object" "content" { for_each = { # (1) "index.html" = "text/html" "styles.css" = "text/css" "cover.png" = "image/png" } bucket = module.s3_bucket.bucket_name # (2) key = each.key # (3) source = "content/${each.key}" # (4) etag = filemd5("content/${each.key}") # (5) content_type = each.value # (6) cache_control = "public, max-age=300" # (7) }-
(1): Have the
aws_s3_objectresource loop over a map where- the key is a file to upload from the content folder
- the value is the content type for that file.
-
(2): Upload the files to the S3 bucket you created earlier.
-
(3): For each file, use the key in the map as its path within the S3 bucket.
-
(4): Read the contents of each file from the
contentfolder. -
(5): Set the entity tag (ETag)24 to the MD5 hash of each file’s contents.
- This is also used by OpenTofu to know when the file has changed, so it uploads a new version when you run
apply.
- This is also used by OpenTofu to know when the file has changed, so it uploads a new version when you run
-
(6): Set the content type25 for each file to the value in the map.
-
(7): Set the cache control26 value for each file to:
-
-
[!WARNING] Watch out for snakes: Don’t upload files to S3 using OpenTofu in production
Using the
aws_s3_objectresource to upload files to an S3 bucket is convenient for simple examples and learning, but don’t use it for production use-cases:
- If you have a large number of files, you may end up with performance and throttling issues with the
aws_s3_objectresource.- You typically want to put static content through an asset pipeline which provides functionality such as minification, fingerprinting, and compression, none of which you can do with OpenTofu.
note
In production, to upload files to S3, you should use either
-
an asset pipeline built into your web framework, or
e.g. Ruby on Rails Asset Pipeline with the asset_sync Gem
-
a library designed to efficiently sync images with S3
e.g. s3_website.
Deploy S3 bucket and static content to S3 bucket
-
Initialize and apply OpenTofu root module
tofu init tofu apply -
Verify that your website (hosted on S3) is up and running
Use a web browser to open
http://<s3_website_endpoint>[!NOTE] Websites hosted on AWS S3 only support HTTP.
To add HTTPS, you need to use AWS CloudFront.
Deploy CloudFront as a CDN in front of the S3 bucket
note
The OpenTofu module cloudfront-s3-website
- in sample code repo at
ch9/tofu/modules/cloudfront-s3-websitefolder - will
- create a globally-distributed CloudFront distribution
- configure your static website in S3 as an origin
- set up a domain name & TLS certificate
- plugs in some basic caching settings
In this example, you will use the OpenTofu module cloudfront-s3-website to deploy CloudFront as a CDN in front of the S3 bucket:
-
Update
main.tfto usecloudfront-s3-websitemoduleprovider "aws" { # ... } module "s3_bucket" { # ... } resource "aws_s3_object" "content" { # ... } module "cloudfront" { source = "github.com/brikis98/devops-book//ch9/tofu/modules/cloudfront-s3-website" bucket_name = module.s3_bucket.bucket_name # (1) bucket_website_endpoint = module.s3_bucket.website_endpoint # (2) min_ttl = 0 # (3) max_ttl = 300 default_ttl = 0 default_root_object = "index.html" # (4) }-
(1): Pass in the S3 bucket name, which is mostly used as the unique ID within the CloudFront distribution.
-
(2): Pass in the S3 bucket website endpoint.
- CloudFront will use this as the origin, sending requests to it for any content that isn’t already cached.
-
(3): Configure the time-to-live (TTL) settings for the cache, which specifies the minimum, maximum, and default amount of time, in seconds, that objects are allowed to
- remain in the CloudFront cache
- before CloudFront
- sends a new request to the origin server
- to check if the object has been updated.
The preceding code configures CloudFront to
- rely on the response headers (e.g., the cache control header) for caching instructions,
- but never caching content for more than 5 minutes.
This is a convenient setting for testing, as it ensures you don’t have to wait more than 5 minutes to see the latest version of your content.
-
(4): Configure CloudFront to
- return the contents of
index.html - whenever someone makes a request to the root of your CloudFront distribution’s domain name.
- return the contents of
-
-
Add CloudFront distribution domain name as an output variable
# examples/ch9/tofu/live/static-website/outputs.tf output "cloudfront_domain_name" { description = "The domain name of the CloudFront distribution" value = module.cloudfront.domain_name }
-
Re-apply OpenTofu module
tofu apply[!TIP] CloudFront distribution can take 2-10 minutes to deploy.
-
Verify you can access the website via HTTPS at
https://<cloudfront_domain_name>
Get your hands dirty: S3 and CloudFront
-
Update the code to configure CloudFront to use a custom domain name and TLS certificate.
You could
- use
static.<YOUR-DOMAIN>as the domain name, where<YOUR-DOMAIN>is the domain name you registered in Route 53 in Chapter 7 - use AWS Certificate Manager (ACM) to provision a free, automatically-renewing certificate for this domain
- use
-
The
s3-websitemodule makes the S3 bucket publicly accessible.However, as you have a CDN in front of the S3 bucket, you can update the code to only allow the contents of the S3 bucket to be accessed via CloudFront.
Semi-Structured Data and Search: Document Stores
What is Semi-Structured Data
When you need to dealing with:
-
user-generated data with unpredictable structure, that you can’t pre-define schema
-
search across those user-generated data, including full-text search, fuzzy search, faceted search…
[!NOTE] Those data that
- does not obey the tabular structure of data models associated with relational databases or other forms of data tables,
- but nonetheless contains tags or other markers to separate semantic elements and enforce hierarchies of records and fields within the data.
is known as semi-structured data
you
-
can’t use relational database, which only works well when the data
- has clear, consistent, predictable structure
- can be stored in tables with well-defined schemas
-
need to use a document store
What is Document Store
document store : similar to a key-value store, except that values are : - richer data structures called documents : - understood, process by the document store
Which Document Store to use
There are 2 type of document stores:
- General-purpose document store: MongoDB, CouchDB, Couchbase, Google Firestore.
- Search-optimized29 document store:
Working with Document Store
Reading and Writing Data (Document Store)
To understand how to read and writing data to a document store, let’s use MongoDB as an example:
-
MongoDB allows you to store JSON documents in collections.
[!TIP] It’s similar to how a relational database allows you to store rows in tables.
-
MongoDB does NOT require you to
- define a schema for your documents.
[!TIP] With MongoDB, you can store JSON data in any format you want.
-
To read and write data, you use the MongoDB Query Language (MQL), which is similar to JavaScript.
e.g.
-
To write a JSON document into the
bankcollection, you can use theinsertOnefunction:db.bank.insertOne({ name: "Brian Kim", date_of_birth: new Date("1948-09-23"), balance: 1500, }); -
To write two JSON documents into the
bankcollection, you use theinsertManyfunction:db.bank.insertMany([ { name: "Karen Johnson", date_of_birth: new Date("1989-11-18"), balance: 4853, }, { name: "Wade Feinstein", date_of_birth: new Date("1965-02-25"), balance: 2150, }, ]); -
To read all data back from the
bankcollection, you can use thefindfunction (without any arguments)db.bank.find();[ { _id: ObjectId("66e02de6107a0497244ec05e"), name: "Brian Kim", date_of_birth: ISODate("1948-09-23T00:00:00.000Z"), balance: 1500, }, { _id: ObjectId("66e02de6107a0497244ec05f"), name: "Karen Johnson", date_of_birth: ISODate("1989-11-18T00:00:00.000Z"), balance: 4853, }, { _id: ObjectId("66e02de6107a0497244ec060"), name: "Wade Feinstein", date_of_birth: ISODate("1965-02-25T00:00:00.000Z"), balance: 2150, }, ];[!NOTE] You get back the exact documents you inserted, except for one new field:
_id.The
_idfield - added to every document by MongoDB - is used as- a unique identifier
- a key for lookups (similar to a key-value store).
-
To look up a document by ID, you also use
findfunction:db.bank.find({ _id: ObjectId("66e02de6107a0497244ec05e") });{ _id: ObjectId('66e02de6107a0497244ec05e'), name: 'Brian Kim', date_of_birth: ISODate('1948-09-23T00:00:00.000Z'), balance: 1500 }
[!NOTE] For both of key-value store and document store, you get the “value” by looking up a “key”.
The key different between key-value stores and document stores is:
- Key-value stores treat values as opaque
- Document stores treat values as transparent values, which is fully understood and processed.
Key-value store Document store “key” key set by you “key” set by document store “value” opaque value (simple scalars or blobs) transparent value
-
-
Compare to a key-value store, with MongoDB, you can look up values with richer query functionality:
e.g.
-
To look up customers born after 1950, you also use
findfunctiondb.bank.find({ date_of_birth: { $gt: new Date("1950-12-31") } });[ { _id: ObjectId("66e02de6107a0497244ec05f"), name: "Karen Johnson", date_of_birth: ISODate("1989-11-18T00:00:00.000Z"), balance: 4853, }, { _id: ObjectId("66e02de6107a0497244ec060"), name: "Wade Feinstein", date_of_birth: ISODate("1965-02-25T00:00:00.000Z"), balance: 2150, }, ]; -
To deduct $100 from all customers, you use
updateManyfunctiondb.bank.updateMany( {}, // (1) { $inc: { balance: -100 } }, // (2) );-
(1): The first argument is a filter to narrow down which documents to update.
- In this case, it’s an empty object, which doesn’t have any filter effect.
-
(2): The second argument is the update operation to perform.
- In this case, the update operation uses the
$incoperator to- increment all balances by -100,
- thereby deducting $100 from all customers.
- In this case, the update operation uses the
-
-
warning
Document stores
-
offers richer querying and update functionality (compare to a key-value store)
-
but has 2 major limitations, that is (for most document stores)
-
Do not support working with multiple collections, which means
- there is no support for joins31.
-
Don’t support ACID transactions.
-
ACID Transactions (Document Store)
Most document stores don’t support ACID transactions32.
-
You might get atomicity for updates on a single document.
e.g.
- When you update one document with
updateOnefunction
- When you update one document with
-
But you rarely get atomicity for updates to multiple documents.
e.g.
- If MongoDB crashes in the middle of the updateMany operation, the code might deduct $100 from some customers but not others.
warning
Again, be aware that most document stores don’t support ACID transactions.
Schemas and Constraints (Document Store)
Most document stores do NOT require you to
- define a schema or constraints up front.
This is sometimes referred to as schemaless33, but that’s a bit of a misnomer.
There is always a schema.
-
The more accurate term is schema-on-read34, in which
- the structure of the data (the schema) is implicit 👈 (implicit schema)
- the data only interpret the schema when the data is read 👈 schema-on-read
-
In contrast to schema-on-write - the traditional approach of relational databases, where
- the schema is explicit 👈 (explicit schema)
- the database ensures all data conforms to it when the data is written 👈 (schema-on-write)
[!TIP] Database’s schema is similar to type checking of programming language
- Schema-on-write ~ compile-time type checking
- Schema-on-read ~ dynamic (run-time) type checking
e.g.
-
To parse data from the
bankcollection in the previous section, you might use the following Java code:public class Customer { private String name; private int balance; private Date dateOfBirth; }This Java class defines the schema and constraint of the data:
- Which field should be in the data?
- Which data type of each field?
In other words, it’s the schema-on-read:
- Either the data matches the
Customerdata structure - Or you will get an error.
With schema-on-read, the data store don’t need to ensure the data to any structure while writing, so
- you can insert & store any data in the data store.
e.g.
-
You can insert a document with a subtle “error” into the
bankcollectiondb.bank.insertOne({ name: "Jon Smith", birth_date: new Date("1991-04-04"), // (1) balance: 500, });- MongoDB will let you insert this data without any complaints.
- But when you try to parse this data with the
Customerclass, you may get an error.
warning
With document stores, you can insert any data without any constraints (as of relational databases), so you may end up with a lot of errors:
e.g.
- Without domain constraints, you might have:
- typos in field names
- null/empty values for required fields
- incorrect types of fields…
- Without foreign key constraints, yo might:
- reference non-existent documents in other collections.
tip
Those errors with document stores can be prevented if you use a relational database.
note
Only use document stores (schema-on-read) when
-
you need to dealing with semi-structured, non-uniform data, e.g.
- user-generated documents
- event-tracking data
- log messages
- in case - for some reason - not all the items in the collections have the same structure.
-
the schema changes often35, or
-
you can sacrifice some part of writing performance.
[!IMPORTANT] Key takeaway #7 Use document stores
- for semi-structured and non-uniform data, where you can’t define a schema ahead of time,
- or for search, when you need full-text search, faceted search, etc.
Analytics: Columnar Databases
Columnar Database Basics
What is columnar database
columnar databases : Aka column-oriented databases : Databases used in online analytic processing (OLAP) system : Look similar to relational databases: : - store data in tables that consist of rows and columns, : - they usually have you define a schema ahead of time, and : - sometimes, they support a query language that looks similar to SQL. : However, there are a few major differences: : - Most columnar databases do not support ACID transactions, joins, foreign key constraints, and many other relational database’s key features. : - They are are column-oriented to optimize for operations across columns
tip
Relational databases are typically row-oriented, which means they are optimized for operations across rows of data.
How columnar database works
How databases store data
The serialized data may be stored different depending on the type of database.
e.g. A books table
| id | title | genre | year_published |
|---|---|---|---|
| 1 | Clean Code | Tech | 2008 |
| 2 | Code Complete | Tech | 1993 |
| 3 | The Giver | Sci-fi | 1993 |
| 4 | World War Z | Sci-fi | 2006 |
-
In a row-oriented relational database,
-
the serialized data may look like this:
[1] Clean Code,tech,2008 [2] Code Complete,tech,1993 [3] The Giver,sci-fi,1993 [4] World War Z,sci-fi,2006The values in each row will be kept together
-
-
In a column-oriented database,
-
the serialized data of the same data may look like this:
[title] Clean Code:1,Code Complete:2,The Giver:3,World War Z:4 [genre] tech:1,2,sci-fi:3,4 [year_published] 2008:1,1993:2,3,2006:4All the values in a single column are laid out sequentially, with
- the column values as keys, e.g.
1993 - the IDs as values, e.g.
2,3
- the column values as keys, e.g.
-
How databases query data
For previous books collections,
-
To look up all the books published in 1993, you can use the following query:
SELECT * FROM books WHERE year_published = 1993;id | title | genre | year_published ----+---------------+--------+---------------- 2 | Code Complete | tech | 1993 3 | The Giver | sci-fi | 1993[!NOTE] This query use
SELECT *, which - without indices - will read:- the
year_publishedcolumn of all rows 👉 to find the matching rows - every single column of any matching rows 👉 to return the data
Under the hood, there is a different in how the data is read:
-
With row-oriented storage:
- The data for each column (of a row) is laid out sequentially on the hard drive
👉 Since sequential reads is faster, row-oriented storage will be faster (for this type of query)
-
With column-oriented storage:
- the data for each column (of a row) is scattered across the hard drive
👉 Since random reads is slower, column-oriented storage will be slower (for this type of query)
- the
-
To compute an aggregation, for example, the number of books published in 1993, you use the following query:
SELECT COUNT(*) FROM books WHERE year_published = 1993;count ------- 2[!NOTE] This query use
COUNT(*), which will read:- only the
year_publishedcolumn of all rows to find the match rows
-
With row-oriented storage:
- The data for each column (of a row) is laid out sequentially on the hard drive, but each row is scattered across the hard drive
👉 This requires jumping all over the hard drive to read the
year_publishedvalue for each row, so row-oriented storage will be slower (for this type of query). -
With column-oriented storage:
- All the data for
year_publishedcolumn is laid out sequentially.
👉 Since sequentially reads is faster, column-oriented storage will be faster (for this type of query).
- All the data for
[!TIP] When you’re doing analytics, aggregate functions such as
COUNT,SUM,AVGcome up all the time, so the column-oriented approach is used in a large number of analytics use cases - only the
Analytics Use Cases
The analytics space is massive, this book only list a few of the most common categories of tools:
| Analytics Uses Cases | Description | Popular tools |
|---|---|---|
| General-purpose columnar databases | Data stores used for a wide variety of use cases | Cassandra, Google Bigtable, HBase, Kudu |
| Time-series databases | Data stores designed for storing & analyzing time-series data36 (e.g. metrics, logs) | InfluxDB, Amazon Timestream, Prometheus, Riak TS, Timescale, Honeycomb |
| Big data systems | Systems designed to process big data37 | - MapReduce model38 / Hadoop 39, Cloudera - Amazon EMR 40, Google Dataproc, Azure HDInsight |
| Fast data systems | Systems designed to do stream processing41 | - Apache’s Spark, Flink, Storm, Samza, Beam, Druid, Pinot - Amazon Data Firehose |
| Data warehouses | A data warehouse is a central repository42 where you integrate data from all of your other systems43. | - Snowflake - Amazon Redshift, Google BigQuery, Azure Synapse Analytics - Apache Hive, Oracle Enterprise Data Warehouse, Teradata, Informatica, Vertica |
[!IMPORTANT] Key takeaway #8 Use columnar databases for
- time-series data
- big data
- fast data
- data warehouses
- and anywhere else you need to quickly perform aggregate operations on columns.
tip
A data warehouse looks like this
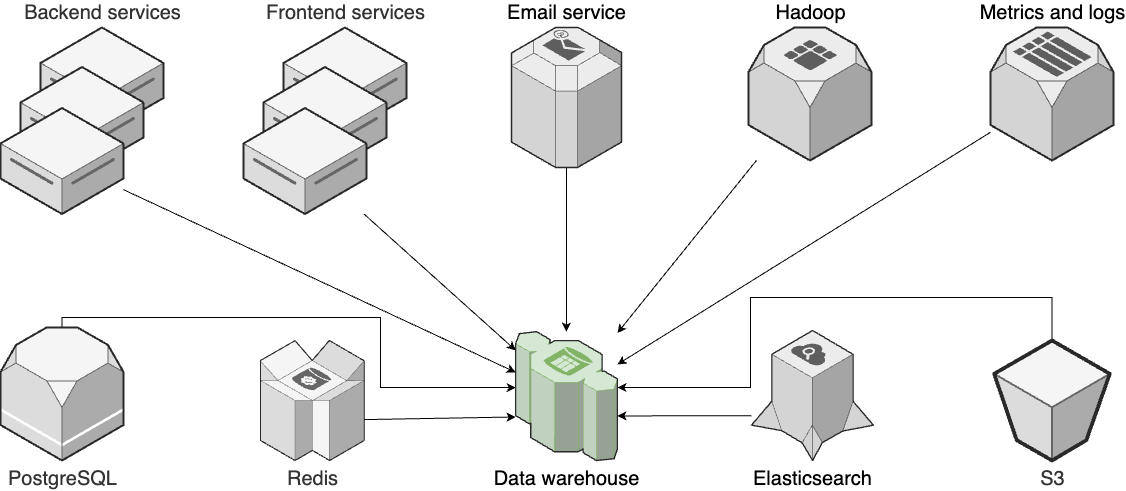 .>
.>
It looks simple, but in fact, it’s a lot more complicated:
-
each arrow from the various systems to the data warehouse are actually complicated background process known as extract, transform, and load (ETL), where you
- use specialized software, e.g.
- to
- extract data from one system that uses one format,
- transform it into the format used by another system (cleaning up and standardizing the data along the way),
- then load it into that other system
-
there are
- not only arrows from each system to the data warehouse
- but also arrows between these systems, too, which now representing background jobs, event-based communication… 👈 aka asynchronous processing
Asynchronous Processing: Queues and Streams
In chap 7, you’ve learned that with microservices,
-
you need to figure out service discovery, so your services can know which endpoint they use talk to another service.
-
these microservices are interacting synchronously.
e.g. When service A needs to talk to service B
- 1: Service A figure out the endpoint of service B by using service discovery (or service mesh).
- 2: Using that endpoint, service A
- 2.1: sends an request to service B
- 2.2: 👈 Service B process the request immediately
- 2.3: wait for service B to response
[!WARNING] If
- service A can’t figure the endpoint of service B, or
- service B doesn’t response
then it’s a fail request.
In chap 6, you’ve also known that there are other ways to breakup codebase into services, one of them is event-driven architecture, which use a different approach for communication - the services interacts asynchronously (instead of synchronously).
e.g.
-
A simple version of asynchronously communication look like this:
When service A needs to talk to service B:
- 1: Service A figure out the endpoint of service B by using service discovery (or service mesh).
- 2: Service A sends a asynchronous messages to service B, then move on (without waiting for response)
- 3: Service B can process that message at its own packet.
- 4: If a response is needed, service B send a new asynchronous message to service.
[!WARNING] In this simple version, service B could:
- have a bug 👉 process a messages multiple times
- out-of-memory or crash 👉 lost all messages
Both ways would cause negative consequence for your business.
-
To ensures each messages is (eventually) processed only once:
- You don’t typically just
- send the messages from service A directly to service B
- have service B hold the messages on its memory, which could:
- used up on the memory of service B
- cause a losing of all unprocessed messages (if service B crash)
- Instead,
- service A sends messages to
- service B reads messages from
a shared data store designed to facilitate asynchronous communication by:
- (1) persisting messages to disk 👈 no more lost messages
- (2) tracking the state of those messages 👈 no more processing a messages more than once…
- You don’t typically just
There are 2 type of data store that can do this:
- Message queues
- Event streams
Message Queues
What is Message Queue
message queue : a data store that can be used for asynchronous communication between: : - producers, who write messages to the queue, : - consumers, who read messages from the queue
note
Many producers and consumers can use the queue, but
- each message is processed only once, by a single consumer.
For this reason, this messaging pattern is often called one-to-one, or point-to-point, communications.
Which Message Queue to use
Some of the most popular message queues are:
How Message Queue Works
The typical process of using a queue is:
-
A producer, such as service A, publishes a message to the queue.
-
The queue persists the message to disk.
[!NOTE] This ensures the message will eventually be processed, even if the queue or either service has an outage.
-
A consumer, such as service B, periodically polls the queue to see if there are new messages.
-
When there is a new message, the queue returns the message to service B.
[!NOTE] The queue may record that the message is “in progress” so that no other consumer can read the message at the same time.
-
Service B processes the message.
-
Once the message has been successfully processed, service B deletes the message from the queue.
[!NOTE] This ensures that the message is only processed one time.
When to use Message Queues
Queues are most often used for
- tasks that run in the background,
- (as opposed to tasks you do during a live request from a user).
e.g.
-
Process images
When users upload images,
-
if you need to process each image
e.g.
- create copies of the image in different sizes for web, mobile, thumbnail previews…
-
you may want to do that in the background, rather than making the user wait for it.
To do that,
- Your frontend server
- stores the original image on a file server
- adds a message to a queue with the location of the image
- Later on, a separate consumer
- reads the message from the queue,
- downloads the image from the file server,
- processes the image, and
- when it’s done, deletes the message from the queue.
-
-
Encoding videos, sending email campaigns, delivering notifications, generating reports, and order processing.
Why use Message Queues
Using queues for asynchronous communication between services provides several key benefits:
-
Handle traffic spikes
A queue acts as a buffer between your services, which allows you to deal with spikes in traffic.
e.g.
-
If traffic from service A suddenly increased by 10x:
- With service A and B were communicating synchronously, then
- B might not be able to keep up with the load, and
- you’d have outages and lost messages.
- With the queue in between,
- service A can write as many messages as it wants, and
- service B can process them at whatever rate it can handle.
- With service A and B were communicating synchronously, then
-
-
Decoupling
-
With synchronous communication, every service needs to know the interface to talk to every other service.
-
In a large company,
- one service may use JSON over HTTP,
- a second may use Protocol Buffers over HTTP/2,
- a third may use gRPC,
- a fourth may work with one service discovery mechanism,
- a fifth doesn’t support service discovery, and
- a sixth may be part of a service mesh that requires mTLS.
Connecting all these disparate services together may be a massive undertaking.
-
-
With asynchronous communication via a message queue,
- each service solely needs to know how to talk to one thing, the API used by the message queue,
- so it gives you a decoupled, standardized mechanism for communication.
-
-
Guarantee tasks are completed
-
With synchronous communication,
If service A sends a message to service B, but never
- gets a response, or
- gets an error,
What do you do? Most synchronous code doesn’t handle those case at all, and just errors out.
- If this is during a live request from a user, the user might get a weird error message, which isn’t a great product experience.
- If this is during a task running in the background, the task might be lost entirely.
You could update your synchronous code with retry logic, but this might result in
- service B processing the message multiple times, or,
- if service B is overloaded, it might make the problem worse.
-
Using asynchronous communication with a message queue allows you to guarantee that
- each task is (eventually) completed,
- even in the face of outages, crashes, and other problems,
- as the queue persists message data and metadata (e.g., whether that message has been processed).
[!WARNING] Most message queues - a type of distributed systems - provide at least once delivery45, so:
- The consumers might receive a message more than once.
But you can write the consumers to be idempotent, so
- if the consumers see the same message more than once,
- it can handle it correctly.
-
-
Guarantee ordering and priority
Some message queues can guarantee
-
not only at least once delivery,
-
but also that messages are delivered in a specific order
e.g.
- Some queues can guarantee that messages are delivered in the order they were received, known as first-in, first out (FIFO)
- Some queues allow you to specify a priority for each message, guaranteeing messages with the highest priorities are delivered first (priority queues).
-
[!IMPORTANT] Key takeaway #9 Use message queues to run tasks in the background, with guarantees that tasks are
- completed
- executed in a specific order.
note
Message queues are used for
- one-to-one communication
- between a producer and a consumer
For one-to-many communication between a producer and many consumers, you need to use event streams.
Event Streams
What is Event Stream
event stream : aka event streaming platform : A data store that : - is similar to a message queue : - allows services to communicate asynchronously : The main difference is: : - a message queue allows each message to be consumed by a single consumer : - an event stream allows each message to be consumed by multiple consumers
Which Event Stream to use
Some of the most popular event streaming tools include:
- Apache Kafka, Confluent
- From cloud providers:
- Amazon MSK 46, Kinesis, EventBridge,
- Google Cloud Managed Service for Kafka, Pub/Sub,
- Azure HDInsight 47
- Apache Pulsar, NATS , Redpanda
How Event Stream works
The typical process of using event streaming is:
-
A producer, such as service A, publishes a message to the event stream.
-
The event stream persists the message to disk.
[!NOTE] This ensures the message will eventually be processed, even if the event stream or any other service has an outage.
[!TIP] Under the hood, the messages are recorded in a log, which is an append-only, totally-ordered sequence of records, ordered by time:
-
One or more consumers, such as services B, C, and D, polls the event streaming platform to see if there are new messages.
-
For each consumer:
-
The streaming platform records that consumer’s offset in the log: that is, what was the last message that consumer saw.
-
When there is a new message past that offset, the streaming platform returns that message to the consumer (i.e., service B, C, or D).
-
-
Services B, C, and D process messages they receive.
-
Once a service has successfully processed a message, it updates its offset in the streaming platform log.
[!NOTE] This ensures the service won’t see the same message again.
tip
You can use a simple version of event stream as a replacement for a message queue, which allow:
- Service A to send a message specifically destined for service B
Event Driven Architecture
What is Event Driven Architecture
The primary use case of an event stream is:
-
Every service publishes a stream of events that
- represent important data points or changes in state in that service
- but aren’t necessarily designed for any one specific recipient
-
This allows multiple other services to
- subscribe & react to whatever streams of events are relevant to them
This is known as an event-driven architecture.
When to use Message Queue and Event Driven Architecture
The difference between
- messages in a message queue
- events in an event stream
has a profound impact on how you build your services.
With event-driven architecture:
- You have a dramatically simplified connectivity
- You can add new services — new consumers — without having to modify any existing producers.
Example 1:
The more realistic version of data warehouse architecture in Analytics Use Cases looks like this:
-
Without an event stream:
As the number of services grows,
- the number of connections between them — whether those are synchronous messages or asynchronous messages via a message queue — grows even faster.
If you have N services, you end up with roughly $N^2$ connections, across a huge variety of interfaces and protocols that often require complicated ETL.
Setting up and maintaining all these connections can be a massive undertaking.
-
With an event stream:
You can connect $N$ services
-
with $N$ connections - each service has one connection to the event streaming platform
-
instead of $N^2$
[!TIP] This is similar to a network switch that allows you to
- connect N computers with N cables (each computer has one cable connected to the switch)
- instead of N2 (with a hub)
-
Example 2:
-
With an architecture where services message each other directly:
Service A
- sends the message
a new image has been uploaded to location X, please process that imageto service B.
6 months later, you want to
- add a new service C to scan images for inappropriate content.
[!WARNING] In order for this service C to do its job, you have to
- update service A to
- send an additional message
a new image has been uploaded to location X, please scan that image for inappropriate contentto service C.
- send an additional message
- sends the message
-
With an event-driven architecture, where:
Service A
- doesn’t have to know about the existence of other services at all; - merely publishes important events, such as “a new image has been uploaded to location X.”
Perhaps on day one, service B
- subscribes to this event stream,
- is able to process each image
6 months later, when you add service C, it can
- subscribe to the same event stream to
- start scanning images for inappropriate content — without any need to modify service A.
[!NOTE] You could add dozens more services that consume service A’s event stream, again, with no need for A to be aware of them at all.
In an event-driven architecture,
-
Every service publishes important events:
e.g.
a new user has registereda user clicked a buttonan order has been placeda server is down…
-
Any other service can
-
subscribe to any of these events streams to
-
perform a variety of actions:
e.g.
- update a search index
- detect fraudulent activity
- generate a report
- send out a notification…
Moreover, each time a service subscribes to an event stream, it can choose to:
-
Start at offset 0 in that stream (of the event bus - See How Event Stream Works):
- effectively “going back in time”
then processing all the historical events from that event stream
e.g.
- all images that have ever been uploaded
- all users that have ever registered
(until it catches up to the latest offset)
-
Start immediately at the latest offset then just process new events.
-
Why use an Event Driven Architecture
Event-driven architectures provide a large number of benefits:
-
All the benefits of a message queue
Event streams offer most of the same benefits as message queues: they help you
- handle traffic spikes
- decouple services
- guarantee tasks are completed
- guarantee task ordering
-
Even stronger decoupling
Message queues provide
-
a limited amount of decoupling
- by allowing services to interact with a single interface - the queue
-
but some coupling remains, as
- each service must be aware of other services to send them messages.
Event stream provides
- decoupling
- by allowing services to interact with a single interface - the event stream
- but it is even more decoupled, as
- publishers don’t need to be aware of consumers at all.
This unlocks remarkable flexibility and scalability in your architecture.
-
-
Monitoring
Event streams turns out to be an excellent way to implement monitoring (including metrics and logs):
- To know what a service is doing (aka visibility), just looks at the event stream from that service
- To help visualize your monitoring data, you can
- hook up various dashboards, log aggregators, alerting systems as consumers
You’ll learn more about monitoring in Chapter 10 [TODO].
-
ETL and stream processing
In Analytics Use Cases, you learned about big data, fast data, and data warehouses.
Event streams play a key role in each of these.
- Event streams gives you a single, standardize way to do ETL.
- Fast data is all about processing streams of data; well, the event stream is what provides those streams of data!
[!IMPORTANT] Key takeaway #10 Use event streams to build highly-scalable, decoupled, event-driven architectures.
Scalability and Availability
In terms of scalability & availability:
- the data store is the biggest bottleneck
- especially for stateful software
Over the years, there have been many attempts, but there’s
- no one-size-fits-all solution
- no silver bullet
that can magically solve scalability & availability challenges.
Relational Databases
To scale a relational databases, you can do a:
-
vertical scaling48, which is easier but has limitation
-
horizontal scaling49, which is harder because most relational databases historically intended to be run on a single server50.
To horizontally scale a relational database —or any data store — there are two primary strategies:
-
Replication
Replication involves copying the same data to multiple servers called replicas.
-
By having multiple replicas that can handle read traffic (aka read replicas):
- you’re scale up your relational database to handle more read traffic.
[!WARNING] Replication doesn’t solve scalability for write traffic.
- All write traffic must go to the primary database (aka write replica).
[!NOTE] Why using replication if it doesn’t solve scalability for write traffic? Because there are many types of software that have vastly more reads than writes.
A good side effect of using replication to solve scalability is you also achieve high availability (aka fault tolerance):
- These read replicas
- serve live traffic (👈 aka active replicas),
- also increase your uptime.
[!NOTE] You can also use replication to provide high availability without handling more load (i.e. without having scalability):
In this case, the replicas
- doesn’t handle any live traffic
- but can be swapped in quickly if the primary database goes down (👈 aka standby replica)
-
-
Partitioning (aka sharding)
Whereas
- replication is copying the same data to multiple servers,
- partitioning is copying different subsets of the data to multiple servers, where each of those servers can handle both reads and writes.
The goal of partitioning is to
- divide your data set deterministically between n servers so
- each one only has to handle $1/n^{th}$ of the total load.
e.g.
- For the previous bank example,
- If you had grown to 10 million customers, you could partition them across 10 servers, so
- all the data for customers with
id$0 - 1,000,000$ would be on server 0 - all the data for customers with
id$1,000,001 - 2,000,000$ would be on server 1 - and so on.
- all the data for customers with
- If the bank had a website where most of the pages only showed data for one customer at a time, then each database would only have to handle ~ $1/10$ of the load, which is a huge win.
- If you had grown to 10 million customers, you could partition them across 10 servers, so
Partitioning effectively turns a single-node database into a distributed system, which
-
helps with availability & scalability
-
but it comes at a cost:
With partitioning,
-
you lose the ability to
- use auto-incrementing sequences,
- queries across data in different partitions,
- use foreign key constraints across data in different partitions.
-
You even lose ACID transactions for data in different partitions:
e.g.
- If a customer with
id$50$ wanted to transfer money to a customer withid$3,000,000$, since the data for each customer lives in a separate partition, you couldn’t perform this update in a single transaction.
- If a customer with
-
Moreover, your relational databases
- might have hot spots51 that
- requires you to do re-balancing, which is difficult & expensive
- might have hot spots51 that
-
[!IMPORTANT] Key takeaway #11 Use replication and partitioning to make relational databases more scalable and highly available.
tip
If you’re using relational databases, replication & partitioning can take you remarkably far (although it’s not easy).
e.g.
- Meta uses MySQL as its primary data store
- for its 3+ billion users
- consisting thousands of servers, hosting millions of shards, storing petabytes of data52.
- Figma spent nine months to horizontally shard Postgres53
- Dropbox scaled from 4k to 40 million users with MySQL54.
An easier option is to move away from relation databases.
NoSQL and NewSQL Databases
NoSQL databases
Why invent NoSQL databases
In the mid-to-late 2000s, the challenges with scalability and high availability for relational databases led to
How NoSQL databases were born
The early inspirations for NoSQL included
- Google’s 2006 paper on BigTable, a distributed storage system that was designed to handle “petabytes of data across thousands of commodity servers”
- Amazon’s 2007 paper on Dynamo, a “highly available key-value storage system that some of Amazon’s core services use to provide an always-on experience”
The actual term “NoSQL”
- came after these papers,
- originating as a Twitter hashtag (
#NoSQL) for a 2009 meetup in San Francisco to- discuss “open source, distributed, non-relational databases”57.
What type of NoSQL there are
The primary types of data stores that fall under the NoSQL umbrella are
- key-value stores
- document stores
- columnar databases
all of which you’ve already seen in this blog post.
Tradeoff of NoSQL databases
Most NoSQL databases were designed from the ground up for
- scalability & availability
so the default deployment often includes replication & partitioning.
e.g.
-
MongoDB is typically deployed in a cluster that consists of multiple shards, where each shard has
- a primary (for writes)
- one or more replicas (for reads),
- plus dedicated servers that handle query routing, auto-sharding, and auto-re-balancing.
The advantage of NoSQL databases
By using NoSQL databases, you get a highly scalable & available data store.
The disadvantages of NoSQL databases
-
NoSQL databases are distributed systems, which are complicated.
-
The sacrifice of key features from relational databases:
- ACID transactions
- referential integrity,
- a flexible query language (SQL) that supports joins.
warning
For some uses cases, these sacrifices because of using NoSQL databases don’t justify the benefits.
NewSQL databases
In the mid-to-late 2010s, there is a new breed of relational database, often called NewSQL, that
- provide better availability & scalability.
- while tried to retain the strengths of a relational database (ACID transactions, SQL…)
Some of the major players in this space include
Under the hood, these are also all complex distributed systems that
- use replication & partitioning to achieve high scalability and availability,
- but they try to use new techniques to not sacrifice too many relational database benefits along the way.
Are NoSQL and NewSQL Databases Mature
Remember:
- “Good software takes at least a decade to develop”.
- Data storage technology is complex and might take more than a decade.
As of the writing of this book (2024):
- Most NoSQL data stores are 10-15 years old, so they are just starting to become mature and reliable systems.
- Most NewSQL systems are still less than 10 years old, so they are still relatively young (at least as far as data storage technologies go).
warning
Both NoSQL an& NewSQL databases are typically complex distributed systems, they face challenges that may take even more time.
What is The Risk when using NoSQL & NewSQL Database
It takes a decade or two to build a reliable data store, and finding a way to sustainably pay developers during all that time is tricky.
Many data store companies have shut down.
e.g.
- RethinkDB, FoundationDB, GenieDB, ScaleDB…
It’s a huge problem if your company relies on these technologies for storing your most valuable asset!
tip
Comparing to a data store that just came out in the last few years, a data store that has been around 20+ years is
- not only more mature than,
- but also more likely to still be around another 20 years from now>
(This is called the Lindy effect).
Distributed Systems
CAP Theorem and Distributed Data Store
In database theory, the CAP theorem states that any distributed data store can provide only two of the following three guarantees:
-
Consistency (C)
Every read receives the most recent write.
-
Availability (A)
Every request receives a response, even if
- some servers are down.
-
Partition tolerance (P)
The distributed system continues to work even if
- there is a break in communications (aka a partition58) between some of the servers
note
In practice, all real-world distributed systems
- have to provide partition tolerance - they have to pick P - or they’re useless at hyper-scale
- which force them to choose between consistency (C) or availability (A)
Tradeoff of Distributed Data Stores
In practice:
-
Some systems, such as HBase and Redis, pick C, so
- they try to keep data consistent on all nodes
- but during a network partition, they lose availability.
[!WARNING] If you use a data store that picks C, you have to accept that
- From time to time, that data store will be down.
-
Other systems, such as Cassandra, Riak, and CouchDB, pick A, so
- they have availability
- but during a network partition, different nodes may end up with different data
[!NOTE] They can’t guarantee consistency (C),
- but they try their best to have eventually consistent.
[!WARNING] If you use a data store that picks A, you have to accept that:
- You only have eventually consistent and might receive stale data (whether with or without there is a partition)
This is confusing for both programmers and users:
e.g.
- You just updated some data, but after refreshing the page, you still see the old data).
tip
Some systems, such as MongoDB, allow you
- to pick C or A depending on the use case
- by tuning for availability or consistency via configuration settings.
Distributed systems introduce many new failure modes
At some point, every data store will fail.
The question is:
- how many different ways can the system fail
- how easy is it to understand and fix each one
- For a single-node system - e.g a relational database -
- The number & complexity of failure modes is far lower.
- For a distributed NoSQL or NewSQL system (with multiple writers, auto-sharding, auto-re-balancing, eventual consistency, consensus algorithms…):
- The number & complexity of failure modes is a lot higher.
warning
The complexity of the many different failure modes was one of the main reasons:
When to use Relational Database - NoSQL, NewSQL, distributed system
For these technology, you need to understand
- what they are good at, what they are not good at
- the risks you are taking on
e.g.
-
If you have extreme scale and availability requirements that you can’t handle with a relational database,
- and you have a team willing to put in the time and effort to deploy and maintain a NoSQL or NewSQL database,
- then by all means, go for it.
-
But if you’re a tiny startup, with virtually no traffic, using a complex distributed data store right out of the gate might not be the right way to spend your limited resources.
[!IMPORTANT] Key takeaway #12 Use NoSQL and NewSQL databases when
- your scalability & availability requirements exceed what you can do with a relational database
but only if you can invest in the time and expertise of deploying & maintaining a distributed data store.
Backup and Recovery
Why Backup Data
Remember, your data is one of the most valuable assets of your company.
-
Losing data can do tremendous damage, or even put you out of business.
-
There are 3 ways you lose your data:
-
Data loss
The data is not longer existed:
- The server, or hard-drive dies
- Someone accidentally or maliciously delete the data
e.g.
- A developer running
DROP TABLEon a test database, but in fact it’s the production database.
-
Data corruption
The data
- is corruption (due to a software bug, human error or malicious actor)
- can’t be read
e.g.
- Data migration process going wrong and writing data to wrong tables/columns.
-
Inaccessible data
The data is still there, but you can no longer access it.
e.g.
- You lost the encryption key
- Ransomware has encrypted it
-
-
To prevent losing data:
- you “simply” backup them:
- make copies of your data
- store those copies elsewhere
- if something goes wrong,
- you can restore from one of those copy
- you “simply” backup them:
Backup Strategies
| Backup Strategy | Scheduled disk backups | Scheduled data store backups | Continuous data store backups | Data store replication |
|---|---|---|---|---|
| Description | Take a snapshot of the entire hard drive on a regular schedule (e.g., daily) | Natively back up just the data in that data store (rather than the entire hard drive) | Take a snapshot after every single change, e.g. INSERT, UPDATE | The replicas used for as a failover or handle load is a full copy of your data. |
| How it works | Use another backup vendor software to backup the whole disk (OS, data store…) | e.g. Dump the data store as SQL dump (all SQL statements that represents the data store) | Use a write-ahead log (WAL) to store the changes, before execute these changes to the actual data. The snapshot is of the WAL. | Also based on WAL, ~ continuous backup |
| Protect against data loss | Support | Support | Support | Support |
| Protect against data corruption | Support | Support | Support | Not support |
| Protect against inaccessible data | Not support | Support: Use a different encryption key | Support: Use a different encryption key | Not support |
| Portable | Moderate: Some backup software gives you snapshots that can move to servers in different hosting environment (cloud, on-premise) | High: Support moving to a different server/OS/hosting environment… | Low: Can’t backup to different server, OS, hosting environment | Low |
| Reliability | High: When boot from a disk snapshot, you get the exact data store configuration, version | Moderate: Vendor software may introduce backward incompatible changes | Low: There is more chance of incompatible breaking changes from vendor software | Low |
| Consistent | Inconsistent: Data store may have data buffered in memory or only partially written to disk | High | High | Consistent |
| Overhead | Storage: OS… CPU, memory: While backup process running | Storage: Less, can use incremental backups to reduces further; CPU, memory: Less | Storage: Depend on the modification pattern; CPU, memory: For every changes | Storage: Depend on the modification pattern; CPU, memory: For every changes |
| Backup data between snapshots | Not support | Not support | Support | Support |
| Support by data store | Not support | Popular | Not popular | Not popular |
| Note | The most popular way to backup data store | Gold standard, use it when it’s available | ||
| _________________________ | __________________________________________________ | __________________________________________________ | __________________________________________________ | __________________________________________________ |
Backup Best Practices
The 3-2-1 backup rule
With 3-2-1 backup rule, you should have at least:
| Rule | Example | Type of disaster protect from |
|---|---|---|
| 3 copies | Original/production + 2 more copies | A failure of the production |
| 2 different types of media | Magnetic HDD, SSD, tape | A failure of the storage technology |
| 1 copy offside | In another AWS region (from the original) | A failure of an entire region |
Test your backups regularly
Ensure that
-
the step-by-step process of how to restore from a backup is documented
[!TIP] When you need to restore from a backup, you’re in a stressful situation with limit time, any mistakes will make things worse.
-
you run through this process regularly both manually and automatically.
[!WARNING] If you don’t run your backup process regularly, there is a big chance that it doesn’t work, because of many reason:
- Hardware/Software
- People
e.g.
- Have practice sessions a few times per year for your team to practice recovering from a backup,
- Have an automated tests that frequently, e.g. nightly
- restores a system from backup
- check that everything works as expected e.g. The queries against the backup should return the same data as the original.
Protect your backups
warning
Any one has access to these backup also has access to your production data.
Ensure that your back ups have multiple layers of protection:
- Be encrypted
- Stored on servers in a private network
- Accessible only by authorized parties
- Be carefully monitored…
[!IMPORTANT] Key takeaway #13 To protect against data loss & data corruption:
- Ensure your data stores are securely backed up follow the 3-2-1 rule.
- Protect your backups,
- Test your backup strategy regularly
Example: Backups and Read Replicas with PostgreSQL
-
Use the Example: PostgreSQL, Lambda, and Schema Migrations as the starting point
# examples/ch9/tofu/live/lambda-rds/main.tf provider "aws" { region = "us-east-2" } module "rds_postgres" { source = "github.com/brikis98/devops-book//ch9/tofu/modules/rds-postgres" name = "bank" instance_class = "db.t4g.micro" allocated_storage = 20 username = var.username password = var.password } -
Enable automatic backups for PostgreSQL
module "rds_postgres" { # ... (other params omitted) ... backup_retention_period = 14 (1) backup_window = "04:00-05:00" (2) }-
1: Setting this to a value greater than zero enables daily snapshots.
The preceding code configures RDS to retain those snapshots for 14 days.
[!NOTE] Older snapshots will be deleted automatically, saving you on storage costs.
-
2: Configure the snap-shotting process to run from 4-5AM UTC.
[!WARNING] Any data written between snapshots could be lost.
[!TIP] You should typically set this to a time when
- load on the database tends to be lower
- or after you run an important business process at some specific time every day.
-
-
Add a read replica with a second module block that uses the
rds-postgresmodulemodule "rds_postgres_replica" { source = "github.com/brikis98/devops-book//ch9/tofu/modules/rds-postgres" name = "bank-replica" (1) replicate_source_db = module.rds_postgres.identifier (2) instance_class = "db.t4g.micro" (3) }-
1: Since the primary database is called
bankname the replicabank-replica. -
2: Set the
replicate_source_dbparameter to the identifier of the primary database.- This is the setting that configures this database instance as a read replica.
-
3: Run the replica on the same micro RDS instance that is part of the AWS free tier.
-
-
Update the Lambda function to talk to read replica
module "app" { source = "github.com/brikis98/devops-book//ch3/tofu/modules/lambda" # ... (other params omitted) ... environment_variables = { DB_HOST = module.rds_postgres_replica.hostname # ... (other env vars omitted) ... } }[!NOTE] The schema migration still you the primary database instance
-
Re-apply the OpenTofu module
cd examples/ch9/tofu/live/lambda-rds tofu apply -
Wait for the replica to be deployed (5-15 minutes), head over to RDS console to the replica is deployed.
-
Head over to Lambda console
- Click
lambda-rds-appfunction - Select
Configurationtab - Click on
Environment variablessection on the left side
Verify the
DB_HOSThas been set to replica’s URL. - Click
-
Verify the Lamda function is working
curl https://<app_endpoint>
Get your hands dirty: Backup and recovery
-
Test your backups! If you don’t test them, they probably don’t work.
Once your RDS instance takes a snapshot,
- find its ID in the RDS snapshots console, and
- pass that ID into the
snapshot_identifierparameter of therds-postgresmodule to restore the database from that snapshot.
-
Enable continuous backups for your database.
-
Replicate your backups to another AWS region or account for extra durability.
note
When you’re done testing, commit your code, and run tofu destroy to clean everything up.
tip
When you destroy everything, the rds-postgres module will take one final snapshot of the database, which is a handy failsafe in case you delete a database by accident.
Conclusion
-
Keep your applications stateless. Store all your data in dedicated data stors.
-
Don’t roll your own data stores: always use mature, battle-tested, proven off-the-shelf solutions.
-
Use relational databases as your primary data store (the source of truth), as they
- are secure, reliable, mature
- support schemas, integrity constraints, foreign key relationships, joins, ACID transactions, and a flexible query language (SQL).
When it comes to data storage, boring is good, and you should choose boring technologies.
-
Only use other data stores if you have use cases that a relational database can’t handle:
Other data stores Use cases … benefit Key-value stores Cache data - Speeding up queries - Reducing load on your primary data store. CDNs Cache static content - Reducing latency for your users - Reducing load on your servers. File servers & object stores Serve static content Allowing your app servers to focus on serving dynamic content. Document stores For semi-structured & non-uniform data Where you can’t define a schema ahead of time For search When you need full-text search, faceted search… Columnar databases For time-series data, big data, fast data, data warehouses… To quickly perform aggregate operations on columns. Message queues Run tasks in the background Guarantees that tasks are completed and executed in a specific order. Event streams Build highly-scalable, decoupled, event-driven architectures.
-
Use replication and partitioning to make relational databases more scalable and highly available.
-
Use NoSQL and NewSQL databases when your scalability and availability requirements exceed what you can do with a relational database—but only if you can invest in the time and expertise of deploying and maintaining a distributed data store.
- Ensure your data stores are securely backed up to protect against data loss and data corruption, protect your backups, test your backup strategy regularly, and follow the 3-2-1 rule.
Ephemeral data is data that is OK to lose if that server is replaced.
Elastic File System
Elastic Block System
When using network-attached drives, you can use software (e.g., OpenTofu, Pulumi) to detach and reattach them when replacing VMs (e.g., as part of a deployment)
e.g. With file serving, it can be advantageous to share a single network-attached hard drive amongst multiple servers, so they can all read from and write to the same disk.
By default, the file system of a container is considered ephemeral, and any data you write to it will be lost when that container is redeployed or replaced.
- If you need to persist data to disk, you need to configure your orchestration tool to create a persistent volume and mount it at a specific path within the container.
- The software within that container can then write to that path just like it’s a normal local hard drive, and the data in that persistent volume will be retained even if the container is redeployed or replaced.
Under the hood, the orchestration tool may handle the persistent volume differently in different deployment environments.
Relational databases
-
have been in development for 25-50 years
- Oracle (1979)
- MS SQL Server (1989)
- MySQL (1995)
- PostgreSQL (1996, though it evolved from a codebase developed in the 1970s)
- SQLite (2000)
-
are still in active development today.
Relational databases are flexible enough to handle a remarkably wide variety of use cases, from being
-
embedded directly within your application,
e.g. SQLite can run in-process or even in a browser
-
all the way up to clusters of thousands of servers that store petabytes of data.
The automatically-incrementing sequence will generate a monotonically increasing ID that is guaranteed to be unique (even in the face of concurrent inserts) for each new row.
Amazon’s Relational Database Service (RDS) is a fully-managed service that provides a secure, reliable, and scalable way to run several different types of relational databases, including PostgreSQL, MySQL, MS SQL Server, and Oracle Database
With cache-aside strategy, you update the cache when data is requested, which makes future queries considerably faster.
Cache invalidation is one of the “two hard things in Computer Science”.
Cache invalidation is one of those problems that’s much harder than it seems.
e.g.
-
If you have 20 replicas of your app, all with code similar to the example cache, then every time the data in your primary data store is updated, you need to find a way to
- (a) detect the change has happened
- (b) invalidate or update 20 caches.
Valkey is a fork of Redis that was created after Redis switched from an open source license to dual-licensing.
You can you DynamoDB as a replacement for Redis.
Cache hit ratio is the percentage of requests that are a cache hit
The name metadata may be different from the file name.
You used Simple Storage Service (S3) in Chapter 5 to store OpenTofu state files.
The Etag is sent as an HTTP response header to web browsers so they know if a file has changed, and they need to download the latest version, or if the file is unchanged, and they can use a locally-cached copy.
The content type is sent as an HTTP response header to web browsers so they know how to display the contents of the file
e.g. Browsers know to render
text/htmlas HTML,image/pngas a PNG image…
Cache control is sent as an HTTP response header, which:
- is used by browsers and shared caches (e.g., CDNs)
- to figure out how to cache the response.
The public directive tells shared caches that this is a public resource that they can safely cache.
The max-age=300 directive tells shared caches and web browsers that they can cache this content for up to 300 seconds (5 minutes).
These search-optimized document store
- build search indices on top of the documents,
- to support full-text search, fuzzy search, faceted search…
OpenSearch is a fork of Elasticsearch that was created after Elasticsearch switched from an open source license to dual-licensing.
There are some exceptions, such as MongoDB, which has support for joins via the lookup operator, although it’s more limited than the types of joins you get with relational databases.
Again, there are some exceptions, such as MongoDB, which has support for distributed transactions, though again, it’s more limited than what you get with relational databases.
Moreover, transactions are not the default, but something you have to remember to use, which is quite error-prone.
With schema-on-read, when the schema’s changed, all you have to do is
- update your application code to be able to handle both the new data format and the old one, and
- your migration is done.
Or, to be more accurate, your migration has just started, and it will happen incrementally as new data gets written.
In 2004, Google released a paper on MapReduce, which described their approach to batch processing huge amounts of data using distributed systems. This kicked off a wave of big data tools.
It’s very common to perform aggregate queries on time-series data (e.g., show me the average response time for this web service).
Big data refers to data sets that are too large or complex to be dealt with by traditional data-processing application software (e.g. relational databases, document stores)
Stream processing is
- generating analytics from large data sets
- by running continuously to incrementally process streams of data on a near real-time basis (e.g., in milliseconds)
Amazon EMR (previously called Amazon Elastic MapReduce) is a managed cluster platform that simplifies running big data frameworks, such as Apache Hadoop and Apache Spark
Data warehouses are often column-oriented, and use specialized schemas (e.g., star and snowflake schemas) optimized for analytics.
With data warehouse, all of your data in one place, so you can perform a variety of analytics, generate reports, and so on.
Amazon Simple Queue Service (SQS)
In distributed systems theory, guaranteeing a message is delivered exactly once is provably impossible (if you’re curious why, look up the Two Generals Problem).
Azure Azure HDInsight is also used for big data system as in Analytics Use Cases.
There were attempts to make relational databases distributed, which are known as distributed relational databases.
Vertical scaling (aka scale up/down) means
- adding/removing resources (CPUs, memory or storage…)
- to/from a single computer
See https://en.wikipedia.org/wiki/Scalability#Vertical_or_scale_up
Horizontally scaling (aka scale out/in) means
- adding or removing nodes, e.g. a computer, a VM
- to a distributed software application.
A hot spot is a partition that get a disproportionately higher percentage of traffic and become overloaded.
Your relational database might have hotpots
- if you don’t partition your data correctly, or
- if your access patterns change
Meta created MySQL Raft, a consensus engine that turns MySQL into a “true distributed system”. See: Building and deploying MySQL Raft at Meta
NoSQL, which at various times stood for Non-SQL or Not-Only-SQL,
- is a fuzzy term that refers to
- databases that do not use SQL or the relational model.
Over the years, there have been many types of non-relational databases,
-
most of which failed to gain wide adoption
e.g.,
- object databases in the 90s,
- XML databases in the early 2000s
-
but NoSQL in particular typically refers to
- a breed of databases that were built in the late 2000s,
- primarily by Internet companies struggling to adapt relational databases to unprecedented demands in performance, availability, and data volume.
- a breed of databases that were built in the late 2000s,
“open source, distributed, non-relational databases” is still the best definition of NoSQL that we have.
e.g. because the network is down