Chapter 5: How to Set Up Continuous Integration (CI) and Continuous Delivery (CD)
Continuous Integration (CI)
Late Integration vs Continuous Integration
late integration : Come up with a final design for all the components of the system : - Have each team works on the components in isolated until it’s finished : When all components are done, assemble at the same time.
continuous integration (CI) : Come up with an initial design fo all the components of the system : - Have each team works on the components : - As teams make progress, they regularly test each component will all the other components & update the design (if there are any problems) : As components are completed, assemble incrementally
The problem with late integration
With late integration, there will a lot of conflicts and design problems:
- What if there are problems when integration between components of 2 teams, which teams should solve that problem?
- If the design has problems, how to go back and fix things?
In software development, late integration is
- developers work in totally isolated feature branches for weeks or months at a time.
- when a release rolls around, these features branches are all merged to the release branch.
When you don’t merge your code together for a long time, you end up with a lot of merge conflicts, e.g.
- 2 teams modified the same file in incompatible ways:
- 1 team made changes in a file, another team deleted it
- 1 team - after a giant refactor - remove all usages of a deprecated service; another teams introduce new usages for that services…
All these conflicts after resolved may still leads to bugs, problems that take days/weeks to stabilized. And the release process turned into a nightmare.
Continuous integration and its benefits
In software development, continuous integration is:
- developers merge their work together on a very regular basic: daily (or multiple times per day)
which will
- exposes problems with these works early in the process
- allows developers to make improvements incrementally (before any problems gone too far)
important
Key takeaway #1 Ensure all developers merge all their work together on a regular basis: typically daily or multiple times per day.
Continuous integration and trunk-based development
trunk-based development
: developers collaboration on a single long-live branches - e.g. main, master, trunk
: developers works on short-live branches; and open pull requests to merge them back into the shared branch on a regular basis
Trunk-based development is the most common way to implement continuous integration (CI)
note
You might think having all developers work on a single branch (main) have a problem with scaling,
- but in fact, it might be the only way to scale.
e.g. By using trunk-based development
- LinkedIn scale from 100 developers to 1000.
- Google scale to tens of thousands of developers, with 2+ billion lines of code, 86TB of source data, 40000 commits per day.
Three questions about continuous integration and trunk-based development
- Wouldn’t you have merge conflicts all the time?
- Wouldn’t the build always be broken?
- How do you make large changes that take weeks or months?
Dealing with Merge Conflicts
note
With late integration (and long-live feature branches), resolving merge conflicts
- occurs right before a release
- is a painful work that you only need to deal with once every few weeks/months.
But with continuous integration (and trunk-based development), you merge your code every day, so you need to resolve conflicts every day? So you need to do the painful work every day?
- If your branches are short-live, the odds of merge conflicts are much lower.
- Even if there are a merge conflicts, it’s much easier to resolve them (if you merge regularly).
tip
Merge conflicts are unavoidable:
- (Don’t try to avoid merge conflicts).
- Make them easy to be done by do them more often.
Preventing Breakages with Self-Testing Builds
-
CI (and trunk-based development) is always used with a self-testing build, which runs automated tests after every commit.
For any commit on any branch,
- every time a developer opens a pull request (PR) to merge a branch to
main- automated tests are run (against their branch)
- test results are shown directly in the PR UI.
- automated tests are run (against their branch)
- every time a developer opens a pull request (PR) to merge a branch to
tip
By having a self-testing build after every commit:
- Code doesn’t pass your test suite doesn’t get merged to
main. - For code does pass you test suite, but cause a breakage:
- as soon as you detect it, you can revert that commit automatically.
How to set up a self-testing build
The most common way to set up a self-testing build is to run a CI server.
CI server : e.g. Jenkins, TeamCity Argo; GitHub Actions, GitLab, CircleCI. : a software that integrates with your VCS to run various automations, e.g. automated tests : - in response to an event (in your VSC), e.g. new commits/branches/PRs…
tip
CI server are such an integral part of CI,
- for many developers, CI server and CI are nearly synonymous.
The benefits of CI (and Automated Tests)
-
Without continuous integration, your software is broken until somebody proves it works, usually during a testing or integration stage.
-
With continuous integration, your software is proven to work (assuming a sufficiently comprehensive set of automated tests) with every new change — and you know the moment it breaks and can fix it immediately.
note
With continuous integration, your code is always in a working & deployable state 👉 You can deploy at any time you want.
tip
The CI server act as a gatekeeper 👮🆔:
- protecting your code from any changes that threaten your ability to deploy at any time.
important
Key takeaway #2 Use a self-testing build after every commit to ensure your code is always in a working & deployable state.
Making Large Changes
For large changes that take weeks/months, e.g. major new feature, big refactor - how can you merge your in-compete work on a daily basis
- without breaking the build
- without releasing unfinished features to users?
important
Key takeaway #3 Use branch by abstraction and feature toggles to make large-scale changes while still merging your work on a regular basis.
Branch by abstraction
branch by abstraction : a technique for making a large-scale change to a software system’s codebase in gradual way, that allows you : - to release the system regularly while the change is still in-progress
Branch by abstraction works at code-level, allow you to
- switch the implementation of the abstract easily (at code-level)
- or even have 2 implementation (versions) of the feature in parallel (at code-level)
For more information, see:
- Branch By Abstraction | Martin Fowler
- Branch by abstraction pattern |AWS Prescriptive Guidance - Decomposing monoliths into microservices
Feature toggles
feature toggle : aka feature flag : you wrap a new feature in conditionals, that let you : - toggle that feature on/off dynamically at deploy time/runtime
By wrap features in conditionals, at code-level,
- you can make some part of your system invisible to the users without changing the code.
e.g.
-
In the Node.js sample-app, you can add a feature toggle to pick between new homepage and the “Hello, World!” text
app.get("/", (req, res) => { if (lookupFeatureToggle(req, "HOME_PAGE_FLAVOR") === "v2") { res.send(newFancyHomepage()); } else { res.send("Hello, World!"); } });- The
lookupFeatureTogglewill check if the feature toggle is enables by querying a dedicated feature toggle service.
- The
For more information, see:
Feature toggle service
A feature toggle service can:
- Store a feature toggle mapping
- Be used to look up feature toggles programmatically
- Update feature toggle values without having to update/deploy code
e.g.
- growthbook, Flagsmith, flagr, OpenFeature
- Managed feature: Split, LaunchDarkly, ConfigCat, Statsig.
Feature toggle and continuous integration
By
- wrapping new features in conditionals (feature toggle check), and
- keep the default value of all feature toggles to off
you can merge your new unfinished feature into main and practice continuous integration.
tip
Feature toggles also give you many super powers, which you can see in the Continuous Delivery section
Example: Run Automated Tests for Apps in GitHub Actions
In this example, you will use GitHub Actions to run the automated tests (that added in Chap 4) after each commit and show the result in pull requests.
-
Copy the Node.js
sample-appand the automated testscd examples mkdir -p ch5 cp -r ch4/sample-app ch5/sample-app -
From the root of the repo, create a folder called
.github/workflowsmkdir -p .github/workflows -
Inside
.github/workflows, create a GitHub workflow file namedapp-tests.yml# .github/workflows/app-tests.yaml name: Sample App Tests on: push # (1) jobs: # (2) sample_app_tests: # (3) name: "Run Tests Using Jest" runs-on: ubuntu-latest # (4) steps: - uses: actions/checkout@v2 # (5) - name: Install dependencies # (6) working-directory: ch5/sample-app run: npm install - name: Run tests # (7) working-directory: ch5/sample-app run: npm test[!NOTE] With GitHub Actions, you use YAML to
- define workflow - configurable automated processes - that
- run one or more jobs
- in response to certain triggers.
- run one or more jobs
[!TIP] If you don’t know about YAMl, see
-
(1)
onblock: The trigger that will cause the workflow to run.In this example,
on: pushconfigure this workflow to run every time you do agit pushto this repo -
(2)
jobsblock: One or more jobs - aka automations - to run in this workflow.[!NOTE] By default, jobs run parallel, but you can
- configure jobs to run sequentially
- (and define dependencies on other jobs, passing data between jobs)
-
(3)
sample_app_tests: This workflow define a single job namedsample_app_tests, which will run the automated tests for the sample app.[!NOTE] GitHub Actions use YAML syntax to define the workflow:
- A YAML node can be one of three types:
- Scalar: arbitrary data (encoded in Unicode) such as strings, integers, dates
- Sequence: an ordered list of nodes
- Mapping: an unordered set of key/value node pairs
- Most of the GitHub Actions’s workflow syntax is a part of a mapping node - with:
- a pre-defined key, e.g.
name,on,jobs, - excepting some where you can specify your own key, e.g.
<job_id>,<input_id>,<service_id>,<secret_id>
- a pre-defined key, e.g.
[!TIP] In this example,
sample_app_testis the<job_id>specified by you - A YAML node can be one of three types:
-
(4)
runs-onblock: Usesubuntu-latestrunner that has:- default hardware configuration (2 CPUs, 7GB RAM, as of 2024)
- software with Ubuntu & a lot of tools (including Node.js) pre-installed.
[!NOTE] Each job runs on a certain type of runner, which is how you configure:
- the hardware (CPU, memory)
- the software (OS, dependencies)
to use for the job.
-
(5)
usesblock: Uses a reusable unit of code (aka action) -actions/checkout- as the first step.[!NOTE] Each job consists of a series of steps that are executed sequentially.
[!NOTE] GitHub Actions allow you to share & reuse workflows, including
- public, open source workflows (available on GitHub Actions Marketplace)
- private, internal workflows within your own organization
-
(6): The second step has a
runblock to execute shell commands (npm install)[!NOTE] A step can has:
- either a
runblock: to run any shell commands - or a
usesblock: to run an action
- either a
-
(7) The thirst step also has a
runblock to execute shell commands (npm test)
- define workflow - configurable automated processes - that
-
Commit & push to your GitHub repo
git add ch5/sample-app .github/workflows/app-tests.yml git commit -m "Add sample-app and workflow" git push origin main -
Verify that the automated tests run
-
Create a new branch
git switch -c test-workflow -
Make a change to the app
sed -i s/Hello, World!/Fundamentals of DevOps!/g ch5/sample-app/app.js -
Commit & push
git add ch5/sample-app git commit -m "Add sample-app and workflow" git push origin main -
Open the GitHub URL for that branch; then “create pull request”
-
Verify that the workflow run
[!TIP] In GitHub PR UI, a workflow run is show as check
-
Open the check detail to know what’s wrong with the check (It’s a fail test).
-
-
Update the automated test to match with the new response text
sed -i s/Hello, World!/Fundamentals of DevOps!/g ch5/sample-app/app.test.js-
Commit & push to the same branch
git add ch5/sample-app/app.test.js git commit -m "Update response text in test" git push origin test-workflow -
GitHub Actions will re-run your automated tests.
-
Open the GitHub PR UI to verify that the automated tests now is passing. (It’s should show “All checks have passed”)
-
Get your hands dirty: Run automated app tests in CI
To help catch bugs, update the GitHub Actions workflow to run a JavaScript linter, such as JSLint or ESLint, after every commit.
To help keep your code consistently formatted, update the GitHub Actions workflow to run a code formatter, such as Prettier, after every commit.
Run both the linter and code formatter as a pre-commit hook, so these checks run on your own computer before you can make a commit. You may wish to use the pre-commit framework to manage your pre-commit hooks.
Machine-User Credentials and Automatically-Provisioned Credentials
If you want to run unit testing with OpenTofu’s test command,
- you need to give the automated tests a way to authenticated to cloud provider
- if these automated tests run on your local machine, they may use a real-user credential - e.g. AWS IAM user credentials, GitHub personal access token -
- if these automated tests run on a CI server, you should never use a real-user credential.
The problem of using real-user credentials for CI server
-
Departures
Typically, when someone leaves a company, you revoke all their access.
If you were using their credentials for automation, then that automation will suddenly break.
-
Permissions
The permissions that a human user needs are typically different than a machine user.
-
Audit logs
If you use same user account for both a human & automation, the audit logs1 aren’t useful for debugging & investigating security incidents anymore.
-
Management
You typically want multiple developers at your company to be able to manage the automations you set up.
- If you use a single developer’s credentials for those automations,
- when he/she need to update the credentials or permissions,
- the other developers won’t be able to access that user account
- when he/she need to update the credentials or permissions,
- If you use a single developer’s credentials for those automations,
important
Key takeaway #4 Use machine user credentials or automatically-provisioned credentials to authenticate from a CI server or other automations.
Machine-user credentials
machine-user : a user account that is only used for automation (not by any human user)
machine-user credential : a credential of a machine-user : usually it’s a long-live credential
How to use a machine-user credential
- Create a machine-user
- Generate credential - e.g. access token - for that machine-user
- Manually copy the credential into whatever tool you’re using, GitHub Actions
Machine-user credentials pros and cons
-
Pros:
- It solves all problems of using a shared real-user credential
-
Cons:
-
You need to manually copy machine-user credentials (just as a password)
-
Machine-user credentials are long-lived credentials
If they are leaked, you would have a big problem.
-
Automatically-provisioned credentials
automatically-provisioned credential : credential that is provisioned automatically (by a system) : - without any need for you to manually create machine users or copy/paste credentials : - so it can be used by another system : usually it’s a short-live credential : e.g. AWS IAM roles
This requires that the two systems
- the system you’re authenticating from, e.g. a CI server
- the system you’re authenticating to, e.g. AWS
have an integration that supports automatically-provision credentials.
The two systems can be
- in the same company’s services 👉 via AWS IAM role (when using with EKS/EC2).
- across companies’ services 👉 via OpenID Connect (OIDC) - an open protocol for authentication.
OpenID Connect (OIDC)
To understand OIDC, let’s examine an example for OIDC integration between GitHub and AWS:
-
You’re authenticate from GitHub to AWS:
- GitHub: the system you’re authenticating from
- AWS: the system you’re authenticating to
-
In other words,
- GitHub system needs to have some permissions to do something with AWS.
- AWS systems will provision the credential that GitHub needs.
-
Under the hood, with OIDC, you configure AWS to
-
trust an IdP (e.g. GitHub)
[!TIP] How can AWS trust an IdP, e.g. GitHub?
OIDC trust is a digital signature system2:
- GitHub has the private key (and use it to sign the OIDC token).
- AWS has the public key (and use it to validate the OIDC token).
-
allow that IdP to exchange an OIDC token3 for short-lived AWS credentials
-
-
Here is how the authenticate from GitHub to AWS works:
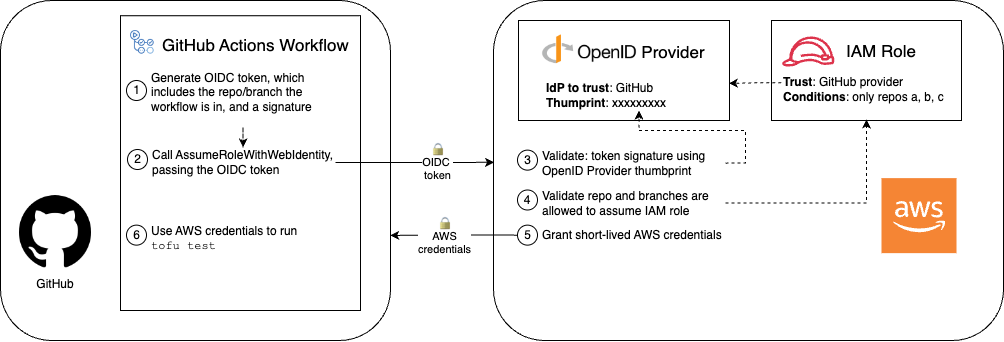
- [GitHub] Generate an OIDC token: includes claims about what repo/branch (the workflow is running in).
- [GitHub] Call the
AssumeRoleWithWebIdentityAPI: to specify the IAM Role to assume (and passing the OIDC token to AWS as authentication). - [AWS] Validate the OIDC token: using the public key (that you provide when setting up GitHub as an IdP).
- [AWS] Validate IAM role conditions: against the claims (whether that repo/branch is allowed to assume the IAM role).
- [AWS] Grant short-lived AWS credentials: then send back to GitHub.
- [GitHub] Use the AWS credentials: to authenticate to AWS (and make changes in AWS account)
Example: Configure OIDC with AWS and GitHub Actions
The github-aws-oidc and gh-actions-iam-roles OpenTofu modules
The sample code repo includes 2 OpenTofu modules
-
github-aws-oidcmodule:- in
ch5/tofu/modules/github-aws-oidcfolder - that can provision GitHub as an OIDC provider for AWS account.
- in
-
gh-actions-iam-rolesmodule:- in
ch5/tofu/modules/gh-actions-iam-rolesfolder - that can provision severals IAM roles for CI/CD with GitHub Actions.
- in
Configure github-aws-oidc and gh-actions-iam-roles OpenTofu module
-
Create a new Git branch
git switch -c opentofu-tests -
Create the folder for the OpenTofu root module
cd examples mkdir -p ch5/tofu/live/ci-cd-permissions cd ch5/tofu/live/ci-cd-permissions -
Configure the
github-aws-oidcmodule# examples/ch5/tofu/live/ci-cd-permissions/main.tf provider "aws" { region = "us-east-2" } module "oidc_provider" { source = "github.com/brikis98/devops-book//ch5/tofu/modules/github-aws-oidc" provider_url = "https://token.actions.githubusercontent.com" # (1) }-
1
provider_url: The URL of the IdP[!TIP] The
github-aws-oidcwill use this URL to fetch GitHub’s fingerprint, that used by AWS to validate the OIDC token from GitHub.
-
-
Configure the
gh-actions-iam-rolesmodule to create examples IAM roles (to be assumed from GitHub Actions).# examples/ch5/tofu/live/ci-cd-permissions/main.tf module "oidc_provider" { # ... (other params omitted) ... } module "iam_roles" { source = "github.com/brikis98/devops-book//ch5/tofu/modules/gh-actions-iam-roles" name = "lambda-sample" # (1) oidc_provider_arn = module.oidc_provider.oidc_provider_arn # (2) enable_iam_role_for_testing = true # (3) # TODO: fill in your own repo name here! github_repo = "brikis98/fundamentals-of-devops-examples" # (4) lambda_base_name = "lambda-sample" # (5) }-
1
name: Base name for this module’s resources -
2
oidc_provider_arn: Specify the IdP (the one created bygithub-aws-oidcmodule) that will be allowed to assume created by this module.[!TIP] Under the hood,
gh-actions-iam-rolesmodule will- configure the trust policy in the IAM roles to
- trust this OIDC provider (and allow it to assume the IAM roles)
- configure the trust policy in the IAM roles to
-
3
enable_iam_role_for_testing: Set totrueto create IAM roles used for testing. -
4
github_repo: Specify the GitHub repo that will be allowed to assume the IAM roles.[!TIP] Under the hood, the
gh-actions-iam-rolesmodule- sets certain conditions in the trust policies of each IAM role
- to specify which repos/branches in GitHub
- are allowed to assume that IAM role
- to specify which repos/branches in GitHub
- sets certain conditions in the trust policies of each IAM role
-
5
lambda_base_name: Manually specify the lambda function base name.
-
-
Create the output variables
output "lambda_test_role_arn" { value = module.iam_roles.lambda_test_role_arn } -
Init & apply OpenTofu code
tofu init
tofu apply
Automated tests and infrastructure code
Example: Run Automated Tests for Infrastructure in GitHub Actions
-
Copy the infrastructure code
cd examples mkdir -p ch5/tofu/modules cp -r ch4/tofu/live/lambda-sample ch5/tofu/live cp -r ch4/tofu/modules/test-endpoint ch5/tofu/modules -
Remove hard-codes names in
lambda-sample(so the tests can run concurrently)-
Define an input variable for
lambda-sample# examples/ch5/tofu/live/lambda-sample/variables.tf variable "name" { description = "The base name for the function and all other resources" type = string default = "lambda-sample" }- This defines a
namevariable to use as the base name forlambda-samplemodule with the default value"lambda-sample"(same as before).
- This defines a
-
Update
main.tfto usevar.name(instead of hard-coded names)# examples/ch5/tofu/live/lambda-sample/main.tf module "function" { # ... (other params omitted) ... name = var.name } module "gateway" { # ... (other params omitted) ... name = var.name }
-
-
Define the GitHub Actions workflow to run the infrastructure automated tests
The workflow
- runs on
push, - contains 2 jobs:
terrascan,opentofu_test
-
# .github/workflows/infra-tests.yml name: Infrastructure Tests on: push jobs: terrascan: name: "Run Terrascan" runs-on: ubuntu-latest steps: - uses: actions/checkout@v2 - name: Run Terrascan uses: tenable/terrascan-action@main with: iac_type: "terraform" iac_dir: "ch5/tofu/live/lambda-sample" verbose: true non_recursive: true config_path: "ch5/tofu/live/lambda-sample/terrascan.toml" # opentofu_test: -
The first job
terrascan:- checkout code
- install then run
terrascanusingtenable/terrascan-actionaction
-
opentofu_test: name: "Run OpenTofu tests" runs-on: ubuntu-latest permissions: # (1) id-token: write contents: read steps: - uses: actions/checkout@v2 - uses: aws-actions/configure-aws-credentials@v3 # (2) with: # TODO: fill in your IAM role ARN! role-to-assume: arn:aws:iam::111111111111:role/lambda-sample-tests # (3) role-session-name: tests-${{ github.run_number }}-${{ github.actor }} # (4) aws-region: us-east-2 - uses: opentofu/setup-opentofu@v1 # (5) - name: Tofu Test env: TF_VAR_name: lambda-sample-${{ github.run_id }} # (6) working-directory: ch5/tofu/live/lambda-sample # (7) run: | tofu init -backend=false -input=false tofu test -verbose -
The second job
opentofu_test:- 1
permissions: In additional tocontents: read(the default one), addid-token: writepermissions to issue an OIDC token. - 2: Authenticate to AWS with OIDC using
aws-actions/configure-aws-credentialsaction to 👉 This callsAssumeRoleWithWebIdentity) - 3: Manually fill in the IAM role to assume, it’s the IAM role created in the previous example.
- 4: Specify the session name when assume the IAM role 👉 This shows up in audit logs.
- 5: Install OpenTofu using
opentofu/setup-opentofuaction. - 6: Use the environment variable
TF_VAR_nameto set thenameinput variable of thelambda-samplemodule. - 7: Run the tests
Skip backend initialization with
backend=falseflag.
- 1
- runs on
-
Commit & push to
opentofu-testsbranch; then open a PR. -
Verify the infrastructure automated tests run.
Get your hands dirty: Run automated infrastructure tests in CI
To help keep your code consistently formatted, update the GitHub Actions workflow to run a code formatter, such as tofu fmt, after every commit.
Continuous Delivery (CD)
Continuous Delivery and Continuous Deployment
continuous delivery (CD) : a software development practice where you ensure that you can : - deploy to production at any time - e.g. daily, several times a days - in a manner that is fast, reliable, sustainable.
continuous deployment (CD*) : a software development practice where you : - deploy to production after every single commit in a manner that is fast, reliable, sustainable
With continuous delivery (CD), you ensure that the frequency of deployment is
- purely a business decision
- not limited by your technology
important
Key takeaway #5 Ensure you can deploy to production at any time in a manner that is fast, reliable, and sustainable.
To achieve continuous delivery (and continuous deployment), you need to fulfill 2 requirements:
-
The code is always in a working & deployable state:
This is the key benefit of practicing CI:
- Everyone integrates their work regularly
- with a self-testing build and a sufficient suite of tests.
- Everyone integrates their work regularly
-
The deployment process is sufficiently automated:
A manually deployment deployment process typically aren’t fast, reliable, sustainable.
This section focus on the second requirement - automating the deployment process using IaC:
- Implementing deployment strategies
- Implementing a deployment pipeline
deployment strategy : a deployment strategy is how you want to deploy your software
deployment pipeline : a deployment pipeline is a system of automated processes that deploy your software to production
Deployment Strategies
There are many deployment strategies that you can use to deploy (aka roll out) changes:
- some have downtime, others don’t
- some are easy to implement, others are complicated
- some only work with stateless apps4
- some only work with stateful apps5
This section will go over the most common deployment strategies. For each strategy, there are:
- Basic overview
- Advantages & disadvantages
- Common use cases
tip
You can combine multiple strategies together.
Downtime deployment
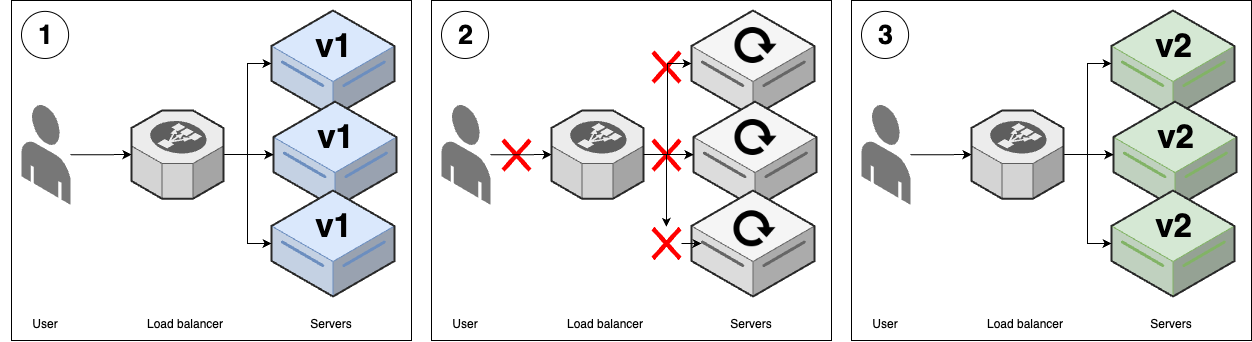
| Downtime deployment | |
|---|---|
| Overview | 1. (v1 replicas) |
| 2. Undeploy all v1 replicas6 | |
| 3. Deploy v2 replicas (to same servers) | |
| Advantages | - Easy to implement |
| - Works with all type of apps | |
| Disadvantages | - Downtime |
| Common use cases | - Single-replica systems |
| - Data migrations |
Rolling deployment without replacement
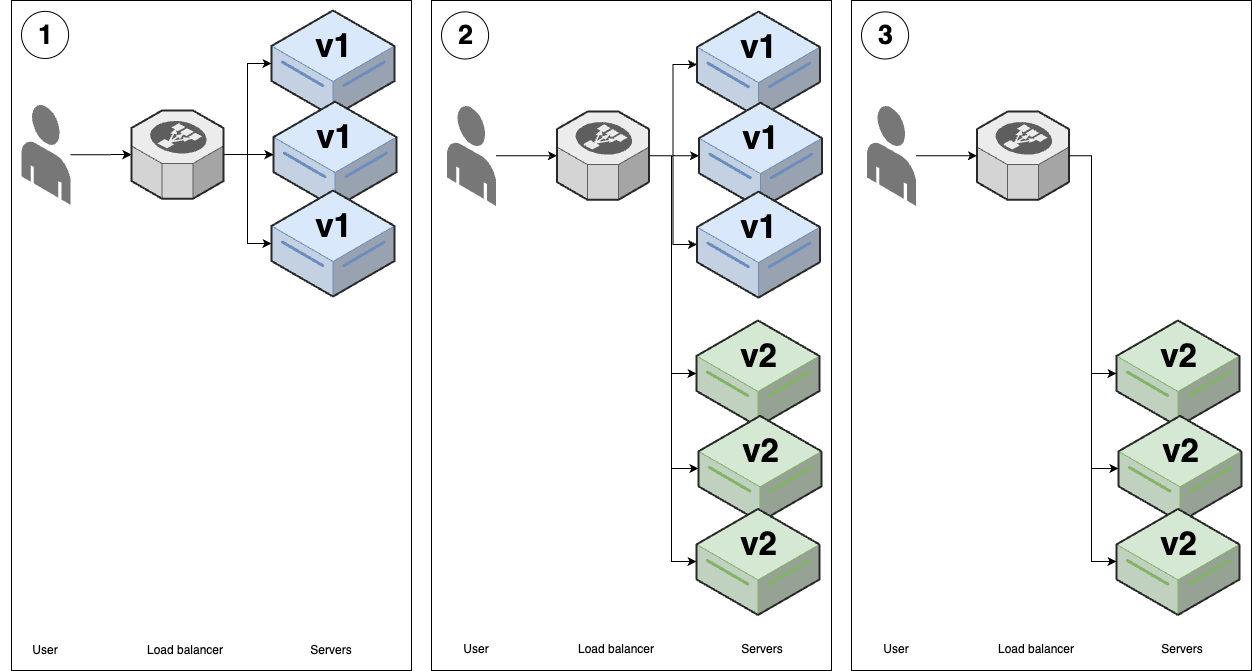
| Rolling deployment without replacement | |
|---|---|
| Overview | 1. (v1 replicas) |
| 2. Deploy v2 replicas (to new server)7 | |
| 3. Gradually undeploy v1 replicas. | |
| Advantages | - No downtime |
| - Widely supported | |
| Disadvantages | - Poor UX |
| - Works only with stateless apps | |
| Common use cases | - Deploying stateless apps |
Rolling deployment with replacement
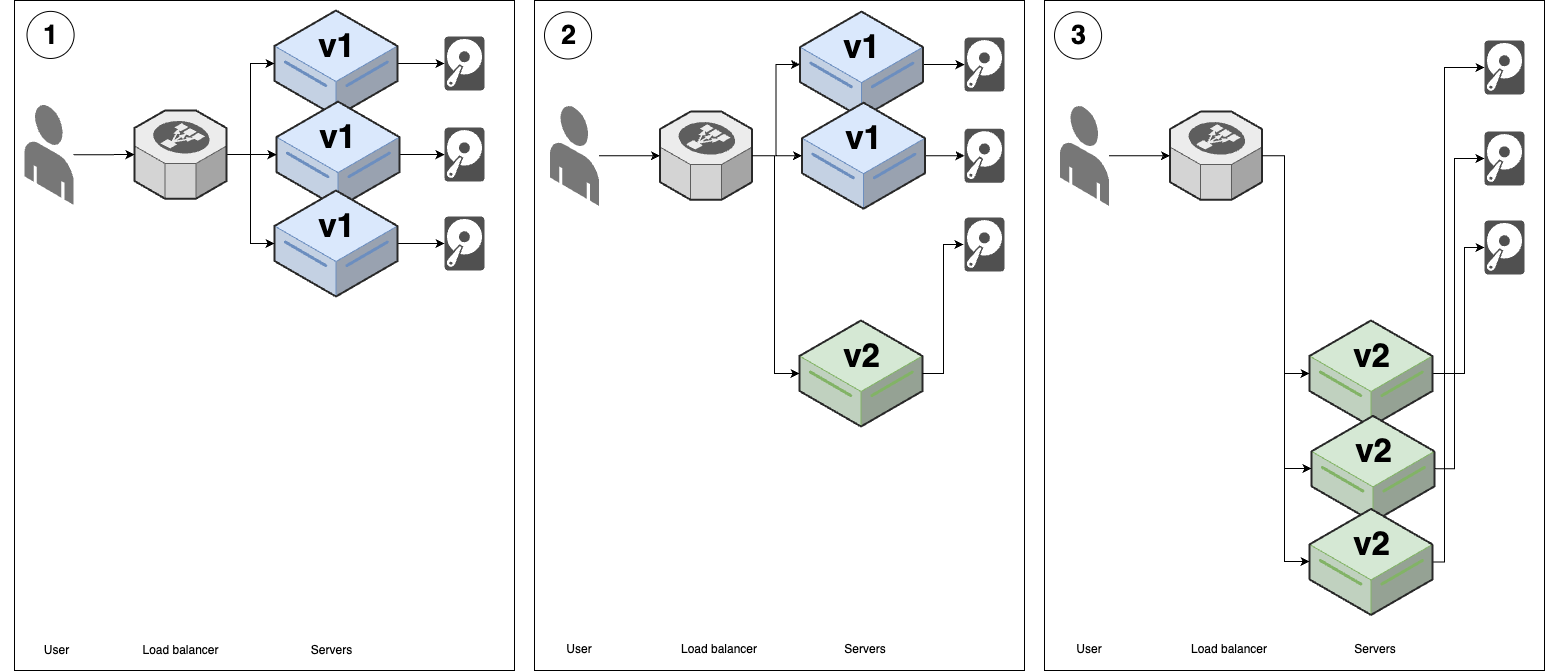
| Rolling deployment with replacement | |
|---|---|
| Overview | 1. (v1 replicas with hard-drive attached) |
| 2. Disconnect one v1 replica; shut down server; move its hard-drive to new v2 server.8 | |
| 3. Repeat for each v1 server | |
| Advantages | - No downtime |
| - Works with all types of apps | |
| - Widely supported | |
| Disadvantages | - Limited support for hard-drive replacement |
| - Poor UX | |
| Common use cases | - Deploying stateful apps |
Blue-green deployment
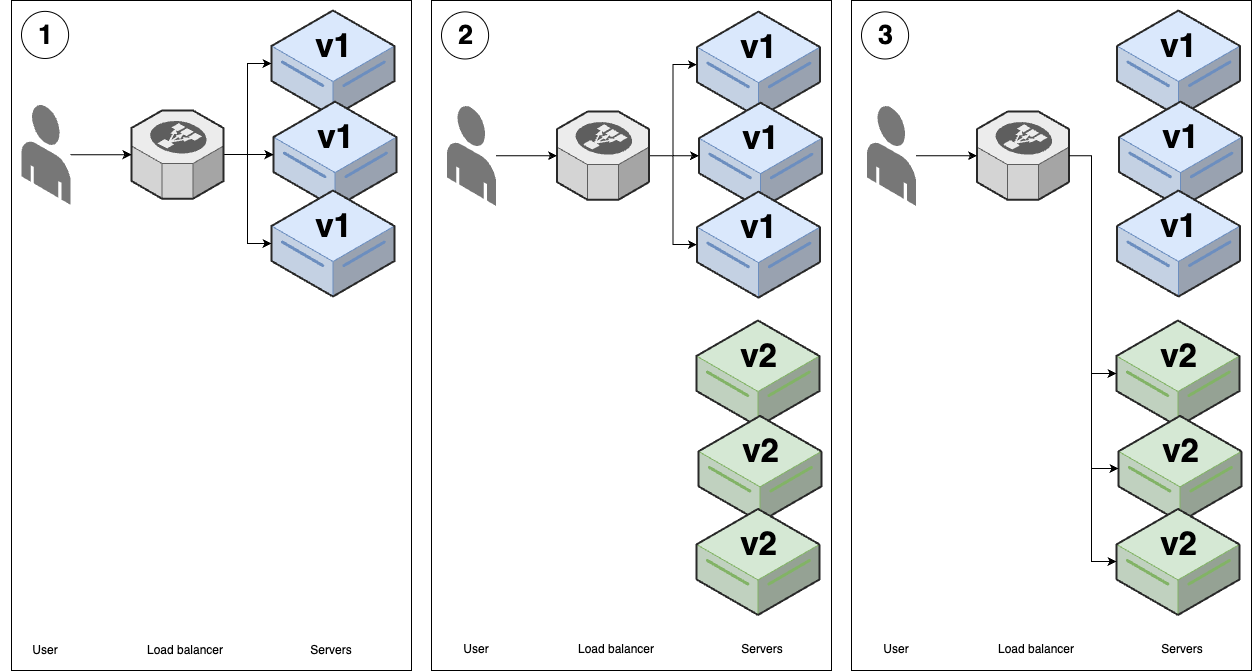
| Blue-green deployment | |
|---|---|
| Overview | 1. (v1 replicas) - aka blue 🔵 |
| 2. Deploy v2 replicas - aka green 🟢9 | |
| 3. When all v2 replicas pass health checks, do an instantaneous switchover. | |
| Advantages | - No downtime |
| - Good UX | |
| Disadvantages | - Limited support |
| - Works only with stateless apps | |
| Common use cases | - Deploying stateless apps |
Canary deployment
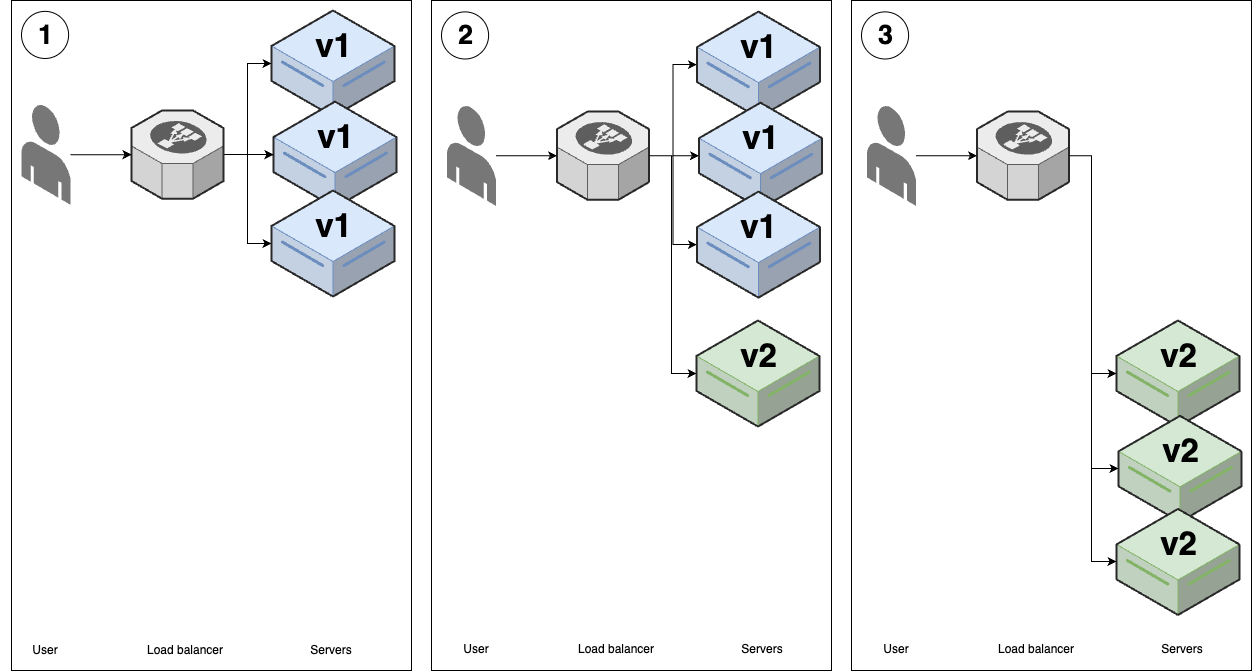
| Canary deployment | |
|---|---|
| Overview | 1. (v1 replicas) |
| 2. Deploy a single v2 replica - aka canary server; - Compare to a control (a random v1 replica)10 | |
| 3. If there isn’t any differences, roll out all v2 replicas using another strategy (e.g. rolling, blue-green) | |
| Advantages | - Catch errors early |
| Disadvantages | - Poor UX |
| Common use cases | - Large deployments |
| - Risky deployments |
Feature toggle deployment
| Feature toggle deployment | |
|---|---|
| Overview | 1. (v1 replicas) |
| 2. Deploy v2 replicas: - Use another strategy, e.g. rolling, blue-green. - Wrap new features in a feature flag (off by default) 11 | |
| 3. Enable v2 features with feature toggle service12 | |
| Advantages | - Separate deployment from release |
| - Resolve issues without deploying new code | |
| - Ramp new features | |
| - A/B test features | |
| Disadvantages | - Requires an extra service |
| - Forked code | |
| Common use cases | - All new feature development |
| - Data-driven development |
Promotion deployment
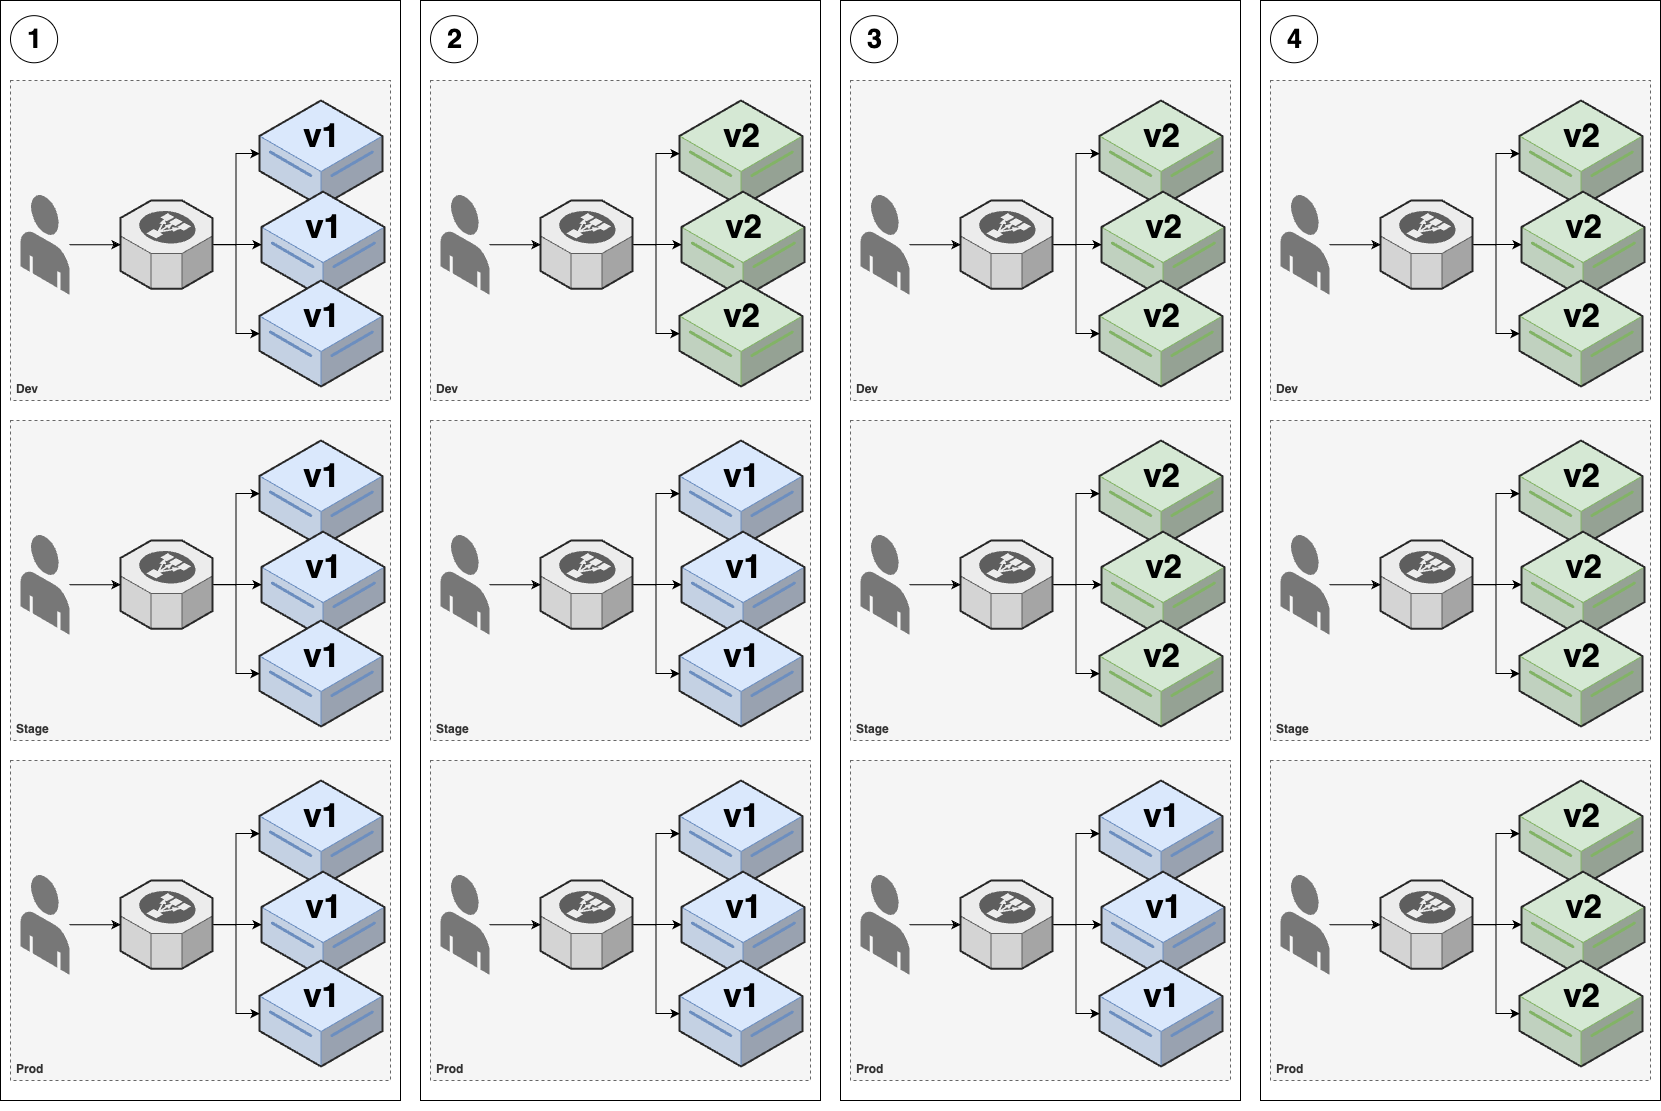
| Promotion deployment | |
|---|---|
| Overview | For example, you have 3 environments (env): dev, stage, prod |
| 1. (v1 replicas is running in all 3 envs) | |
2. Deploy v2 across dev environment (using another strategy, e.g. rolling, blue-green)- Then do a round of testing in dev env | |
3. If everything works well in dev env, deploy exactly the same v2 across stage env (aka promoting)- Then do a round of testing in stage env | |
4. If everything works well in stage env, you finally promote v2 to prod env | |
| Advantages | - Multiple chances to catch errors |
| Disadvantages | - Requires multiple environments |
| Common use cases | - All deployments |
Infrastructure deployment
All the previous deployment strategies (except promotion deployment) only applicable for deploying application code, e.g. apps written in Go, Javascript, Ruby, Python.
For infrastructure code (e.g. OpenTofu, CloudFormation, Pulumi), the deployment strategies are:
- much more limited
- typically binary: make a change or not (no gradual rollout, no feature toggle, no canary…)
| Infrastructure deployment | |
|---|---|
| Overview | 1. (v1 replicas) |
2. Validate plan output: e.g. tofu plan, kubectl apply --dry-run | |
| 3. Use a promotion deployment to promote infrastructure changes between environments | |
| Advantages | - Works with infrastructure deployments |
| - Even more chances to catch errors | |
| Disadvantages | - Requires multiple environments |
| Common use cases | - All infrastructure deployments |
Deployment Pipelines
deployment pipeline : the process that you use to : - go from an idea to live code13 : consists of all the steps (you must go through) to release
Most deployment pipelines include the following steps:
-
Commit
- How do you get code into version control?
- Do you use a pull-request based process?
- Do you use trunk-based development?
-
Build
- 🏗️ What compilation & build steps do you need?
- 📦 How do you package the code?
-
Test
- 🦾 What automated tests do you run against the code?
- 👐 What manual tests?
-
Review
- ❓ What review processes do you use?
- ✅ Who has to sign off & approve merges and deployments?
-
Deploy
- 🔟 How do you get the new code into production?
- ✨ How do you release new functionality to users?
note
Delivery, deploy, release? TODO
Typically, you run a deployment pipeline on a deployment server, which is:
-
the same server used for CI, e.g. GitHub Actions, CircleCI, GitLab CI
-
a server that is designed for a specific technology
e.g. For OpenTofu/Terraform: HashiCorp Cloud Platform, Spacelift, Atlantis, env0, Scalr.
Deployment pipelines are typically defined as code, by using:
- the same Domain-Specific Language (DSL) for CI, e.g. GitHub Actions workflow (via YAML)
- a scripting language, e.g. Ruby, Python, Bash
- build system’s language, e.g. NPM, Maven, Make
- a workflow-specific tool to define workflows that can run on multi platforms, e.g. Dagger, Common Workflow Language (via YAML)
note
In many cases, a deployment pipeline will use multiple languages & tools together.
Example: Configure an automated deployment pipeline in GitHub Actions
In this example, you will deploy a deployment pipeline for the lambda-sample OpenTofu module:
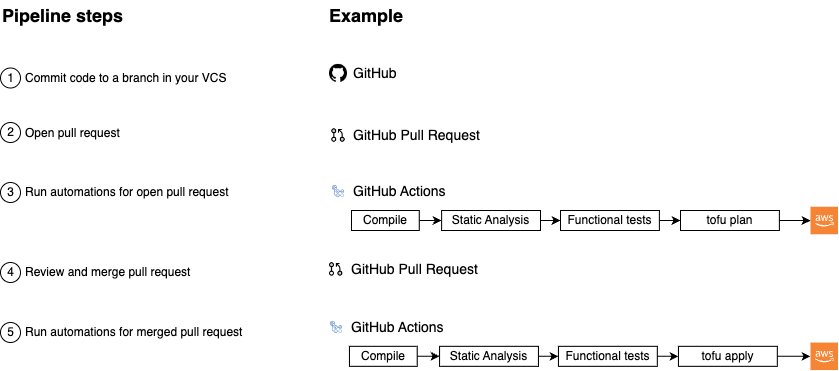
The deployment pipeline has 5 typical steps:
-
Commit code to a branch in your VCS:
First, you make some code changes in a branch.
-
Open a pull request:
Once the changes are ready to review, you open a PR.
-
Run automations for open pull request:
Your deployment server runs automations on the open PR, such as
- compiling the code, static analysis
- functional tests, e.g., unit tests, integration tests…
- generating the plan output by running
tofu plan.
-
Review and merge the pull request:
Your team members
- review the PR:
- the code
- the outputs of the automations, e.g. test results, plan output
- if everything looks good, merge the PR in.
- review the PR:
-
Run automations for the merged pull request:
Finally, your deployment server runs automations for the merged PR, such as
- compiling the code, static analysis, functional tests…
- deploying the changes by running
tofu apply.
note
This type of pipeline, where you drive actions through Git’s operations (e.g. commits, branches, pull requests…) is referred to as GitOps pipeline.
In Example: Run Automated Tests for Infrastructure in GitHub Actions, most of the steps in this deployment pipeline has been implemented, except:
- When you open a PR, run
tofu planon thelambda-samplemodule. - When you merge a PR, run
tofu applyon thelambda-samplemodule.
To implement these 2 items, you need to:
- Share OpenTofu state (by using a remote backend for OpenTofu state)
- Add IAM roles for infrastructure deployments in GitHub Actions.
- Define a pipeline for infrastructure deployments.
Sharing OpenTofu state files
In Chapter 2 - Example: Update Infrastructure Using OpenTofu, you learned that, by default, OpenTofu uses the local backend to store OpenTofu state in .tfstate files (on your local hard drive).
- Local backend works file when you’re learning and working alone.
- If you want to use OpenTofu in a team, you need a way to share these state files.
warning
The problems with sharing state files using version control:
-
Manual error
It’s just a matter of time before someone
- run
tofu applywith out-of-date state files and:- accidentally rolls back
- accidentally duplicates previous deployments
- run
-
No Locking Mechanism
2 teams members might run
tofu applyat the same time (on the same state files). -
Exposed Secrets
OpenTofu state files are just plain-text, which might including secrets (sensitive data from some resources).
- If you store these state file in VCS, any one has access to your infrastructure code also have access to your infrastructure.
The best way to share state files (in a team) is to use a remote backend, e.g. Amazon S3.
-
In additional to solving all problems of using VSC to store state files:
-
No manual error:
When using remote backend, OpenTofu will automatically
- load state files from that backend before each
tofu plan/apply. - store state files in that backend after each
tofu apply.
- load state files from that backend before each
-
Locking mechanism:
Most of the remote backends natively support locking. Before each
tofu apply, OpenTofu will automatically:- acquire a lock
- if the lock is already acquired by someone else, you will have to wait.
-
Secrets are encrypt-in-transit and encrypt-at-rest
-
Example: Use S3 as a remote backend for OpenTofu state
If you’re using OpenTofu with AWS, S3 is the best choice for remote backend. S3:
- supports locking (via DynamoDB)
- supports encryption
- supports versioning 👈 ~ VSC (you can roll back to an older version)
- is designed for 99.999999999% durability and 99.99% availability 👈 no data loss, no outages
- is a managed services 👈 no needs to deploy & manage extra infrastructure
- is inexpensive 👈 almost “free” with AWS Free Tier.
The state-bucket OpenTofu module
The sample code repo includes state-bucket OpenTofu module:
- in
ch5/tofu/modules/state-bucketfolder - that can:
- provision an S3 bucket to store OpenTofu state, including:
- enable versioning on the S3 bucket.
- enable server-side encryption for all files written to the S3 bucket.
- block all public access to the S3 bucket.
- provision a DynamoDB table for OpenTofu locking.
- provision an S3 bucket to store OpenTofu state, including:
Configure state-bucket OpenTofu module
-
Checkout the
mainbranchcd devops-book git checkout main git pull origin main -
Create a folder for the root module
cd examples mkdir -p ch5/tofu/live/tofu-state cd ch5/tofu/live/tofu-state -
Configure the
state-bucketmodule# examples/ch5/tofu/live/tofu-state/main.tf provider "aws" { region = "us-east-2" } module "state" { source = "github.com/brikis98/devops-book//ch5/tofu/modules/state-bucket" # TODO: fill in your own S3 bucket name! name = "fundamentals-of-devops-tofu-state" } -
Init & apply OpenTofu module to create a S3 bucket (that will be used as a remote backend)
tofu init
tofu apply
-
Configure S3 bucket and DynamoDB table as a remote backend
# examples/ch5/tofu/live/tofu-state/backend.tf terraform { backend "s3" { # TODO: fill in your own bucket name here! bucket = "fundamentals-of-devops-tofu-state" # (1) key = "ch5/tofu/live/tofu-state" # (2) region = "us-east-2" # (3) encrypt = true # (4) # TODO: fill in your own DynamoDB table name here! dynamodb_table = "fundamentals-of-devops-tofu-state" # (5) } }- 1
bucket: The S3 bucket to use as a remote backend. - 2
key: The path within the S3 bucket, where the OpenTofu state file should be written. - 3
region: The AWS region where you created the S3 bucket. - 4
encrypt: Encrypt the OpenTofu state when store in S3. - 5
dynamodb_table: The DynamoDB table to use for locking.
- 1
-
Re-run
tofu initto initialized the new backend configtofu init
-
Update the same backend configuration for
lambda-samplemodule# examples/ch5/tofu/live/lambda-sample/backend.tf terraform { backend "s3" { # TODO: fill in your own bucket name here! bucket = "fundamentals-of-devops-tofu-state" # (1) key = "ch5/tofu/live/lambda-sample" # (2) region = "us-east-2" encrypt = true # TODO: fill in your own DynamoDB table name here! dynamodb_table = "fundamentals-of-devops-tofu-state" # (3) } }- 1
bucket: Use the same S3 bucket astofu-statemodule. - 2
key: Use a different key fromtofu-statemodule. - 3
dynamodb_table: Use the same DynamoDB table astofu-statemodule.
- 1
-
Re-run
tofu initforlambda-samplemodule.
- Commit your changes to
tofu-stateandlambda-samplemodule; then push tomain.
Example: Add IAM roles for infrastructure deployments in GitHub Actions
In previous section, you have configure an OIDC provider to give GitHub Actions access to your AWS account for running automated tests.
In this example, you will give GitHub Actions access to your AWS account for deployments.
note
Normally, you would deploy to a totally separate environment (separate AWS account) from where you run automated tests.
- So you’d need to configure a new OIDC provider for your deployment environment.
To keep this example simple, you will use the same AWS account for both testing and deployment:
- (You don’t need a new OIDC provider)
- You only need new IAM roles with different permissions:
- For deployment
- For
plan, which is run on any branch before a PR has merged: read-only permissions. - For
apply, which is run onmainafter a PR has merged: read & write permissions.
- For
- For deployment
-
Update the
ci-cd-permissionsmodule to enable IAM roles forplanandapply# examples/ch5/tofu/live/ci-cd-permissions/main.tf module "iam_roles" { # ... (other params omitted) ... enable_iam_role_for_testing = true enable_iam_role_for_plan = true # (1) enable_iam_role_for_apply = true # (2) # TODO: fill in your own bucket and table name here! tofu_state_bucket = "fundamentals-of-devops-tofu-state" # (3) tofu_state_dynamodb_table = "fundamentals-of-devops-tofu-state" # (4) }- 1: Enable IAM role for
plan- This IAM role has read-only permissions.
- The OIDC provider is allowed to assume this role from any branch.
- 2: Enable IAM role for
apply- This IAM role has both read & write permissions.
- The OIDC provider is allowed to assume this role from
mainbranch, which ensures that only merged PRs can be deployed.
- 3, 4: Configure the S3 bucket and DynamoDB table.
- 1: Enable IAM role for
-
Add output variables for new IAM roles
# examples/ch5/tofu/live/ci-cd-permissions/outputs.tf output "lambda_deploy_plan_role_arn" { value = module.iam_roles.lambda_deploy_plan_role_arn } output "lambda_deploy_apply_role_arn" { value = module.iam_roles.lambda_deploy_apply_role_arn } -
Apply the OpenTofu module
ci-cd-permissionstofu apply -
Commit changes to
ci-cd-permissionsand push tomain
Example: Define a pipeline for infrastructure deployments
In this examples, you can finally implement a deployment pipeline for deploying infrastructure (the lambda-sample module):
- When you open a PR, run
planon thelambda-samplemodule. - When you merge a PR, run
applyon thelambda-samplemodule.
dangerous
Watch out for snakes: this is a very simplified pipeline
- The pipeline described here represents only a small piece of a real-world deployment pipeline.
- It’s missing several important aspects.
-
Create workflow for
tofu plan# .github/workflows/tofu-plan.yml name: Tofu Plan on: pull_request: # (1) branches: ["main"] paths: ["examples/ch5/tofu/live/lambda-sample/**"] jobs: plan: name: "Tofu Plan" runs-on: ubuntu-latest permissions: pull-requests: write # (2) id-token: write contents: read steps: - uses: actions/checkout@v2 - uses: aws-actions/configure-aws-credentials@v3 with: # TODO: fill in your IAM role ARN! role-to-assume: arn:aws:iam::111111111111:role/lambda-sample-plan # (3) role-session-name: plan-${{ github.run_number }}-${{ github.actor }} aws-region: us-east-2 - uses: opentofu/setup-opentofu@v1 - name: tofu plan # (4) id: plan working-directory: ch5/tofu/live/lambda-sample run: | tofu init -no-color -input=false tofu plan -no-color -input=false -lock=false - uses: peter-evans/create-or-update-comment@v4 # (5) if: always() env: RESULT_EMOJI: ${{ steps.plan.outcome == 'success' && '✅' || '⚠️' }} with: issue-number: ${{ github.event.pull_request.number }} body: | ## ${{ env.RESULT_EMOJI }} `tofu plan` output ```${{ steps.plan.outputs.stdout }}```-
(1): Run on
pull requests(instead of on push):- on
mainbranch - that have modifications to the
examples/ch5/tofu/live/lambda-samplefolder.
- on
-
(2): Add the
pull-request: writepermission so in (5), the workflow can post a comment on your pull request. -
(3): Assume the
planIAM role. -
(4): Run
tofu initandtofu planwith a few flag to ensure the command run well in a CI environment. -
(5): Use
peter-evans/create-or-update-commentaction to post commend (plan’s output) on the pull requests that run this workflow.
-
-
Create workflow for
tofu apply# .github/workflows/tofu-apply.yml name: Tofu Apply on: push: # (1) branches: ["main"] paths: ["examples/ch5/tofu/live/lambda-sample/**"] jobs: apply: name: "Tofu Apply" runs-on: ubuntu-latest permissions: pull-requests: write id-token: write contents: read steps: - uses: actions/checkout@v2 - uses: aws-actions/configure-aws-credentials@v3 with: # TODO: fill in your IAM role ARN! role-to-assume: arn:aws:iam::111111111111:role/lambda-sample-apply # (2) role-session-name: apply-${{ github.run_number }}-${{ github.actor }} aws-region: us-east-2 - uses: opentofu/setup-opentofu@v1 - name: tofu apply # (3) id: apply working-directory: ch5/tofu/live/lambda-sample run: | tofu init -no-color -input=false tofu apply -no-color -input=false -lock-timeout=60m -auto-approve - uses: jwalton/gh-find-current-pr@master # (4) id: find_pr with: state: all - uses: peter-evans/create-or-update-comment@v4 # (5) if: steps.find_pr.outputs.number env: RESULT_EMOJI: ${{ steps.apply.outcome == 'success' && '✅' || '⚠️' }} with: issue-number: ${{ steps.find_pr.outputs.number }} body: | ## ${{ env.RESULT_EMOJI }} `tofu apply` output ```${{ steps.apply.outputs.stdout }}```-
(1): Run only on
pushto themainbranch that have modifications to theexamples/ch5/tofu/live/lambda-samplefolder. -
(2): Assume the
applyIAM role. -
(3): Run
tofu initandtofu apply, again passing a few flags to ensure the commands run well in a CI environment. -
(4): Use
jwalton/gh-find-current-prto find the pull request that this push came from. -
(5): Use
peter-evans/create-or-update-commentaction to post commend (apply’s output) on the pull requests that run this workflow.
-
-
Commit these new workflows to
mainand push to GitHubgit add .github/workflows git commit -m "Add plan and apply workflows" git push origin main
Let’s try your new deployment pipeline
-
Create a new branch
git switch -c deployment-pipeline-test -
Make a change to
lambda-samplemodule-
Update the Lambda function response text
// examples/ch5/tofu/live/lambda-sample/src/index.js exports.handler = (event, context, callback) => { callback(null, { statusCode: 200, body: "Fundamentals of DevOps!" }); }; -
Update the automation test
# examples/ch5/tofu/live/lambda-sample/deploy.tftest.hcl assert { condition = data.http.test_endpoint.response_body == "Fundamentals of DevOps!" error_message = "Unexpected body: ${data.http.test_endpoint.response_body}" } -
Commit the changes, then push to the
deployment-pipeline-testbranch
-
-
Open a new pull request
-
Verify
- workflow for
tofu planrun as a check. - after the deployment pipeline has finished, the PR should be automatically update with a comment that shows the
planoutput.
- workflow for
Get your hands dirty: Terragrunt
If you’re like me, you’re probably annoyed by all the copy/paste you need to do with these backend configurations.
-
Unfortunately, OpenTofu does not support using variables or any other kind of logic in backend blocks, so some amount of copy/paste is necessary.
-
However, you can try out one of the following approaches to significantly reduce the code duplication:
- Partial backend configuration
- Terragrunt
Get your hands dirty: IAM roles
-
Open up the code for the
gh-actions-iam-rolesmodule and read through it.- What permissions, exactly, is the module granting to those IAM roles?
- Why?
-
Create your own version of the
gh-actions-iam-rolesmodule that you can use for deploying other types of infrastructure, and not just Lambda functions.e.g. try to create IAM roles for deploying EKS clusters, EC2 instances, and so on.
Get your hands dirty: Deployment pipelines
-
Update the pipeline to
- automatically detect changes in an any folder with OpenTofu code (rather than only the
lambda-samplefolder) - automatically run
planandapplyin each one. The open sourcechanged-filesaction can be helpful here.
- automatically detect changes in an any folder with OpenTofu code (rather than only the
-
If a pull request updates multiple folders with OpenTofu code, have the pipeline run plan and apply across multiple folders concurrently by using a matrix strategy.
Deployment pipeline best practices
Automate all the steps that can be automated
In a deployment pipeline, there are steps that
- can not be automated - must be done by humans:
- writing code (for now)
- reviewing code (for now)
- manual testing & verification
- can be automated.
All the steps that can be automated - done without a human - should be automated.
tip
For things that can be automated, the computers are excel over humans.
Deploy only from a deployment server
These automated steps should be run on a dedicated deployment server (not from any developer’s computer) because of:
-
Full automation
By deploying only from a deployment server, it forces you to automate everything that can be automated.
It’s only when you have a fully automated pipeline, that you get a CD pipeline that is fast, reliable & sustainable:
- You will have environments that are truly reproducible (consistent, repeatable)
- You can achieve world-class software delivery (and deploy thousands of times per day.)
[!TIP] Mostly automated vs fully automated
- A mostly automated pipeline still requires a few manual steps.
- A fully automated pipeline doesn’t requires any manual step.
-
Repeatability
If developers run deployment from their own computers, there will be problems due to differences in how their computers are configured:
- OSes, dependencies, configurations
- modified infrastructure code
-
Permissions management
It’s easier to enforce good security practices
- for some dedicated servers
- then a lot of developer’s computer
Protect the deployment server
Typically, a deployment server
- has “admin permissions” (fancy words for arbitrary permissions):
- it can access to sensitive permissions
- it is designed to execute arbitrary code
- is a tempting target for malicious actors
To protect your deployment server, you should:
-
Lock down your deployment server:
- Make it accessible only over HTTPs
- Make it accessible only over VPN connections, your company’s networks
- Require all users to be authenticated
- Ensure all actions are logged
- …
-
Protect your code (version control system)
Since deployment server can execute arbitrary code from your VSC, if an attacker can slip malicious code into your VSC, the deployment server may execute that malicious code.
So protect your code with signed commit and branch protection.
-
Enforce an approval workflow
Each request to deployment should be approved by at least one person (other than the person that make the request).
-
Limit permissions before approval/merge
Before the PR are approved/merged, the pipeline’s steps should have read-only permissions, so the approval workflow cannot be bypassed.
-
Give the deployment server short-lived credentials
Whenever possible,
- use an automatically-managed, short-lived credentials, e.g. OIDC
- instead of manually-managed, long-lived credentials, e.g. machine-user, human-user’s credentials.
-
Limit the permissions granted to each pipeline (What does a pipeline can do?)
Instead of a single pipeline that do everything and therefore needs arbitrary permissions:
- create multiple pipelines, each for a specific tasks:
- grant each pipeline a limited set of permissions (it needs for that specific task).
You can also restrict access to each pipeline so only the developers who needs to use it have access to it.
- create multiple pipelines, each for a specific tasks:
-
Limit the permissions granted to each developer (To which scope a developer can apply their permissions?)
For example,
- a developer can access a pipeline that have “admin permission”
- you might limit the scope to which the developer can use “admin permission” and run arbitrary code:
- only for a specific commands, e.g.
tofu apply - only on code from specific repos, e.g. repos with OpenTofu modules
- only on specific branches, e.g.
main - only in specific folders
- only for a specific commands, e.g.
You should also lock down the workflow definitions, so
- only a set of admins can update them
- only with PR approval from at least one of other admin.
Conclusion
Automating your entire SDLC through the use of CI/CD:
-
CI: Ensure all developers merge all their work together on a regular basis: typically daily or multiple times per day.
- Use a self-testing build after every commit to ensure your code is always in a working and deployable state.
- Use branch by abstraction and feature toggles to make large-scale changes while still merging your work on a regular basis.
-
Security: Use machine user credentials or automatically-provisioned credentials to authenticate from a CI server or other automations.
-
CD: Ensure you can deploy to production at any time in a manner that is fast, reliable, and sustainable.
Most systems maintain an audit log that records who performed what actions in that system.
Digital signature system and public-key encryption system are 2 type of systems that use public-key cryptography (asymmetric cryptography).
OIDC token is a JSON Web Token - a JSON object that contains claims (data that being asserted)
Stateless apps are apps that don’t need to persist (across deployments) any of the data that they store on their local hard drives (e.g., most web frontend apps are stateless)
Stateful apps are apps that need to persist (across deployments) any of the data that they store on their local hard drives (e.g., any sort of database or distributed data system).
For downtime deployment, there is only one version running & serving (outage/downtime).
For rolling deployment without replacement, both versions may be running & serving at the same time.
For rolling deployment with replacement, both versions may be running & serving at the same time.
For blue-green deployment, both versions may be running at the same time, but only v1 replicas are serving.
For canary deployment, both versions may be running & serving
For feature toggle deployment; both versions may be running & serving; but only old features not new features.
The users start to see new features (of new version) only the feature is enabled.
Live code is code that affects your users.