Chapter 4: How to Version, Build, and Test Your Code
With most real-world code, software development is a team sport, not a solo effort.
You need to figure out how to support many developers collaborating safety and efficiently on the same codebase.
In particular, you need to solve the following problems:
| The problem | How to … | Notes |
|---|---|---|
| Code access | - Allow all developers (in the team) to access the codebase ? | 👈 So they can collaborate |
| Integration | - Integrate changes from all developers - Handle any conflicts - Ensure no one’s work is accidentally lost or overwritten | |
| Correctness | - Prevent bugs & breakages slipping in? | |
| Release | - Release the changes (in your codebase) to production on a regular basis? | 👉 So the code can generate value for users & your company |
These problems are all key part of your software development life cycle (SDLC).
- In the pasts, many companies came up with their own ad-hoc, manual SDLC processes:
- Email code changes back & forth
- Spend weeks integrating changes together manually
- Test everything manually (if they did any testing at all)
- Release everything manually, e.g. Using FTP to upload code to a server
- Now a day, we have far better tools & techniques for solving these problems:
- Version control
- Build system
- Automated testing
Version Control
What is Version Control
version control system (VCS) : a tool that allows you to : - store source code : - share it with your team : - integrate your work together : - track changes over time
Version Control Primer
| Your normal workflow with an essay in Microsoft Word | Your workflow in version control terms |
|---|---|
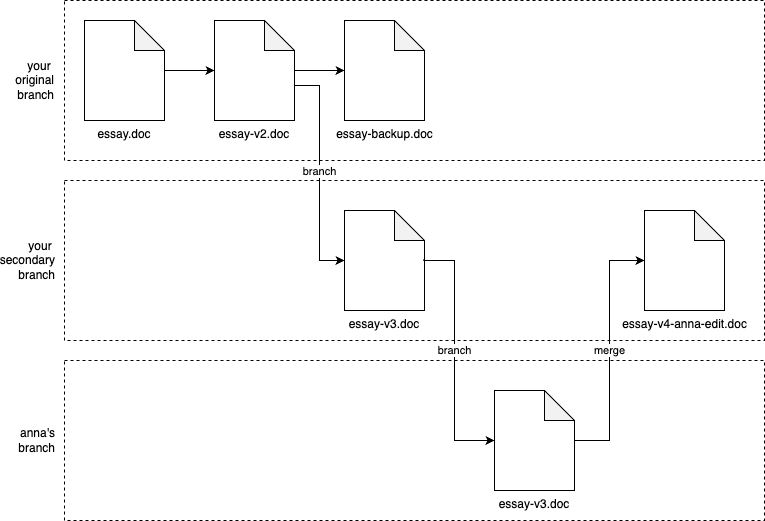
You start with a file called essay.doc, | You start with essay.doc. |
You realize you need to do some pretty major changes, so you create essay-v2.doc | After some major edits, you commit your changes to a new revision called essay-v2.doc. |
You decide to remove some big pieces, but you don’t want to lose them, so you put those in essay-backup.doc, and move the remaining work to essay-v3.doc; | Then, you realize that you need to break off in a new direction, so you could say that you’ve created a new branch from you original work, and in that new branch, you commit another new revision called essay-v3.doc. |
Maybe you work on the essay with your friend Anna, so you email her a copy of essay-v3.doc | When you email Anna essay-v3.doc, and she starts her work, you could say that she’s working in yet another branch. |
Anna starts making edits; at some point, she emails you back the doc with her updates, which you then manually combine with the work you’ve been doing, and save that under the new name essay-v4-anna-edit.doc | When she emails you back, you manually merge the work in your branch and her branch together to create essay-v4-anna-edit.doc. |
You keep emailing back and forth, and you keep renaming the file, until minutes before the deadline, you finally submit a file called something like essay-final-no-really-definitely-final-revision3-v58.doc. |
 Visualizing your process with Word documents as version control
Your normal workflow with the an essay - copying, renaming, emailing… - is a type of version control, but not a manual version control system.
There are better version control tools, in which you commit, branch, merge… your works.
Version Control Concepts
Repositories : You store files (code, documents, images, etc.) in a repository (repo for short).
Branches
: (You start with everything in a single branch, often called something like main.)
: At any time, you can create a new branch from any existing branch, and work in your own branch independently.
Commits : Within any branch, : - you can edit files, : - when you’re ready to store your progress in a new revision, you create a commit with your updates (you commit your changes) : The commit typically records : - not only the changes to the files, : - but also who made the changes, and a commit message that describes the changes.
Merges
: At any time, you can merge branches together.
: e.g.
: - It’s common to create a branch from main, work in that branch for a while, and then merge your changes back into main.
Conflicts : (VCS tools can merge some types of changes completely automatically), : But if there is a conflict (e.g., two people changed the same line of code in different ways), : - the VCS will ask you to resolve the conflict manually.
History : The VCS tracks every commit in every branch in a commit log, which lets you see : the full history of how the code changed: : - all previous revisions of every file, : - what changed between each revision : - who made each change.
note
There are many version control systems:
- CVS, Subversion, Perforce…
- Mercurial, Git…
These days, the most popular is Git.
Example: A Crash Course on Git
Git basics
-
Install Git: Follow the office guide
-
Let Git know your name & email
git config --global user.name "<YOUR NAME>"
git config --global user.email "<YOUR EMAIL>"
-
Initialize a Git repo
[!NOTE] Before initial a Git repo, you need to create a empty folder:
mkdir /tmp/git-practice
cd /tmp/git-practice
(or you can use an existing repo)
git init[!NOTE] Now, create a text file that will be including in your first commit:
echo 'Hello, World!' > example.txt[!TIP] The contexts of the
git-practicefolder looks like this$ tree -aL 1 . ├── .git └── example.txt[!NOTE] The
.gitfolder is where Git record all information about your branches, commits, revisions… -
Show the working tree status
git status[!NOTE] The
git statusshow the working tree status:- What branch you’re on.
- Any commits you’ve made.
- Any changes that haven’t been committed yet.
-
Before commit your changes, you first need to add the file(s) you want to commit to the staging area using
git addgit add example.txt -
Re-run
git statusgit statusOn branch main No commits yet Changes to be committed: (use "git rm --cached <file>..." to un-stage) new file: example.txt- The
example.txtis now in thestaging area, ready to be committed.
- The
-
To commit the staged changes, use the
git commitgit commit -m "Initial commit"- Use the
-mflag to pass in the commit message.
- Use the
-
Check the commit log using
git loggit logFor each commit in the log, you’ll see
- commit ID
- author
- date
- commit message.
[!NOTE] Each commit has a different ID that you can use to uniquely identify that commit, and many Git commands take a commit ID as an argument.
[!TIP] Under the hood, a commit ID is calculated by taking the SHA-1 hash of:
- the contents of the commit,
- all the commit metadata (author, date, and so on), and
- the ID of the previous commit
[!TIP] Commit IDs are 40 characters long,
- but in most commands, you can use just
- the first 7 characters, as that will be unique enough to identify commits in all but the largest repos.
Let’s make another change and another commit:
-
Make a change to the
example.txtecho 'New line of text' >> example.txt -
Show your working tree status
git statusOn branch main Changes not staged for commit: (use "git add <file>..." to update what will be committed) (use "git restore <file>..." to discard changes in working directory) modified: example.txt- Git is telling you that the changes is current “in working directory” (working tree), and is “not staged for commit”
- Git also tell you the changed files:
modified: example.txt
-
To see what exactly these changes are, run
git diffgit diff$ git diff diff --git a/example.txt b/example.txt index 8ab686e..3cee8ec 100644 --- a/example.txt +++ b/example.txt @@ -1 +1,2 @@ Hello, World! +New line of text[!NOTE] Use
git difffrequently to check what changes you’ve made before committing them:- If the changes look good:
- Use
git add <file>...to stage the changes. - Then use
git committo commit them.
- Use
- If the changes don’t look good:
- Continue to modify the changes
- Or use
"git restore <file>..."to discard changes in working directory.
- If the changes look good:
-
Re-stage the changes and commit:
git add example.txt git commit -m "Add another line to example.txt" -
Use
git logonce more with--oneline:git log --oneline02897ae (HEAD -> main) Add another line to example.txt 0da69c2 Initial commit
important
The commit log is very powerful 👈 It’s has the commit IDs and commit messages:
-
Debugging:
Something breaks -> “What changed?” -> Check commit log’s messages
-
Reverting:
-
You can use
git revert <COMMIT_ID>to create a new commit that reverts all the changes in the commit<COMMIT_ID>.(in other words, undoing the changes in that commit while still preserving your Git history)
-
You yan use
git reset --hard <COMMIT_ID>to get rid of:- all commits after
COMMIT_ID. - including the history about them.
- all commits after
-
-
Comparison:
You can use
git diffto compare not only local changes, but also to compare any two commits. -
Author:
You can use
git blameto annotate each line of a file with information about the last commit that modified that file, (including the date, the commit message, and the author).- Don’t use this to blame someone for causing a bug, as the name implies. It may be war!
- The more common use case is to help you understand where any give piece of code came from, and why that change was made.
Git branching and merging
-
To create a new branch and switch to it, use
git checkout -bgit checkout -b testing[!NOTE] If you want to make sure you never lost your code, you can use
git switch -cto create a new branch and switch to it. -
Check the you’re on new branch with
git statusgit status -
You can also list all the branches (and see which one you’re on) with
git branchgit branch[!TIP] The branch which you’re on is mark with asterisk (
*) -
Any changes you commit now will go into the
testingbranch:-
Try it with the example.txt
echo 'Third line of text' >> example.txt -
Stage and commit the changes
git add example.txt git commit -m "Added a 3tr line to example.txt" -
You git log to check that you have three commits on
testingbranch:git log --oneline
-
-
Switch back to
mainbranch to see thatmainbranch still has only 2 commitsgit switch main git log --oneline
-
Merge the work in your
testingbranch back to themainbranchgit merge testing # Merge testing branch (to current branch - main)Updating c4ff96d..c85c2bf Fast-forward example.txt | 1 + 1 file changed, 1 insertion(+)- It’s a
Fast-forward, Git was able to merge all the changes automatically, as there were no conflicts betweenmain&testingbranches.
- It’s a
Get your hands dirty with Git
-
Learn how to use the
git tagcommand to create tags. -
Learn to use
git rebase.- When does it make sense to use it instead of
git merge?
- When does it make sense to use it instead of
Example: Store your Code in GitHub
-
Git is a distributed VSC:
Every team member can
- have a full copy of the repository.
- do commits, merges, branches completely locally.
-
But the most common way to use Git is using one of the repositories as a central repository, which acts as your source of truth.
- Everyone will initially get their code from this central repo
- As someone make changes, he/she always pushes them back to this central repo.
-
There are many way to run such a central repo:
-
Hosting yourself
-
Use a hosting service, which is the most common approach:
- Not only host Git repos
- But also provide:
- Web UIs
- User management
- Development workflows, issue tracking, security tools…
The most popular hosting service for Git are GitHub, GitLab, BitBucket.
[!NOTE] GitHub is the most popular, and what made Git popular.
- GitHub provides a great experience for hosting repos & collaboration with team members.
- GitHub has become de facto home for most open source projects.
-
In this example, you will push the example code you’ve worked in while reading this book/blog post series to GitHub.
-
Go the folder where you have your code
cd devops-books -
The contents of the folder should look like this:
tree -L 2. ├── ch1 │ ├── ec2-user-data-script │ └── sample-app ├── ch2 │ ├── ansible │ ├── bash │ ├── packer │ └── tofu └── ch3 ├── ansible ├── docker ├── kubernetes ├── packer └── tofu -
Initialize an empty Git repository in
.git/git init -
Show working tree status
git status- There is “no commits yet”, and only “untracked files”.
-
Create gitignore file (
.gitignore)*.tfstate # 1 *.tfstate.backup *.tfstate.lock.info .terraform # 2 *.key # 3 *.zip # 4 node_modules # 5 coverage- 1: Ignore OpenTofu state.
- 2: Ignore
.terraform, used by OpenTofu as a scratch directory. - 3: Ignore the SSH private keys used in Ansible examples.
- 4: Ignore build artifact created by
lambdamodule. - 5: Ignore Node.js’s scratch directories.
[!TIP] Commit the
.gitignorefile first to ensure you don’t accidentally commit files that don’t belong in version control. -
Stage and commit
.gitignoregit add .gitignore git commit -m "Add .gitignore" -
Stage all files/folders in root of the repo:
git add . git commit -m "Example for first few chapters"- The code in now in a local Git repo in your computer.
- In the next section, you’ll push it to a Git repo on GitHub
-
Create a GitHub account if you haven’t one
-
Authenticate to GitHub on the CLI: Follow the official docs
-
Create a new repository in GitHub
-
Add that GitHub repository as a remote to your local Git repository:
[!NOTE] A remote is a Git repository hosted somewhere, i.e. somewhere on the Internet
git remote add origin https://github.com/<USERNAME>/<REPO>.git- This will add your GitHub repo as a remote named
origin
[!TIP] Your remote GitHub repo can be any where, but anyone that access your repo, which now acts as a central repository can refer to it as
origin. - This will add your GitHub repo as a remote named
-
Push your local branch to your GitHub repo
git push origin main[!TIP] You push to
REMOTEaLOCAL_BRANCHwith:git push REMOTE LOCAL_BRANCH -
Refresh your repo in GitHub, you should see your code there.
note
You’ve just push your changes to a remote endpoint, which being halfway to be able to collaborate with other developers.
-
You can click the
Add a READMEbutton, then:- Fill in the README content.
- And commit changes directly to the Git repo.
-
If you do that, your GitHub repo now has a
README.mdfile, but the local repo on your computer doesn’t. -
To get the latest code from the
origin, usegit pull:git pull origin main[!NOTE] The command
git pull REMOTE REMOTE_BRANCHwill:- “Fetch” from
REMOTEtheREMOTE_BRANCH. - Merge that
REMOTE_BRANCHto current branch (in the local repository).
- “Fetch” from
-
If your haven’t have a local copy of the central repository, first you need to clone that repo:
git clone https://github.com/<USERNAME>/<REPO>This command will
- checkout a copy of the repo
<REPO>to a folder called<REPO>in your current working directory. - automatically add the repo’s URL as a remote named origin
- checkout a copy of the repo
You’ve just seen the basic Git workflows when collaboration:
git clone: Check out a fresh copy of a repo.git push origin <LOCAL_BRANCH>: Share your changes to other team members.git pull origin <REMOTE_BRANCH>: Get changes from other team members.
A Primer on Pull Request
pull request
: a request to merge one branch into another branch
: ~ you’re requesting the owner runs git pull on your repo/branch
tip
GitHub popularized the PR workflow as the de facto way to make changes to open source repos
And these days, many companies use PRs to make changes to private repos as well.
A pull request processes is as a follows:
-
You check out a copy of repo
R, create a branchB, and commit your changes to this branch.- If you have write access to repo
R, you can create branchBdirectly in repoR. - However, if you don’t have write access, which is usually the case if repo
Ris an open source repo in someone else’s account, then you- first create a fork of repo
R, which is a copy of the repo in your own account, - then you create branch
Bin your fork.
- first create a fork of repo
- If you have write access to repo
-
When you’re done with your work in branch
B, you open a pull request against repoR:- Requesting that the maintainer of that repo merges your changes from branch
Binto some branch in repoR(typicallymain).
- Requesting that the maintainer of that repo merges your changes from branch
-
The owner of repo
Rthen- uses GitHub’s PR UI to review your changes,
- provide comments and feedback,
- and ultimately, decide to either
- merge the changes in,
- or close the PR unmerged.
Example: Open a Pull Request in GitHub
-
Create a new branch named
update-readmeand switch to itgit switch -c update-readme -
Make a change to the
README.mdfileecho "https://www.fundamentals-of-devops.com/" >> README.md -
Show un-staged changed
git diff -
Stage & commit the changes
git add README.md git commit -m "Add URL to README" -
Push your
update-readmebranch to theoriginremotegit push origin update-readme[!TIP] In the
git pushoutput, GitHub conveniently shows you a URL for creating a pull request.You can also create PRs by
- going to the
Pull Requeststab of your repo in GitHub Web UI - clicking
New Pull Requestbutton.
- going to the
-
Open the URL in a web browser, then
- Fill in the pull request’s title, description.
- Scroll down to see the changes between your
update-readme&mainbranches. - If those changes look OK, click
Create pull requestbutton. - You’ll end up in the GitHub PR UI.
-
You and your team members cana use the Github PR page to
- see the changes
- discuss the changes
- request reviewers, modifies to those changes…
-
If the PR looks gook:
- Click
Merge pull request - Then
Confirm mergeto merge the changes in.
- Click
Version Control Best Practices
-
Always use version control
- Using version control brings massive benefits for software engineering.
- Version control’s easy, cheap/free.
[!IMPORTANT] Key takeaway #1 Always manage your code with a version control system.
-
Write good commit messages
When you’re trying to figure out what caused a bug, an outage,
git logandgit blamecan help you, but only if the commit message are well written.[!NOTE] What is a good commit message?
- Summary: Short, clear summary of the change (< 50 characters).
- Context:
- If you need more than a summary, put a new line after the summary, then provide more information to understand the context.
- Focus on what changed; why it changed (How it changed should be clear from the the code itself).
e.g.
Fix bug with search auto complete

A more detailed explanation of the fix, if necessary. Provide
additional context that may not be obvious from just reading the
code.

- Use bullet points
- If appropriate

Fixes #123. Jira #456.
[!TIP] You can go a little further with the commit messages by:
- Following How to Write a Good Commit Message
- Adopting Conventional Commits
-
Commit early and often
Committing as you’re solving a large problem, break it down to small, manageable parts.
[!NOTE] What to commit and PR?
Atomic commit/PR.
In other words, each commit or pull request should do exactly one small, relatively self-contained thing.
[!TIP] Atomic commit: You should be able to describe the commit in one short sentence and use it as the commit message’s summary.
e.g. Instead of a single, massive commit that implements an entire large feature,
- aim for a series of small commits, where each one implements some logical part of that feature:
- a commit for backend logic
- a commit for UI logic
- a commit for search logic
[!TIP] Atomic PR:
- A single PR can contain multiple commits, but it should still represent a single set of cohesive changes - changes that naturally & logically go together.
- If your PR contains unrelated changes, you should break it up into multiple PRs.
e.g. Follow the Boy Scout Rule1 is a good idea, but
- don’t make a PR that contains a new feature, a bug fix, and a refactor
- put each of these changes into its own PR:
- a PR for the new feature
- a PR for the bug fix
- a PR for the refactor
- put each of these changes into its own PR:
[!NOTE] What is the benefit of atomic commits, PRs?
Benefit Description More useful Git history Each commit/PR can fit in oneline in the history. Cleaner mental model Force you to break the work down. Less risk Easy to revert. Easier code reviews Quick to approve. Less risky refactors You can try something new then go back to any commits quickly without losing much work. Lower risk of data loss Commit (and push) act as a data backup. More frequent integration Quick to merge, release. - aim for a series of small commits, where each one implements some logical part of that feature:
-
Use a code review process
[!NOTE] Why any one should have their code review?
In the writing world, even if you’re the smarted, most capable, most experienced, you can’t proofread your own work:
- You’re too close to the concept.
- You can’t put yourself in the shoes of someone who is hearing them for the first time.
The same applies for writing code.
[!TIP] Having your code review by someone else is a highly effective way to catch bugs, reducing defect rates by as much as 55-80% - which is even a higher rate than automated test.
[!NOTE] Code reviews are also an efficient mechanism to
- spread knowledge, culture, training
- provide a sense of ownership throughout the team
[!NOTE] How to do code reviews?
-
Enforce a pull request workflow
You can enforce that
- all changes are done through pull requests
- so the maintainers of each repo can asynchronously review each change before it gets merged.
- all changes are done through pull requests
-
Use pair programming
Pair programming:
-
a development technique where two programmers work together at one computer:
- one person as the driver, responsible for writing the code
- the other as the observer, responsible for
- reviewing the code and
- thinking about the program at a higher level
(the programmers regularly switch roles)
-
results in code review process happens all the time:
- driver will also try to make clear what the code is doing
Pair programming is used:
- by some companies for all their coding
- by other companies for only complex tasks, or ramping up a new hire.
-
-
Use formal inspections
Formal inspection is when you schedule a live meeting for a code review where you:
- present the code to multiple developers
- go through it together, line-by-line.
Formal inspection can be apply for mission critical parts of your systems.
- present the code to multiple developers
[!TIP] Whatever process you pick for code reviews, you should
- define your code preview guidelines up front,
- so everyone can have a process that is consistent & repeatable across the entire team:
- what to look for, e.g. design, functionality, complexity, tests.
- what not to look for, e.g. code formatting (should be automated)
- how to communicate feedback effectively
- so everyone can have a process that is consistent & repeatable across the entire team:
For example, have a look at Google’s Code Review Guidelines.
-
Protect your code:
For many companies these day, the code you write is:
- your most important asset.
- a highly sensitive asset: if someone can slip malicious code into the codebase, it would be a nightmare.
[!NOTE] How to protect your code?
-
Signed commits:
By default, any one can set the email used by Git to any email they want.
-
What if a bad actor introduces some malicious code in your name (email).
-
Fortunately, most VSC hosts (GitHub, GitLab…) allow you to enforce signed commits on your repos, where they reject any commit that doesn’t have a valid cryptographic signature.
Under the hood:
- You give Git the private key; and give the VSC host the public key.
- When you commit, Git will sign that your commits with the private key.
- When you push to central repo on VSC host, VSC host will use the public key to verify that these commit are signed by your private key.
-
-
Branch protection:
Most VCS hosts (GitHub, GitLab, etc.) allow you to enable branch protection, where you can
- enforce certain requirements before code can be pushed to certain branches (e.g.,
main)
For example, you can require that all changes to
mainbranch:- Submitted via pull requests
- Those pull requests are review by at least N other developers.
- Certain checks - e.g. security scans - pass
before these pull requests can be merged.
- enforce certain requirements before code can be pushed to certain branches (e.g.,
Get your hands dirty with Git amend, squash
Build System
What is Build System?
build system (build tools) : the system used by most software project to automate important operations, e.g. : - Compiling code : - Downloading dependencies : - Packaging the app : - Running automated tests…
Why use Build System?
The build system serves 2 audiences:
- The developers on your team, who run the build steps as part of local development.
- The automated tools (scripts), which run the build steps as part of automating your software delivery process.
Which Build System to use?
You can:
- create your own build system from ad-hoc scripts, duct tape & glue.
- or use an off-the-shelf build system.
There are many off-the-shelf build systems out there:
- Some were originally designed for use with a specific programming language, framework. e.g
- Rake for Ruby
- Gradle, Mavan for Java
- SBT for Scale
- NPM for JavaScript (Node.js)
- Some are language agnostic:
- Make: granddad of all build systems.
- Bazel: fast, scalable, multi-language and extensible build system.
tip
Usually, the language-specific tools will give you the best experience with that language.
You should only go with the language-agnostic ones in specific circumstances, such as:
- Massive teams
- Dozens of languages
- Gigantic monorepo
important
Key takeaway #2 Use a build system to capture, as code, important operations and knowledge for your project, in a way that can be used both by developers and automated tools.
Example: Configure your Build Using NPM
The example-app is written is JavaScript (Node,js), so NPM is a good choice for build system.
-
The code for this example will be in
examples/ch4/sample-appcd examples mkdir -p ch4/sample-app -
Clone the
app.jsfrom previous examplecp ch1/sample-app/app.js ch4/sample-app/app.js -
Install Node.js which comes with NPM
-
To use NPM as a build system, you need a
package.jsonfile.[!NOTE] The
package.jsonfile can be- created manually
- scaffold by running
npm init
In this example, you will run
npm initnpm init # npm will prompt you for the package name, version, description...You should have a
package.jsonfile looks like this:{ "name": "sample-app", "version": "1.0.0", "description": "Sample app for 'Fundamentals of DevOps and Software Delivery'", "scripts": { "test": "echo \"Error: no test specified\" && exit 1" } }[!NOTE] NPM has a number of built-in scripts, such as
npm install,npm start,npm test, and so on.All of these have default behaviors, but in most cases, you can define what these script do by
- adding them to the scripts block.
- specify which commands that script should run.
For example
npm initgives you an initialtestscript in the scripts block that just run a command that exits with an error.
-
Add a script named
startto the script block inpackage.json{ "scripts": { "start": "node app.js" } } -
Now you run the
npm startscript to run your app.npm start[!NOTE] By using
npm startto run your app, you’re using a well-known convention:- Most Node.js and NPM users know to use
npm starton a project. - Most tools that work with Node.js know to use
npm startto start a Node.js app.
In other words, you capture how to run your app in the build system.
- Most Node.js and NPM users know to use
-
Create a
Dockerfile# examples/ch4/sample-app/Dockerfile FROM node:21.7 WORKDIR /home/node/app # 1 COPY package.json . COPY app.js . EXPOSE 8080 USER node # 2 CMD ["npm", "start"]This Dockerfile is identical to the one in previous example, except:
- 1: In addition to
app.js, you also copy thepackage.jsonto the Docker image. - 2: Instead of using
node app.js, you usenpm startto start the app.
- 1: In addition to
-
Create a script called
build-docker-image.sh# examples/ch4/sample-app/build-docker-image.sh #!/usr/bin/env bash set -e # (1) version=$(npm pkg get version | tr -d '"') # (2) docker buildx build \ --platform=linux/amd64,linux/arm64 \ -t sample-app:"$version" \ .- 1: Run
npm pkg get versionto get the value of theversionkey inpackage.json. - 2: Run
docker buildx, setting version to the value from 1.
- 1: Run
-
Make the script executable
chmod u+x build-docker-image.sh -
Add a
dockerizescript to thescriptsblock inpackage.json{ "scripts": { "dockerize": "./build-docker-image.sh" } } -
Now instead of trying to figure out how to build the Docker image, your team members can execute
npm run dockerizeto build the Docker image.npm run dockerize[!NOTE] Notice it’s
npm run dockerize(with the extrarun) asdockerizeis a custom script, not a built-in script of NPM.
Dependency Management
dependencies : software packages & libraries that your code uses.
Kind of dependencies
-
Code in the same repo
You can
- break your code in a single repo into multiple modules/packages
- have these modules depend on each other
These modules/packages allow you
- develope different parts of your codebase in
- isolation from the others,
- (possible with completely separate teams working on each part)
-
Code in different repos
You can store code across multiple repos, which
- give you more isolation between different parts of your software
- make it even easier for separate teams to take ownership for each part.
Typically, when code in repo A depends on code in repo B:
-
it’s a specific version of the code in repo B, which may correspond to a specific Git tag.
-
or it’s a versioned artifact published form the repo B
e.g.
- a Jar file in the Java world
- a Ruby Gem in the Ruby world
- give you more isolation between different parts of your software
-
Open source code
Most common type of dependency these days. A type of code in different repos.
Why use a dependency?
Yoy use a dependency so
- you can reply on someone else to solve certain problems for you
- instead of having to
- solve everything yourself from scratch
- (maintain it)
important
Key takeaway #3 Use a dependency management tool to pull in dependencies—not copy & paste.
The problems with copy-paste dependency
-
Transitive dependencies
Copy/pasting a single dependency is easy, but if
- that dependency has its own dependencies, and
- those dependencies have their own dependencies, and
- so on (collectively known as transitive dependencies),
- those dependencies have their own dependencies, and
then copy/pasting becomes rather hard.
- that dependency has its own dependencies, and
-
Licensing
Copy/pasting may violate the license terms of that dependency, especially if you end up modifying that code (because it now sits in your own repo).
[!WARNING] Be especially aware of dependencies that uses GPL-style licenses (known as copyleft or viral licenses),
- if you modify the code in those dependencies,
- you need to release your own code under the same license i.e. you’ll be forced to open source your company’s proprietary code!.
- if you modify the code in those dependencies,
-
Staying up to date
If you copy/paste the code, to get any future updates, you’ll have to
- copy/paste new code, and new transitive dependencies, and
- make sure you don’t lose any changes your team members made along the way.
-
Private APIs
(Since you can access those files locally), you may end up
- using private APIs
- instead of the public ones that were actually designed to be used,
which can lead to unexpected behavior, (and make staying up to date even harder)
- using private APIs
-
Bloating your repo
Every dependency you copy/paste into your version control system makes it larger and slower.
How to use dependencies
-
Instead of copy-paste, use a dependency management tool, which is usually built-in with build systems.
-
You define your dependencies
- as code
- in the build configuration
- including the version (of the dependencies)
the dependency management tools is then responsible for:
- downloading those dependencies (plus any transitive dependencies)
- making them available to your code.
Example: Add Dependencies in NPM
So far, the Node.js example-app has not any dependencies other than the http standard library built in Node.js.
In this example, you will introduce an dependency named Express, which is a popular web framwork for Node.js
-
Install Express & save it to
dependenciesinpackage.jsonnpm install express --save-
The package will now have a new
dependenciessection:{ "dependencies": { "express": "^4.19.2" } }
-
-
There will be 2 new file/folder next to the
package.jsonfile:-
node_modulesfolder: where NPM download & install dependencies- Should be in your
.gitignore; anyone check out this repo the first time can runnpm installto install the dependencies.
- Should be in your
-
package-lock.jsonfile: a dependency lock file, which captures the exact dependencies what were installed.- In
package.json, you can specify a version range instead of a specific version. - Without the
package-lock.json, every time you runnpm install,- you may get a new version of the dependencies,
- which make the builds not reproducible
- you may get a new version of the dependencies,
- With the
package-lock.jsonfile, you can usenpm clean-install(npm ciin short) to- tell NPM to perform a clean install (and install the exact versions in the lock file)
- so the build is reproducible (every time)
- tell NPM to perform a clean install (and install the exact versions in the lock file)
- In
-
-
Re-write the code in
app.jsto use Express frameworkconst express = require("express"); const app = express(); const port = 8080; app.get("/", (req, res) => { res.send("Hello, World!"); }); app.listen(port, () => { console.log(`Example app listening on port ${port}`); });[!TIP] By using the Express framework, it’ll be a lot easier to evolve this code into a real app by leverage all the features built into Express e.g. routing, templating, error handling, middleware, security…
-
Update the Dockerfile to run
npm ciFROM node:21.7 WORKDIR /home/node/app # (1) COPY package.json . COPY package-lock.json . # (2) RUN npm ci --only=production COPY app.js . EXPOSE 8080 USER node CMD ["npm", "start"]- 1: Copy not only
package.json, but alsopackage-lock.jsoninto the Docker image. - 2: Run
npm cito have a clean install with the exact dependencies in the lock file.
[!NOTE] The
--only=productionflag tells NPM to only install the production dependencies.- An NPM package can also have dev-dependencies - which are only used in the dev environment.
- When running in production environment, these dev dependencies are not needed.
- 1: Copy not only
Get your hands dirty with modern frontend build systems
- PNPM
- Yarn
- Turborepo
- Lerna
- Parcel
Automated Testing
Why use automated testing
legacy code : spaghetti code without automated tests, documentation : code that you don’t have the confidence to make changes
To prevent legacy code, you use automated testing, where you:
- write test code to validate that
- your production code works
- the way you expect it to.
- your production code works
By writing automated tests, you might catch some of the bugs,
-
but the most important benefit of having a good suite of automated tests is, you have the confidence to make changes quickly, because:
- you don’t have to keep the whole program in your head
- you don’t have to worry about breaking other people’s
- you don’t have to repeat the same boring, error-prone manual testing over & over agian.
important
Key takeaway #4 Use automated tests to give your team the confidence to make changes quickly.
Types of automated tests
There’re a lot of type of automated tests:
-
Compiler
If you’re using a statically-typed language (e.g., Java, Scala, Haskell, Go, TypeScript), you can pass your code through the complier (compile) to automatically identify
- (a) syntactic issues
- (b) type errors.
If you’re using a dynamically-typed language (e.g., Ruby, Python, JavaScript), you can pass the code through the interpreter to identify syntactic issues.
-
Static analysis / linting
These are tools that read & check your code “statically” — that is, without executing it — to automatically identify potential issues.
Examples:
- ShellCheck for Bash
- ESLint for JavaScript
- SpotBugs for Java
- RuboCop for Ruby.
-
Policy tests
In the last few years, policy as code tools have become more popular as a way to define and enforce company policies & legal regulations in code.
Examples: Open Policy Agent, Sentinel, Intercept.
- Many of these tools are based on static analysis, except they give you flexible languages to define what sorts of rules you want to check.
- Some rely on plan testing, as described next.
-
Plan tests
Whereas static analysis is a way to test your code without executing it at all, plan testing is a way to partially execute your code. This typically only applies to tools that can generate an execution plan without actually executing the code.
For example:
- OpenTofu has a plan command that shows you what changes the code would make to your infrastructure without actually making those changes: so in effect, you are running all the read operations of your code, but none of the write operations.
You can write automated tests against this sort of plan output using tools such as Open Policy Agent and Terratest.
-
Unit tests
This is the first of the test types that fully execute your code to test it.
The idea with unit tests is to execute only a single “unit” of your code:
- What a unit is depends on the programming language, but it’s typically a small part of the code, such as one function or one class. - You typically mock any dependencies outside of that unit (e.g., databases, other services, the file system), so that the test solely executes the unit in question.
To execute the unit tests:
- Some programming languages have unit testing tools built in
e.g.
testingfor Go;unittestfor Python - Whereas other languages rely on 3rd party tools for unit testin
e.g.
JUnitfor Java;Jestfor JavaScript
-
Integration tests
Just because you’ve tested a unit in isolation and it works, doesn’t mean that multiple units will work when you put them together. That’s where integration testing comes in.
With integeration tests, you test
- multiple units of your code (e.g., multiple functions or classes),
- often with a mix of
- real dependencies (e.g., a database)
- mocked dependencies (e.g., a mock remote service).
-
End-to-end (E2E) tests
End-to-end tests verify that your entire product works as a whole, which mean you:
- run
- your app,
- all the other services you rely on,
- all your databases and caches, and so on,
- test them all together.
These often overlap with the idea of acceptance tests, which verify your product works from the perspective of the user or customer (“does the product solve the problem the user cares about”).
- run
-
Performance tests
Most unit, integration, and E2E tests verify the correctness of a system under ideal conditions: one user, low system load, and no failures.
Performance tests verify the stability & responsiveness of a system in the face of heavy load & failures.
Example: Add Automated Tests for the Node.js App
-
How to know if the the Node.js
example-appwork?const express = require("express"); const app = express(); const port = 8080; app.get("/", (req, res) => { res.send("Hello, World!"); }); app.listen(port, () => { console.log(`Example app listening on port ${port}`); }); -
So far, you will do it through manual testing:
- Manually ran the app with
npm start - Then open the app URL in the brower.
- Verify that the output is matched.
- Manually ran the app with
-
What if you have
- hundreds of URLs?
- hundreds of developers making changes?
note
The idea with automated testing is to
- write code that
- performs the testings steps for you.
Then the computer can run these test code and test your app faster, more reliable.
Add unit tests for the Node.js App
-
You’ve start with unit test. To add a unit test, first you need a unit of code, which you will introduce in this example
-
For this example, create a basic module with 2 functions that reverve characters & words in a string. Those 2 functions acts as the unit of code to be tested.
# 1 function reverseWords(str) { return str.split(" ").reverse().join(" "); } # 2 function reverseCharacters(str) { return str.split("").reverse().join(""); } module.exports = { reverseCharacters, reverseWords };- 1:
reverseWordsreverses the words in a string. e.g.hell worldwill be reversed toworld hello - 2:
reverseCharactersreverses the characters in a string e.g.abcdewill be reversed toedcba
- 1:
note
How do you know this code actually works?
- Imagine how the code runs in your head?
- Test the code manually?
- Fire up a REPL - an interactive shell - to manuallt execute code.
- Import the
revervefile - Run the
reverseWords,reverseCharactersfunction with your input> , and check the output. - (When you’re done with the REPL, use
Ctrl+Dto exit).
- Import the
- Capture the steps you did in a REPL in an automated test.
-
In this example, you will use
Jestas the testing framework, andSuperTestas the library for testing HTTP apps. -
Intstall Jest and Supertest (and save them as dev dependencies with
--save-devflag)npm install --save-dev jest supertestYour
package.jsonshould looks like this:{ "dependencies": { "express": "^4.19.2" }, "devDependencies": { "jest": "^29.7.0", "supertest": "^7.0.0" } } -
Update the
testscript (inpackage.json) to run Jest{ "scripts": { "test": "jest --verbose" } }
-
Writing tests for
reserveWordsfunctionconst reverse = require("./reverse"); // 1 describe("test reverseWords", () => { // 2 test("hello world => world hello", () => { const result = reverse.reverseWords("hello world"); // 3 expect(result).toBe("world hello"); // 4 }); });- 1: Use
descibefunction to group server tests together.- The first argument: description of the group of tests.
- The second argument: a function that will run the tests for this group.
- 2: Use
testfunction to define individual tests- The first argument: description of the test.
- The second argument: a function that will run the test
- 3: Call the
reverseWordsfunction and store the result in the variableresult. - 4: Use the
expectmatcher to check that theresultmatches “world hello”. (If it doesn’t match, the test will fail.)
- 1: Use
-
Use
npm testto run the testsnpm test- The test
PASSwithout any error.
- The test
-
Add a second unit test for the
reverseWordsfunctiondescribe("test reverseWords", () => { test("hello world => world hello", () => {}); test("trailing whitespace => whitespace trailing", () => { const result = reverse.reverseWords("trailing whitespace "); expect(result).toBe("whitespace trailing"); }); }); -
Re-run
npm testnpm test- The test
FAIL
- The test
-
Fix whitespace handling in
reverseWordsfunction reverseWords(str) { return str .trim() // 1 .split(" ") .reverse() .join(" "); }- 1: Use the
trimfuncton to strip leading & trailing whitespace.
- 1: Use the
-
Re-run
npm test; it should pass now.
This is a good example of the typical way you write code
- when you have a good suite of automated test to lean on:
- make a change
- re-run the tests
- make another changes
- re-run the tests
- add new tests
- …
With each iteration,
- your test suite gradually improves
- you build more & more confidence in your code
- you can go faster & faster
- you build more & more confidence in your code
The automated tests
- provides a rapid feedback loop that help you being more productive
- acts as regression tests prevent old bugs
important
Key takeaway #5 Automated testing makes you more productive while coding by providing a rapid feedback loop: make a change, run the tests, make another change, re-run the tests, and so on.
important
Key takeaway #6 Automated testing makes you more productive in the future, too: you save a huge amount of time not having to fix bugs because the tests prevented those bugs from slipping through in the first place.
Using code coverage tools to improve unit tests
code coverage : the percent of code got executed by your tests : can be measured by many automated testing tools
-
Update
testscript to also measure code coverage{ "scripts": { "test": "jest --verbose --coverage" } } -
Run
npm testto see the extra information about code coveragenpm test- There is also a new
coveragefolder (next topackage.json), which contains HTML reports about code coverage. - Open the HTML reports, you can see:
- How many time each part of the code were executed
- The part of code that wasn’t executed at all
- There is also a new
-
Now, you know which parts of the code wasn’t tested, you can add unit test for them:
describe("test reverseCharacters", () => { test("abcd => dcba", () => { const result = reverse.reverseCharacters("abcd"); expect(result).toBe("dcba"); }); }); -
Re-run the test and now the code coverage is 100%.
Add end-to-end tests for the Node.js App
In this example, you will add an end-to-end test for the Node.js sample-app: a test that makes an HTTP request to the app, and chcek the response.
-
First, split out the part of the app that listen on a port
// app.js
const express = require("express");

const app = express();

app.get("/", (req, res) => {
  res.send("Hello, World!");
});

module.exports = app;
// server.js const app = require("./app"); const port = 8080; app.listen(port, () => { console.log(`Example app listening on port ${port}`); }); -
Update the
startscript inpackage.json{ "scripts": { "start": "node server.js" } } -
Add a end-to-end test for the app
// app.test.js const request = require("supertest"); const app = require("./app"); // 1 describe("Test the app", () => { test("Get / should return Hello, World!", async () => { const response = await request(app).get("/"); // 2 expect(response.statusCode).toBe(200); // 3 expect(response.text).toBe("Hello, World!"); // 4 }); });- 1: Inport the app code from
app.js - 2: Use the SuperTest libary (imported under the name
request) to fire up the app and make an HTTP GET request to it at the/URL. - 3: Check that the reponse status code is a
200 OK - 4: Check that the response body is the text
"Hello, World!"
- 1: Inport the app code from
-
Re-run
npm testnpm test
Get your hands dirty with end-to-end test for Node.js app
- Add a new endpoint to the sample app
- Add a new automated test to validate the endpoint works as expected.
Example: Add Automated Tests for the OpenTofu Code
note
You can write automated tests not only for app code, but also for infrastructure code, too.
The tooling for infrastructure tests isn’t as mature, and the tests take longer to run, but the tests five all the same benefits.
In this example, you will add an automated tests for the lambda-sample OpenTofu module in Chapter 3.
note
There are several approaches to test OpenTofu code:
- Static analysis: Terrascan, Trivy, tflint
- Policy testing: Open Policy Agent, Sentinel
- Plan testing: build-in
testcommand, Open Policy Agent, Terratest - Unit, integration, end-to-end testing:
- Build-in
testcommand: for simple modules, tests. - Terratest : for more complex modules, tests.
- Build-in
-
Copy that module
cd examples
mkdir -p ch4/tofu/live
cp -r ch3/tofu/live/lambda-sample ch4/tofu/live
cd ch4/tofu/live/lambda-sample
Add static analysis for your OpenTofu code using Terrascan
-
Create a config file for Terrascan called
terrascan.toml[severity] level = "high" -
Install Terrscan
-
Run terrascan in the
lambda-samplefolderterrascan scan \ --iac-type terraform \ --non-recursive \ --verbose \ -c terrascan.toml-
--iac-type terraform: Analyze only Terraform or OpenTofu code. -
--non-recursive:By default, Terrascan tries to scan everything in the current folder and all subfolders.
This flag avoids Terrascan scanning the
srcfolder within lambda-sample and complaining that folder doesn’t contain OpenTofu code. -
--verbose: This gives a bit of extra log output, including Rule IDs for any policies that have been violated. -
-c terrascan.toml: Use the settings in the configuration fileterrascan.tomlyou created.
-
Add unit tests for your OpenTofu code using the test command
note
The test in this example will deploy real resources into your AWS accounts.
- It’s closer to integration tests
- But it still test just a single unit - so it’s still a unit test
- Use the
test-endpointmodule (in example code repo atch4/tofu/modules/test-endpoint) to make an HTTP request to an endpoint (from your OpenTofu code)
note
Currently, the test command can only use local modules, so use need to make a copy of it in your test.
-
Clone
test-endpointmodulecd examples mkdir -p ch4/tofu/modules cp -r ../../<EXAMPLE_CODE_REPO>/ch4/tofu/modules/test-endpoint ch4/tofu/modules -
In the
lambda-samplemodule, create a test file# examples/ch4/tofu/live/lambda-sample/deploy.tftest.hcl run "deploy" { command = apply } # (2) run "validate" { command = apply # (3) module { source = "../../modules/test-endpoint" } # (4) variables { endpoint = run.deploy.api_endpoint } # (5) assert { condition = data.http.test_endpoint.status_code == 200 error_message = "Unexpected status: ${data.http.test_endpoint.status_code}" } # (6) assert { condition = data.http.test_endpoint.response_body == "Hello, World!" error_message = "Unexpected body: ${data.http.test_endpoint.response_body}" } }-
1: The first
runblock will runapplyon thelambda-samplemodule itself. -
2: The second
runblock will runapplyas well, but this time on atest-endpointmodule, as described in (3). -
3: This
moduleblock is how you tell therunblock to runapplyon thetest-endpointmodule (the module you copied from the blog post series’s sample code repo). -
4: Read the API Gateway endpoint output from the
lambda-samplemodule and pass it in as theendpointinput variable for thetest-endpointmodule. -
5:
assertblocks are used to check if the code actually works as you expect. This firstassertblock checks that thetest-endpointmodule’s HTTP request got a response status code of 200 OK. -
6: The second
assertblock checks that thetest-endpointmodule’s HTTP request got a response body with the text “Hello, World!”
-
-
(Authenticate to AWS)
-
Run
tofu testtofu test- OpenTofu will
- run
apply, deploy your real resources, and then - at the end of the test, run
destroyto clean everthing up again.
- run
- OpenTofu will
Get your hands dirty with Infrastructure Test
-
Figure out how to encrypt the environment variables in the
lambdamodule, which is a better fix for the Terrascan error. -
Add a new endpoint in your
lambdamodule and add a new automated test to validate the endpoint works as expected.
Testing Best Practices
Which type of test to use? - The test pyramid
The first question with testing: Which testing approach should you use? Unit tests? Integration tests? E2E test?
The answer: A mix of all of them.
- Each type of test can catch different type of errors; and have different strengths & weaknesses.
- The only way to be confident your code works as expected is to combine multiple types of tests. In most cases, he proportion of tests follow the test pyramid.
For more information, see:
What to test
The second question with testing: What should you test?
- Some believe that every line of code must be tested (or you must achieve 100% code coverage).
- But remember, each test has a cost, does the cost bring enough values?
Before deciding if a part of your code should be test, evaluating your testing strategy & making trade-offs between the following factors:
-
The code of bugs
e.g.
- A prototype that will be throw away in a week -> the cost of bug is low
- A payment processing system -> the cost of bug is very high.
Usually, the cost of bug is high for systems that
- touches data storage
- relates to securiy
- cannot be break…
-
The likelehood of bugs
e.g.
- If there is a lot of people working on the same code, there might be more bugs (integration bugs…).
- Math problems.
- Your own distributed consensus algorithm
-
The cost of testing
- Usually, unit tests has low cost
- Integration tests, end-to-end tests, performance tests are more expensive to write, run.
-
The cost of not having tests
Many companies make analysis about cost/benefit of test and conlcude that tests aren’t worth it.
But not have tests has a big cost: FEAR.
- The company may end up having a paralyzed dev team.
When to test
The third question about testing: When to test?
- Add tests several years after you write the code: much expensive, but not as beneficial.
- Add tests a day after you write the code: cheaper, more beneficial.
- Add tests before you write the code: lowest cost, most beneficial.
Test-Driven Development (TDD)
TDD (Test-Driven Development) : You write the test before you write the implementation code : Isn’t it weird? How can you test something not-existed?
With TDD, The tests
- will test the implementation code
- provide a feedback that leads to a better design
By trying to write tests for your code (before you write the implementation codes), you’re forced to take a step back & ask important questions:
- How do I structure the code so I can test it?
- What dependencies do I have?
- What are the common use cases? Corner cases?
tip
If you find that your code is hard to test, it’s almost always
- a sign that it needs to be refactored (for some other reasons) too.
e.g.
- The code uses a lot of mutable state & side effects -> Hard to test & hard to reuse, understand.
- The code has many ocmplex interactions with its dependencies -> It’s tightly coupld & hard to change.
- The code has many use cases to cover -> It’s doing too much, needs to be broken up.
TDD cycle:
- Add basic placeholders for the new functionality (e.g., the function signatures):
- just enough for the code to compile
- but don’t actually implement the functionality.
- Add tests for the new functionality.
1.2. (RED) Run all the tests. The new tests should fail, but all other tests should pass.
- Implement the new functionality.
2.2. (GREEN) Rerun the tests. Everything should now pass.
- (REFACTOR) Refactor the code until you have a clean design, re-running the tests regularly to check everything is still working.
tip
A TDD cycle is also known as Red - Green - Refactor.
note
When using TDD, the design of your code emerges as a result of a repeated test-code-test cycle.
- Without TDD, you often come up with a design and make it your final design.
- With TDD:
- you need to figure how to pass new tests (in each cycle), which forces you to iterate on your design.
- you often ship something more effective.
Which type of test to apply TDD?
- You can apply TDD for many type of tests:
- Unit tests -> Force you consider how to design the small parts of your code.
- Integration tetsts -> Force you to consider how your different parts communicate with each other.
- End-to-end tests -> Force you to consider how to deploy everything.
- Performance tests -> Force you to think what is the bottlenecks are & which metrics you need gather to identify them.
For more information about TDD, see:
- Growing Object-Oriented Software, Guided by Tests by Steve Freeman and Nat Pryce (Addison-Wesley Professional)
- Hello, Startup: A Programmer’s Guide to Building Products, Technologies, and Teams (O’Reilly)
The other benefits of TDD:
- By writing tests first, you increase the chance of having thorough test converage.
- Because you’re forced to write code incrementally. Each incremental code can be tested more easy.
When not to use TDD?
- If you’re doing exploratory coding:
- you don’t yet know exactly what you’re building
- you’re just exploring the problem space by coding & messing with data
How TDD works with legacy codebase (that doesn’t have any tests)?
-
You can use TDD for any changes you make to the codebase
It’s a standard TDD cycle with some extra steps at the front:
A. Write a test for the functionality you’re about to modify. B. Run all the tests. They should all pass. C. Use the standard TDD process for new changes you’re about to make.
So it’s GREEN + Red-Green-Refactor.
tip
TDD can also be used for bug fixing.
- If there’s a bug in production, it’s mean there was no test that caught the bug.
- So you can do Test-Driven Bug Fixing.
Conclusion
To allow your team members to collaborate on your code:
-
Always manage your code with a version control system.
-
Use a build system to capture, as code, important operations and knowledge for your project, in a way that can be used both by developers and automated tools.
-
Use a dependency management tool to pull in dependencies — not copy & paste.
-
Use automated tests to give your team the confidence to make changes quickly.
-
Automated testing makes you more productive while coding by providing a rapid feedback loop: make a change, run the tests, make another change, re-run the tests, and so on.
-
Automated testing makes you more productive in the future, too: you save a huge amount of time not having to fix bugs because the tests prevented those bugs from slipping through in the first place.
-
THE BOY SCOUTS HAVE A RULE: “Always leave the campground cleaner than you found it.”2
https://learning.oreilly.com/library/view/97-things-every/9780596809515/ch08.html